


Any Recommendation on a headset press?
 04-20-17, 08:44 PM
#76
Senior Member
Join Date: Jul 2007
Location: Minneapolis, MN
Posts: 250
Bikes: '86 Trek Elance 400; '83 Trek 520; 90s Specialized Crossroads, '84 Trek 610 (wife's), 90s Trek Multitrack (wife's), Cargo Trailers, Burley for the Kids, WeeHoo Trailer
Mentioned: 0 Post(s)
Tagged: 0 Thread(s)
Quoted: 0 Post(s)
Likes: 0
Liked 0 Times
in
0 Posts
Homemade Headset Press with Pic
I seem a little late to the party, but I, like others, made a headset press a few years ago and used it on three bikes. It was pretty cheap to make and worked well. I used the optional copper flange pieces to help center and push the headset on. They were the most expensive part of the set-up (but not expensive), but I think they helped a lot with keeping things centered and just pushing things on well....and soft enough where they weren't going to damage anything. So, the copper pieces fit in the headset to be pushed in. On top of them are flat, big, fender washers, and then nylon washers on top of that, then the nuts. I found the copper flange pieces (not sure what they are really called) in the plumbing section of my local big box store. I haven't used the headset press since.
The roller bearing headset I really wanted at the time still works great (pictured). The Velo Orange Grand Cru headset I put on my wife's bike is a little sharper looking though.
The roller bearing headset I really wanted at the time still works great (pictured). The Velo Orange Grand Cru headset I put on my wife's bike is a little sharper looking though.
 04-20-17, 10:35 PM
#77
Calamari Marionette Ph.D


Likes For SquidPuppet:
04-21-17, 03:51 AM
#78
Senior Member
Join Date: Jul 2008
Location: Minas Ithil
Posts: 9,173
Mentioned: 66 Post(s)
Tagged: 0 Thread(s)
Quoted: 2432 Post(s)
Liked 638 Times
in
395 Posts
Put headset cups in the freezer for awhile. Take them out. Use heat gun on both ends of headtube to expand it. Lightly tap in cups using rubber handle of chain whip laying across the cup and hammer. Done.
Likes For Lazyass:
04-21-17, 05:57 AM
#79

Senior Member

Join Date: Jun 2008
Location: Louisville, KY
Posts: 13,445
Mentioned: 33 Post(s)
Tagged: 0 Thread(s)
Quoted: 4234 Post(s)
Liked 2,949 Times
in
1,808 Posts
I've used a similar setup to respace 120mm rear triangle to 130 mm. Big enough rear washers (supported by increasingly smaller ones held in place by nuts on both sides of the dropouts) kept dropouts more or less aligned on a mixte frame with stamped dropouts. Ended up never using the frame (it still sits with a single coat of poorly applied primer), but I'm pretty sure I used my hanger alignment tool (once I finally got one a couple years later) to check and the alignment was pretty tight.
 04-23-17, 12:17 AM
#80
Senior Member
Join Date: Aug 2013
Posts: 693
Mentioned: 3 Post(s)
Tagged: 0 Thread(s)
Quoted: 157 Post(s)
Likes: 0
Liked 17 Times
in
15 Posts
Have used a homemade one just like this on over a dozen headsets with no issues. I find lubing the threaded rod makes things easier. Check Sheldon Brown site - there's a description of what I made there.
04-24-17, 10:47 AM
#81
Senior Member
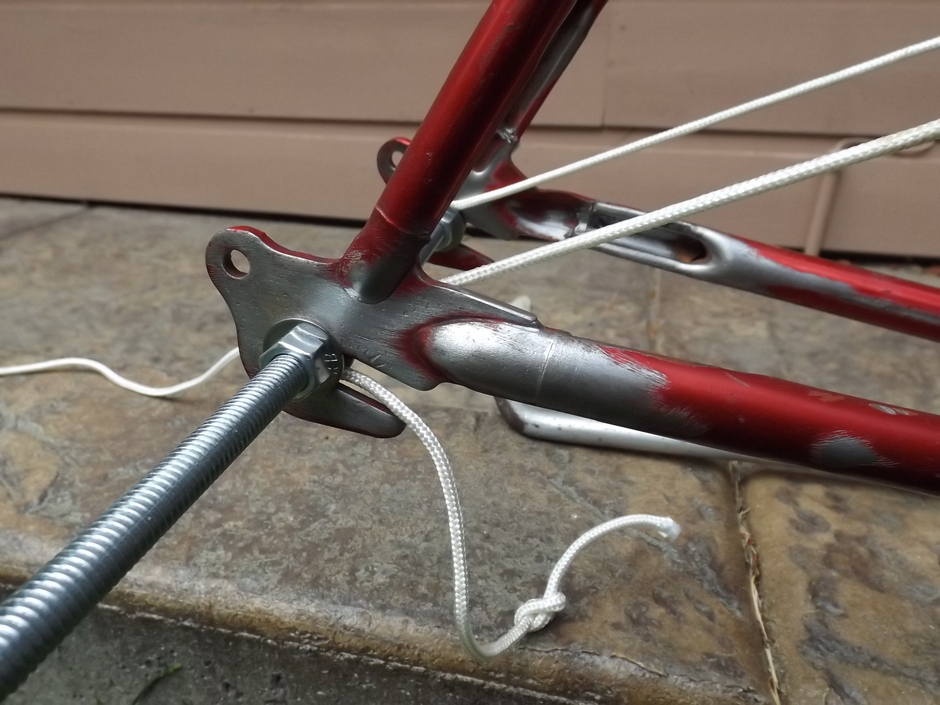
Squid - Nice. The string and ruler method is what I started out using for tandem builds (in the mid-1970's) to check alignments before tacking the joints. If the line is pulled very tight around the headtube it can be amazingly accurate. It is still one of the most practical final checks for any frame build (I always put a washer and nut on the outside of the dropout, followed by a another washer and nut to force the cord in tight to the inner nut). The method is also very useful to avoid a lemon when buying a used bike or frame off Craigslist, etc., where many crashed/re-forked bikes are for sell as "like new".
05-22-22, 03:40 PM
#82
Newbie
No heat on carbon bikes
Be sure to check the headtube seat inside diameters first to be sure that the interference fit is within spec. Good practice to check the outside diameter of the races too, though they should be within spec from the supplier if new. The risk is that if for some reason the interference is greater than recommended (seats in need of reaming), freezing the races before installing them raises the possibility that the race could be squeezed in despite being "oversized", then could deform upon warming to room temp, potentially leading to a non-uniform race for the bearings to ride on. {NOTE: I have not experienced this first hand on headsets, but in other machining contexts.}
Don't EVER use a heat gun on a carbon frame bike. The epoxy is subject to soften at lower temps than you might imagine. I'm not sure I'd even use a hair dryer unless on a very low setting. And even then, I sure wouldn't risk it myself. I just really hate ruining things.
05-22-22, 05:13 PM
#83
Clark W. Griswold
Join Date: Mar 2014
Location: ,location, location
Posts: 13,519
Bikes: Foundry Chilkoot Ti W/Ultegra Di2, Salsa Timberjack Ti, Cinelli Mash Work RandoCross Fun Time Machine, 1x9 XT Parts Hybrid, Co-Motion Cascadia, Specialized Langster, Phil Wood Apple VeloXS Frame (w/DA 7400), R+M Supercharger2 Rohloff, Habanero Ti 26
Mentioned: 54 Post(s)
Tagged: 0 Thread(s)
Quoted: 4355 Post(s)
Liked 3,993 Times
in
2,665 Posts
Excellent tip. Two caveats though:
Be sure to check the headtube seat inside diameters first to be sure that the interference fit is within spec. Good practice to check the outside diameter of the races too, though they should be within spec from the supplier if new. The risk is that if for some reason the interference is greater than recommended (seats in need of reaming), freezing the races before installing them raises the possibility that the race could be squeezed in despite being "oversized", then could deform upon warming to room temp, potentially leading to a non-uniform race for the bearings to ride on. {NOTE: I have not experienced this first hand on headsets, but in other machining contexts.}
Don't EVER use a heat gun on a carbon frame bike. The epoxy is subject to soften at lower temps than you might imagine. I'm not sure I'd even use a hair dryer unless on a very low setting. And even then, I sure wouldn't risk it myself. I just really hate ruining things.

Thread
Thread Starter
Forum
Replies
Last Post
cookiejar
Bicycle Mechanics
9
07-02-12 11:20 AM
