


Threaded headset gets loose after every ride
 08-26-19 | 11:10 AM
#26

aka Tom Reingold


Joined: Jan 2009
Posts: 44,338
Likes: 6,637
From: New York, NY, and High Falls, NY, USA
Bikes: 1962 Rudge Sports, 1971 Raleigh Super Course, 1971 Raleigh Pro Track, 1974 Raleigh International, 1975 Viscount Fixie, 1982 McLean, 1996 Lemond (Ti), 2002 Burley Zydeco tandem
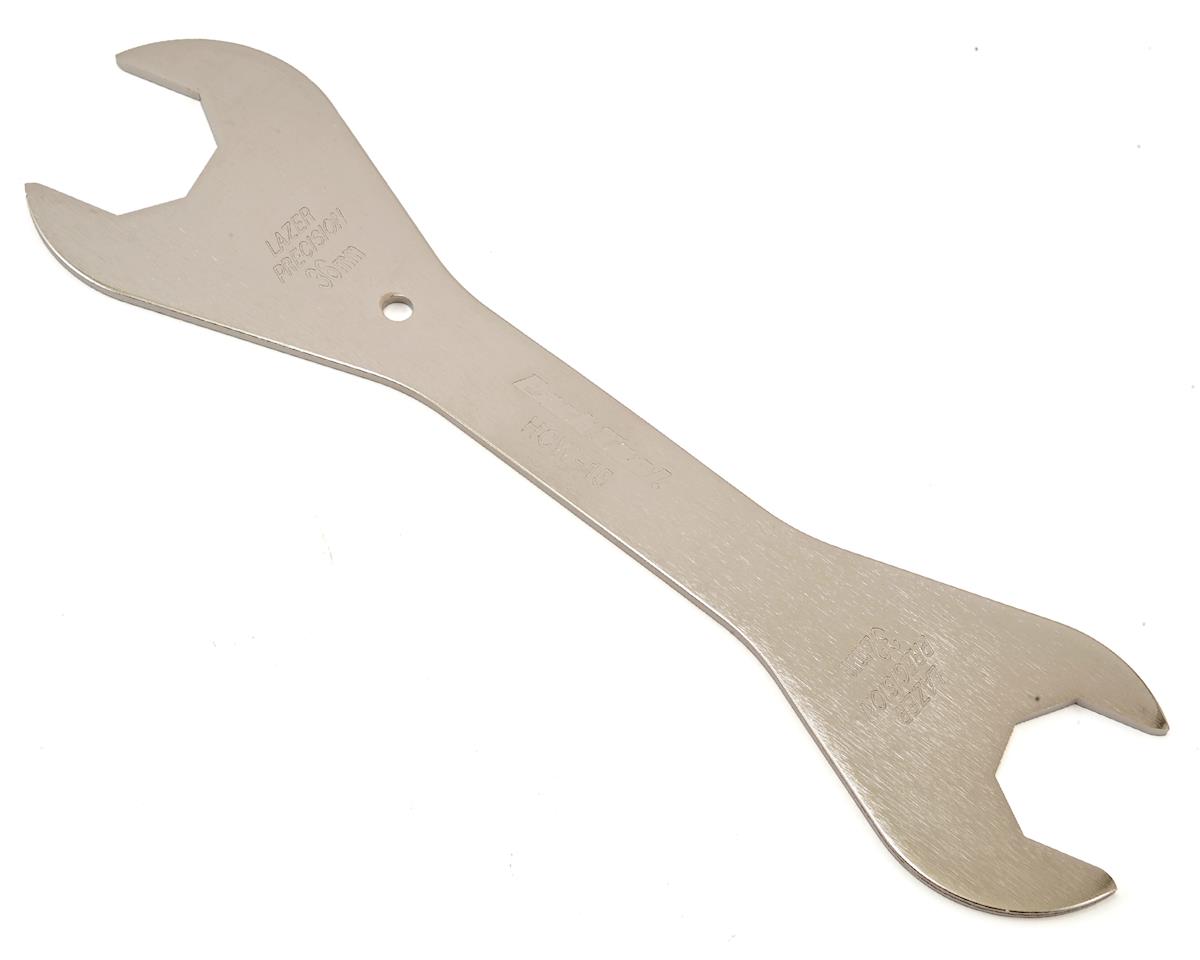
I don't know why the shop did it wrong, but we can walk you through doing it right. You have a flat spanner that fits on the adjustable cup, right? It should look like this.
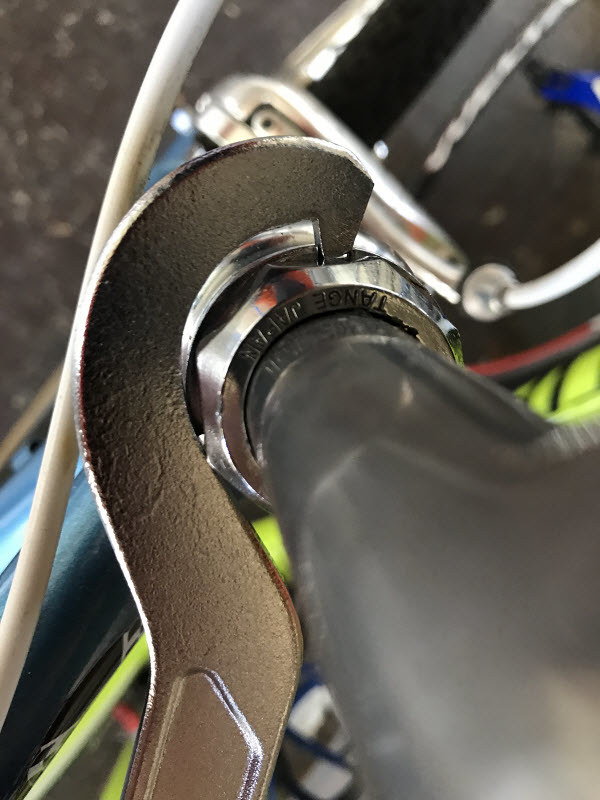
You also need that hooked spanner, so yes, go ahead and buy it. You might be able to get by using a big channel lock instead. You'll mar that notched nut, but maybe you don't care. I would do it with my bike, but some won't do it with theirs.
The notched thing is not a washer; it's actually a nut. It's somewhat redundant, as most headsets just use the top nut as a locknut.
Put the bike on the floor. You don't do this adjustment with the bike in a stand. Face the bike from the front, and put the front wheel between your legs. Hold the headset wrench with your left hand and the hook wrench with your right hand. Adjust the cup approximately and tighten the notched nut onto it. Do this by holding the wheel with your legs, hold the cup still with the wrench in your left hand, then turning the notched nut with your right hand. Once the notched nut is tight against the cup, use your right hand to apply the front brake. Rock the bike back and forth to see if there is play. If there is, you need to repeat and tighten the cup. If there is no play, lift the front of the bike and make sure the cup is not too tight. You want the front end to spin easily. If it is too tight, redo, loosening the cup. It takes some trial and error.
Once it's adjusted with no play but also no binding, hold the wheel with your knees, hold the cup with the flat wrench, and tighten the locknut with a big wrench.
__________________
Tom Reingold, tom@noglider.com
New York City and High Falls, NY
Blogs: The Experienced Cyclist; noglider's ride blog
�When man invented the bicycle he reached the peak of his attainments.� � Elizabeth West, US author
Please email me rather than PM'ing me. Thanks.
Tom Reingold, tom@noglider.com
New York City and High Falls, NY
Blogs: The Experienced Cyclist; noglider's ride blog
�When man invented the bicycle he reached the peak of his attainments.� � Elizabeth West, US author
Please email me rather than PM'ing me. Thanks.
 08-26-19 | 02:28 PM
#27

Thread Starter
bill nyecycles

Joined: Mar 2013
Posts: 3,333
Likes: 360
From: Houston TX
I don't know why the shop did it wrong, but we can walk you through doing it right. You have a flat spanner that fits on the adjustable cup, right? It should look like this.
You also need that hooked spanner, so yes, go ahead and buy it. You might be able to get by using a big channel lock instead. You'll mar that notched nut, but maybe you don't care. I would do it with my bike, but some won't do it with theirs.
The notched thing is not a washer; it's actually a nut. It's somewhat redundant, as most headsets just use the top nut as a locknut.
Put the bike on the floor. You don't do this adjustment with the bike in a stand. Face the bike from the front, and put the front wheel between your legs. Hold the headset wrench with your left hand and the hook wrench with your right hand. Adjust the cup approximately and tighten the notched nut onto it. Do this by holding the wheel with your legs, hold the cup still with the wrench in your left hand, then turning the notched nut with your right hand. Once the notched nut is tight against the cup, use your right hand to apply the front brake. Rock the bike back and forth to see if there is play. If there is, you need to repeat and tighten the cup. If there is no play, lift the front of the bike and make sure the cup is not too tight. You want the front end to spin easily. If it is too tight, redo, loosening the cup. It takes some trial and error.
Once it's adjusted with no play but also no binding, hold the wheel with your knees, hold the cup with the flat wrench, and tighten the locknut with a big wrench.
Yes I do have one of those headset wrenches already - it's what I was using with a regular wrench to tighten everything before I took it back to the shop (would use that + the top nut).
I was basically doing this already - just with only tightening the cup and top nut because I didn't have the other wrench (or know, really).
So I'll order that wrench for the notched nut and give it a shot.
08-26-19 | 06:01 PM
#28

Senior Member

Joined: Feb 2004
Posts: 30,225
Likes: 649
From: St Peters, Missouri
Bikes: Catrike 559 I own some others but they don't get ridden very much.
Check the threads on the steer tube. Riding with a loose headset can damage the threads such that the threaded headset parts can no longer hold adjustment.
If you find damage, the fix is either a replacement fork with intact threads on the steer tube, or filling the damaged threads with brass and cutting new threads into the brass.
If you find damage, the fix is either a replacement fork with intact threads on the steer tube, or filling the damaged threads with brass and cutting new threads into the brass.
__________________
My greatest fear is all of my kids standing around my coffin and talking about "how sensible" dad was.
My greatest fear is all of my kids standing around my coffin and talking about "how sensible" dad was.
08-27-19 | 05:53 PM
#29
Thread Starter
bill nyecycles
Joined: Mar 2013
Posts: 3,333
Likes: 360
From: Houston TX
So that notched wrench I linked to above is not the correct one. It arrived today and its way too big. Anyone link me to what to buy?
I'l keep this tool in case I ever need it for fixed gear lockrings or whatever, not a big deal.
I'l keep this tool in case I ever need it for fixed gear lockrings or whatever, not a big deal.
08-28-19 | 02:06 AM
#30
Senior Member
Joined: Feb 2004
Posts: 30,225
Likes: 649
From: St Peters, Missouri
Bikes: Catrike 559 I own some others but they don't get ridden very much.
What size headset wrench do you need? I just reorganized my workshop and I've got headset wrenches in a box to take to the co-op. If you PM me exactly what you need and your address, I'll mail you one.
__________________
My greatest fear is all of my kids standing around my coffin and talking about "how sensible" dad was.
My greatest fear is all of my kids standing around my coffin and talking about "how sensible" dad was.
08-28-19 | 11:12 AM
#32
Thread Starter
bill nyecycles
Joined: Mar 2013
Posts: 3,333
Likes: 360
From: Houston TX
I tweeted at Park Tool for some help and they were a little bewildered because they said
But it seems perfectly normal to a lot of y'all and people in C&V as well...
Interesting, The notched lockring is not normally found there. If someone has installed that in the past they may just be using it as a spacer. If it is indeed threaded onto the steering column then you will need a hook spanner like the HCW-5 as well as the HCW-15.
But it seems perfectly normal to a lot of y'all and people in C&V as well...
08-28-19 | 02:21 PM
#33

Old fart
Joined: Nov 2004
Posts: 26,411
Likes: 5,350
From: Appleton WI
Bikes: Several, mostly not name brands.
I tweeted at Park Tool for some help and they were a little bewildered because they said
Interesting, The notched lockring is not normally found there. If someone has installed that in the past they may just be using it as a spacer. If it is indeed threaded onto the steering column then you will need a hook spanner like the HCW-5 as well as the HCW-15.
But it seems perfectly normal to a lot of y'all and people in C&V as well...
Park Tools must have lost all their old sandal-wearing bearded guys who know this kind of thing.
Last edited by JohnDThompson; 08-28-19 at 02:25 PM.
08-28-19 | 02:45 PM
#34

Senior Member

Joined: Nov 2014
Posts: 27,576
Likes: 5,484
From: Eugene, Oregon, USA
So far I've seen those hook wrenches used for other things like bottom brackets, but haven't encountered them on a headset.
You could probably replace the entire locknut with a non-threaded spacer, or a stack of spacers.
Personally I dislike the steer tubes with the grove for a lock ring. If the ring should twist while trying to remove it, it is quick to chew up threads. It also creates a weak spot in the steer tube.
You could probably replace the entire locknut with a non-threaded spacer, or a stack of spacers.
Personally I dislike the steer tubes with the grove for a lock ring. If the ring should twist while trying to remove it, it is quick to chew up threads. It also creates a weak spot in the steer tube.
08-28-19 | 04:04 PM
#35
Thread Starter
bill nyecycles
Joined: Mar 2013
Posts: 3,333
Likes: 360
From: Houston TX
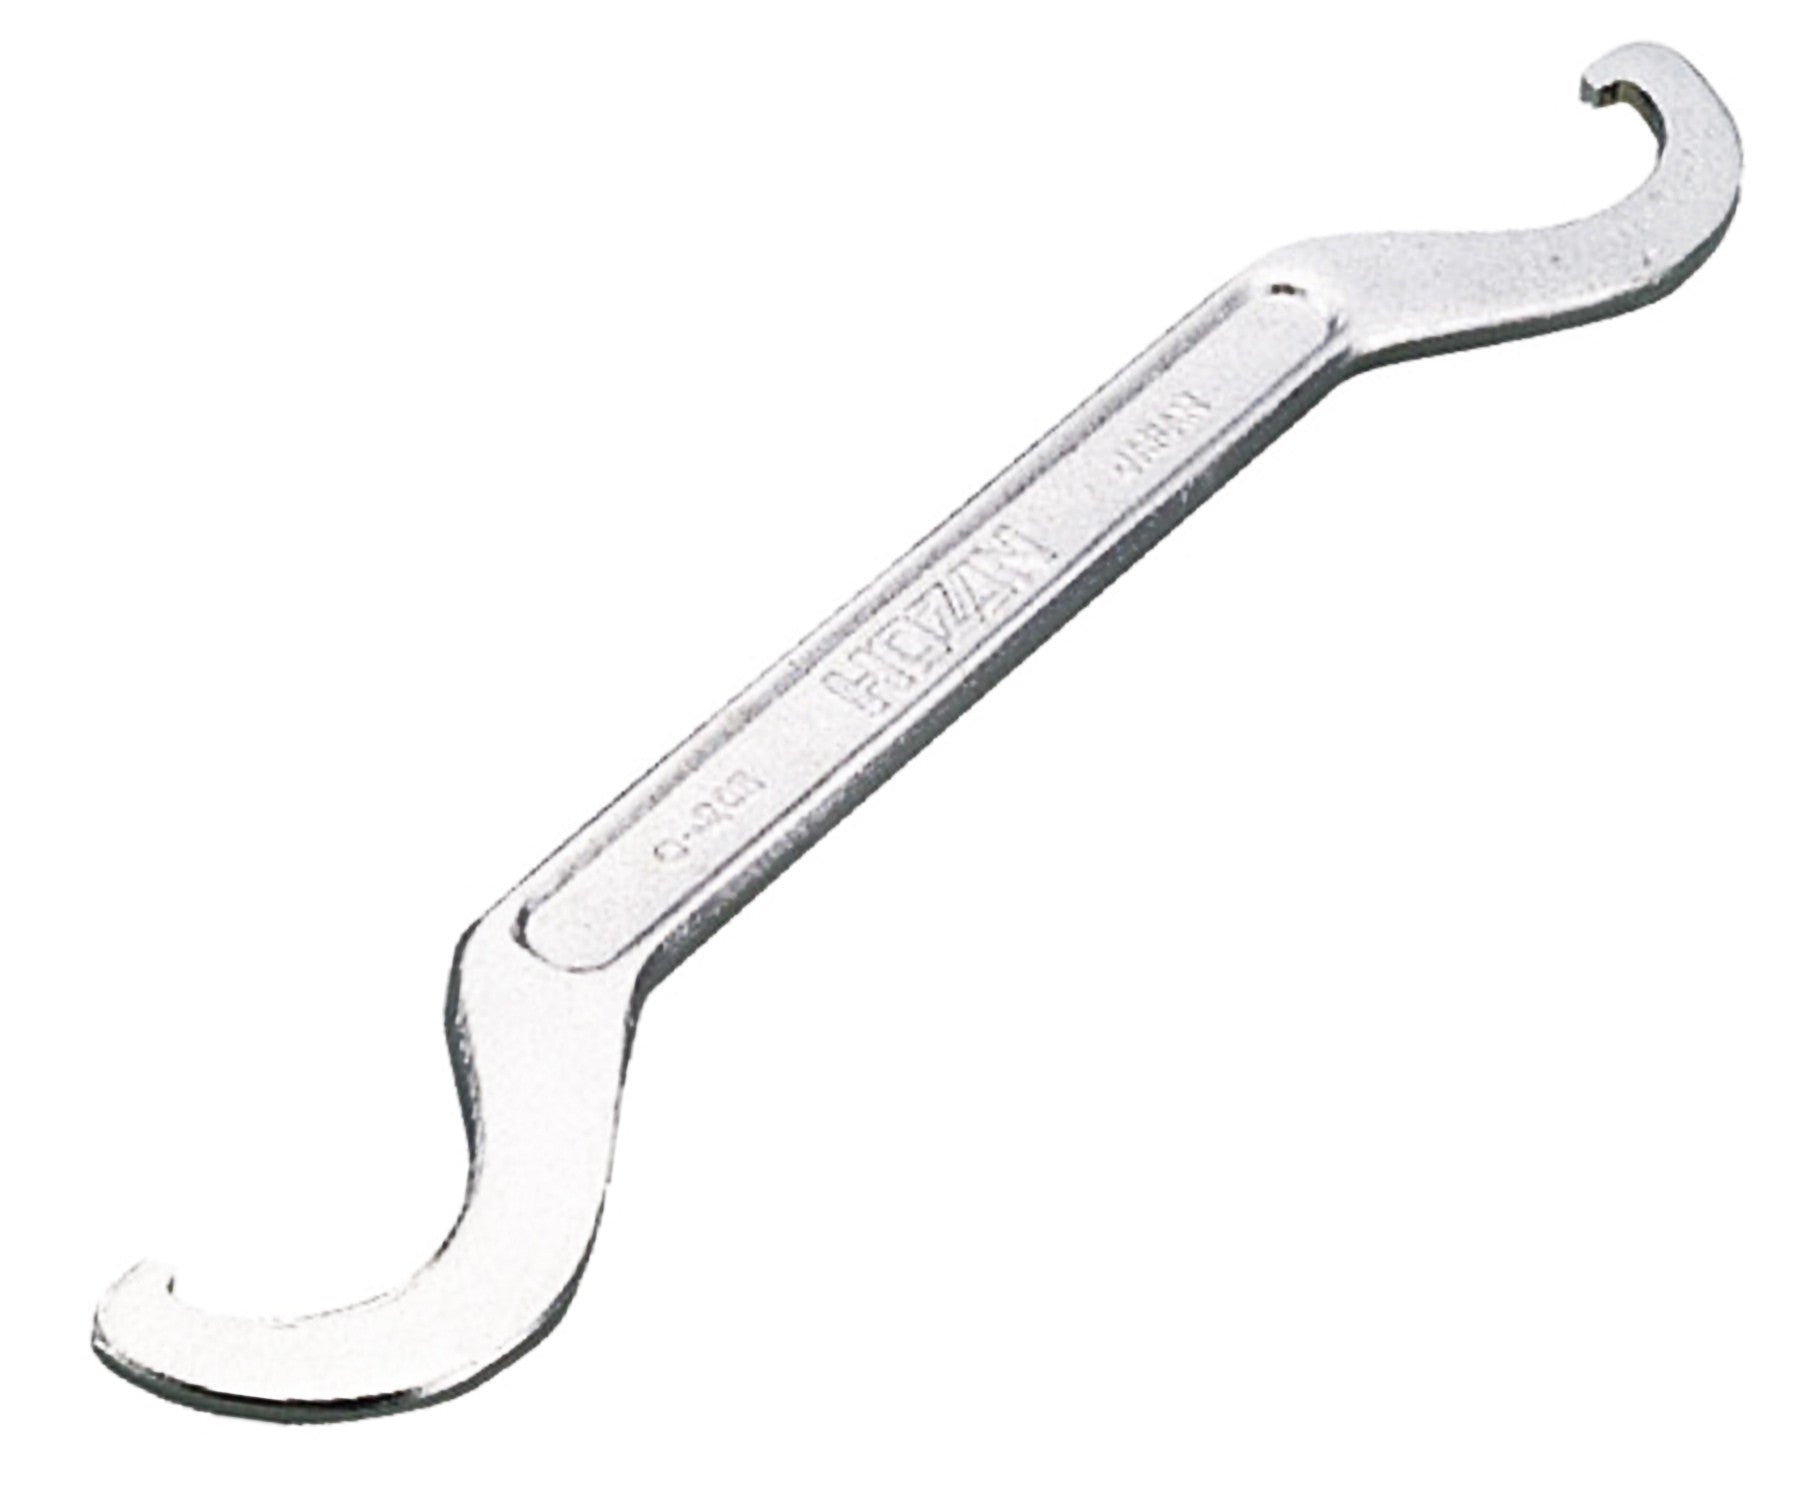
Headsets with notched lockrings in addition to a typical top nut were fairly common on bike-boom era Japanese bikes and some others. The Hozan C-205 hook spanner has two different radius hooks; one for larger bottom bracket lockrings, the other for smaller headset lockrings and track lockrings:
For real hahahaha. I was a little surprised to see customer support from a company like Park Tool who literally makes everything to fix bikes, didn't know what to do.
08-28-19 | 07:03 PM
#36
Senior Member

Joined: May 2019
Posts: 3,983
Likes: 3,225
From: Bloomington, IN
Bikes: Paramount, Faggin, Ochsner, Rossin, Ciocc
Science guy,
I took apart a headset on a Bianchi today with the same set up. The ring with the three spanner notches is actually the lock nut for the headset adjustment and the spacers above it are only for closing down the headset, like if there was a cable support in the mix. HTH, MH
I took apart a headset on a Bianchi today with the same set up. The ring with the three spanner notches is actually the lock nut for the headset adjustment and the spacers above it are only for closing down the headset, like if there was a cable support in the mix. HTH, MH
08-30-19 | 12:12 PM
#37
Thread Starter
bill nyecycles
Joined: Mar 2013
Posts: 3,333
Likes: 360
From: Houston TX
Success! Wish it were a little more snug, but it'll do for my small needs.
09-02-19 | 08:03 PM
#38
Thread Starter
bill nyecycles
Joined: Mar 2013
Posts: 3,333
Likes: 360
From: Houston TX
So, I spent about 3 hours futzing with 3 wrenches trying to find a happy medium where the headset was tight enough to not have play with rocking the front wheels, but loose enough not to feel the grinding of the bearings and it "locking" into the various pitted areas. And it did not work. I was about 30 seconds away from ripping the thing out with a blow torch, spitting on it, crunching it into an industrial compressor then tossing it into an industrial shredder, then launching it into the sun..
So I'm taking it to another shop this week to have them rip it out, diagnose the headtube & fork, and put in another one without a notched washer and make sure it sits proper.
So I'm taking it to another shop this week to have them rip it out, diagnose the headtube & fork, and put in another one without a notched washer and make sure it sits proper.
09-02-19 | 08:12 PM
#39
Senior Member
Joined: Nov 2014
Posts: 27,576
Likes: 5,484
From: Eugene, Oregon, USA
So, I spent about 3 hours futzing with 3 wrenches trying to find a happy medium where the headset was tight enough to not have play with rocking the front wheels, but loose enough not to feel the grinding of the bearings and it "locking" into the various pitted areas. And it did not work. I was about 30 seconds away from ripping the thing out with a blow torch, spitting on it, crunching it into an industrial compressor then tossing it into an industrial shredder, then launching it into the sun..
So I'm taking it to another shop this week to have them rip it out, diagnose the headtube & fork, and put in another one without a notched washer and make sure it sits proper.
So I'm taking it to another shop this week to have them rip it out, diagnose the headtube & fork, and put in another one without a notched washer and make sure it sits proper.
But, for the indexing issue, you likely have a row of pits in the crown race.
You can purchase generic crown races that may help, and are quite cheap.
Or, if you have bearing cages, try loose bearings, + 1 ball.
09-03-19 | 04:50 AM
#40
Old fart
Joined: Nov 2004
Posts: 26,411
Likes: 5,350
From: Appleton WI
Bikes: Several, mostly not name brands.
As [MENTION=392454]CliffordK[/MENTION] notes, replacing the crown race is the "best practice" means of fixing the "indexed steering" issue. If you're not ready for that yet, using loose balls rather than retained balls usually allows at least one more ball to be added to the race, which means the balls won't fall back into their old pits. This can get some extra service life out of a pitted race. If you already have loose balls in the lower stack, removing the crown race and rotating it to a different position also can give the balls a fresh surface to rest.
09-03-19 | 06:41 AM
#41
Senior Member
Joined: Oct 2009
Posts: 1,280
Likes: 322
From: Sherwood, OR
The other option is to re-clock the bottom cup. By removing the cup and turning it slightly before reinstalling it, you �misalign� any pits in the cups. Unfortunately, this takes more tools - you need a bearing cup remover and a bearing press. You can use an old screwdriver to remove the cup, but alignment is critical to reinstall. You can do it with all thread, bolts and blocks, but you have to be very careful to avoid damaging the head tube.
09-03-19 | 08:34 AM
#42
Thread Starter
bill nyecycles
Joined: Mar 2013
Posts: 3,333
Likes: 360
From: Houston TX
n00b question: Isn't the crown race not part of a headset? so if i ask the shop to replace the headset does the crown race get replaced as well? I thought it was?
I enjoy trying to work on things myself but I think this is a little beyond my comfort and i don't have the necessary tools right now.
I may ask the shop to use loose balls instead of caged so as to try to avoid this happening again so quickly in the future.
I enjoy trying to work on things myself but I think this is a little beyond my comfort and i don't have the necessary tools right now.
I may ask the shop to use loose balls instead of caged so as to try to avoid this happening again so quickly in the future.
09-03-19 | 04:56 PM
#43

mechanically sound
Joined: Jan 2007
Posts: 1,610
Likes: 87
From: Dover, NH
Bikes: Indy Fab steel deluxe, Aventon cordoba, S-works stumpy fsr, Masi vincere, Dahon mu uno, Outcast 29 commuter
Crown race is included with the headset, but can also be purchased separately.
__________________

09-04-19 | 07:26 AM
#44

aged to perfection
Joined: Jun 2009
Posts: 2,242
Likes: 1,660
From: PacNW
Bikes: Dinucci Allez 2.0, Richard Sachs, Alex Singer, Serotta, Masi GC, Raleigh Pro Mk.1, Hetchins, etc
In most cases you can pop the crown race off the fork, rotate it 90 degrees, and re-install it.
then pound out the lower cup, rotate 90 degrees in the opposite direction, and re-install it.
that will give a somewhat worn headset a new lease on life.
now over on CR I did a little study about headset loads vs head tube length. To sum it up, small frames with short head tubes are very rough on headsets. it's the leverage imposed by the ratio of fork length to headtube length.
There's a product called a gorilla lock nut that has an allen screw built into the headset top nut such that it will not move. Highly recommended for problems like this.
Mark Petry
Bainbridge Island, WA USA
09-05-19 | 09:26 PM
#46
Thread Starter
bill nyecycles
Joined: Mar 2013
Posts: 3,333
Likes: 360
From: Houston TX
I have no qualms about having to tighten it every week or so because of general pounding it gets, but with the setup the way it is currently I can't adjust it properly. Hopefully the fork isn't damaged too much.....
Haven't hit any curbs, but, see above...
09-06-19 | 12:30 AM
#47
Senior Member
Joined: Jun 2014
Posts: 4,628
Likes: 943
From: Ontario, Canada
Bikes: iele Latina, Miele Suprema, Miele Uno LS, Miele Miele Beta, MMTB, Bianchi Model Unknown, Fiori Venezia, Fiori Napoli, VeloSport Adamas AX
This isn't surprising. The headtube on the bike is pretty small, and my daily commute in Houston is a banger. The roads are rough - most are cement sections so the gap between them is an impact every 50 feet. The [paved] trail I ride has roots, cracks (from shifting ground in the coastal plain along a bayou), stray rocks, etc. Not to mention the 4 wood plank bridges I go over that basically feel like riding down a WWII bombed street in Europe. And speed bumps on the road. It's bad.
I have no qualms about having to tighten it every week or so because of general pounding it gets, but with the setup the way it is currently I can't adjust it properly. Hopefully the fork isn't damaged too much.....
Haven't hit any curbs, but, see above...
I have no qualms about having to tighten it every week or so because of general pounding it gets, but with the setup the way it is currently I can't adjust it properly. Hopefully the fork isn't damaged too much.....
Haven't hit any curbs, but, see above...
Cheers and good luck
09-06-19 | 01:11 PM
#48


Senior Member
Joined: Apr 2005
Posts: 17,197
Likes: 761
From: Ann Arbor, MI
Bikes: 1980 Masi, 1984 Mondonico, 1984 Trek 610, 1980 Woodrup Giro, 2005 Mondonico Futura Leggera ELOS, 1967 PX10E, 1971 Peugeot UO-8
Re you sure the pitting isn't the issue? Balls in the pits and the race will feel tight as it turns and the balls are forced out and vice versa. If you like this bike., get a new HS and have the shop face the headtube (so the races are parallel. This goes a long ways in distributing the bearing forces and slows pitting. The shop probably should have done this when they installed the last one but if is an extra, oh i guess $25 for the facing.
Ben
Ben

Thread
Thread Starter
Forum
Replies
Last Post
AKArider
Bicycle Mechanics
3
05-21-13 09:40 PM
