


Hollowtech II preload adjustment tool?
 06-30-22 | 04:18 PM
#1
Thread Starter
Senior Member

Joined: Jul 2004
Posts: 8,162
Likes: 647
From: Brooklyn NY
Bikes: Kuota Kredo/Chorus, Trek 7000 commuter, Trek 8000 MTB and a few others
Hollowtech II preload adjustment tool?
WHY WHY WHY WHY WHY? ? ? ? ? ? ?
Why does that require a special tool? Why isn't it a standard 8 or 10mm allen wrench that everybody already has, or is at least available at a hardware store? Why do I need to buy a tool just for this? It is just a piece of plastic, as is the tool. If it has to be a special tool, why don't they just include one?
I've bought my share of specialized bike tools over the years but as a home mechanic working mostly on my own bikes many if not most don't get used more than once. It's just crazy.
For this one I'm going to improvise, especially since it isn't even supposed to go tight. After all, it is just a plastic piece. I've got some very hard ipe scrap wood that I can chisel to a square that'll fit. Hmmm, I wonder if a square taper spindle would work???

 06-30-22 | 05:00 PM
#3
Senior Member
Joined: Aug 2005
Posts: 33,657
Likes: 1,119
From: Pittsburgh, PA
Bikes: '96 Litespeed Catalyst, '05 Litespeed Firenze, '06 Litespeed Tuscany, '20 Surly Midnight Special, All are 3x10. It is hilly around here!
That plastic tool is intended to limit the torque you apply. The specified torque is 0.7 to 1.5 Nm which is quite low and well within "finger tight" using that plastic tool. BTW, that tool is really cheap so it's not like you are being taken.
A standard 8 or 10mm allen key would allow (or encourage) excessive tightening.
A standard 8 or 10mm allen key would allow (or encourage) excessive tightening.
06-30-22 | 05:09 PM
#4
Senior Member
Joined: Jul 2013
Posts: 3,767
Likes: 2,940
From: Nor-Cal
Bikes: lots
That plastic tool is intended to limit the torque you apply. The specified torque is 0.7 to 1.5 Nm which is quite low and well within "finger tight" using that plastic tool. BTW, that tool is really cheap so it's not like you are being taken.
A standard 8 or 10mm allen key would allow (or encourage) excessive tightening.
A standard 8 or 10mm allen key would allow (or encourage) excessive tightening.
06-30-22 | 06:39 PM
#5
Senior Member


Joined: Feb 2012
Posts: 19,373
Likes: 5,515
From: Rochester, NY
Bikes: Stewart S&S coupled sport tourer, Stewart Sunday light, Stewart Commuting, Stewart Touring, Co Motion Tandem, Stewart 3-Spd, Stewart Track, Fuji Finest, Mongoose Tomac ATB, GT Bravado ATB, JCP Folder, Stewart 650B ATB
Nor has the OP an understanding to Shimano's marketing methods. Of course they would make a unique tool. Andy
__________________
AndrewRStewart
AndrewRStewart
06-30-22 | 10:02 PM
#6
Senior Member

Joined: Apr 2007
Posts: 7,765
Likes: 1,744
I agree with the posts about the tool being designed to be more or less idiot proof. I have one. But the first Hollowtech crank I installed was before I got the tool. I just took a small/fine-bladed needle nose pliers and spread it against the fastener to tighten it. I read the installation instructions so I understood it should be about finger tight and did so.
Last edited by Camilo; 06-30-22 at 11:42 PM.
06-30-22 | 10:47 PM
#7
ignominious poltroon
Joined: Jan 2022
Posts: 6,027
Likes: 5,377
The OP makes it clear that the requirement for minimal torque is in fact understood. The question raised, as I understand it, is why the non-standard tool (which we all answered), and, in the absence of having that over-priced bit of plastic, how something can be improvised (which some of us answered).
07-01-22 | 04:08 AM
#8
Thread Starter
Senior Member
Joined: Jul 2004
Posts: 8,162
Likes: 647
From: Brooklyn NY
Bikes: Kuota Kredo/Chorus, Trek 7000 commuter, Trek 8000 MTB and a few others
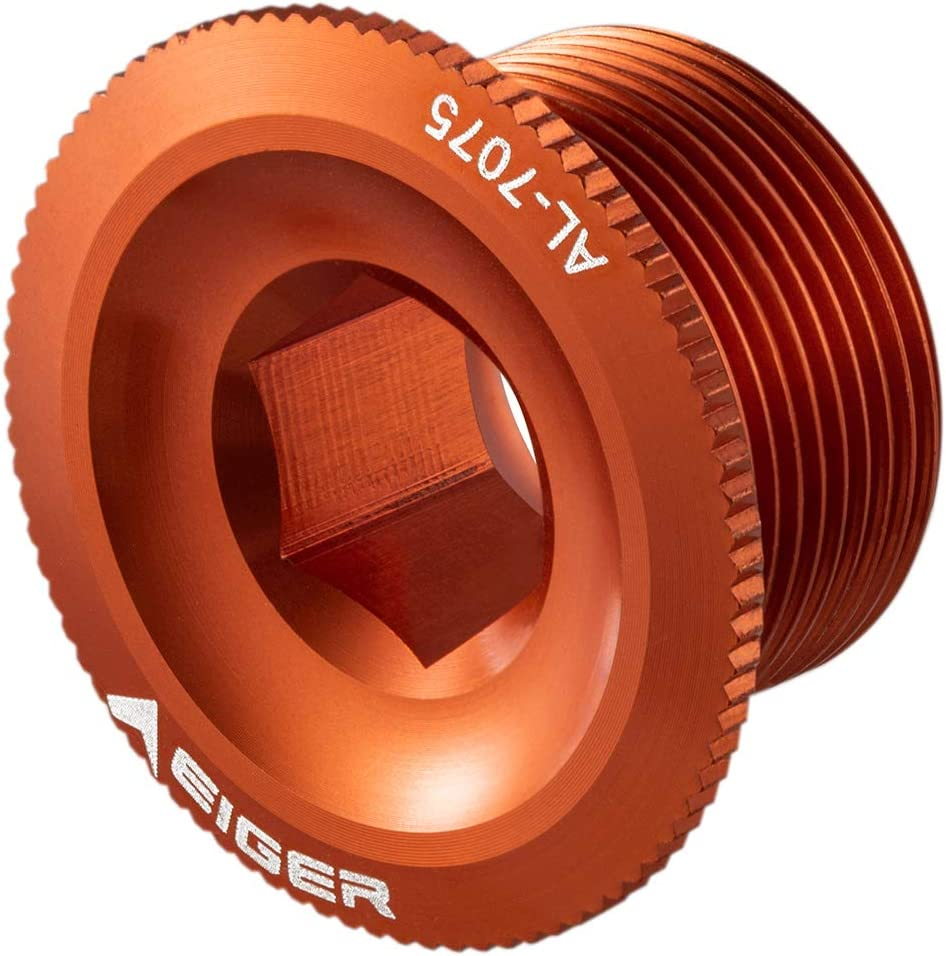
You are all mostly missing the point. Why design something that needs a special tool if you’re not going to include it? Even IKEA includes them. Why even design it so it needs a tool at all? You could make it so you can turn it with your fingers, just knurl the edge and have it protrude. The one in the pic looks about right, except leave off the hex slot if you don’t want it torqued.
And before you make assumptions about someone’s misunderstanding of written instructions, how about you try to read what was written in the first place.
I did find something that fits it that won’t be able to torque it. Just hand tight.
This is a truly dumb design of what should be a simple piece of plastic.
07-01-22 | 08:26 AM
#9
Senior Member
Joined: Feb 2012
Posts: 19,373
Likes: 5,515
From: Rochester, NY
Bikes: Stewart S&S coupled sport tourer, Stewart Sunday light, Stewart Commuting, Stewart Touring, Co Motion Tandem, Stewart 3-Spd, Stewart Track, Fuji Finest, Mongoose Tomac ATB, GT Bravado ATB, JCP Folder, Stewart 650B ATB
You are all mostly missing the point. Why design something that needs a special tool if you�re not going to include it? Even IKEA includes them. Why even design it so it needs a tool at all? You could make it so you can turn it with your fingers, just knurl the edge and have it protrude. The one in the pic looks about right, except leave off the hex slot if you don�t want it torqued.
And before you make assumptions about someone�s misunderstanding of written instructions, how about you try to read what was written in the first place.
I did find something that fits it that won�t be able to torque it. Just hand tight.
This is a truly dumb design of what should be a simple piece of plastic.
If one were to redesign the draw/preload bolt (that plastic threaded thing we are talking about) please don't have it stick out past the crankarm's surface. There's a reason why crank arm dust caps have been flush (or very nearly so) with the arm's surface, for many decades. But the best way to figure out what works better is to make a version and then pass it around to others to get their feedback. I am sure many here would look forward to being part of the testing phase

I'll add just because I understand and have learned to deal with Shimano's designs and business/product philosophy doesn't mean I like it better than other companies way of design or marketing. I do respect what the big S has done though. Andy
__________________
AndrewRStewart
AndrewRStewart
07-01-22 | 08:48 AM
#10
Facts just confuse people


Joined: Jul 2017
Posts: 19,366
Likes: 7,076
From: Mississippi
Bikes: Tarmac Disc Comp Di2 - 2020
It's not a big deal. You can with a little effort push the crank arms on far enough to engage the stopper plate with your own hands. At least I have been able too.
The only purpose of the fancy named pre-load adjustment tool is to get the crank arms on the spindle at the proper depth to let the stopper plate engage the notch in the spindle.
There are all sorts of tools listed in the Shimano documents for the components on my bike. I frequently get by without most of them. Why does this one upset you so much?
 07-01-22 | 09:48 AM
#11
Senior Member
Joined: Jul 2006
Posts: 3,135
Likes: 108
From: Middle of the road, NJ
I agree with the posts about the tool being designed to be more or less idiot proof. I have one. But the first Hollowtech crank I installed was before I got the tool. I just took a small/fine-bladed needle nose pliers and spread it against the fastener to tighten it. I read the installation instructions so I understood it should be about finger tight and did so.
07-01-22 | 10:02 AM
#12
SE Wis
Joined: Apr 2005
Posts: 11,555
Likes: 4,332
From: Milwaukee, WI
Bikes: '68 Raleigh Sprite, '02 Raleigh C500, '84 Raleigh Gran Prix, '91 Trek 400, 2013 Novara Randonee, 1990 Trek 970
07-01-22 | 10:23 AM
#14
Senior Member
Joined: Oct 2007
Posts: 5,773
Likes: 105
From: West Yorkshire, United Kingdom
HT2 has been out for almost 20 years now and the tool for the crank pre-load hasn't changed since it was introduced, could understand an issue if Shimano changed the spec every few years, but they haven't, the only change in HT2 since it's introduction has been the size of higher end bottom brackets (smaller shell size), and when these changed (not bought one recently, so unsure if they still do) the retail packaged BB's came with an adaptor to if the older tools.
As you need a tool to fit the BB's as alcjphil notes, the Park BBT9 is an all in one which includes the BB and crank tool.
As you need a tool to fit the BB's as alcjphil notes, the Park BBT9 is an all in one which includes the BB and crank tool.
07-05-22 | 10:29 AM
#15
Thread Starter
Senior Member
Joined: Jul 2004
Posts: 8,162
Likes: 647
From: Brooklyn NY
Bikes: Kuota Kredo/Chorus, Trek 7000 commuter, Trek 8000 MTB and a few others
My first choice of improvised tool didn't work well, my thumb. In the end I used the rear end of a plastic tire lever and it was fine. I tightened it more than I knew was necessary to see how that felt, then loosened and freed the arm and did it again the proper way. I checked the feel and then checked for any play and everything spins freely with no play. Since it is a plastic cap you can't tighten it too much anyway. I don't understand why a knurled edge isn't just put on it so you can do it by hand. I already had the tool in my cart but didn't need it anyway. I also improvised the bearing press for the BB bearings, a long bolt, a few large washers and a nut to tighten. That also worked fine.
 07-05-22 | 02:07 PM
#17
Senior Member
Joined: Jun 2002
Posts: 6,655
Likes: 2,253
From: Montreal, Quebec
My first choice of improvised tool didn't work well, my thumb. In the end I used the rear end of a plastic tire lever and it was fine. I tightened it more than I knew was necessary to see how that felt, then loosened and freed the arm and did it again the proper way. I checked the feel and then checked for any play and everything spins freely with no play. Since it is a plastic cap you can't tighten it too much anyway. I don't understand why a knurled edge isn't just put on it so you can do it by hand. I already had the tool in my cart but didn't need it anyway. I also improvised the bearing press for the BB bearings, a long bolt, a few large washers and a nut to tighten. That also worked fine.
07-05-22 | 03:10 PM
#18
Thread Starter
Senior Member
Joined: Jul 2004
Posts: 8,162
Likes: 647
From: Brooklyn NY
Bikes: Kuota Kredo/Chorus, Trek 7000 commuter, Trek 8000 MTB and a few others
Think about this: If there was a knurled edge that projected above the edge of the center of the crank arm it could easily come into contact with your ankle as you pedal. No manufacturer would ever accept such a design, especially if it were to be sold in the USA. It could bankrupt them. No component manufacturer has ever done this for very good reason
It may be a 20 year old design, but it is a pretty poor one.
07-05-22 | 03:31 PM
#19
Senior Member
Joined: Feb 2012
Posts: 19,373
Likes: 5,515
From: Rochester, NY
Bikes: Stewart S&S coupled sport tourer, Stewart Sunday light, Stewart Commuting, Stewart Touring, Co Motion Tandem, Stewart 3-Spd, Stewart Track, Fuji Finest, Mongoose Tomac ATB, GT Bravado ATB, JCP Folder, Stewart 650B ATB
zacster- I think you now have a project to do. Design and make (3D print, machine your choice) a replacement draw bolt. Please report back to us after you have some real world testing/use. Andy
__________________
AndrewRStewart
AndrewRStewart
07-05-22 | 05:38 PM
#20
Senior Member
Joined: May 2005
Posts: 2,335
Likes: 133
From: SFBay
Bikes: n, I would like n+1
The official Shimano tool for this is all of $5, or if you want to get it from Jeff Bezos in which case it�s less than $7. I think one even came with one of my cranks, though that would have been ~10 years ago.
Should it probably be a common thing like a 6 mm allen? Yes. Can it be improvised with common toolbox items? Yes. Do I use a torque wrench with that particular plastic screw? No.
Should it probably be a common thing like a 6 mm allen? Yes. Can it be improvised with common toolbox items? Yes. Do I use a torque wrench with that particular plastic screw? No.
07-05-22 | 07:07 PM
#21
Senior Member
Joined: Jul 2013
Posts: 3,767
Likes: 2,940
From: Nor-Cal
Bikes: lots
Wait, what? A plastic knurled edge flush with the arm is a hazard? GMAFB. Just look at the pic above of that after-market cap, and I wouldn't even have it protrude that much, nor would I make it 7075 Al, just plastic. And even further, the pinch bolts are what hold it on, the cap is just to adjust the preload. Get rid of it altogether. Make the cap a tool to adjust the preload that comes off and stays off and just include it with the crank. And this brings me back to my first point, why not just include the plastic tool? It is a cheap piece of plastic.
It may be a 20 year old design, but it is a pretty poor one.
It may be a 20 year old design, but it is a pretty poor one.
07-05-22 | 07:49 PM
#22

Senior Member
Joined: Jan 2010
Posts: 842
Likes: 453
From: Georgia
Bikes: I don't even
The majority of people using these cranks don't install the crank themselves, and the majority of people installing these cranks already have the tool. As already stated a non-specialized interface ie: 8mm allen would encourage over torqueing for those who don't know what they're doing.
07-05-22 | 08:18 PM
#23
Senior Member
Joined: Dec 2014
Posts: 547
Likes: 104
From: New Hampshire
Bikes: Pinarello Gavia TSX; Bianchi Intenso
I don�t work on HTII cranks all that often. I do have one but mainly Campagnolo. But I do think the preload tool is doing more than pushing the crank on far enough to secure the retention device. I always thought the preload was, well, preloading the bearings before the crank arm is secured.
07-05-22 | 08:18 PM
#24
Clark W. Griswold

Joined: Mar 2014
Posts: 18,376
Likes: 6,704
From: ,location, location
Bikes: Foundry Chilkoot Ti W/Ultegra Di2, Salsa Timberjack Ti, Cinelli Mash Work RandoCross Fun Time Machine, 1x9 XT Parts Hybrid, Co-Motion Cascadia, Specialized Langster, Phil Wood Apple VeloXS Frame (w/DA 7400), R+M Supercharger2 Rohloff, Habanero Ti 26
I haven't had any issues getting a tool and using it. This isn't rocket appliances here. The Shimano tool is cheap and you can get an even nicer tool and spend a little more and that is fine as well. 8 bucks for a tool you rarely use is not a huge investment and if that is too much for you then maybe tools aren't your jam. Or maybe don't buy Shimano HT2 Cranks!
I like the proprietary tool in this part because it makes it hard to over tighten. This is bearing pre-load it is rather important it is not an Ikea shelf here it is a fairly expensive part and very important to install properly. A lot of folks don't want to install these parts themselves and don't need a tool and those who do want to install it could easily get that tool and will learn how to use it somehow either through various videos or reading the Shimano manual. You give someone a 8-10mm tool they will use it and crank down on a fastener that doesn't require that and a little 3mm hole would be rather silly and probably would still wind up with striped fasteners in some way. That $8 tool helps prevent that is easy to acquire and at the end any good shop will have one and is also happy to do the work for you if you don't wish to to do it or don't want to buy a tool.
I like the proprietary tool in this part because it makes it hard to over tighten. This is bearing pre-load it is rather important it is not an Ikea shelf here it is a fairly expensive part and very important to install properly. A lot of folks don't want to install these parts themselves and don't need a tool and those who do want to install it could easily get that tool and will learn how to use it somehow either through various videos or reading the Shimano manual. You give someone a 8-10mm tool they will use it and crank down on a fastener that doesn't require that and a little 3mm hole would be rather silly and probably would still wind up with striped fasteners in some way. That $8 tool helps prevent that is easy to acquire and at the end any good shop will have one and is also happy to do the work for you if you don't wish to to do it or don't want to buy a tool.
07-07-22 | 01:07 AM
#25
Senior Member
Joined: Oct 2009
Posts: 2,161
Likes: 323
From: Mt Shasta, CA, USA
Bikes: Too many. Giant Trance X 29, Surly Midnight Special get the most time.
I'll agree that this is both a kind of annoying design choice and is also not really that big of a deal. I liked the design of some older FSA cranks that were basically HTII cross compatible that used a 5mm hex tooling on the preload bolt, and included a small plastic tool you were supposed to use to prevent over torquing. The danger of course is that it's easy to overtorque them with a normal 5mm wrench if you're an idiot. At least Shimano has stuck with this design for a while.