


Truing stand modification
 01-07-24 | 12:23 PM
#26
Senior Member

Joined: Feb 2007
Posts: 1,841
Likes: 548
I have a Park TS-2 and use dial indicators.The last three wheel sets I have built and maintain have machined sidewalls. Velocity Psycho, Andra 30 and Andra 40 rims. I use Parks dial indicator holders for their stand. I have better dial indicators that read in the thousands. So I use these instead of the metric ones that came with the Park setup. The machined sidewalls allow the dial indicators to work pretty smoothly. I also have the holder for the dial indicator to check the rotors.I am able to get .005 TIR on wheels and rotors.
 01-09-24 | 02:12 PM
#27

Thread Starter
Senior Member
Joined: Oct 2022
Posts: 630
Likes: 466
From: UK, New Forest
Bikes: 1948-49 Allin SB Long Term Resto 1948 Raleigh Lenton Clubman Frame Project 1950 Raleigh Clubman Frame Project 1951 Claud Butler New Allrounder Frame Project 1959 Claud Butler European 1977 Motob�cane C4 1977 Carlton Clubman 1980 Gitane Sprint
Been busy today, but have managed to get the Islandix up and running. Quite easy for a dinosaur to do.
First the Mitutoyo indicators. I guessed a 50mm extension would be required for the radial indicator to be within its mid-point of measurement (5-6mm of 12.7mm) on the rim wall when the radial indicator was in position on the rim. I didn’t take in the head measurement depth which is 5mm, so after fitting a 45mm extension it is spot on.
I found the spring force in the radial indicator was a little weak (maybe because it is second hand, a new internal spring is only �3-4, so an option to try at a later date) in the upside down position and asked Mitutoyo if they supplied an uprated spring. They only do such a spring for the 25mm travel indicators, so I got some 10mm heating plastic pipe and weak springs and played around. Must say, very happy with the result. Before occasionally it was weak to return to zero, but now very positive without any excess force to push down.
I had a wheel I built up previously, that was pretty good so popped it in. It is hard to trust a screen, but I have the feeling that when I do it will be very quick to dial it in. I will have a play tomorrow and report back, but I need to build a wheel from scratch to get the real feel for it. I have a set waiting to build but just waiting something in the post before I start.
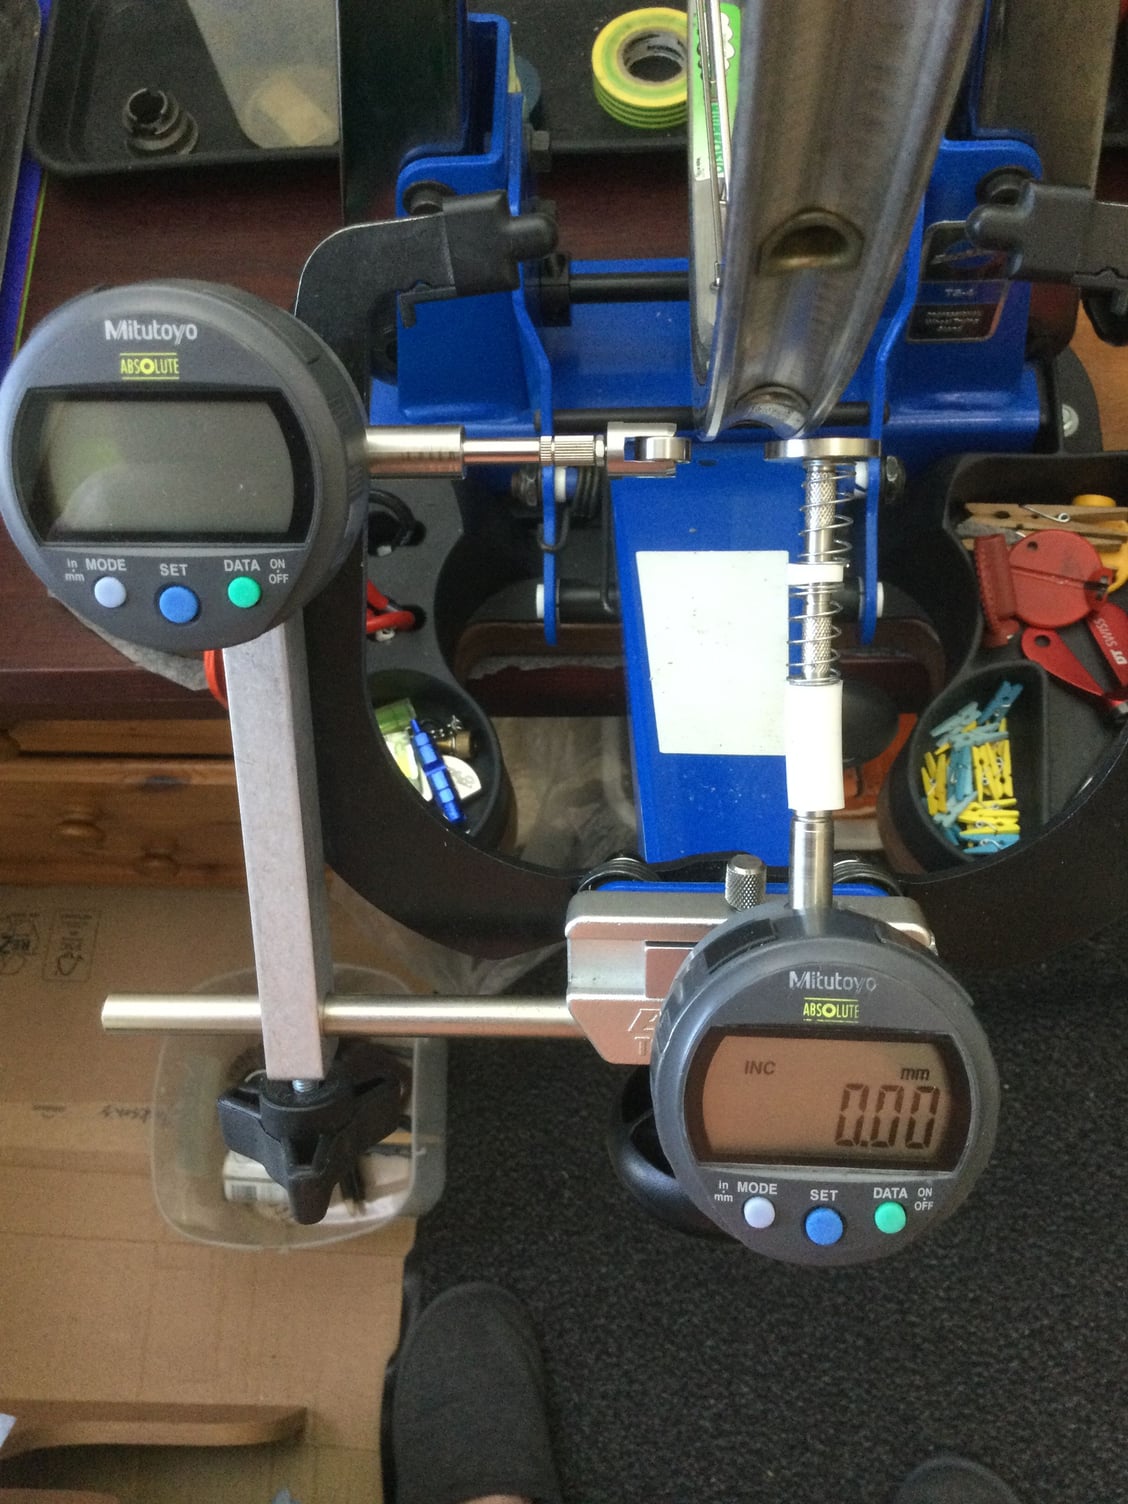
Note lateral roller not in position
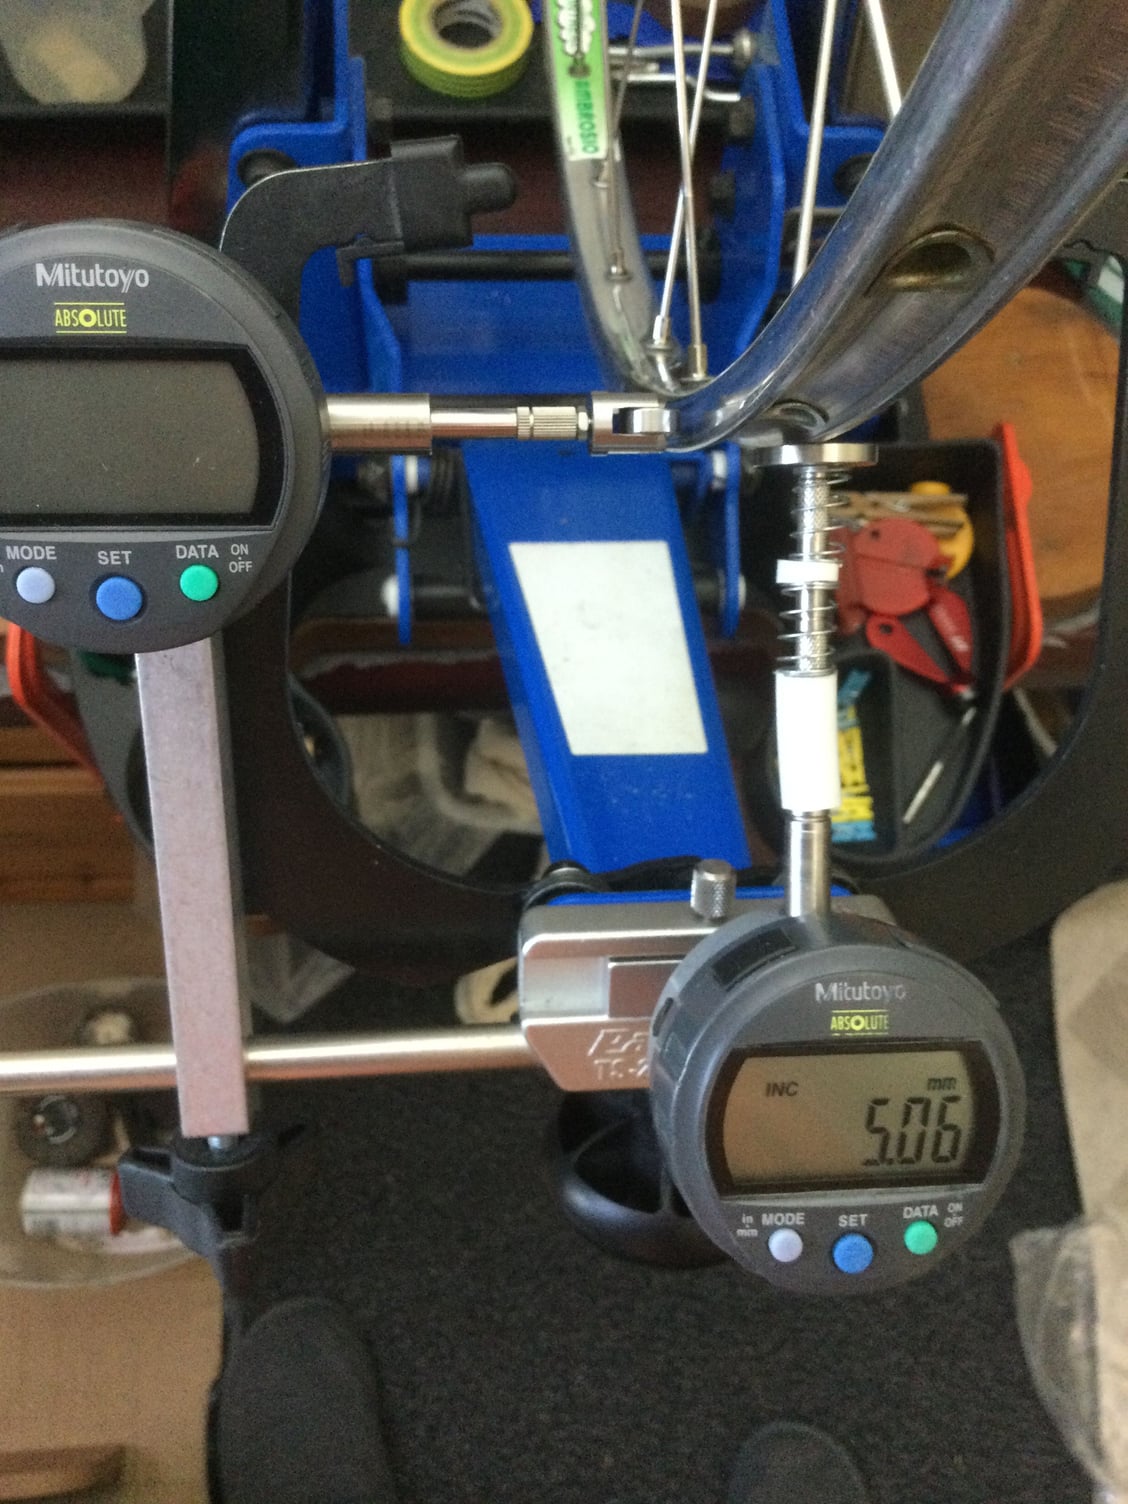
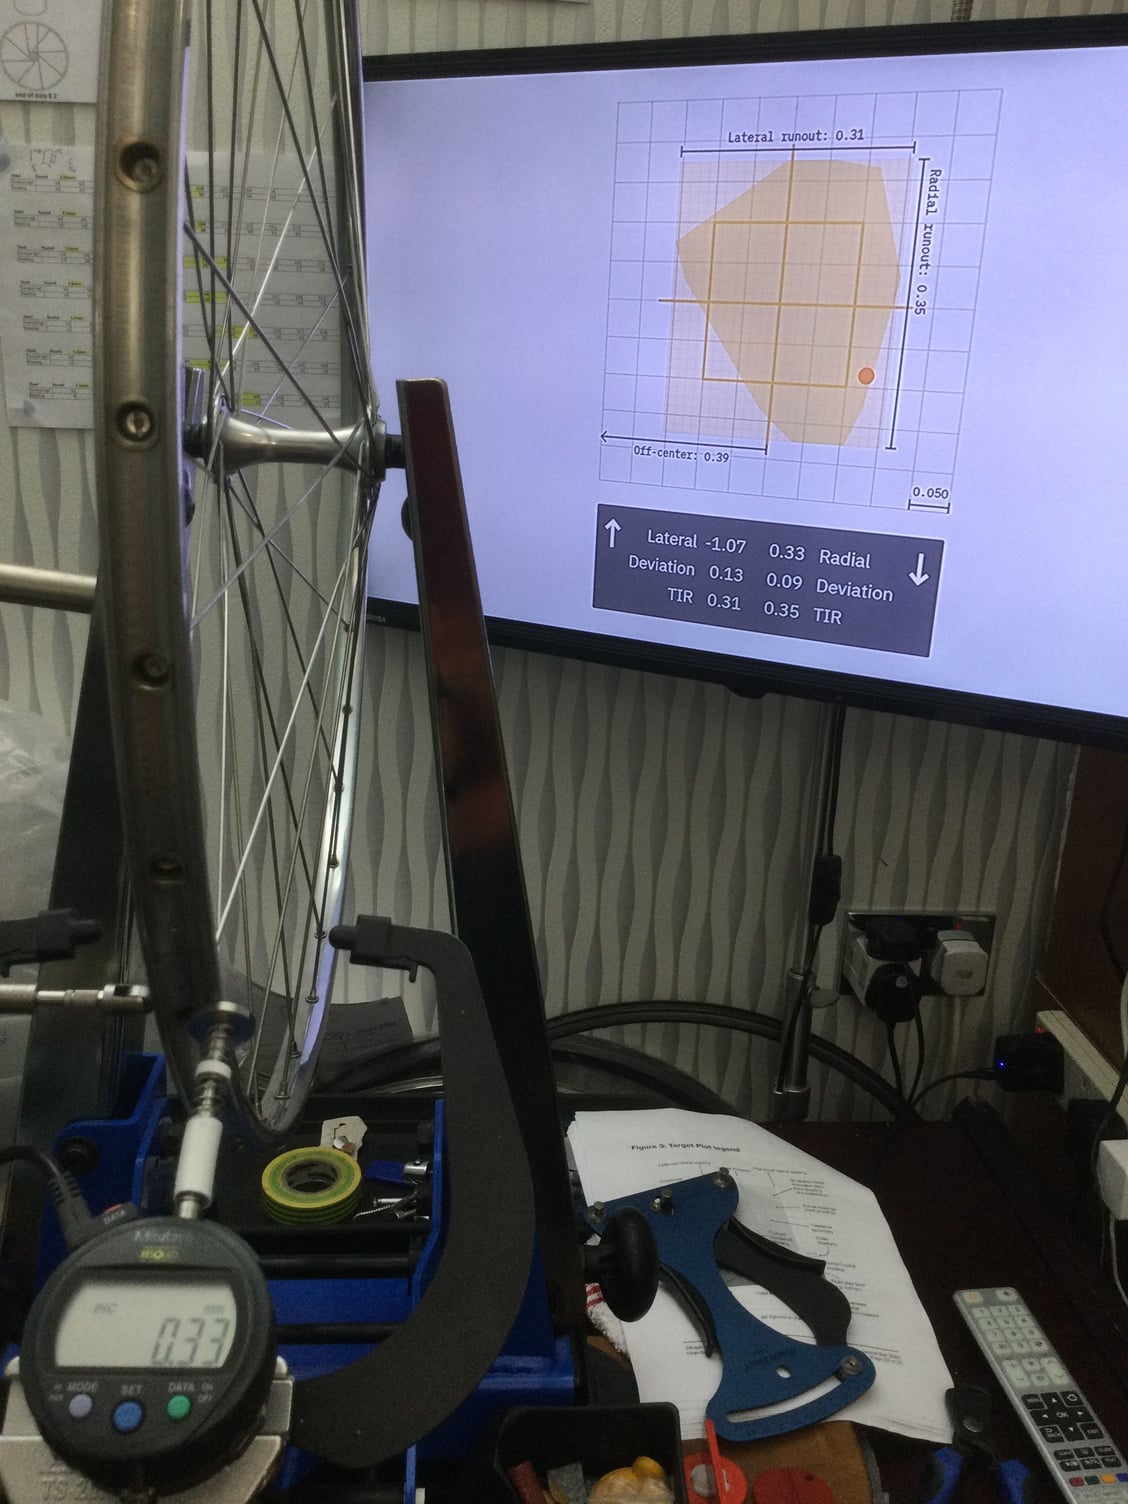
Lateral roller where it should be and radial in mid measuring movement
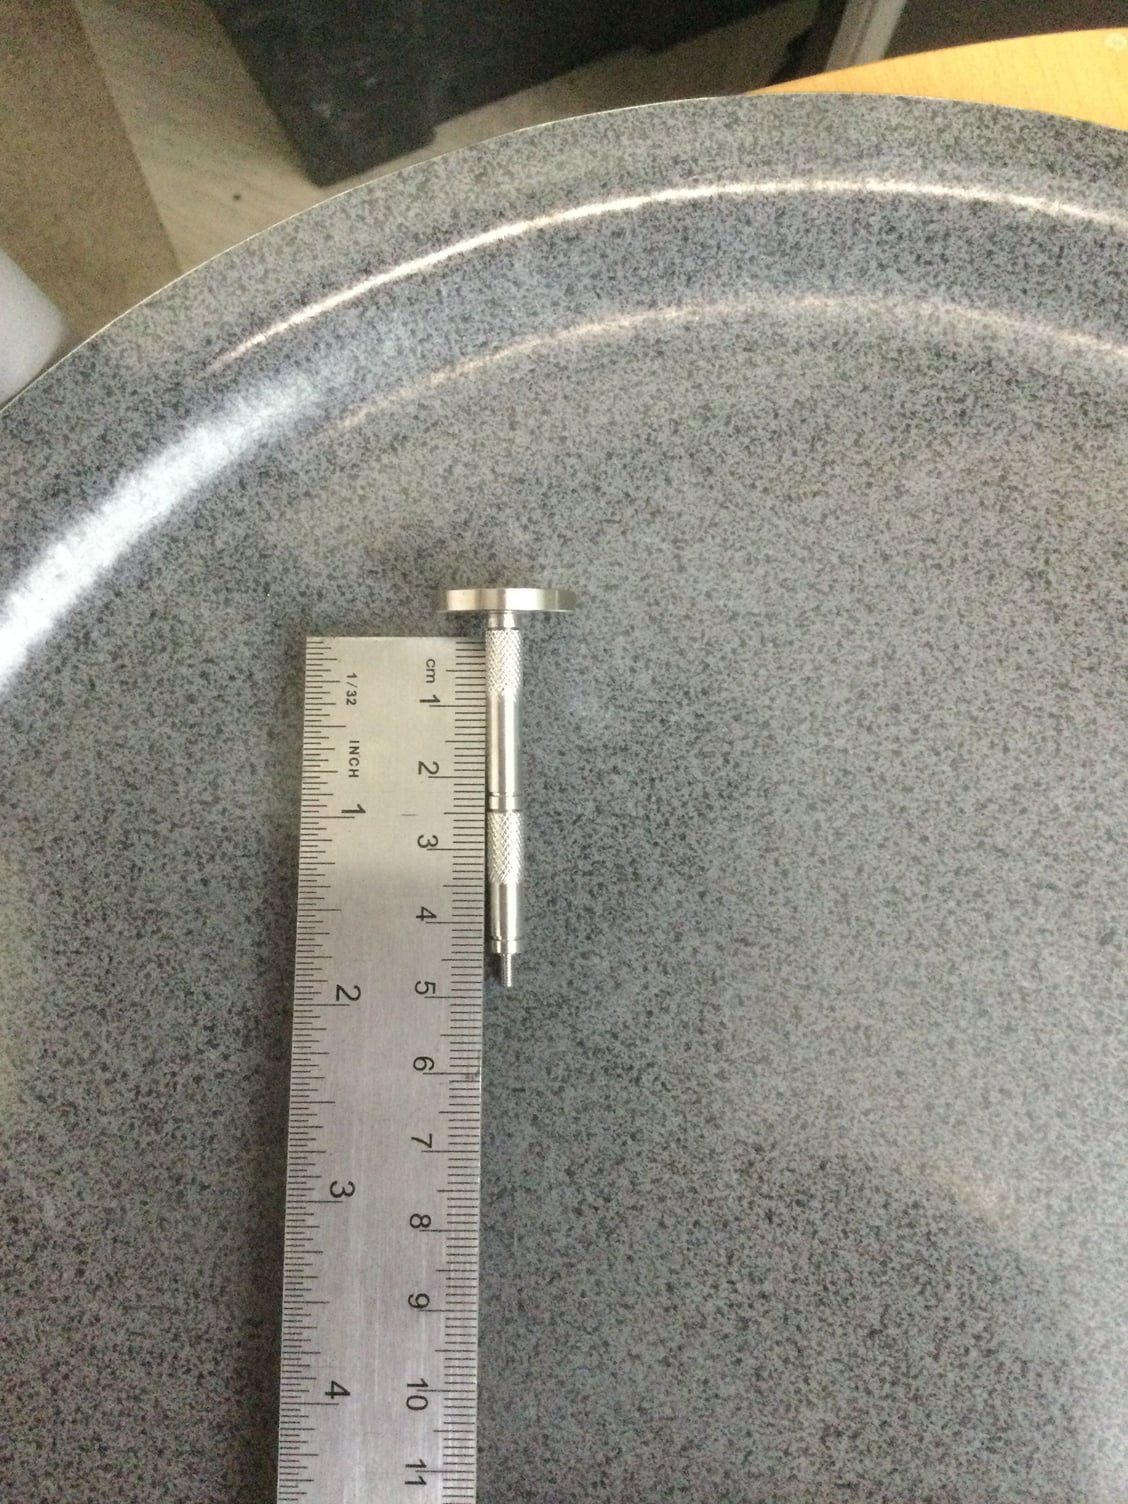
45+5mm
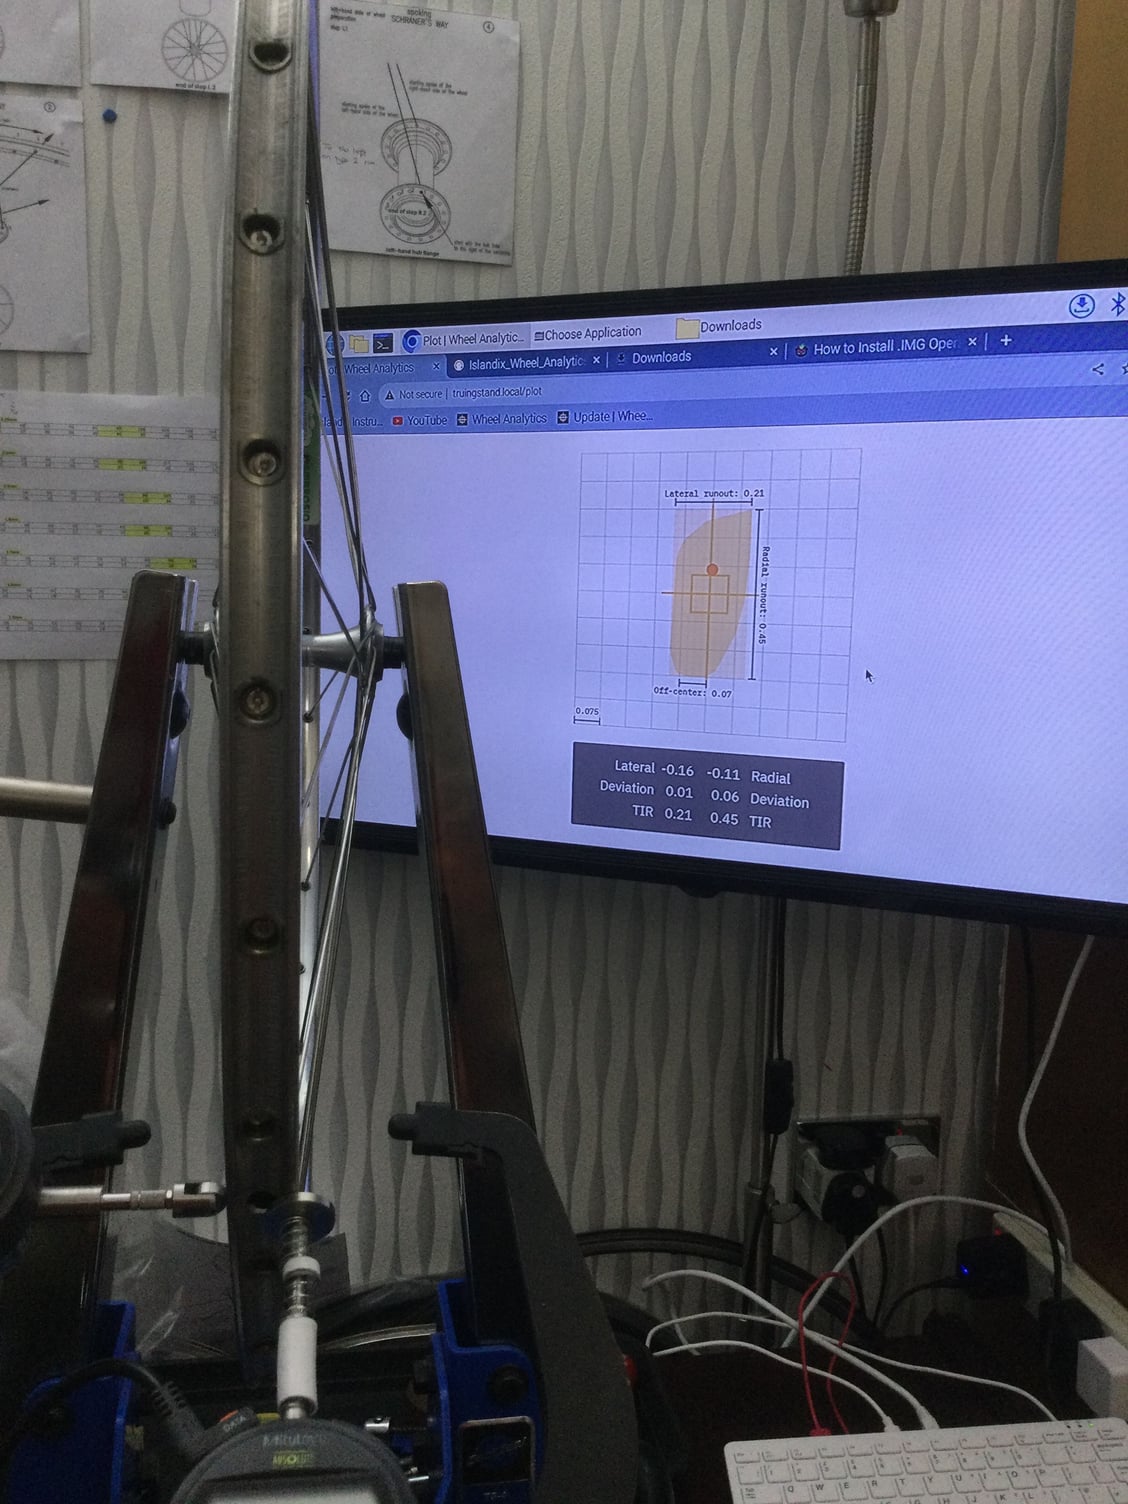
Screen shot
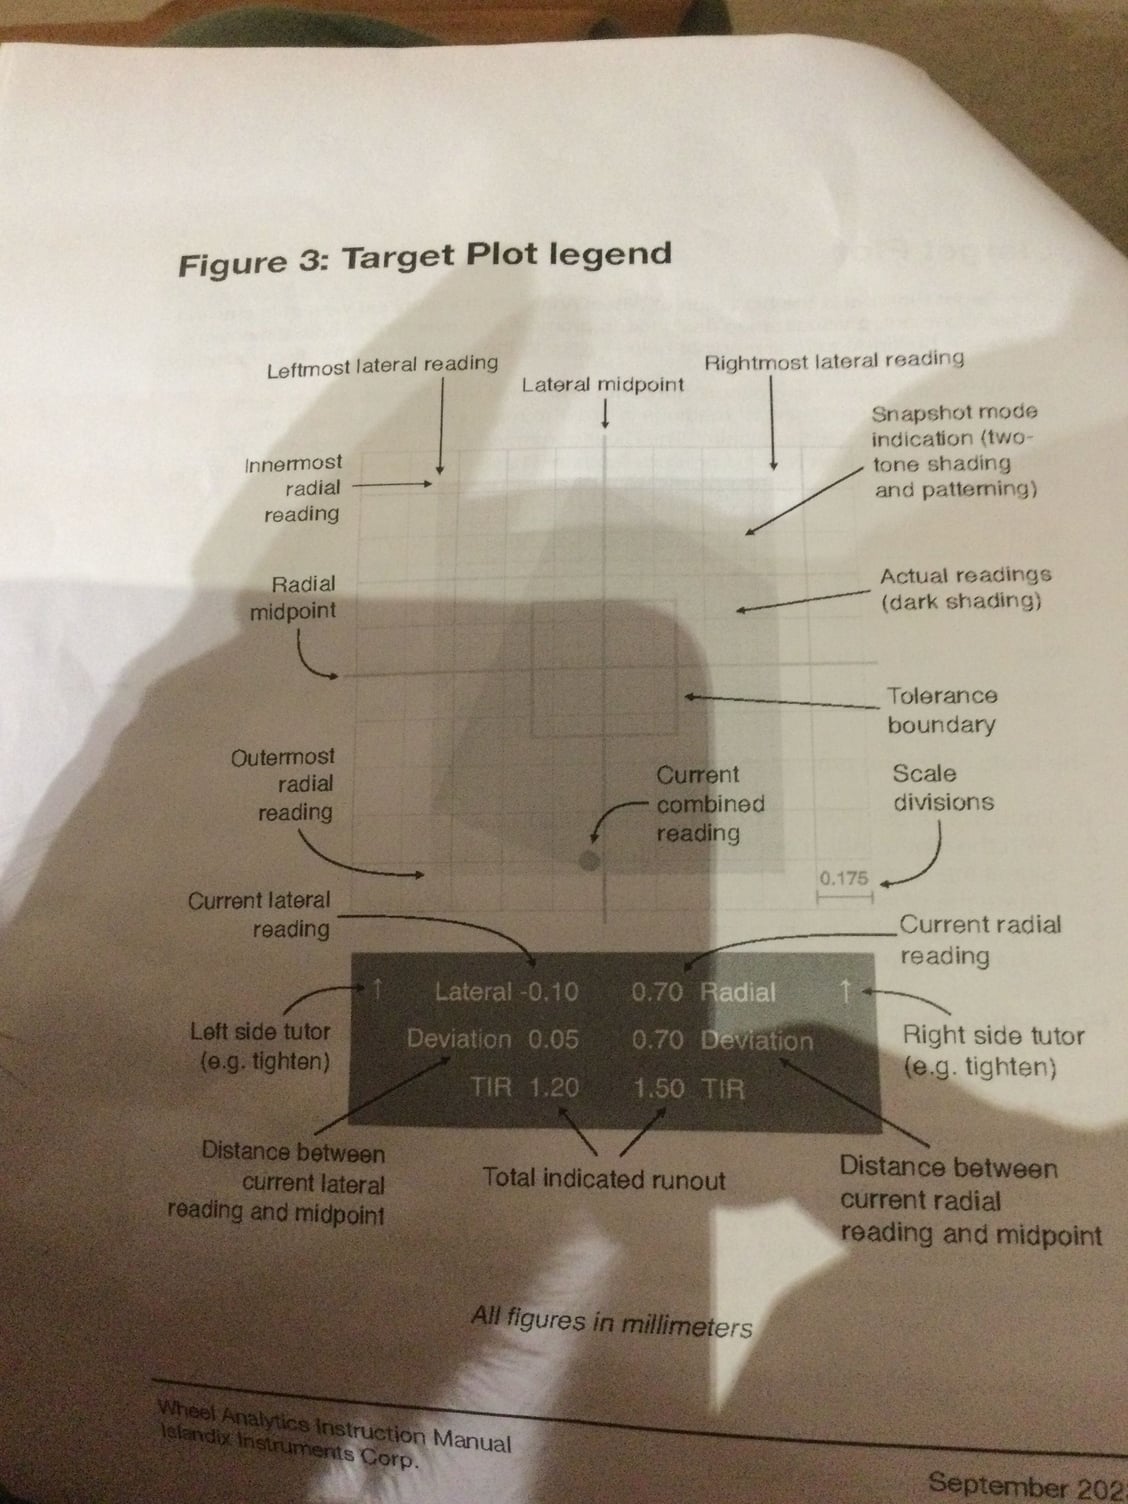
Here you can see what the numbers mean
First the Mitutoyo indicators. I guessed a 50mm extension would be required for the radial indicator to be within its mid-point of measurement (5-6mm of 12.7mm) on the rim wall when the radial indicator was in position on the rim. I didn’t take in the head measurement depth which is 5mm, so after fitting a 45mm extension it is spot on.
I found the spring force in the radial indicator was a little weak (maybe because it is second hand, a new internal spring is only �3-4, so an option to try at a later date) in the upside down position and asked Mitutoyo if they supplied an uprated spring. They only do such a spring for the 25mm travel indicators, so I got some 10mm heating plastic pipe and weak springs and played around. Must say, very happy with the result. Before occasionally it was weak to return to zero, but now very positive without any excess force to push down.
I had a wheel I built up previously, that was pretty good so popped it in. It is hard to trust a screen, but I have the feeling that when I do it will be very quick to dial it in. I will have a play tomorrow and report back, but I need to build a wheel from scratch to get the real feel for it. I have a set waiting to build but just waiting something in the post before I start.
Note lateral roller not in position
Lateral roller where it should be and radial in mid measuring movement
45+5mm
Screen shot
Here you can see what the numbers mean
01-09-24 | 06:13 PM
#28

aged to perfection

Joined: Jun 2009
Posts: 2,242
Likes: 1,660
From: PacNW
Bikes: Dinucci Allez 2.0, Richard Sachs, Alex Singer, Serotta, Masi GC, Raleigh Pro Mk.1, Hetchins, etc
Wow that is so cool !
thanks for posting the pics.
what are your comments - does it seem easy to use ?
/markp
thanks for posting the pics.
what are your comments - does it seem easy to use ?
/markp
01-10-24 | 10:23 AM
#29

Senior member

Joined: Oct 2004
Posts: 8,380
Likes: 915
From: Oakville Ontario
Been busy today, but have managed to get the Islandix up and running. Quite easy for a dinosaur to do.
First the Mitutoyo indicators. I guessed a 50mm extension would be required for the radial indicator to be within its mid-point of measurement (5-6mm of 12.7mm) on the rim wall when the radial indicator was in position on the rim. I didn�t take in the head measurement depth which is 5mm, so after fitting a 45mm extension it is spot on.
I found the spring force in the radial indicator was a little weak (maybe because it is second hand, a new internal spring is only �3-4, so an option to try at a later date) in the upside down position and asked Mitutoyo if they supplied an uprated spring. They only do such a spring for the 25mm travel indicators, so I got some 10mm heating plastic pipe and weak springs and played around. Must say, very happy with the result. Before occasionally it was weak to return to zero, but now very positive without any excess force to push down.
I had a wheel I built up previously, that was pretty good so popped it in. It is hard to trust a screen, but I have the feeling that when I do it will be very quick to dial it in. I will have a play tomorrow and report back, but I need to build a wheel from scratch to get the real feel for it. I have a set waiting to build but just waiting something in the post before I start.
Note lateral roller not in position
Lateral roller where it should be and radial in mid measuring movement
45+5mm
Screen shot
Here you can see what the numbers mean
01-10-24 | 11:05 AM
#30
aged to perfection
Joined: Jun 2009
Posts: 2,242
Likes: 1,660
From: PacNW
Bikes: Dinucci Allez 2.0, Richard Sachs, Alex Singer, Serotta, Masi GC, Raleigh Pro Mk.1, Hetchins, etc
What this thing purports to be able to do is show you the simultaneous runout in both radial and lateral dimensions
so with practice you can identify the ONE SINGLE SPOKE that will affect both dimensions. And that spoke will be a tension outlier
Ric Hjertberg (Wheel Fanatyk) spends quite a lot of time in his wheelbuilding class discussing this exact phenomenon. It is truly the next quantum leap in wheel building and for automated systems, it is the key to tension uniformity and speed of production.
/markp
01-10-24 | 12:32 PM
#31

I don't know.
Joined: May 2003
Posts: 2,370
Likes: 1,233
From: South Meriden, CT
Bikes: '90 B'stone RB-1, '92 B'stone RB-2, '89 SuperGo Access Comp, '03 Access 69er, '23 Trek 520, '14 Ritchey Road Logic, '09 Kestrel Evoke, '08 Windsor Tourist, '17 Surly Wednesday, '89 Centurion Accordo, '15 CruX, '17 Ridley X-Night, '89 Marinoni
to the OP, that's a nice mod. A friend did a similar mod to his, and he routered more cups into the base he added.
01-10-24 | 02:14 PM
#32
Senior member
Joined: Oct 2004
Posts: 8,380
Likes: 915
From: Oakville Ontario
you might be surprised.
What this thing purports to be able to do is show you the simultaneous runout in both radial and lateral dimensions
so with practice you can identify the ONE SINGLE SPOKE that will affect both dimensions. And that spoke will be a tension outlier
Ric Hjertberg (Wheel Fanatyk) spends quite a lot of time in his wheelbuilding class discussing this exact phenomenon. It is truly the next quantum leap in wheel building and for automated systems, it is the key to tension uniformity and speed of production.
/markp
One application where I could see a benefit of the gauges is when building with carbon rims with a high gloss finish. I build a lot of carbon wheels but most of them are Matt finish. The glossy ones can make watching the gap more difficult.
My ear is pretty well attuned to pick out tension outliers by plucking the spokes but I can see the benefit of monitoring both radial and lateral simultaneously.
01-10-24 | 05:49 PM
#33
Thread Starter
Senior Member
Joined: Oct 2022
Posts: 630
Likes: 466
From: UK, New Forest
Bikes: 1948-49 Allin SB Long Term Resto 1948 Raleigh Lenton Clubman Frame Project 1950 Raleigh Clubman Frame Project 1951 Claud Butler New Allrounder Frame Project 1959 Claud Butler European 1977 Motob�cane C4 1977 Carlton Clubman 1980 Gitane Sprint
Well, got to play this afternoon with a rim that is an absolute pain to get right. It’s a circa 1976 nos ambrosio Montreal. See quote from velo-pages below.
“Very bad! They became rare because they failed. The eyelets don't stand the spoke tension.Even without riding, they can fail”
I built them for my ‘77 Motorbecane c4, but decided on some high flange Normandy Luxe, they are my tester wheels now, a sort of self-flagellation with spokes when I think I’m great, lol! One wrong move and they start an uncontrollable reaction…..anyway, I digress.
I started to feel a strange yearning for my analogue dials, as if It was somehow cheating, chasing a dot on a screen! Then I remembered the Villum that a lot of the bike manufacturers used (not as easy to move around mind!) and felt a lot better!
See https://hollandmechanics.com/bicycle-wheel/villum/
I tried just following the arrows to see where that took me, I tried a kyudo type approach. The rim didn’t pretzel. Hmm, stop think about what the chart is telling me, go again, and again, loosen a random few off and try again. Once you start to digest the information on the screen you start seeing what is happening at individual spokes. One remarkable thing is how easy the radial shape came, (because you update the reading when you like) that was a big surprise. 0.2-0.3mm runout on radial, lateral and dish came quite quickly, I was trying to chase for more but the weld on that rim said enough!
I now have more information for my brain to process, you realise it does not replace any skills you have it, just gives you more information to get you to where you want to go faster. It is strange you automatically keep looking at the gauges to start with but get used to watching the screen. I found this much easier to see for a longer period, less eye strain.
The wheel dish works really well, and easy to use. I noticed that the spoke tension was all within 1-2 marks on a park tool tm-1 that I am using, just from keeping the lateral and radial where it should. I seriouslywant need a digital tension meter so I can link in to the tension program that comes with it.
I have a pair of wheels to build next with 14/15db on drive and 15/16db for all the rest. I would have started them by now but I am waiting for a new de-burring tool for the holes I want to try on the rim before I lace it up. I am looking forward to using this system from a scratch build and will hopefully have more detail to write up. Seriously, I am impressed and relived it still requires a human to think about what they are doing to achieve a good result. I think those analogues are going to get dusty.
Dam, got to go to bed!
ciao.
“Very bad! They became rare because they failed. The eyelets don't stand the spoke tension.Even without riding, they can fail”
I built them for my ‘77 Motorbecane c4, but decided on some high flange Normandy Luxe, they are my tester wheels now, a sort of self-flagellation with spokes when I think I’m great, lol! One wrong move and they start an uncontrollable reaction…..anyway, I digress.
I started to feel a strange yearning for my analogue dials, as if It was somehow cheating, chasing a dot on a screen! Then I remembered the Villum that a lot of the bike manufacturers used (not as easy to move around mind!) and felt a lot better!
See https://hollandmechanics.com/bicycle-wheel/villum/
I tried just following the arrows to see where that took me, I tried a kyudo type approach. The rim didn’t pretzel. Hmm, stop think about what the chart is telling me, go again, and again, loosen a random few off and try again. Once you start to digest the information on the screen you start seeing what is happening at individual spokes. One remarkable thing is how easy the radial shape came, (because you update the reading when you like) that was a big surprise. 0.2-0.3mm runout on radial, lateral and dish came quite quickly, I was trying to chase for more but the weld on that rim said enough!
I now have more information for my brain to process, you realise it does not replace any skills you have it, just gives you more information to get you to where you want to go faster. It is strange you automatically keep looking at the gauges to start with but get used to watching the screen. I found this much easier to see for a longer period, less eye strain.
The wheel dish works really well, and easy to use. I noticed that the spoke tension was all within 1-2 marks on a park tool tm-1 that I am using, just from keeping the lateral and radial where it should. I seriously
I have a pair of wheels to build next with 14/15db on drive and 15/16db for all the rest. I would have started them by now but I am waiting for a new de-burring tool for the holes I want to try on the rim before I lace it up. I am looking forward to using this system from a scratch build and will hopefully have more detail to write up. Seriously, I am impressed and relived it still requires a human to think about what they are doing to achieve a good result. I think those analogues are going to get dusty.
Dam, got to go to bed!
ciao.
Last edited by awac; 01-11-24 at 03:22 AM.
01-11-24 | 03:06 AM
#34
Thread Starter
Senior Member
Joined: Oct 2022
Posts: 630
Likes: 466
From: UK, New Forest
Bikes: 1948-49 Allin SB Long Term Resto 1948 Raleigh Lenton Clubman Frame Project 1950 Raleigh Clubman Frame Project 1951 Claud Butler New Allrounder Frame Project 1959 Claud Butler European 1977 Motob�cane C4 1977 Carlton Clubman 1980 Gitane Sprint
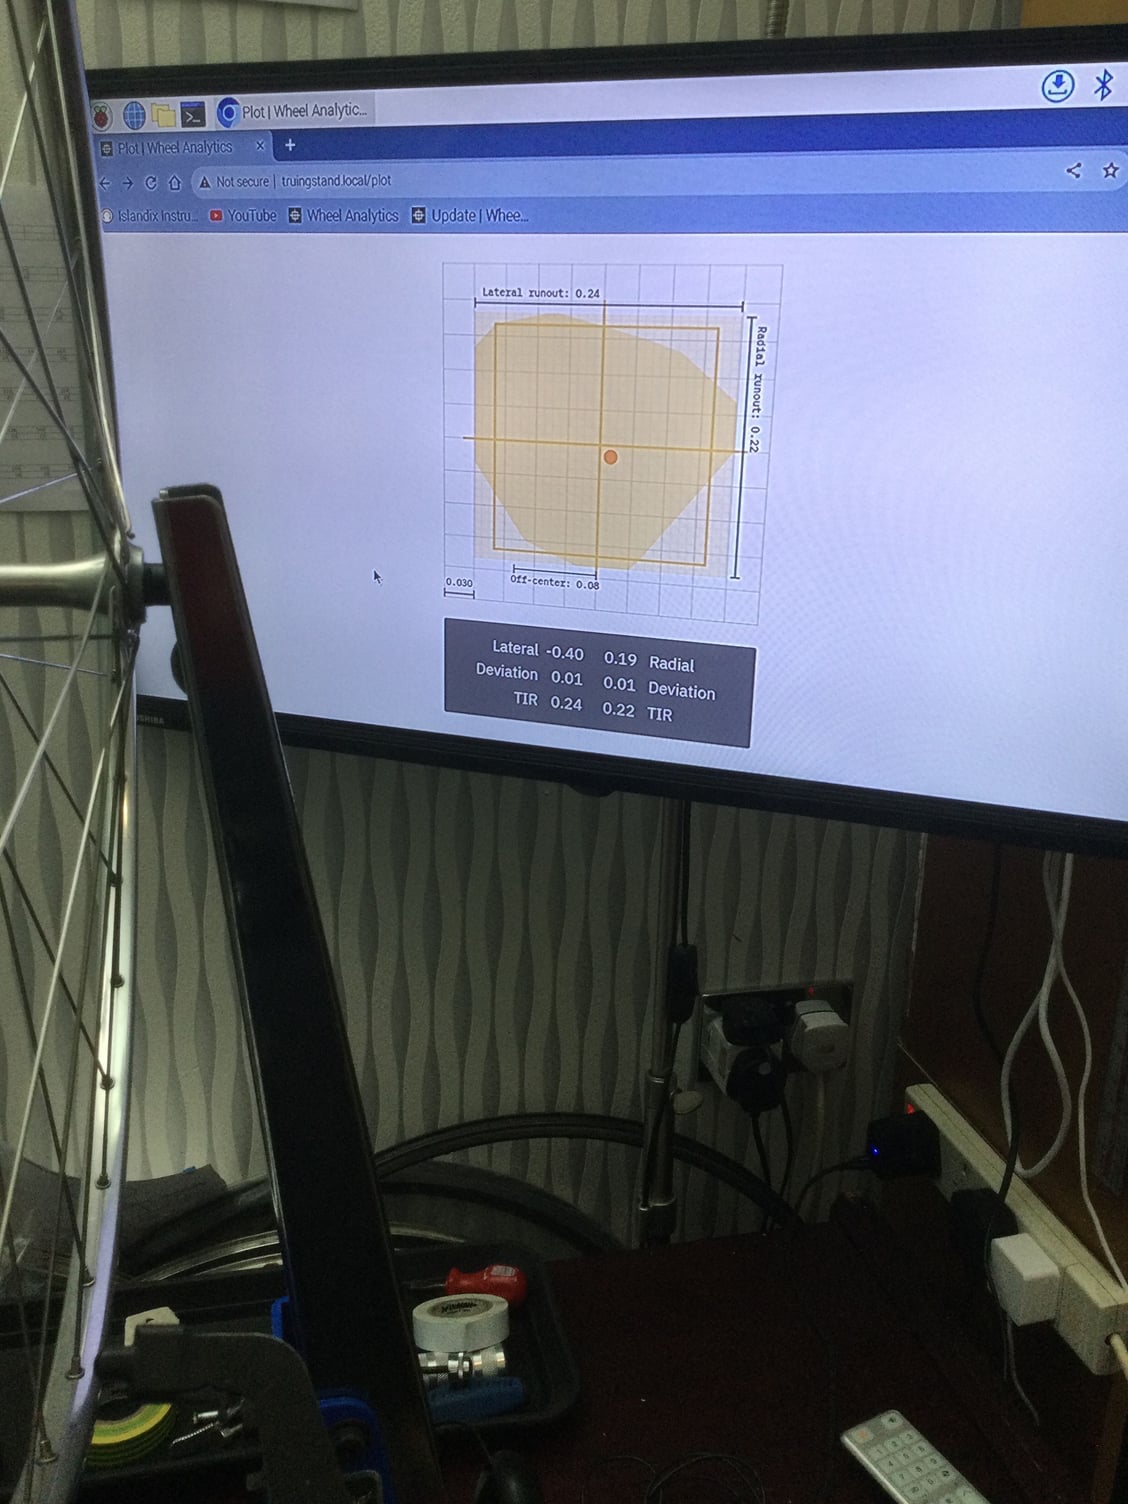
Work in progress
Picture during truing. It gives you an idea of the information it is feeding back to you.
you might be surprised.
What this thing purports to be able to do is show you the simultaneous runout in both radial and lateral dimensions
so with practice you can identify the ONE SINGLE SPOKE that will affect both dimensions. And that spoke will be a tension outlier
Ric Hjertberg (Wheel Fanatyk) spends quite a lot of time in his wheelbuilding class discussing this exact phenomenon. It is truly the next quantum leap in wheel building and for automated systems, it is the key to tension uniformity and speed of production.
/markp
What this thing purports to be able to do is show you the simultaneous runout in both radial and lateral dimensions
so with practice you can identify the ONE SINGLE SPOKE that will affect both dimensions. And that spoke will be a tension outlier
Ric Hjertberg (Wheel Fanatyk) spends quite a lot of time in his wheelbuilding class discussing this exact phenomenon. It is truly the next quantum leap in wheel building and for automated systems, it is the key to tension uniformity and speed of production.
/markp
Last edited by awac; 01-11-24 at 03:13 AM.
01-11-24 | 08:14 AM
#35
Thread Starter
Senior Member
Joined: Oct 2022
Posts: 630
Likes: 466
From: UK, New Forest
Bikes: 1948-49 Allin SB Long Term Resto 1948 Raleigh Lenton Clubman Frame Project 1950 Raleigh Clubman Frame Project 1951 Claud Butler New Allrounder Frame Project 1959 Claud Butler European 1977 Motob�cane C4 1977 Carlton Clubman 1980 Gitane Sprint
Any chance of a photo of your friends base?
01-12-24 | 08:49 AM
#36
Thread Starter
Senior Member
Joined: Oct 2022
Posts: 630
Likes: 466
From: UK, New Forest
Bikes: 1948-49 Allin SB Long Term Resto 1948 Raleigh Lenton Clubman Frame Project 1950 Raleigh Clubman Frame Project 1951 Claud Butler New Allrounder Frame Project 1959 Claud Butler European 1977 Motob�cane C4 1977 Carlton Clubman 1980 Gitane Sprint
Look at the scale
ok, had a quick go before work this morning (I was late btw), and quickly pulled this together. I couldn’t quite put my finger on it before today, but it is all to do with scale. I know how much to move the nipple key to get the desired movement on the analogue dials, it’s automatic. The tv screen is big and I think I was ever so slightly over compensating my movement. The distances are small, the screen is big!
(This reminds me of an episode of “Father Ted” when he is trying to explain to Dougal that cows in the distance and cows near are the same size and it’s called “perspective”. If you have never seen this comedy series do yourself a favour and watch it. It was made by channel 4 uk and called “Father Ted” funnily enough!).
I have set the box to 0.2mm, the shading is the movement outside of this, most of this is the joint. When the dot is in a quarter of the box it will either be to low/high and/or right/left. You know if the spoke is too tight or loose, and can make a slight adjustment and quickly see the effect it is having on its neighbour's just by its position.
In short you need to calibrate yourself and then it all comes together. Marvellous.
01-12-24 | 09:16 AM
#37
Senior Member

Joined: Feb 2012
Posts: 19,381
Likes: 5,528
From: Rochester, NY
Bikes: Stewart S&S coupled sport tourer, Stewart Sunday light, Stewart Commuting, Stewart Touring, Co Motion Tandem, Stewart 3-Spd, Stewart Track, Fuji Finest, Mongoose Tomac ATB, GT Bravado ATB, JCP Folder, Stewart 650B ATB
Am I correct in that the only aspect being measured is the rim's location? No actual spoke tension readout? Andy
__________________
AndrewRStewart
AndrewRStewart
01-12-24 | 12:47 PM
#38
Thread Starter
Senior Member
Joined: Oct 2022
Posts: 630
Likes: 466
From: UK, New Forest
Bikes: 1948-49 Allin SB Long Term Resto 1948 Raleigh Lenton Clubman Frame Project 1950 Raleigh Clubman Frame Project 1951 Claud Butler New Allrounder Frame Project 1959 Claud Butler European 1977 Motob�cane C4 1977 Carlton Clubman 1980 Gitane Sprint
It might take more effort if you are not pulling it up equally as you lace the wheel, as you should do. It also includes a spoke tension software so you can plug in a mitutoyo compatible tensionmeter and gives you a readout. I have a spare gauge but need the frame for it. Islandix give details how to convert a cheap generic one which I might do because I am missing out if I have the software built in!
01-12-24 | 03:57 PM
#39
Senior Member
Joined: Feb 2012
Posts: 19,381
Likes: 5,528
From: Rochester, NY
Bikes: Stewart S&S coupled sport tourer, Stewart Sunday light, Stewart Commuting, Stewart Touring, Co Motion Tandem, Stewart 3-Spd, Stewart Track, Fuji Finest, Mongoose Tomac ATB, GT Bravado ATB, JCP Folder, Stewart 650B ATB
The reason I ask is I wonder about tension issues when relying on rim true only, especially working on "well used" wheels. No surprise about the seam having significant hop though. Andy
__________________
AndrewRStewart
AndrewRStewart
01-12-24 | 04:52 PM
#40
Thread Starter
Senior Member
Joined: Oct 2022
Posts: 630
Likes: 466
From: UK, New Forest
Bikes: 1948-49 Allin SB Long Term Resto 1948 Raleigh Lenton Clubman Frame Project 1950 Raleigh Clubman Frame Project 1951 Claud Butler New Allrounder Frame Project 1959 Claud Butler European 1977 Motob�cane C4 1977 Carlton Clubman 1980 Gitane Sprint
I loosened all the spokes off and found it gave wonderful feedback. I then went around with the park tool tm-1 and was only 1-2 marks off on average, very impressed. I need to get the digital tension meter! Mark
01-12-24 | 09:37 PM
#41

Full Member
Joined: Sep 2015
Posts: 340
Likes: 72
From: Denver Colorado
Bikes: 2020 Pivot Vault, 1983 Rossin Record, Garneau R1, Mesamods home built gravel/rain commuter bike, 1995 Barracuda A2V modified with Surley single speed dropouts, 1969 Bottecchia junkyard special fixed gear, Cervelo P4, Mesamods 650b klunker
The best mod I've made was updating my Park TS-2 to the later main shaft/bearings and current calipers.
01-13-24 | 03:36 AM
#42
Thread Starter
Senior Member
Joined: Oct 2022
Posts: 630
Likes: 466
From: UK, New Forest
Bikes: 1948-49 Allin SB Long Term Resto 1948 Raleigh Lenton Clubman Frame Project 1950 Raleigh Clubman Frame Project 1951 Claud Butler New Allrounder Frame Project 1959 Claud Butler European 1977 Motob�cane C4 1977 Carlton Clubman 1980 Gitane Sprint
The best mod I've made was updating my Park TS-2 to the later main shaft/bearings and current calipers.https://www.youtube.com/watch?v=VheCYE8-i_Q
Edit.
Sorry, for whatever reason the link didn’t appear when I wrote the above, but the video has just appeared! Will watch it!
01-27-24 | 10:13 AM
#43

Senior Member
Joined: Feb 2016
Posts: 670
Likes: 344
From: Olympic Peninsula, WA
Bikes: '8? Ciocc Mockba 80, '82 Ron Cooper, '84 Allez, '86 Tommasini Racing, '86? Klein Quantum, '87 Ciocc Designer 84, '95 Trek 5500, '98 Litespeed Classic, '98 S-Works Mtb, 2017 Storck TIX
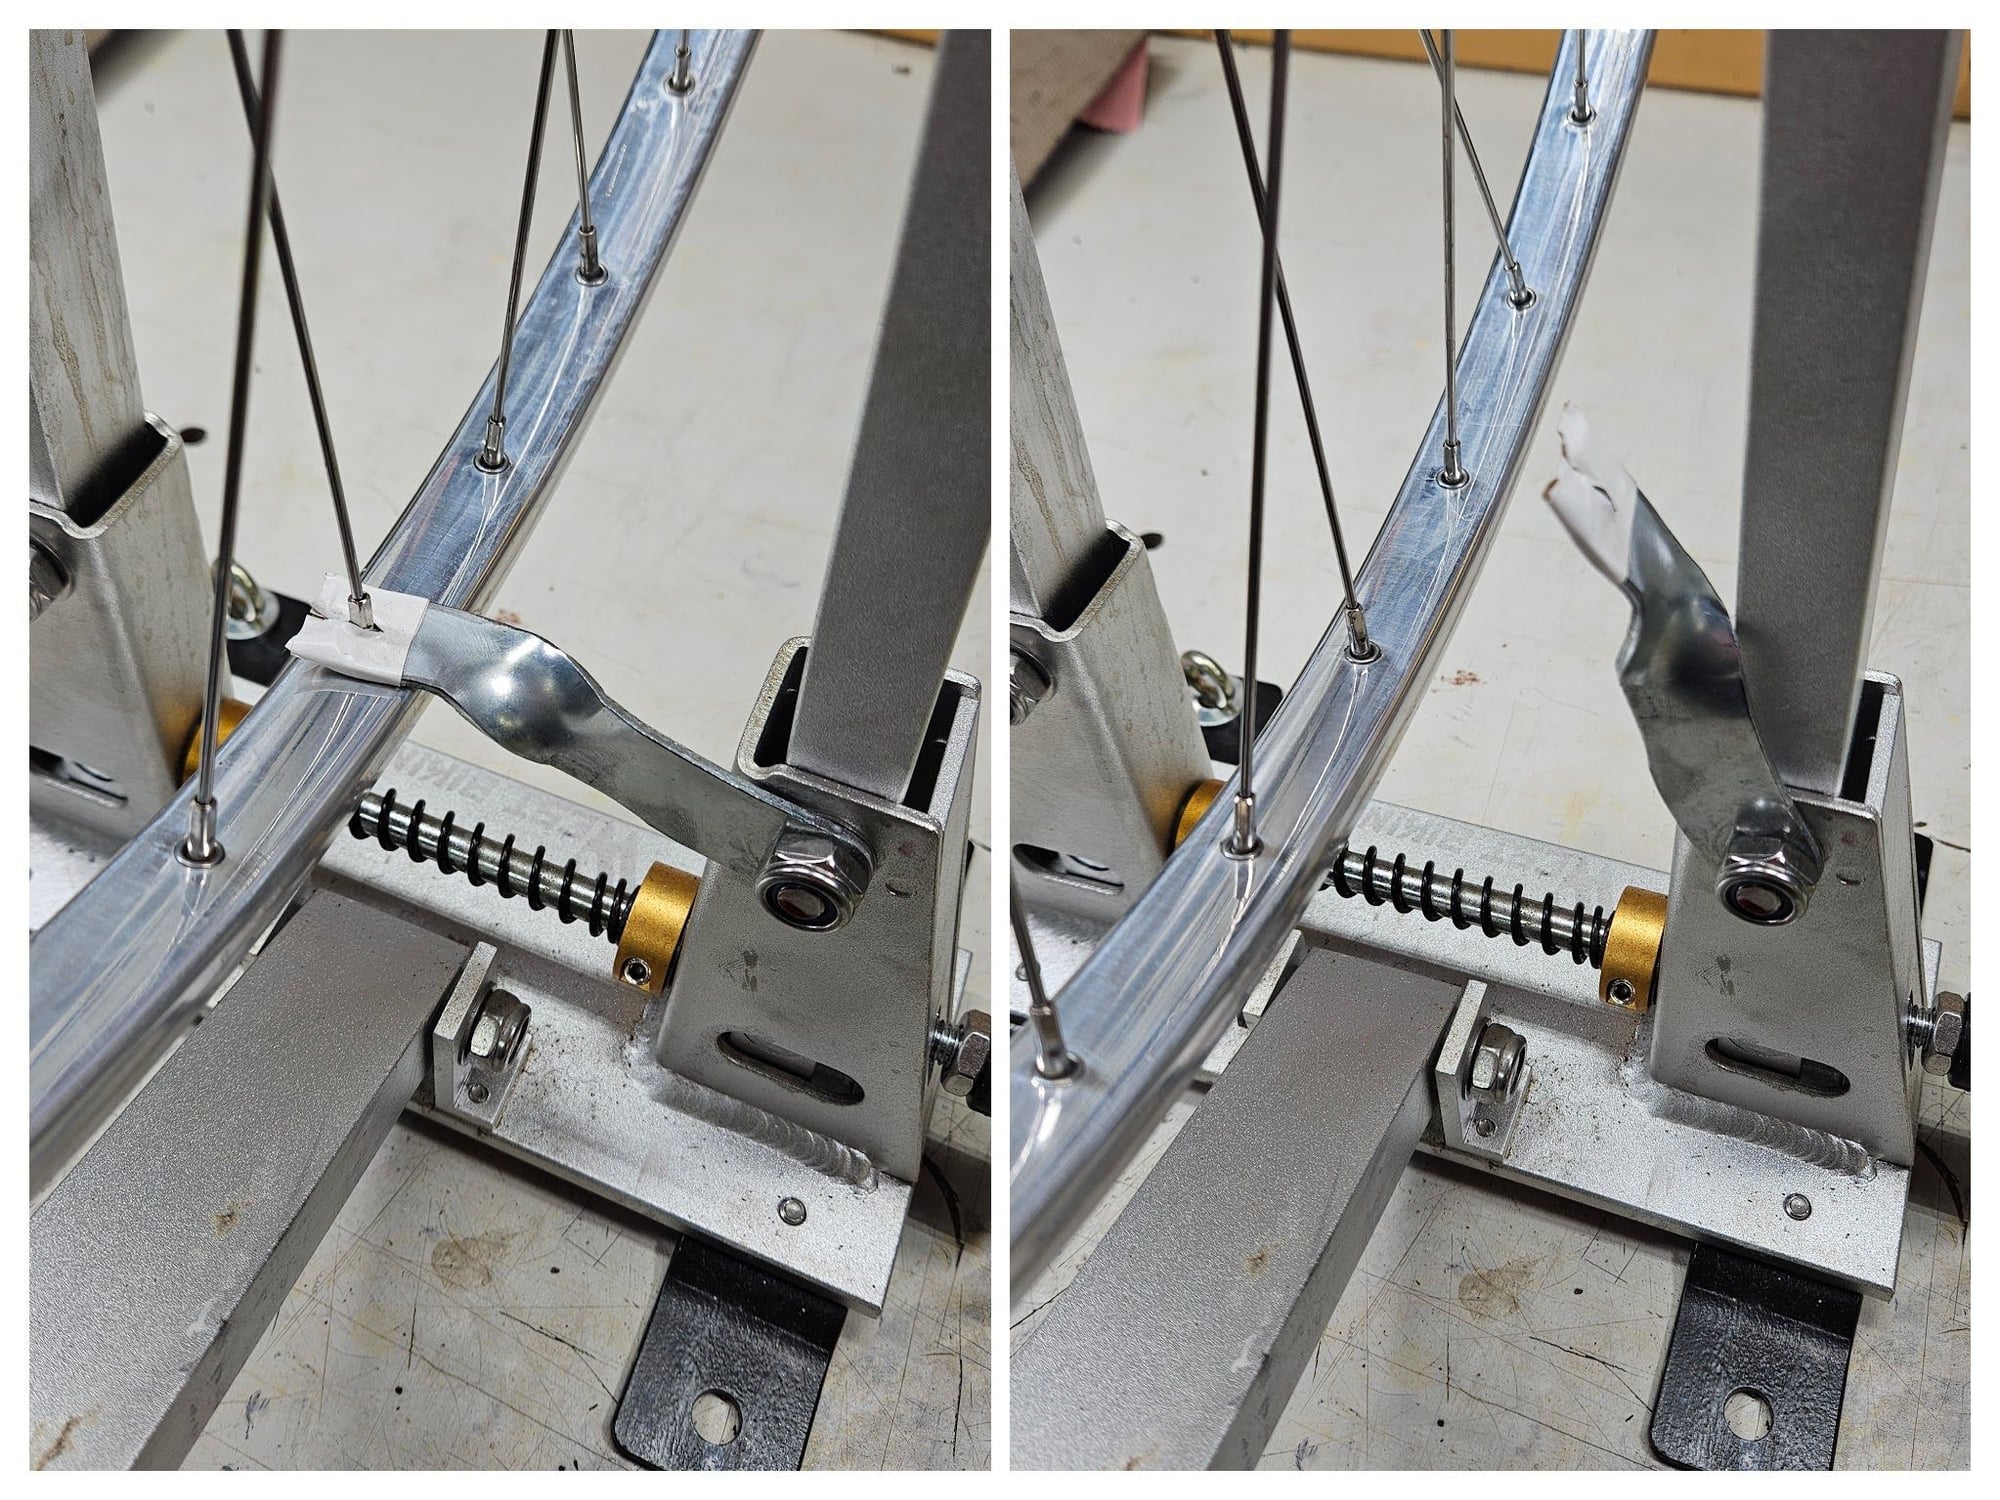
Post #41 of this thread inspired me to upgrade my ancient TS-2 with roller thrust bearings. There was nothing wrong with the original shaft or the plastic bushings, so these parts were reused. I purchased two roller thrust bearings, four washers, and the split shaft collars on Amazon. Total outlay was ~$16. The spring came from one of my bins. See these parts in the pic below. Width adjustment of the uprights is now silky smooth. Certainly no change to the quality of my wheel builds, but the stand feels better in my hands.
Dean
 E6614097-D29B-4BEB-B644-6377829CE021
Dean
E6614097-D29B-4BEB-B644-6377829CE021
__________________
Roll Me Up and Smoke Me When I Die
Roll Me Up and Smoke Me When I Die
03-14-24 | 08:00 AM
#44
Thread Starter
Senior Member
Joined: Oct 2022
Posts: 630
Likes: 466
From: UK, New Forest
Bikes: 1948-49 Allin SB Long Term Resto 1948 Raleigh Lenton Clubman Frame Project 1950 Raleigh Clubman Frame Project 1951 Claud Butler New Allrounder Frame Project 1959 Claud Butler European 1977 Motob�cane C4 1977 Carlton Clubman 1980 Gitane Sprint
From a post by SharpByCoop called “Wheel stand lock for polishing”. Just wanted to copy onto my post so I don’t lose this simple great idea of a truing stand modification. When I get called for dinner I use a peg on a spoke, I could see this being very handy to keep where you are in a build. Good one SBC.
“Wheel stand 'lock' for polishingI'm doing a bunch of refurbishing of wheels and rims. Polishing them yeilds SUCH great results. You will agree.
I found it hard to polish rims on my stand. When I used the cloth I want to pull it 3/4 around the spoke, and it made me shoulder it to stabilize. Messy and imperfect.
So I created a little arm which pivots and captures the spoke. I wrapped it with some electrical tape to prevent rattling and scratches. Not ideal, but it works.
Do a couple of sections, lift, rotate, lock in. Repeat.
I'll just say this was a game changer for me. I'm sharing because it was so simple and effective.
Coop”
08-26-25 | 11:59 AM
#45
Thread Starter
Senior Member
Joined: Oct 2022
Posts: 630
Likes: 466
From: UK, New Forest
Bikes: 1948-49 Allin SB Long Term Resto 1948 Raleigh Lenton Clubman Frame Project 1950 Raleigh Clubman Frame Project 1951 Claud Butler New Allrounder Frame Project 1959 Claud Butler European 1977 Motob�cane C4 1977 Carlton Clubman 1980 Gitane Sprint
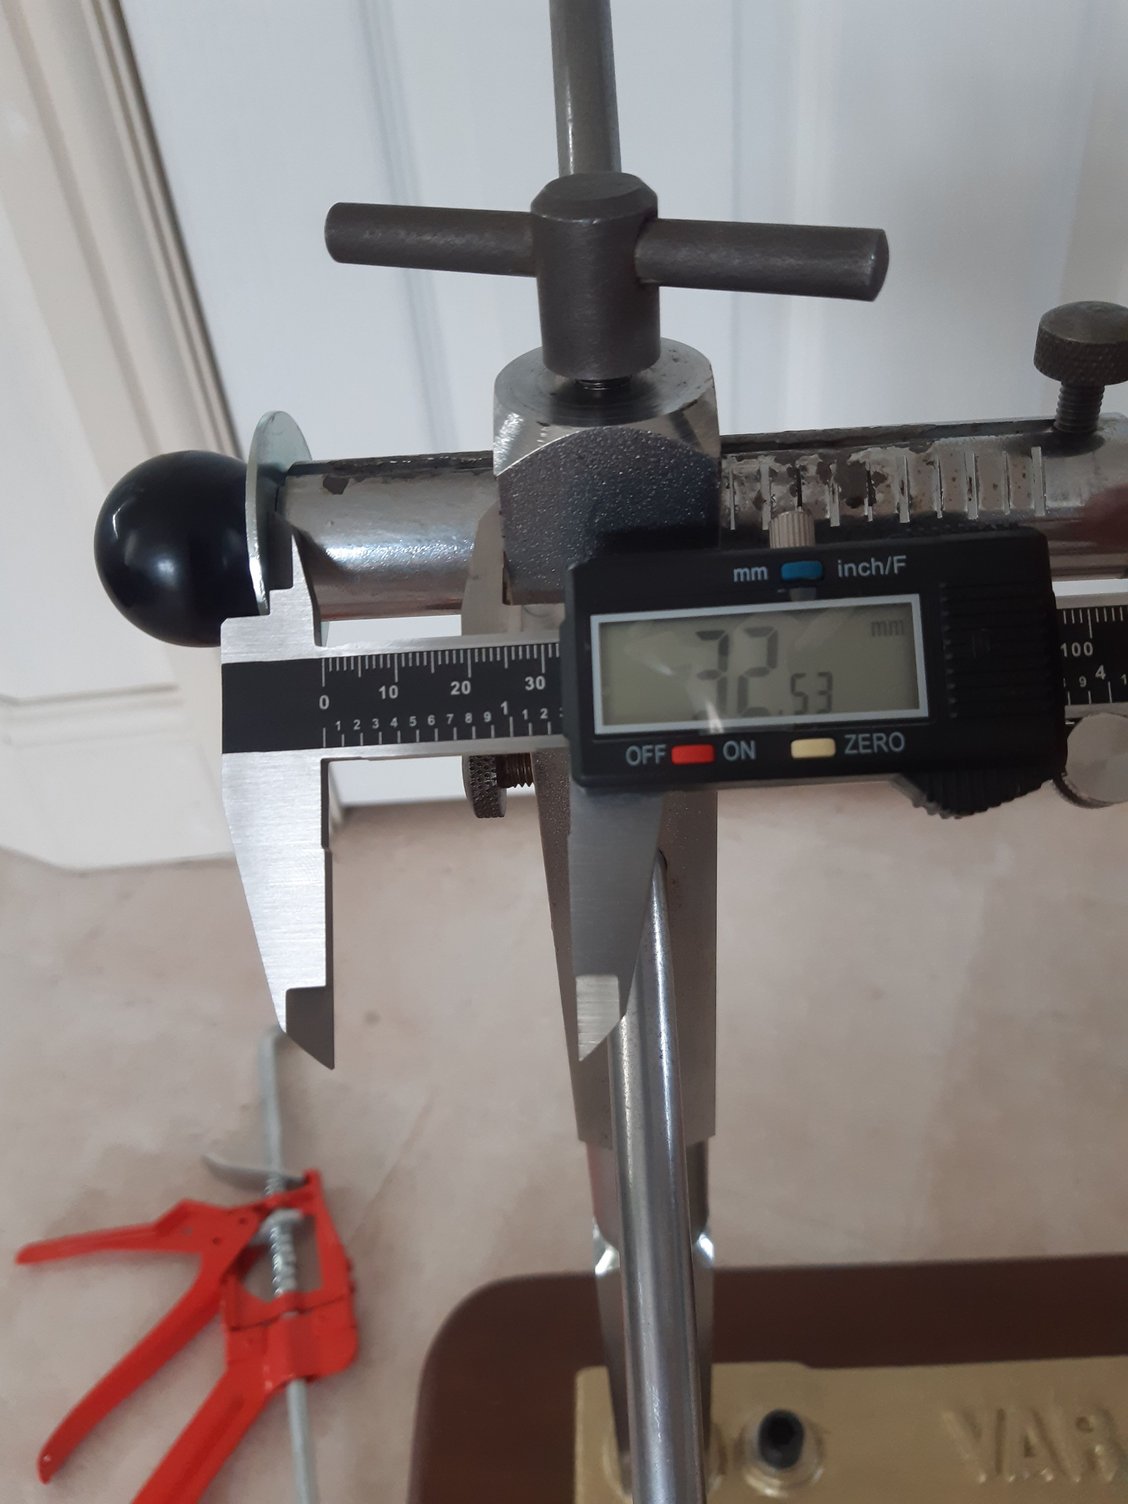
Not long got a VAR 74 because it came up at the right price and long wanted to try one. It is different from the Park Tool (which I still love, and quite honestly is my go to) and operates more like the DT Swiss stand. I will try and fit the Islandix gauges on it at a later stage so I can compare a stand with moving parts and one that you centre yourself each time for micro adjustment.
Cleaned it up a little and made a wood clamp down stand. Really want to strip the chrome off the hub holders, chemical black and paint the notches white (I seem to see a black background better than a white one with watches so think that will better for me to see the notches easier).
The "modification" is two washers. Please excuse if this has been done before!
*Edit, I was overthink it before. Slide one side all in, put the hub in, snug the other up and measure (which the washers help with a positive edge), now divide by two and set. The hub is now sitting in the centre of the uprights. The radial/lateral gauge/ruler is held very securely by two circlips. Once you centre that, it should stay put.*
Last edited by awac; 08-28-25 at 01:40 PM. Reason: Overthinking

 05-16-26 | 01:04 PM
#47
Thread Starter
Senior Member
Joined: Oct 2022
Posts: 630
Likes: 466
From: UK, New Forest
Bikes: 1948-49 Allin SB Long Term Resto 1948 Raleigh Lenton Clubman Frame Project 1950 Raleigh Clubman Frame Project 1951 Claud Butler New Allrounder Frame Project 1959 Claud Butler European 1977 Motob�cane C4 1977 Carlton Clubman 1980 Gitane Sprint
I have to know. Has anybody got or used one of these? How advanced it must have seemed for 1980, but did it work?!

Taken from the VAR catalogue on Sheldon Browns site.
Taken from the VAR catalogue on Sheldon Browns site.
05-20-26 | 02:22 AM
#48
Bergz
Joined: Dec 2022
Posts: 152
Likes: 754
Bikes: Woodrup, Avanti, no-name
05-20-26 | 12:26 PM
#49
Thread Starter
Senior Member
Joined: Oct 2022
Posts: 630
Likes: 466
From: UK, New Forest
Bikes: 1948-49 Allin SB Long Term Resto 1948 Raleigh Lenton Clubman Frame Project 1950 Raleigh Clubman Frame Project 1951 Claud Butler New Allrounder Frame Project 1959 Claud Butler European 1977 Motob�cane C4 1977 Carlton Clubman 1980 Gitane Sprint
