


shimano crank dust cap removal
 10-17-23, 10:12 PM
#1
Newbie
Thread Starter
shimano crank dust cap removal
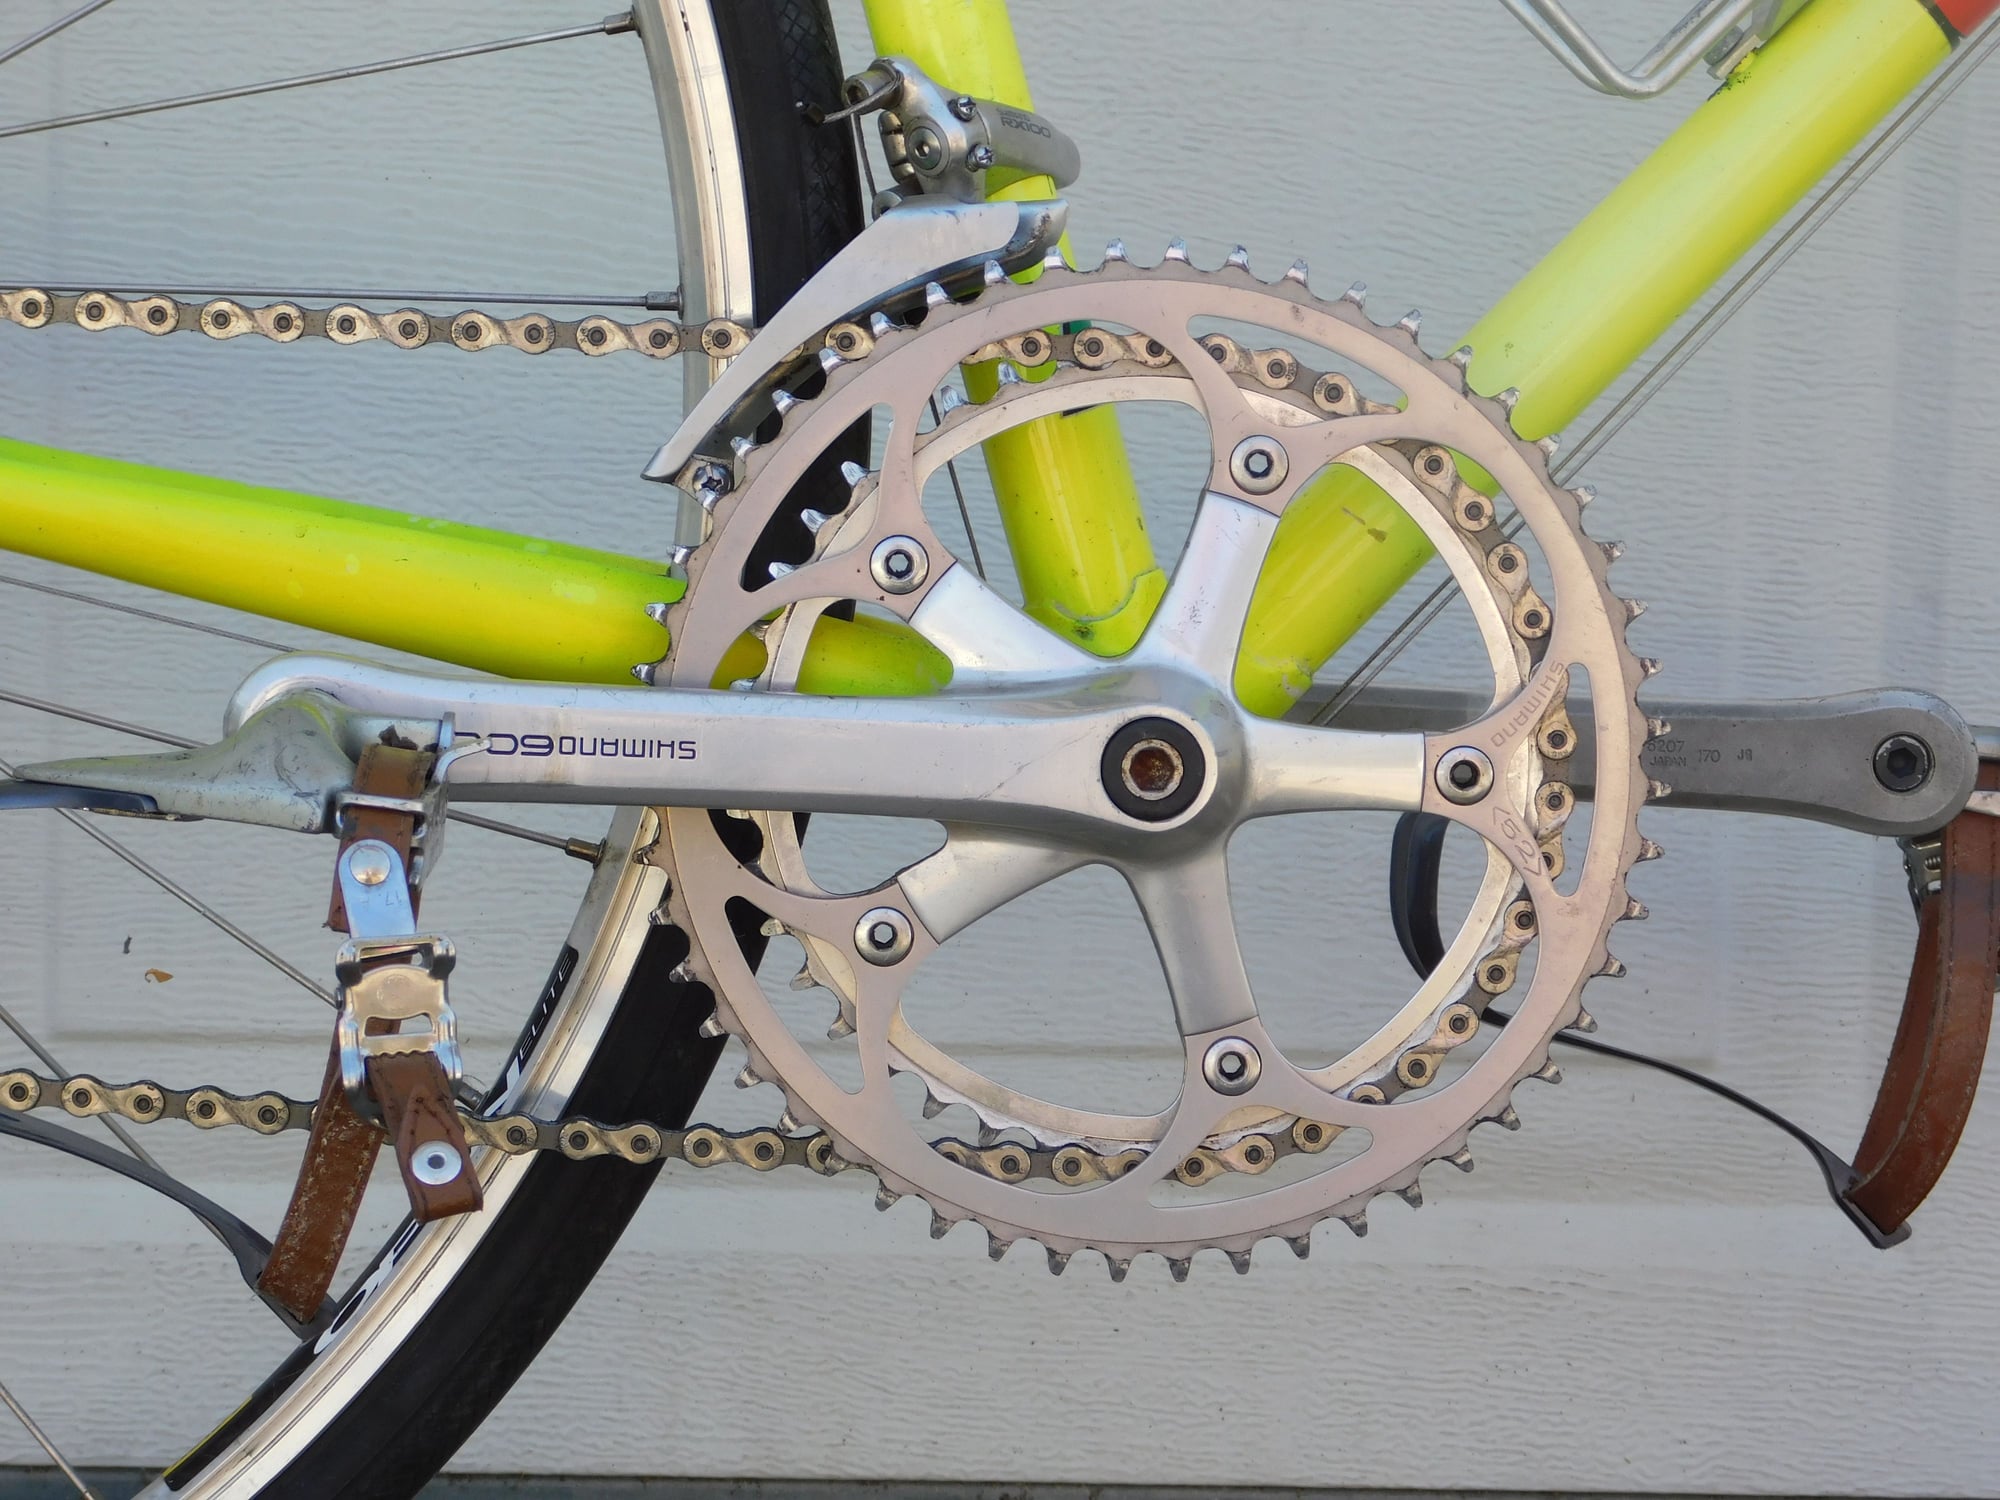
I have crank dust caps on a recently acquired bike that I can't see how to remove. They are part of a Shimano golden arrow crank set and they appear to have a hex fitting in the middle but 5mm is too small and 5.5mm is too large. Do these require a special tool?
I had a nice photo ready to attach but I haven't reached the 10 post level. Sorry.
I had a nice photo ready to attach but I haven't reached the 10 post level. Sorry.

 10-17-23, 10:24 PM
#3

Senior Member
Join Date: Apr 2011
Posts: 7,082
Mentioned: 41 Post(s)
Tagged: 0 Thread(s)
Quoted: 4418 Post(s)
Liked 1,569 Times
in
1,031 Posts
I don't believe that is the original cover. That crank had 6mm self extracting bolts.
I would try imperial size allens or torx to get it out. It is low torque. Don't put it back in - something is rounded out with it.
I would try imperial size allens or torx to get it out. It is low torque. Don't put it back in - something is rounded out with it.
Likes For Kontact:
10-18-23, 04:49 AM
#4
Newbie
Thread Starter
Okay. The few that I saw for sale on ebay showed the "hex" hole going all the way through the cap which I think would defeat the purpose of having a cap. All appear to have been distorted a bit by a tool or is not an actual "hex".
Thanks.
Thanks.
10-18-23, 07:02 AM
#5
Senior Member
Join Date: Jan 2013
Posts: 2,683
Bikes: too many sparkly Italians, some sweet Americans and a couple interesting Japanese
Mentioned: 10 Post(s)
Tagged: 0 Thread(s)
Quoted: 569 Post(s)
Liked 589 Times
in
412 Posts
Looks like my caps but with some damage. I would also give it some penetrant spray, PB B'laster or the like, at that age things can start coorsion/binding and cause a hex to round out.
Likes For easyupbug:
10-18-23, 07:28 AM
#6
Senior Member
Join Date: Apr 2011
Posts: 7,082
Mentioned: 41 Post(s)
Tagged: 0 Thread(s)
Quoted: 4418 Post(s)
Liked 1,569 Times
in
1,031 Posts
If you can't get it off with other size hex tools (it is clearly hex in your picture), carefully slot it with a dremel cutting tool and use a large screw driver or coin to turn it out.
Likes For Kontact:
 10-18-23, 08:34 AM
#8
I'm good to go!
Join Date: Jul 2017
Location: Mississippi
Posts: 15,002
Bikes: Tarmac Disc Comp Di2 - 2020
Mentioned: 51 Post(s)
Tagged: 0 Thread(s)
Quoted: 6199 Post(s)
Liked 4,816 Times
in
3,323 Posts
The socket for the bolt is a smaller size hex than the hex in the cover.
I'm not going to guess though what that is you have. But if there is a small hex socket visible inside that hole, it may well be self extracting. Though someone has already questioned if that is the correct cover for that. So even if it was, it may not be any longer or vice versa.
10-18-23, 09:55 AM
#9
Senior Member
Join Date: Apr 2011
Posts: 7,082
Mentioned: 41 Post(s)
Tagged: 0 Thread(s)
Quoted: 4418 Post(s)
Liked 1,569 Times
in
1,031 Posts
For self extracting crank arms, the hole is necessary because you have to be able to access the bolt that holds the crank arm on. The bolt head pushes on the "cover" as you unscrew it and pushes the arm off the spindle.
The socket for the bolt is a smaller size hex than the hex in the cover.
I'm not going to guess though what that is you have. But if there is a small hex socket visible inside that hole, it may well be self extracting. Though someone has already questioned if that is the correct cover for that. So even if it was, it may not be any longer or vice versa.
These caps are often made of soft cast aluminum or even chromed zinc, so they aren't built for much torque and get rounded out easily.
Likes For Kontact:
10-18-23, 10:02 AM
#10
I'm good to go!
Join Date: Jul 2017
Location: Mississippi
Posts: 15,002
Bikes: Tarmac Disc Comp Di2 - 2020
Mentioned: 51 Post(s)
Tagged: 0 Thread(s)
Quoted: 6199 Post(s)
Liked 4,816 Times
in
3,323 Posts
There are many pictures online of the 600ex self extracting bolts, and this is not it. Someone replaced those with a normal 14mm bolt and put an aftermarket cap on that was probably 5mm, but is now rounded out.
These caps are often made of soft cast aluminum or even chromed zinc, so they aren't built for much torque and get rounded out easily.
These caps are often made of soft cast aluminum or even chromed zinc, so they aren't built for much torque and get rounded out easily.
But I guess it does start as a jumping point for you to give further info to all. I only characterized it as "cast doubt" because I didn't have any proof at the moment, nor did I want to look for proof.
10-18-23, 10:35 AM
#11
Senior Member
Join Date: Apr 2011
Posts: 7,082
Mentioned: 41 Post(s)
Tagged: 0 Thread(s)
Quoted: 4418 Post(s)
Liked 1,569 Times
in
1,031 Posts
I didn't doubt you at all. There wasn't any need for you to explain it to me.
But I guess it does start as a jumping point for you to give further info to all. I only characterized it as "cast doubt" because I didn't have any proof at the moment, nor did I want to look for proof.
But I guess it does start as a jumping point for you to give further info to all. I only characterized it as "cast doubt" because I didn't have any proof at the moment, nor did I want to look for proof.
10-18-23, 10:51 AM
#12
Friendship is Magic

Join Date: Nov 2010
Location: Sacramento, CA
Posts: 22,985
Bikes: old ones
Mentioned: 304 Post(s)
Tagged: 0 Thread(s)
Quoted: 26427 Post(s)
Liked 10,383 Times
in
7,211 Posts
.
...when the hex in those gets rounded out like that (not uncommon), the simplest method of extraction is to drill a couple of small holes in the cap, and employ and adjustable pin spanner. But these caps have a long history of getting corroded in place, when not initially inserted using some sort of grease or anti-seize compound on the threads. So if that's the case, this sounds a lot easier to do, than it often is in practice. What usually helps (a lot), is a couple of heating and cooling cycles, using a Mapp gas torch and Freeze Off.
It's one of the reasons I've gradually tried to replace mine with the crank bolts that are all one piece, and have a socketed head.
__________________
10-18-23, 10:53 AM
#13
Friendship is Magic
Join Date: Nov 2010
Location: Sacramento, CA
Posts: 22,985
Bikes: old ones
Mentioned: 304 Post(s)
Tagged: 0 Thread(s)
Quoted: 26427 Post(s)
Liked 10,383 Times
in
7,211 Posts
...you want to drill your holes to end up with something resembling this.
__________________
Likes For 3alarmer:
10-18-23, 08:14 PM
#14
Newbie
Thread Starter
Thanks.
The 5mm hex in mine do not go all the way through. They have a bottom. I guess I will try the two drilled holes solution to start with.
In case you're wondering the bike is a mid-80s Ross Signature 292s I bought on Craigslist for $100. I intend to upgrade it a bit and use it on the many miles of paved greenways here in Raleigh, NC and surrounding. It came with 700x23s but I had no problem installing a front wheel off another bike 700x33. I think there may even be enough room for a 35 so light gravel may not be out of the questions. The Shimano golden arrow brakes will work with the larger tires if you give up quick release.
10-18-23, 08:55 PM
#15
Friendship is Magic
Join Date: Nov 2010
Location: Sacramento, CA
Posts: 22,985
Bikes: old ones
Mentioned: 304 Post(s)
Tagged: 0 Thread(s)
Quoted: 26427 Post(s)
Liked 10,383 Times
in
7,211 Posts
I guess I will try the two drilled holes solution to start with.
__________________
10-18-23, 08:57 PM
#16
SE Wis
Join Date: Apr 2005
Location: Milwaukee, WI
Posts: 10,517
Bikes: '68 Raleigh Sprite, '02 Raleigh C500, '84 Raleigh Gran Prix, '91 Trek 400, 2013 Novara Randonee, 1990 Trek 970
Mentioned: 40 Post(s)
Tagged: 0 Thread(s)
Quoted: 2747 Post(s)
Liked 3,401 Times
in
2,058 Posts
https://manualzz.com/doc/53869411/sh...-exploded-view
10-18-23, 09:06 PM
#17
Senior Member
Join Date: Apr 2011
Posts: 7,082
Mentioned: 41 Post(s)
Tagged: 0 Thread(s)
Quoted: 4418 Post(s)
Liked 1,569 Times
in
1,031 Posts
Those are the correct covers for the OP's FC-S105 crank. It did not use self extractors
https://manualzz.com/doc/53869411/sh...-exploded-view
https://manualzz.com/doc/53869411/sh...-exploded-view
10-19-23, 09:24 AM
#18
Senior Member
Join Date: May 2008
Location: Fredericksburg, Va
Posts: 9,579
Bikes: '65 Frejus TDF, '73 Bottecchia Giro d'Italia, '83 Colnago Superissimo, '84 Trek 610, '84 Trek 760, '88 Pinarello Veneto, '88 De Rosa Pro, '89 Pinarello Montello, '94 Burley Duet, 97 Specialized RockHopper, 2010 Langster, Tern Link D8
Mentioned: 73 Post(s)
Tagged: 0 Thread(s)
Quoted: 1609 Post(s)
Liked 2,216 Times
in
1,103 Posts
@3alarmer - I am soaking a post with that mixture. It has been sitting for a couple of months. Does the acetone evaporate out of the mixture over time?
__________________
Bikes don't stand alone. They are two tired.
Bikes don't stand alone. They are two tired.
10-19-23, 10:35 AM
#19
Friendship is Magic
Join Date: Nov 2010
Location: Sacramento, CA
Posts: 22,985
Bikes: old ones
Mentioned: 304 Post(s)
Tagged: 0 Thread(s)
Quoted: 26427 Post(s)
Liked 10,383 Times
in
7,211 Posts
@3alarmer - I am soaking a post with that mixture. It has been sitting for a couple of months. Does the acetone evaporate out of the mixture over time?
...it's acetone. Depending on exposure to the air, it evaporates out pretty rapidly. The main reason it's in there is to thin out the ATF, so it wicks into the thread spaces better (or in your case, the space between the post and frame). The heating with a torch thing helps a great deal, and the expansion and contraction from that probably does a better job of breaking any corrosive bonding. In your case, if you are worried about frame paint. apply your heating to the exposed parts of the post. The acetone portion will flare off, so reapply before you start twiting and turning to extract.
The real value of the stuff seems to be that it penetrates well, due to the acetone, and it reduces friction at the interface, due to the space age additives in the ATF.
__________________
Likes For 3alarmer:
10-19-23, 01:19 PM
#20
Senior Member
Join Date: May 2008
Location: Fredericksburg, Va
Posts: 9,579
Bikes: '65 Frejus TDF, '73 Bottecchia Giro d'Italia, '83 Colnago Superissimo, '84 Trek 610, '84 Trek 760, '88 Pinarello Veneto, '88 De Rosa Pro, '89 Pinarello Montello, '94 Burley Duet, 97 Specialized RockHopper, 2010 Langster, Tern Link D8
Mentioned: 73 Post(s)
Tagged: 0 Thread(s)
Quoted: 1609 Post(s)
Liked 2,216 Times
in
1,103 Posts
@3alarmer Thanks for the explanation of the mechanics! I have not tried the application of heat due to the rubber stopper at the open end of the post. The paint looks really bad so I may just apply there too after refreshing again. Refreshed a couple of weeks ago with no change in removal resistance.
 PXL_20221115_180109829 on Flickr
Some would say, "why bother." Well, it is a challenge, and I don't like to loose! The head of the post has been removed with most of the post still intact.
I have non period parts for it so i was thinking it would be a good beater bike as is with some upgraded (newer 70's like parts).
PXL_20221115_180109829 on FlickrSome would say, "why bother." Well, it is a challenge, and I don't like to loose! The head of the post has been removed with most of the post still intact.
I have non period parts for it so i was thinking it would be a good beater bike as is with some upgraded (newer 70's like parts).
__________________
Bikes don't stand alone. They are two tired.
Bikes don't stand alone. They are two tired.
10-19-23, 04:22 PM
#21
Friendship is Magic
Join Date: Nov 2010
Location: Sacramento, CA
Posts: 22,985
Bikes: old ones
Mentioned: 304 Post(s)
Tagged: 0 Thread(s)
Quoted: 26427 Post(s)
Liked 10,383 Times
in
7,211 Posts
.
...what happens when an alloy post gets galvanically corroded in a steal seat tube, is that the aluminum oxide junk kind of fills any space between the two. So if there's a long length of post in there (which sometimes, sadly, there is), you can't get good penetration of anything. My own preference is to try Ammonia in there first, then go with heating and cooling cycles, to provide some shock to interface with the expansion and contraction. I don't usually go with the ATF/ acetone stuff until I'm ready to put the end of the post in the bench vise, prior to twisting the frame off the post. If you've already had the ATF in there that long, don't bother with the ammonia. The oil will probably prevent it penetrating very far. Don't twist the frame without putting a hub or axle spacer in the rear dropouts, and it's easier to handle if you pull the fork.
It's also easier if you can get another person to help. One person does the twisting, and the other person pulls on the frame to try and make it move off the post, while you are twisting.
They usually come out eventually...maybe 90% of them or a little better. With the torch heating and cooling, I think maybe 100%, IME.
...what happens when an alloy post gets galvanically corroded in a steal seat tube, is that the aluminum oxide junk kind of fills any space between the two. So if there's a long length of post in there (which sometimes, sadly, there is), you can't get good penetration of anything. My own preference is to try Ammonia in there first, then go with heating and cooling cycles, to provide some shock to interface with the expansion and contraction. I don't usually go with the ATF/ acetone stuff until I'm ready to put the end of the post in the bench vise, prior to twisting the frame off the post. If you've already had the ATF in there that long, don't bother with the ammonia. The oil will probably prevent it penetrating very far. Don't twist the frame without putting a hub or axle spacer in the rear dropouts, and it's easier to handle if you pull the fork.
It's also easier if you can get another person to help. One person does the twisting, and the other person pulls on the frame to try and make it move off the post, while you are twisting.
They usually come out eventually...maybe 90% of them or a little better.
With the torch heating and cooling, I think maybe 100%, IME.
__________________
10-20-23, 03:46 PM
#22
Newbie
Thread Starter
I used the two hole method and it worked very easily. Caps were not tight or stuck, to my surprise, just lacking a way to provide force. Five mm hex hole on the caps does go all the way through. I don't see what they do.
The rest came off without a hitch. The Cup-and-cone bb is shot. I may keep it and use loose balls and grease or I may replace it. Removing the dust caps was the most difficult part of the job.
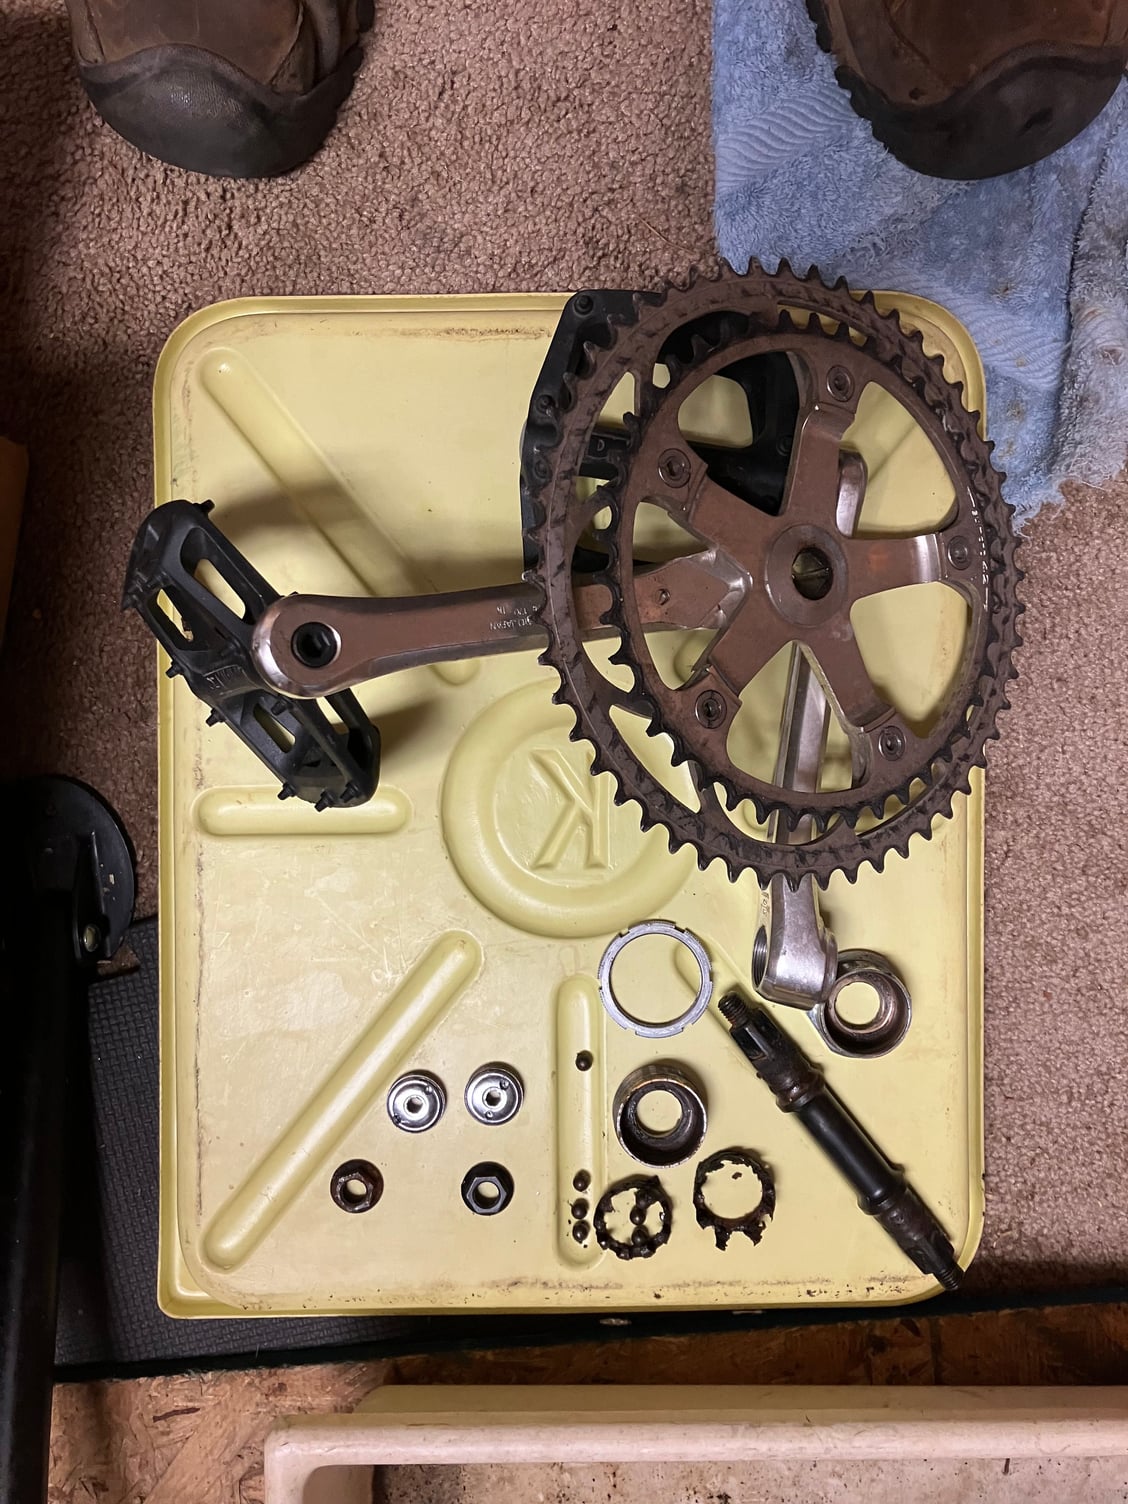
The rest came off without a hitch. The Cup-and-cone bb is shot. I may keep it and use loose balls and grease or I may replace it. Removing the dust caps was the most difficult part of the job.
Likes For schnurrp:
10-20-23, 06:52 PM
#23
Friendship is Magic
Join Date: Nov 2010
Location: Sacramento, CA
Posts: 22,985
Bikes: old ones
Mentioned: 304 Post(s)
Tagged: 0 Thread(s)
Quoted: 26427 Post(s)
Liked 10,383 Times
in
7,211 Posts
A lot of people run without them. Or you can replace with the one piece crank bolt version that is available, which also protects the threads..
__________________
Likes For 3alarmer:
10-20-23, 06:52 PM
#24
SE Wis
Join Date: Apr 2005
Location: Milwaukee, WI
Posts: 10,517
Bikes: '68 Raleigh Sprite, '02 Raleigh C500, '84 Raleigh Gran Prix, '91 Trek 400, 2013 Novara Randonee, 1990 Trek 970
Mentioned: 40 Post(s)
Tagged: 0 Thread(s)
Quoted: 2747 Post(s)
Liked 3,401 Times
in
2,058 Posts
personally, I'd throw a cartridge in it and be good other than needing another tool to install it
10-20-23, 07:13 PM
#25
Newbie
Thread Starter
That makes sense 3alarmer. When I removed the first one the crank bolt was rusty but it came out with no problem and yes the threads used by the crank puller were in good condition.
And, yes, I have a cartridge on another bike that will work so I'll probably do that.
And, yes, I have a cartridge on another bike that will work so I'll probably do that.