


IMPOSSIBLE to remove bottom bracket


 12-14-24 | 10:59 PM
#52
Highly Enriched Driftium


Joined: Apr 2017
Posts: 6,724
Likes: 2,180
12-14-24 | 11:04 PM
#53
Senior Member


Joined: Apr 2011
Posts: 12,650
Likes: 4,792
Or... a hollow spindle two-piece crank (a la hollowtech II) with external bearings (I prefer standardized ISO notch pattern). The spindle will be 24 mm diameter, should fly right through that metal tube. These cranks are available generic brand on amazon (low cost including bearings and rings, and good quality), in various BCD patterns (I like 5x110 mm), and in road or mtb Q-factor (pedal spacing, road is more narrow than mtb).
12-14-24 | 11:57 PM
#54
Highly Enriched Driftium
Joined: Apr 2017
Posts: 6,724
Likes: 2,180
But even a cheap external BB bearing set, has been super durable for me, provided I maintain bearing preload, readjust immediately if any slack. Ton of miles so far. High on my list of great designs.
Last edited by Duragrouch; 12-15-24 at 12:11 AM.
12-15-24 | 12:16 AM
#55
Senior Member
Joined: Apr 2011
Posts: 12,650
Likes: 4,792
True, but I posted it because the whole kit these days can be had for not much more than a good quality taper BB cartridge, and half the price of a really good one like a Phil Wood. Gosh I can't recall which website, they also sold ones that were I think stainless steel spindle and SKF bearings that were $150 but looked really good. EDIT: Whole thing by SKF, made in Germany, USD$169, Rene Herse website, really good seals, 10 year warranty including bearings. Yowza.
But even a cheap external BB bearing set, has been super durable for me, provided I maintain bearing preload, readjust immediately if any slack. Ton of miles so far. High on my list of great designs.
But even a cheap external BB bearing set, has been super durable for me, provided I maintain bearing preload, readjust immediately if any slack. Ton of miles so far. High on my list of great designs.
12-15-24 | 12:26 AM
#56
Highly Enriched Driftium
Joined: Apr 2017
Posts: 6,724
Likes: 2,180
That's exactly what I used to use (lower end Shimano UN52 or 72?). But even bone dry conditions, with the miles I put on, would start to get a little bit of slack after 6 months. And with no way to readjust, that's when the wear accelerates, that's the key; The cartridge is good quality, but the ability to maintain correct preload, I'm finding, is key for long life. It's the only thing I don't like about internal cartridges, I was a diehard taper-spindle guy, eshewing newer designs like the plague. Then I tried hollow spindle, mostly because the square taper cranks on amazon for my 2X conversion weighed a ton and large Q, this one was light and road Q. Needed to buy bearing wrench (bought a 4 way one, I'm set for future). Made me a convert. Couldn't believe the price for the whole kit of crank, rings, and bearings. And fit ancient 68mm BSA. Noticeably *smoother* and uber durable. Even looks good with traditional 5 arm spider.
Last edited by Duragrouch; 12-15-24 at 12:32 AM.
12-15-24 | 12:38 AM
#57
Senior Member
Joined: Apr 2011
Posts: 12,650
Likes: 4,792
That's exactly what I used to use. But even bone dry conditions, with the miles I put on, would start to get a little bit of slack after 6 months. And with no way to readjust, that's when the wear accelerates, that's the key; The cartridge is good quality, but the ability to maintain correct preload, I'm finding, is key for long life. It's the only thing I don't like about internal cartridges, I was a diehard taper-spindle guy, eshewing newer designs like the plague. Then I tried hollow spindle, mostly because the square taper cranks on amazon for my 2X conversion weighed a ton and large Q, this one was light and road Q. Needed to buy bearing wrench (bought a 4 way one, I'm set for future). Made me a convert. Couldn't believe the price for the whole kit of crank, rings, and bearings. Noticeably *smoother* and uber durable. Even looks good with traditional 5 arm spider.
But despite your extensive experience with cartridge bottom brackets, most any of them last a long time and any small amount of play they develop doesn't matter until it is enough to make replacement worthwhile.
12-15-24 | 01:44 AM
#58
Highly Enriched Driftium
Joined: Apr 2017
Posts: 6,724
Likes: 2,180
The cartridge bearing in square taper units are no different than the ones in hollow spindle cranks. If the bearings are worn enough to have noticeable play, you can't adjust that away because that isn't the way cartridge bearings work.
But despite your extensive experience with cartridge bottom brackets, most any of them last a long time and any small amount of play they develop doesn't matter until it is enough to make replacement worthwhile.
But despite your extensive experience with cartridge bottom brackets, most any of them last a long time and any small amount of play they develop doesn't matter until it is enough to make replacement worthwhile.
The external cartridge bearings are different, they are angular contact on both sides (like cup and cone, only enclosed), and readjusting out slack and adding preload is a simple matter of loosening the left crank arm clamp around the splines, retorque the end cap to 6-13 lb-in, retighten the crank arm clamp, and you're done. (Usually when I do this, after loosening, I remove the left arm and retract the right spider a bit, clean any dirt out from the interfaces, reassemble, then torque.) It's a brilliantly simple and very effective system. I've only had to retorque once so far, about 6 months into use (what a surprise, same interval as internal cartridge starting to loosen a bit), not since. I think the first slack may come from burnishing in the bearings, removing the grinding marks. Having no slack and the proper preload, loads a lot closer to 180 degrees of balls per side with radial load, rather than only a couple with slack. Other bonuses with external: More space for more bearing balls, closer to crank arms so radial load is reduced, stiffer and lighter spindle, and as mentioned, backwardly compatible into BSA BB shells. I wish I had invented the system, it's one of those things I look at and just marvel in its brilliance. Only negative is some off-roaders feel taper spindle (or internal cartridge in general) is better in mud, seals recessed, unlike the contact surface between crank arms and external bearings, dirt might grind there; Sounds valid.
Aheadset stems are very similar in how they adjust preload on a headset, much easier than the old style with big open end wrenches, not having to deal with thread backlash. Maybe the Aheadset (came first) was inspiration for the Hollowtech-II system.
Last edited by Duragrouch; 12-15-24 at 05:35 AM.

 12-15-24 | 10:44 AM
#60
Senior Member
Joined: Apr 2011
Posts: 12,650
Likes: 4,792
(bold above) With greatest respect for you, you have more experience than I, but the above is not true. Internal cartridges are two ball bearing assemblies (I think deep groove radial contact) or one ball and the other roller bearing, like the SKF, with no adjustment possible. Maybe internally they are not cartridge, but races right on the spindle and cup and cone, but the key is, not adjustable.
The external cartridge bearings are different, they are angular contact on both sides (like cup and cone, only enclosed), and readjusting out slack and adding preload is a simple matter of loosening the left crank arm clamp around the splines, retorque the end cap to 6-13 lb-in, retighten the crank arm clamp, and you're done. (Usually when I do this, after loosening, I remove the left arm and retract the right spider a bit, clean any dirt out from the interfaces, reassemble, then torque.) It's a brilliantly simple and very effective system. I've only had to retorque once so far, about 6 months into use (what a surprise, same interval as internal cartridge starting to loosen a bit), not since. I think the first slack may come from burnishing in the bearings, removing the grinding marks. Having no slack and the proper preload, loads a lot closer to 180 degrees of balls per side with radial load, rather than only a couple with slack. Other bonuses with external: More space for more bearing balls, closer to crank arms so radial load is reduced, stiffer and lighter spindle, and as mentioned, backwardly compatible into BSA BB shells. I wish I had invented the system, it's one of those things I look at and just marvel in its brilliance. Only negative is some off-roaders feel taper spindle (or internal cartridge in general) is better in mud, seals recessed, unlike the contact surface between crank arms and external bearings, dirt might grind there; Sounds valid.
Aheadset stems are very similar in how they adjust preload on a headset, much easier than the old style with big open end wrenches, not having to deal with thread backlash. Maybe the Aheadset (came first) was inspiration for the Hollowtech-II system.

You are either taking up slack elsewhere in the system, or you are forcing the bearing races out of alignment. Neither of which is making a bearing adjustment.
Has the OP removed his cable guide screw yet?
12-15-24 | 10:58 AM
#61
SE Wis

Joined: Apr 2005
Posts: 11,549
Likes: 4,329
From: Milwaukee, WI
Bikes: '68 Raleigh Sprite, '02 Raleigh C500, '84 Raleigh Gran Prix, '91 Trek 400, 2013 Novara Randonee, 1990 Trek 970
Poster just has an obsession with BB bearing preload on items that to most, are install and forget, until they need replacement.
12-15-24 | 10:54 PM
#62
Highly Enriched Driftium
Joined: Apr 2017
Posts: 6,724
Likes: 2,180
EDIT: Can't yet find online, if any externals use angular contact. But did find this snippet: Internal may be stronger as bearings are fully supported by the BB shell, whereas with externals being cantilevered outside the BB shell, with the bearing carrier being aluminum and thin section thickness at the corner to the threads, taking a big huck (jump) may be more likely to fracture that carrier on externals.
EDIT: Some makers, such as Wheels Mfg, offer a choice of "standard" ABEC 3 BB bearings for BSA 24mm, or "angular contact" at higher cost.
My externals are brand-x same as my crank, so not a clue what bearing type.
Good question and comments asking about the difference on an online discussion board, but won't allow me posting the link, or even the name of the board. Discussion is titled:
Are the angular contact bearings worth the extra cost (Wheels Mfg BB)?
Last edited by Duragrouch; 12-15-24 at 11:35 PM.
12-15-24 | 11:32 PM
#63
Senior Member
Joined: Apr 2011
Posts: 12,650
Likes: 4,792
Interesting, sincere thank you. If my external bearings are same, that means preload is (also) loading the sides (inboard on outer race, outboard on inner race) of the bearing grooves. I need to ponder what that means in terms of spreading the bearing load better. On hub cup and cone bearings (angular contact), preload has made a huge difference to me in durability. If the external bearings are different, perhaps not. But they do come with a torque spec on the cap, and after the first retorque, no loosening for almost 2 years and counting. Whereas with internal cartridges, they just keep getting looser and looser after that starts.
And you have completely misunderstood the cap torque. They list .7 to 1.5 Nm, but then provide a tool that you use by hand and is designed to slip from your grip when it is sufficiently tight. That is supposed to work out to .7 to 1.5, but functionally it is just enough to locate the crank are against the forces of shaft and thread friction. The cap is there to remove play, not preload anything.
You are one of those people who has convinced yourself that your narrow experience and engineering textbook knowledge cause you to have a better, smarter understanding of how bikes work. But bikes don't work like jet engines. They exist in a low torque, low rpm, low temperature world where virtually all the wear and tear comes from bad specs and dirt - not treating the bearings in some super special way.
If you were having problems with bearings wearing out quickly, it was almost certainly due to something you were doing wrong, or out of spec BB shells. So I wish you would stop inventing stuff and then telling people about your new wisdom. You don't even know how the equipment you already own works.
12-15-24 | 11:58 PM
#64
Highly Enriched Driftium
Joined: Apr 2017
Posts: 6,724
Likes: 2,180
You don't need to ponder anything. Standard bearings are not designed for side loading to remove play.
And you have completely misunderstood the cap torque. They list .7 to 1.5 Nm, but then provide a tool that you use by hand and is designed to slip from your grip when it is sufficiently tight. That is supposed to work out to .7 to 1.5, but functionally it is just enough to locate the crank are against the forces of shaft and thread friction. The cap is there to remove play, not preload anything.
You are one of those people who has convinced yourself that your narrow experience and engineering textbook knowledge cause you to have a better, smarter understanding of how bikes work. But bikes don't work like jet engines. They exist in a low torque, low rpm, low temperature world where virtually all the wear and tear comes from bad specs and dirt - not treating the bearings in some super special way.
If you were having problems with bearings wearing out quickly, it was almost certainly due to something you were doing wrong, or out of spec BB shells. So I wish you would stop inventing stuff and then telling people about your new wisdom. You don't even know how the equipment you already own works.
The biggest difference in durability has been with pedals; Cup and cone with tiny balls, proper preload has made a huge difference in durability, versus intentionally leaving in the tiniest perception of slack.
Just because knowlege comes from outside bicycle mechanics, doesn't mean it's wrong. I appreciate you noting that Shimano externals are not angular contact. But evidently some externals are (in my revision above while you were posting). And taking out slack on straight radial bearings may help, I have to think about that, my guess is, with just a small preload, it still behaves mostly like a pure radial bearing, but the preload to one side, taking out the slack, makes it perform better.
I'll be curious about the wheel hub setup on my new bike, which is supposed to have cartridge bearings front and rear, so I wonder if the spindle just clamps axially to the inner races of each bearing, or if there is any side preload between inner and outer races across the two bearings?
Last edited by Duragrouch; 12-16-24 at 12:24 AM.
12-16-24 | 12:02 AM
#65
Senior Member
Joined: Apr 2011
Posts: 12,650
Likes: 4,792
I wish, for the life of me, I could find where online, years ago, they had a superb explanation on bearing life versus proper preload. It was great, and has proven to be true for me. It makes sense, and explains why I was spalling cones and balls years ago when I would adjust the cones for just the tiniest bit of slack, based on dad's advice on bearings, "better a little too loose, than a little too tight". He used to snug tapered roller bearings on front car axle, then back off "two flats", so 120 degrees. I later learned this is way, way wrong, it results in bad roller edge loading, and he was an automotive engineer, but didn't have as much knowledge with regard to rolling contact bearings. Bicycle bearing loads are not huge, but the difference between loading almost half the balls per side and only a couple, makes a huge difference in wear. This is something I have experienced. Perhaps a high preload is not needed, just taking out the slack, but either way, it's much better than leaving in the slack, which, by the way, also stretches the seals radially. I torque my cap to specs, just like you said in metric equivalent, I could have guestimated it, but I have a microtorque wrench which makes it easy. The crank maker did include a plastic wrench, but if they only wanted people to use that, they wouldn't have made the interface a standard Allen socket, nor labeled it with torque value.
The biggest difference in durability has been with pedals; Cup and cone with tiny balls, proper preload has made a huge difference in durability, versus intentionally leaving in the tiniest perception of slack.
Just because knowlege comes from outside bicycle mechanics, doesn't mean it's wrong. I appreciate you noting that Shimano externals are not angular contact. But evidently some externals are. And taking out slack on straight radial bearings may help, I have to think about that, my guess is, with just a small preload, it still behaves mostly like a pure radial bearing, but the preload to one side, taking out the slack, makes it perform better.
I'll be curious about the wheel hub setup on my new bike, which is supposed to have cartridge bearings front and rear, so I wonder if the spindle just clamps axially to the inner races of each bearing, or if there is any side preload between inner and outer races across the two bearings?
If you want to learn about current bike parts, read their manuals. No: no lateral preload.
12-16-24 | 08:55 AM
#66
Senior Member
Joined: Apr 2009
Posts: 2,893
Likes: 1,917
From: NorCal
I would be fascinated to learn what the exact recommended "preload" might and how one goes about measuring it. I hope that it's not the old BS about compressing a 10mm steel tube linearly with a quick release.
12-16-24 | 06:56 PM
#67
Senior Member
Joined: Apr 2011
Posts: 12,650
Likes: 4,792
Since everyone with a QR bike and a set of cone wrenches knows that the hub does indeed change bearing adjustment with the QRs closed, which BS are you referring to?
12-17-24 | 01:13 AM
#68
Highly Enriched Driftium
Joined: Apr 2017
Posts: 6,724
Likes: 2,180
The goal for adjustable bearings is to have the bearings rotate as freely as possible without any knocking or play.
For me, durability is everything. When I left the tiniest slack in my bearings, they wore, they spalled. Perhaps just adjusting out any slack would have prevented that. However, looking online for more knowledge, I ran across an article from a bearing manufacturer regarding proper preload, and I went with that as follows: To sense preload, you need to be able to spin the axle in your fingers, not wheel around fixed axle installed. There are various ways to replace the folk dropouts with spacers to check preload with QR closed. If, spinning axle in your fingers, it feels "notchy" (what Park Tool calls "binding"), the preload is too high. Even with no slack in the bearing, if it feels the same as that, in my experience, too loose, no preload. In between those two, is a setting where it doesn't feel notchy, but you can feel all the balls engaged when spinning; That's the sweet spot. On my current bike, getting this was extremely easy because I don't have QR axles. No axle spacers needed. The way it feels adjusted off the bike, is identical once installed. Adjusting to that sweet spot, on hub bearings, pedal bearings, BB spindles (cup and cone, not cartridge), drastically improved durability and eliminated need for readjustment, going on years and 10K+ miles now. Again, perhaps I would have had same result by only adjusting out all slack, but no axial preload. Don't know. I'll let you know if I find out.
EDIT!:
https://www.gmnbt.com/resources/guid...aring-preload/
Preloading a bearing helps prevent plastic deformation caused by overloaded bearings and optimizes bearing performance.
First, it�s important to know that a preload is required for angular contact bearings. This is because of the bearing design; it needs constant contact to happen between the balls and raceway. This constant contact is achieved through a bearing preload.
Radial ball bearings don�t need nonstop contact between the balls and raceway; therefore, a preload is usually not required.
QED.
Regarding the source of this discussion, external BB bearings, I don't know if mine are angular or radial contact.
More info (other website, and this time I'm bookmarking them all): "Excessive preload reduces durability. Lack of preload can cause "ball skidding". (I found evidence of ball skidding, linear spalls, in past rebuilds where I had small slack in hub and pedal bearings, no preload.)
Last edited by Duragrouch; 12-17-24 at 01:41 AM.
05-29-25 | 01:11 PM
#69
Thread Starter
Newbie
Joined: Apr 2008
Posts: 57
Likes: 6
From: Copenhagen
Hey, I never got around to updating this thread. I managed to bank out that tube from the frame, and I did install the Shimano BSA Krankboks, 68mm (122.5mm version) I bought. As I feared, it was too wide, but I just accepted that, thinking that it was only a matter of aesthetics.
Then I left the bike alone because I also needed to change the freehub -- it took a long time to arrive and I had to focus on other things.
Now I finally got around to putting everything together and it rides great, but! I noticed that when I roll the bike back (only when I roll it back, the freehub is installed properly), the pedals turn back by themselves. When I do that having the chain on the biggest cog of the cassette, it goes out to the next cog by itself. If I lift up the back wheel and pedal backwards, it's the same story: when on the biggest cog, it goes out to the next cog out.
Eventually, I figured out what was happening. It's related to my new bottom bracket being too wide, as I initially suspected.
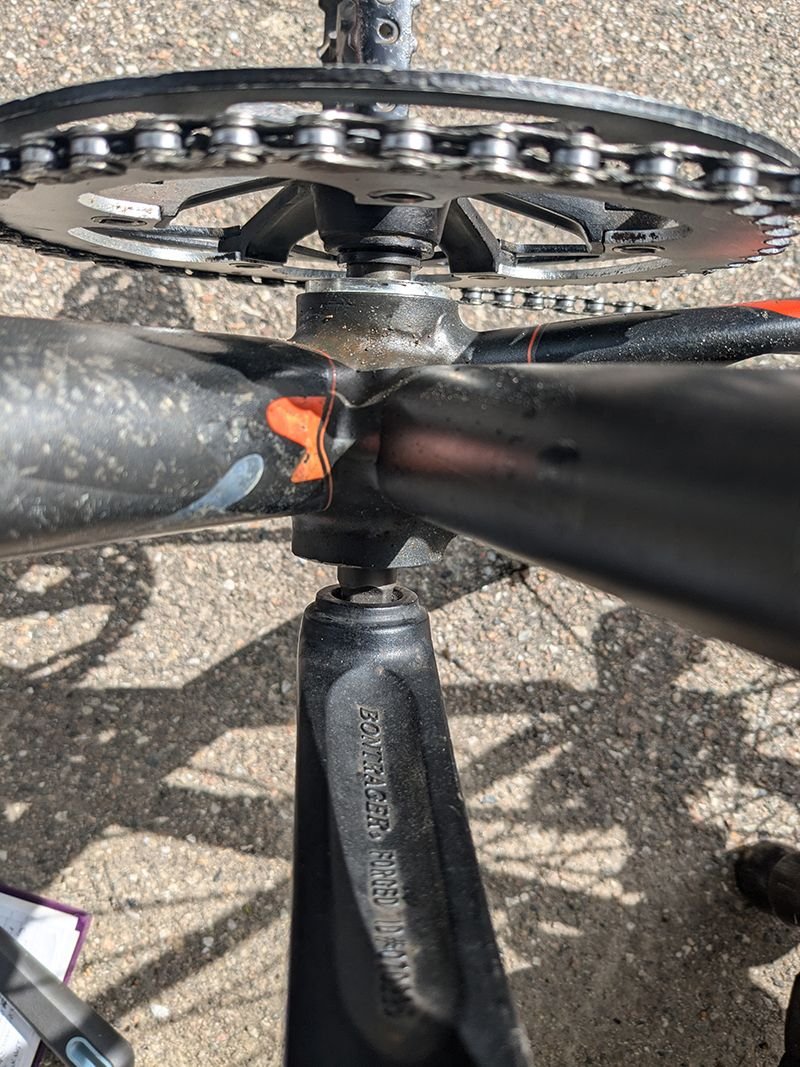
Bottom bracket too wide.
What's happening is that the overwide bottom bracket is causing the chainring to be too far out in the direction shown by the arrows in the picture below. This is resulting in a misalignment between the chainring and the cassette. It's hard to see it in the picture, but the chain is not centered in the chainring.
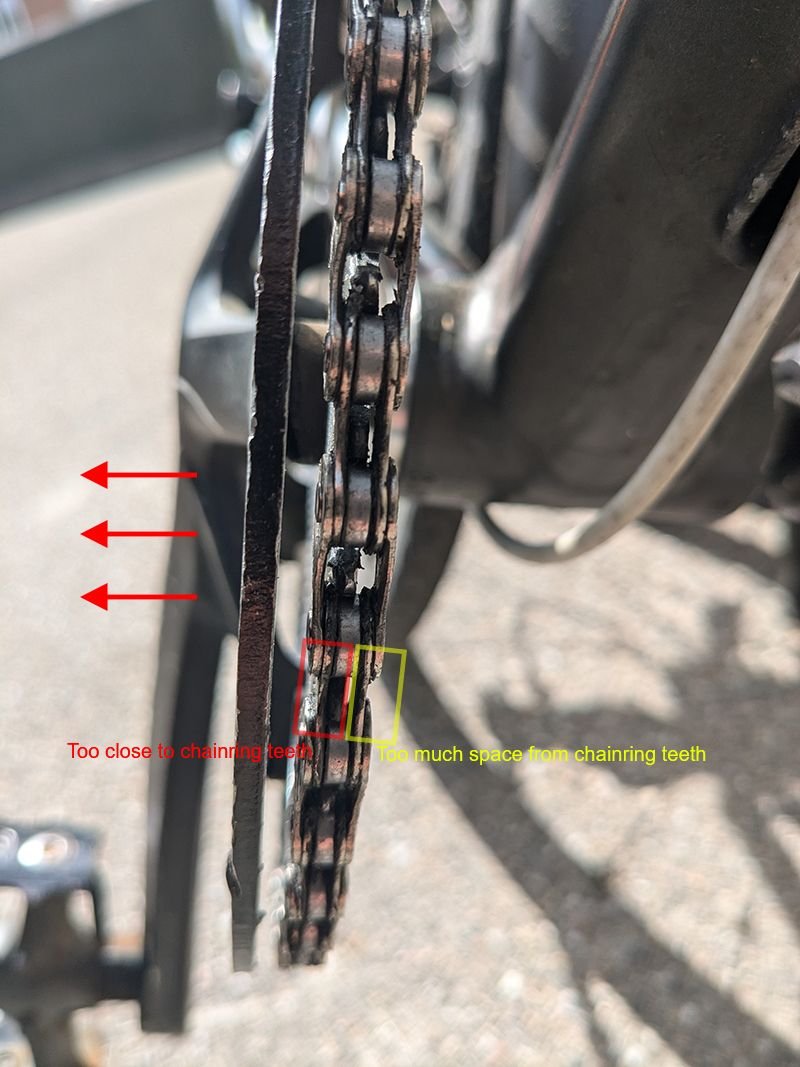
Chainring too far out
Ultimately, the result is the chainring pulling the chain out when I pedal backwards, as shown mid-action in the picture below.
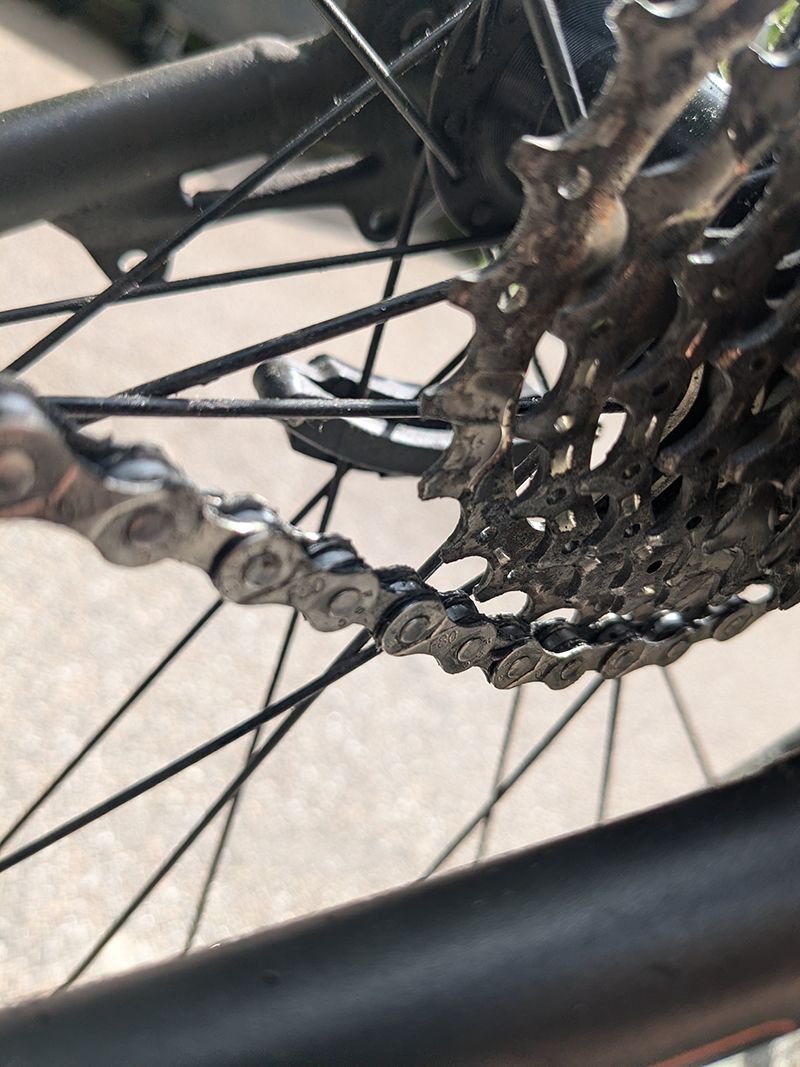
Chain being pulled out from the big cog
I think it's all better illustrated in this final image:
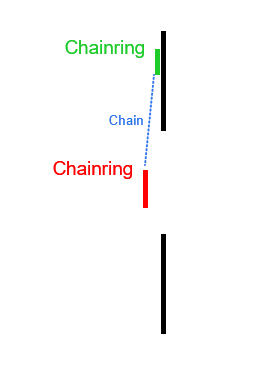
I had originally thought that the derailleur needed adjustment, so I went through the process today until I discovered the real issue. Due to the nature of this misalignment, the pedal thankfully doesn't move when I'm rolling the bike forward or when I'm coasting. Most importantly, the chain doesn't automatically hop to the next cog under any circumstances while riding the bike. It's all as smooth as can be.
So now my question: Is it worth changing the bottom bracket again? Could this misalignment be causing any damage or be dangerous in any way?
Then I left the bike alone because I also needed to change the freehub -- it took a long time to arrive and I had to focus on other things.
Now I finally got around to putting everything together and it rides great, but! I noticed that when I roll the bike back (only when I roll it back, the freehub is installed properly), the pedals turn back by themselves. When I do that having the chain on the biggest cog of the cassette, it goes out to the next cog by itself. If I lift up the back wheel and pedal backwards, it's the same story: when on the biggest cog, it goes out to the next cog out.
Eventually, I figured out what was happening. It's related to my new bottom bracket being too wide, as I initially suspected.
Bottom bracket too wide.
What's happening is that the overwide bottom bracket is causing the chainring to be too far out in the direction shown by the arrows in the picture below. This is resulting in a misalignment between the chainring and the cassette. It's hard to see it in the picture, but the chain is not centered in the chainring.
Chainring too far out
Ultimately, the result is the chainring pulling the chain out when I pedal backwards, as shown mid-action in the picture below.
Chain being pulled out from the big cog
I think it's all better illustrated in this final image:
I had originally thought that the derailleur needed adjustment, so I went through the process today until I discovered the real issue. Due to the nature of this misalignment, the pedal thankfully doesn't move when I'm rolling the bike forward or when I'm coasting. Most importantly, the chain doesn't automatically hop to the next cog under any circumstances while riding the bike. It's all as smooth as can be.
So now my question: Is it worth changing the bottom bracket again? Could this misalignment be causing any damage or be dangerous in any way?
05-29-25 | 01:21 PM
#70

Senior Member
Joined: Jan 2010
Posts: 3,388
Likes: 4,854
From: se MIch.
Bikes: 1938 claud butler,1983 Basso,teledyne titan,teocali super,nrs,1993 stumpjumper fsr,Paramountain,Paramount Buell(sold),4 banger,Zaskar LE,Colnago Master Ibex MTB,1987ish,.etc....
chainline/
all you need to know next time changing your cranks.https://www.sheldonbrown.com/chainline.html usefull bearing news;https://us14.campaign-archive.com/?u...&id=72fd2b3524
05-29-25 | 07:32 PM
#71
Highly Enriched Driftium
Joined: Apr 2017
Posts: 6,724
Likes: 2,180
Yes, the chainline is off. Pedaling forward, the rear derailleur bottom pulley compensates and straightens the chainline before the chain reaches the top (jockey) pulley. Pedaling backwards, there is no rear derailleur between the chainring and cogs, so it can't do that for you. On MY bike, I had spaced the crank 4mm out because I had an interference issue at the front derailleur cage due to a very fat seat tube (folding bike), and it was constantly dropping the chain when shifting onto the inner ring when on the low (largest) cog. I fixed the interference issue and removed the spacers so the chainrings and chainline was correct as the bicycle gods intended, no more dropping chains. If you are not suffering similar problems, you could leave things be. But you can also correct the chainline if you desire. Note: I would NOT try to space the cassette out at all; I wanted to do that because my chain would sometimes jam hard between the small cog and dropout, so I wanted to make that gap smaller, and put a spacer behind the cassette, however that greatly reduced the engagement of the threaded lockring, and small cog on the freehub shoulders, enough that I did not feel things were sound, so removed the spacer. And changing the rear derailleur from the inferior Dahon compact design to a normal RD and mounting location, cured the chain dropping off the small cog.
P.S. - My 2X chainset specifies 43.5mm as chainline, bike centerline to middle of 2X rings, which matches the middle of my 7 speed cassette on 130mm rear hub. The crank is a hollowtech 2 style so no separate bottom bracket spindle. And spacing the crank out 4mm also reduced the left arm clamp area that much and it came loose. Design specs are design specs.
P.S. - My 2X chainset specifies 43.5mm as chainline, bike centerline to middle of 2X rings, which matches the middle of my 7 speed cassette on 130mm rear hub. The crank is a hollowtech 2 style so no separate bottom bracket spindle. And spacing the crank out 4mm also reduced the left arm clamp area that much and it came loose. Design specs are design specs.
Last edited by Duragrouch; 05-29-25 at 07:41 PM.
