IMPOSSIBLE to remove bottom bracket
 11-13-24 | 02:39 PM
#1
Thread Starter
Newbie

Joined: Apr 2008
Posts: 57
Likes: 6
From: Copenhagen
IMPOSSIBLE to remove bottom bracket
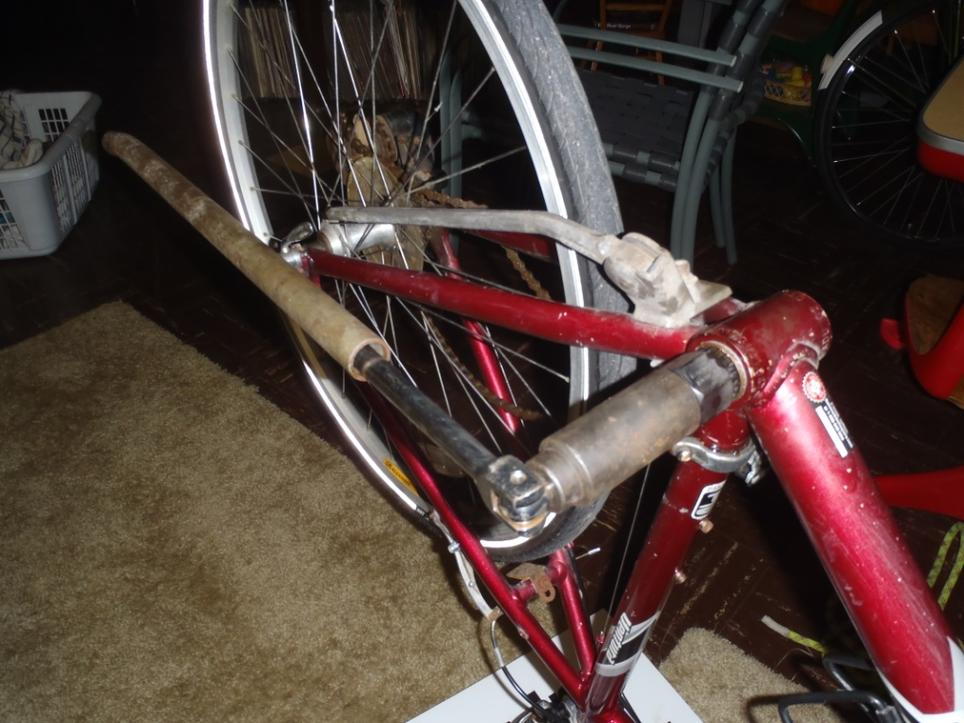
My pedals suddenly began wobbling from side to side, so I decided to just completely replace the bottom bracket. The struggle that followed cost me hours and only left me with a broken tool. The bottom bracket hasn't budged at all. I'm literally about to salvage parts from my bike and throw the frame away at this point. There is one last thing I want to try first, but I'm not happy about it. Looking for feedback and advice. Here's my journey:
I did my best to remove the dirt and grime with a toothbrush, spray it away with compressed air, get into the crevices with something small, and lubricate it with some WD-40.
Then I inserted this piece (don't know what it's called in English, so I'll just refer to it as "aftr�kker" from here on) into the bottom bracket. It fit well and the hardened steel also stood up well:

So far so good. Unfortunately I don't have a big enough socket wrench or even regular wrench so I used my water pump pliers to hold it:

With that, I could get a very good grip on the aftr�kker and I tried to turn it counter-clockwise (since I was working on the non-drive side) but it wouldn't budge. At all. I used all my strength, different angles, I hammered on it, I stood on it, I stomped on it. But nothing. I carried on for a long time, and eventually my water pump pliers got worn out and even broke!
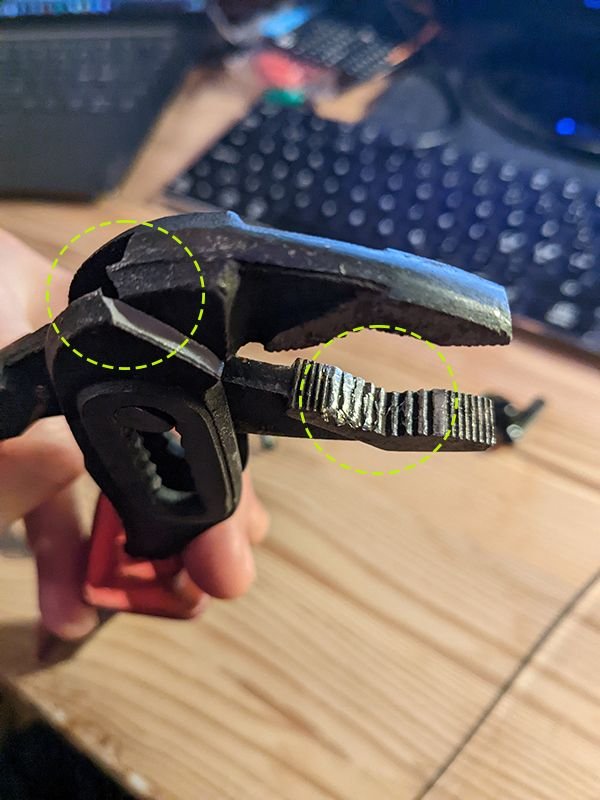
Well, that's a shame because I'm not rich. And shortly after this, I gave up for now. My plan now is to buy a bigger socket wrench with a bit that fits around the aftr�kker. This is turning out to be an expensive endeavor because I'll have to invest in new water pump pliers too (it's a great tool that has gotten me out of many hard spots so I gotta have it around). And it might all be for nothing, as I'm not very confident that anything will work at this point.
So my question here is: considering the story I just told, do you think I have any chance with a socket wrench or am I just wasting my time and money? Any other ideas?
I did my best to remove the dirt and grime with a toothbrush, spray it away with compressed air, get into the crevices with something small, and lubricate it with some WD-40.
Then I inserted this piece (don't know what it's called in English, so I'll just refer to it as "aftr�kker" from here on) into the bottom bracket. It fit well and the hardened steel also stood up well:
So far so good. Unfortunately I don't have a big enough socket wrench or even regular wrench so I used my water pump pliers to hold it:
With that, I could get a very good grip on the aftr�kker and I tried to turn it counter-clockwise (since I was working on the non-drive side) but it wouldn't budge. At all. I used all my strength, different angles, I hammered on it, I stood on it, I stomped on it. But nothing. I carried on for a long time, and eventually my water pump pliers got worn out and even broke!
Well, that's a shame because I'm not rich. And shortly after this, I gave up for now. My plan now is to buy a bigger socket wrench with a bit that fits around the aftr�kker. This is turning out to be an expensive endeavor because I'll have to invest in new water pump pliers too (it's a great tool that has gotten me out of many hard spots so I gotta have it around). And it might all be for nothing, as I'm not very confident that anything will work at this point.
So my question here is: considering the story I just told, do you think I have any chance with a socket wrench or am I just wasting my time and money? Any other ideas?
 11-13-24 | 03:51 PM
#2
Senior Member

Joined: Apr 2009
Posts: 39,897
Likes: 3,865
From: New Rochelle, NY
Bikes: too many bikes from 1967 10s (5x2)Frejus to a Sumitomo Ti/Chorus aluminum 10s (10x2), plus one non-susp mtn bike I use as my commuter
You need more leverage than you'll ever get with pump pliers or a wrench.
Instead, clamp the tool (BB cup remover) onto the bike with a long bolt, or using the crank spindle and something on the other side.
Once it's secure, place the tool in a vise and use the frame as the wrench. FYI, it's important that thd tool I'd bolted securely to the frame because there's a tendency to not keep everything square, and you'll tear the cup an/or the tool apart.
You'll also help yourself by soaking the area in penetrating oil for a day or two before trying.
One last note - - - make sure you're turning in the right direction. In some countries both sides have right hand threads, however ISO threading has the right side (chain side) using a LEFT HAND THREAD, so it's possible you've been killing yourself trying to tighten, rather than loosen it.
Last edited by FBinNY; 11-13-24 at 04:47 PM.
11-13-24 | 03:52 PM
#3

Let your bike be the tool
Joined: Jun 2006
Posts: 1,111
Likes: 697
From: NC/SC border
Bikes: '66 Raleigh Carlton, '70 Ron Cooper, '95 Bianchi CD'I, "Bottecchia" Zonal Frame with Xenon gruppo, "Bottecchia"Carbon Frame with Record Gruppo, Columbia Twosome, Terry Classic, Bianchi SX, Gravity SS/FG, Titanium "Motobecane" with Ultegra DI2
Are you certain you are trying to turn it in the correct direction? Anti-clockwise on the non-drive side if it is an English bottom bracket. One option would be to put the tool in a vise and turn the bike frame for more leverage.
__________________
Never try to teach a pig to sing...
Never try to teach a pig to sing...
11-13-24 | 04:10 PM
#4
Thread Starter
Newbie
Joined: Apr 2008
Posts: 57
Likes: 6
From: Copenhagen
Yes, I'm working on the non-drive side and I'm sure I've been trying to turn the BB cup remover anti-clockwise. What if I have a weird bike and it should be the opposite?? Have I tightened it so much that I'll never get it out now?
11-13-24 | 04:12 PM
#5

Senior Member
Joined: Jul 2006
Posts: 11,478
Likes: 4,884
From: San Jose (Willow Glen) Ca
Bikes: Kirk Custom JK Special, 86 De Rosa Pro, '84 Team Miyata,(dura ace old school) 80?? SR Semi-Pro 600 Arabesque
Regular WD40 is not a good penetrating oil. Unless you used
put the frame on the side and apply the oil and let it sit for 24 hours
then follow the above ideas
WD-40 Specialist Super Penetrating Oil
get some of that or Cano Kroll penetrating oilput the frame on the side and apply the oil and let it sit for 24 hours
then follow the above ideas
__________________
Life is too short not to ride the best bike you have, as much as you can.
Life is too short not to ride the best bike you have, as much as you can.
11-13-24 | 04:31 PM
#6

Senior Member


Joined: Jul 2015
Posts: 7,361
Likes: 3,217
From: NW Oregon
Bikes: 1982 Trek 930R Custom, '91 Diamondback Ascent w/ XT, XTR updates, Fuji Team Pro CF road flyer, Specialized Sirrus Gravel Convert, '09 Comencal Meta 5.5 XC, '02 Marin MBX500, '84 Gitane Criterium bike
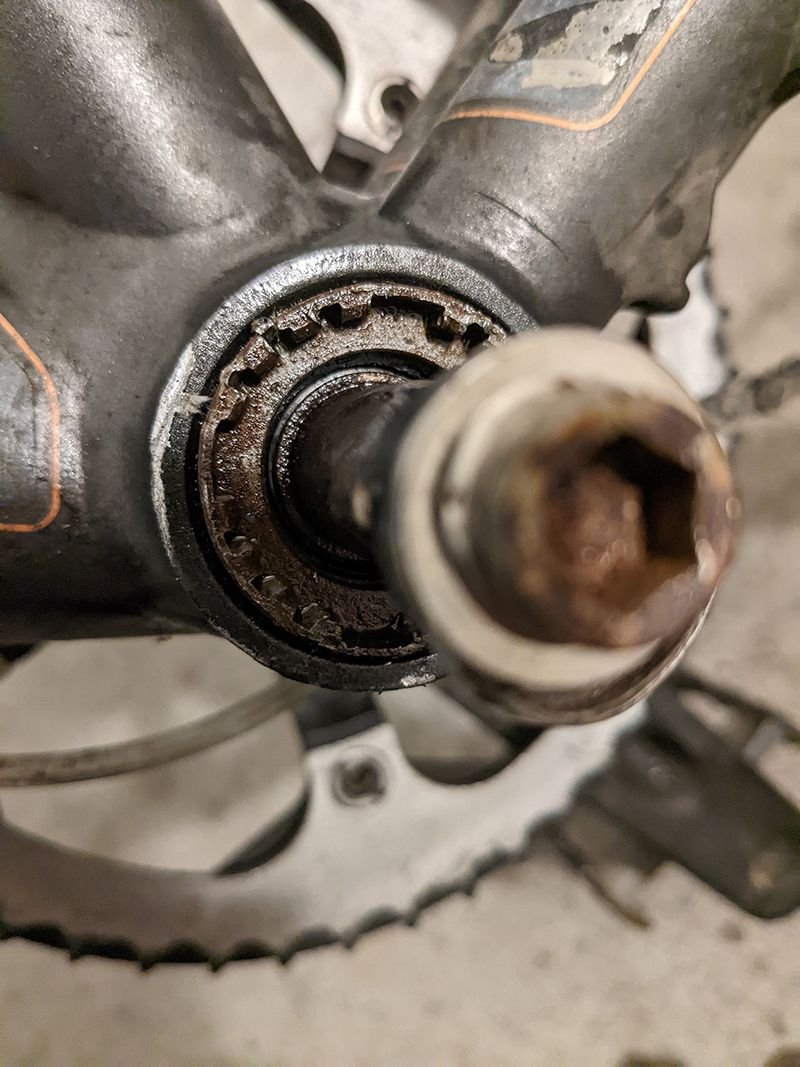
the penetrating oil lubed the splines, making them slippery. this helped the improperly driven BB remover socket climb out of the splines... if you don't have the correct tools or experience, take the bike to a bike shop before you damage it.
The splines in the BB are already Damaged... any more damage will not be good.
take the bike to a Good Bike Shop before you Damage it .
The splines in the BB are already Damaged... any more damage will not be good.
take the bike to a Good Bike Shop before you Damage it .
Last edited by maddog34; 11-13-24 at 04:36 PM.
 11-13-24 | 05:16 PM
#8
Senior Member
Joined: Apr 2009
Posts: 39,897
Likes: 3,865
From: New Rochelle, NY
Bikes: too many bikes from 1967 10s (5x2)Frejus to a Sumitomo Ti/Chorus aluminum 10s (10x2), plus one non-susp mtn bike I use as my commuter
__________________
FB
Chain-L site
An ounce of diagnosis is worth a pound of cure.
Just because I'm tired of arguing, doesn't mean you're right.
�One accurate measurement is worth a thousand expert opinions� - Adm Grace Murray Hopper - USN
WARNING, I'm from New York. Thin skinned people should maintain safe distance.
FB
Chain-L site
An ounce of diagnosis is worth a pound of cure.
Just because I'm tired of arguing, doesn't mean you're right.
�One accurate measurement is worth a thousand expert opinions� - Adm Grace Murray Hopper - USN
WARNING, I'm from New York. Thin skinned people should maintain safe distance.
11-13-24 | 05:28 PM
#9

Really Old Senior Member
Joined: Feb 2007
Posts: 14,629
Likes: 1,882
From: Mid Willamette Valley, Orygun
Bikes: 87 RockHopper,2008 Specialized Globe. Both upgraded to 9 speeds. 2019 Giant Explore E+3
This is how I secure the tool.
I have a couple different length bolts in the tool box if needed. (and shorter tool)
Thread is M8-1.0mm.
In the US, M8-1.25mm is more common. I don't know about Europe.

I have a couple different length bolts in the tool box if needed. (and shorter tool)
Thread is M8-1.0mm.
In the US, M8-1.25mm is more common. I don't know about Europe.
Last edited by Bill Kapaun; 11-13-24 at 05:38 PM.
11-13-24 | 08:26 PM
#10
Clark W. Griswold
Joined: Mar 2014
Posts: 18,248
Likes: 6,624
From: ,location, location
Bikes: Foundry Chilkoot Ti W/Ultegra Di2, Salsa Timberjack Ti, Cinelli Mash Work RandoCross Fun Time Machine, 1x9 XT Parts Hybrid, Co-Motion Cascadia, Specialized Langster, Phil Wood Apple VeloXS Frame (w/DA 7400), R+M Supercharger2 Rohloff, Habanero Ti 26
This tool could be your friend if you want to continue doing it yourself. Always make sure you are turning the correct way.
Remove the seatpost and get something down that tube to the bottom bracket that will actually help remove the rust. Maybe try some phosphoric/citric acid with baking soda and water and that could help out. You could also try some heat but I would make sure you do it in a place with good ventilation because everything spayed or poured or whatever in those tubes will heat up and you don't want to breath it in. Generally I find WD-40 to be good for displacing water (hence the WD) but for lubrication I will look elsewhere unless it is a different product from the WD-40 company.
Before you put a tool on anything clean the area well and dry it, you don't want oil, grease or anything that will make things slippery on your tools. Use a good tool with good leverage that will not slip along with the B.B. Socket Holder putting the tool in a good sturdy vise and using the frame for leverage is a good idea from FBinNY You could also make one as others have suggested but I have found the Pedro's tool to be quite handy and easy to use.
11-14-24 | 01:50 AM
#12
Industry guy
Joined: Nov 2007
Posts: 414
Likes: 103
From: Minnesota
Bikes: To many to name - I ride a custom built steel frame.
There is tool made by Stein.
It is designe to hold the removal tool firmly in place, allowing all effort to me place on breaking the bb free from the shell.
A long breaker bar should suffice to get the torque required, with the tool held in place.
rusty
It is designe to hold the removal tool firmly in place, allowing all effort to me place on breaking the bb free from the shell.
A long breaker bar should suffice to get the torque required, with the tool held in place.
rusty
11-14-24 | 03:42 AM
#13
Senior Member

Joined: Dec 2019
Posts: 1,187
Likes: 387
Water pump pliers are not a good enough lever and will also mar your tool. Use a vice as suggested or a socket wrench (with a tube over the handle to make it a couple of feet long if necessary).
11-14-24 | 05:18 AM
#14
Thread Starter
Newbie
Joined: Apr 2008
Posts: 57
Likes: 6
From: Copenhagen
Many people here are suggesting a tool to hold the removal tool firmly (socket holder). I actually improvised something like that, but it didn't help enough. The common thread here seems to be that I need better leverage. I thought it was enough to stomp on the problem with all my weight, but I guess I'll try a tool with better leverage. I'm not understanding how to use a vise in this case, though. Anyone care to show me in pictures?
11-14-24 | 06:49 AM
#16
Senior Member
Joined: Jan 2009
Posts: 4,367
Likes: 1,651
From: San Diego, CA
You just clamp the wrench flats of the BB tool in a vise with the teeth facing upward and place the BB on top of that using the leverage of the bike to turn it. Of course, a BAV (Big Ass Vise) is needed for this.
11-14-24 | 07:11 AM
#17
Senior Member
Joined: Apr 2016
Posts: 3,835
Likes: 1,768
Many people here are suggesting a tool to hold the removal tool firmly (socket holder). I actually improvised something like that, but it didn't help enough. The common thread here seems to be that I need better leverage. I thought it was enough to stomp on the problem with all my weight, but I guess I'll try a tool with better leverage. I'm not understanding how to use a vise in this case, though. Anyone care to show me in pictures?
11-14-24 | 07:19 AM
#18

Full Member
Joined: Jun 2022
Posts: 466
Likes: 396
From: San Diego, California USA
Bikes: 1974 Masi GC, 1982 Trek 728 (aka 720), 1992 Trek Multitrack 750 (Stolen), 2023 Bike Friday Diamond Llama (Fat Boi Edition)
It is no fun dancing with the workbench when you're trying to get production done!
11-14-24 | 01:02 PM
#19
Really Old Senior Member
Joined: Feb 2007
Posts: 14,629
Likes: 1,882
From: Mid Willamette Valley, Orygun
Bikes: 87 RockHopper,2008 Specialized Globe. Both upgraded to 9 speeds. 2019 Giant Explore E+3
Many people here are suggesting a tool to hold the removal tool firmly (socket holder). I actually improvised something like that, but it didn't help enough. The common thread here seems to be that I need better leverage. I thought it was enough to stomp on the problem with all my weight, but I guess I'll try a tool with better leverage. I'm not understanding how to use a vise in this case, though. Anyone care to show me in pictures?
If using a wrench, you need to hold the tool with one hand to keep it centered to the BB.
Use a LARGE adjustable wrench. Better yet, a large box end wrench that fits the tool.
You may have some kind of pawn shop/used tool store where you can get one for cheap?
11-14-24 | 01:12 PM
#20
Newbie
Joined: Oct 2024
Posts: 11
Likes: 1
You need more leverage than you'll ever get with pump pliers or a wrench.
Instead, clamp the tool (BB cup remover) onto the bike with a long bolt, or using the crank spindle and something on the other side.
Once it's secure, place the tool in a vise and use the frame as the wrench. FYI, it's important that thd tool I'd bolted securely to the frame because there's a tendency to not keep everything square, and you'll tear the cup an/or the tool apart.
You'll also help yourself by soaking the area in penetrating oil for a day or two before trying.
One last note - - - make sure you're turning in the right direction. In some countries both sides have right hand threads, however ISO threading has the right side (chain side) using a LEFT HAND THREAD, so it's possible you've been killing yourself trying to tighten, rather than loosen it.
Instead, clamp the tool (BB cup remover) onto the bike with a long bolt, or using the crank spindle and something on the other side.
Once it's secure, place the tool in a vise and use the frame as the wrench. FYI, it's important that thd tool I'd bolted securely to the frame because there's a tendency to not keep everything square, and you'll tear the cup an/or the tool apart.
You'll also help yourself by soaking the area in penetrating oil for a day or two before trying.
One last note - - - make sure you're turning in the right direction. In some countries both sides have right hand threads, however ISO threading has the right side (chain side) using a LEFT HAND THREAD, so it's possible you've been killing yourself trying to tighten, rather than loosen it.
 11-14-24 | 01:39 PM
#22
Senior Member
Joined: Aug 2009
Posts: 3,127
Likes: 1,631
11-14-24 | 02:50 PM
#23
Senior Member
Joined: Apr 2009
Posts: 39,897
Likes: 3,865
From: New Rochelle, NY
Bikes: too many bikes from 1967 10s (5x2)Frejus to a Sumitomo Ti/Chorus aluminum 10s (10x2), plus one non-susp mtn bike I use as my commuter
Bolt the tool to the bottom bracket cup however you choose to so it cannot climb or twist out.
Then take the whole frame with tool attached, and hold it horizontal tool side down, clamping the tool into your vise. Now with the tool held securely, turn the frame, just as you would a wrench.
Unless you own a three foot long wrench, this is the most leverage you could possibly get.
11-14-24 | 05:31 PM
#24
Wheelman
Joined: Aug 2021
Posts: 1,636
Likes: 1,596
From: Putney, London UK
Bikes: 1982 Holdsworth Avanti (531), 1961 Holdsworth Cyclone, 1953 Holdsworth Whirlwind
I removed a fixed cup recently.
Soaked with penetrating oil for 3 days
Fixed tool in place (Sheldon Brown 5/8" bolt in my case)
Apply socket set
Apply 4 foot scaffolding pole extender bar
Place frame on floor and lean on the bar.
It was resisting with a 4 foot handle on the socket then it just gave up.
No damage to anything.
Soaked with penetrating oil for 3 days
Fixed tool in place (Sheldon Brown 5/8" bolt in my case)
Apply socket set
Apply 4 foot scaffolding pole extender bar
Place frame on floor and lean on the bar.
It was resisting with a 4 foot handle on the socket then it just gave up.
No damage to anything.
 11-14-24 | 09:38 PM
#25
SE Wis

Joined: Apr 2005
Posts: 11,548
Likes: 4,329
From: Milwaukee, WI
Bikes: '68 Raleigh Sprite, '02 Raleigh C500, '84 Raleigh Gran Prix, '91 Trek 400, 2013 Novara Randonee, 1990 Trek 970
You're definitely under tooled. You have to bolt the tool into the BB, lots of real penetrating oil (not WD40) and big wrenches