


Rim brake drags
 06-22-25 | 03:44 PM
#1
Thread Starter
old newbie

Joined: Nov 2009
Posts: 1,806
Likes: 1,142
From: Fort Worth, Texas
Bikes: Specialized Roubaix
Rim brake drags
This is the second time since replacing tires that I have come back to my jeep after a 6 mile ride to find a rear rim brake pad rubbing. I noticed pedaling seemed harder the last half mile ir so.
When I put my bike on the carrier I spun the tires looking for stickers and the rear only turned about 6�.
It�s a 2013 Spec Roubaix with Ultegra groupset.
When I put my bike on the carrier I spun the tires looking for stickers and the rear only turned about 6�.
It�s a 2013 Spec Roubaix with Ultegra groupset.
 06-22-25 | 03:50 PM
#2
Senior Member


Joined: Apr 2011
Posts: 12,778
Likes: 4,884
Grab the entire brake caliper in your hand, rotate it until isn't centered on the rim. If it rotates too easily, tighten the 5mm mounting bolt that attaches it to the frame.
Make sure you have the wheel fully seated up into the dropouts and the qr fully tight.
Make sure you have the wheel fully seated up into the dropouts and the qr fully tight.
06-22-25 | 04:29 PM
#3
Thread Starter
old newbie
Joined: Nov 2009
Posts: 1,806
Likes: 1,142
From: Fort Worth, Texas
Bikes: Specialized Roubaix
I thought I had the wheel all the way up in the dropouts but since I did have it off then reinstalled it I will check that first.
Is there any situation that can cause the brake to rotate to one side?
06-22-25 | 06:34 PM
#4
Method to My Madness

Joined: Nov 2020
Posts: 4,753
Likes: 2,086
From: Orange County, California
Bikes: Trek FX 2, Cannondale Synapse x2, Cannondale CAAD4, Santa Cruz Stigmata 3
This is the second time since replacing tires that I have come back to my jeep after a 6 mile ride to find a rear rim brake pad rubbing. I noticed pedaling seemed harder the last half mile ir so.
When I put my bike on the carrier I spun the tires looking for stickers and the rear only turned about 6�.
It�s a 2013 Spec Roubaix with Ultegra groupset.
When I put my bike on the carrier I spun the tires looking for stickers and the rear only turned about 6�.
It�s a 2013 Spec Roubaix with Ultegra groupset.
DM-BR0003-09-ENG.pdf
It doesn�t rotate easily. I centered it a few days ago after it did the same thing. I made sure there was the same space between the pads and rim on both sides.
I thought I had the wheel all the way up in the dropouts but since I did have it off then reinstalled it I will check that first.
I thought I had the wheel all the way up in the dropouts but since I did have it off then reinstalled it I will check that first.
1. See above re: centering adjustment bolt.
2. You keep hitting your brake caliper on one side.
3. Assuming you have a dual-pivot brake caliper, one pivot is binding. Disassemble, clean, and grease all moving parts.
06-22-25 | 06:35 PM
#5
Senior Member
Joined: Apr 2011
Posts: 12,778
Likes: 4,884
It doesn’t rotate easily. I centered it a few days ago after it did the same thing. I made sure there was the same space between the pads and rim on both sides.
I thought I had the wheel all the way up in the dropouts but since I did have it off then reinstalled it I will check that first.
Is there any situation that can cause the brake to rotate to one side?
I thought I had the wheel all the way up in the dropouts but since I did have it off then reinstalled it I will check that first.
Is there any situation that can cause the brake to rotate to one side?
06-23-25 | 09:35 AM
#6
Senior Member

Joined: Mar 2012
Posts: 1,453
Likes: 987
It doesn�t rotate easily. I centered it a few days ago after it did the same thing. I made sure there was the same space between the pads and rim on both sides.
I thought I had the wheel all the way up in the dropouts but since I did have it off then reinstalled it I will check that first.
Is there any situation that can cause the brake to rotate to one side?
I thought I had the wheel all the way up in the dropouts but since I did have it off then reinstalled it I will check that first.
Is there any situation that can cause the brake to rotate to one side?
06-23-25 | 10:04 AM
#7
Thread Starter
old newbie
Joined: Nov 2009
Posts: 1,806
Likes: 1,142
From: Fort Worth, Texas
Bikes: Specialized Roubaix
Let's be clear about this. When Kontact said to rotate the brake, he meant that the brake body must actually move relative to the frame. Lots of people just push on one of the brake arms and think that they are centering the brake. That's not how it works and after a few applications of the brakes, they will be off-center again. If you can't move the brake body by hand, then loosen the attachment bolt, center the brake, and tighten the attachment bolt while making sure that the brake body doesn't move. You might need to do this a couple of times to get it right. I always tighten my brake attachment bolts such that the brakes can't easily be knocked off center, but so that I can move the brake body with significant hand force.
06-23-25 | 07:05 PM
#8
Thread Starter
old newbie
Joined: Nov 2009
Posts: 1,806
Likes: 1,142
From: Fort Worth, Texas
Bikes: Specialized Roubaix
The mount bolt was tight. I managed to get it moved just enough. I must have moved it when I installed the rear tire.
Someone mentioned what series Ultegra it is. It cam on my �13 Spec Roubaix. I have no idea what series that is. Here is a pic.
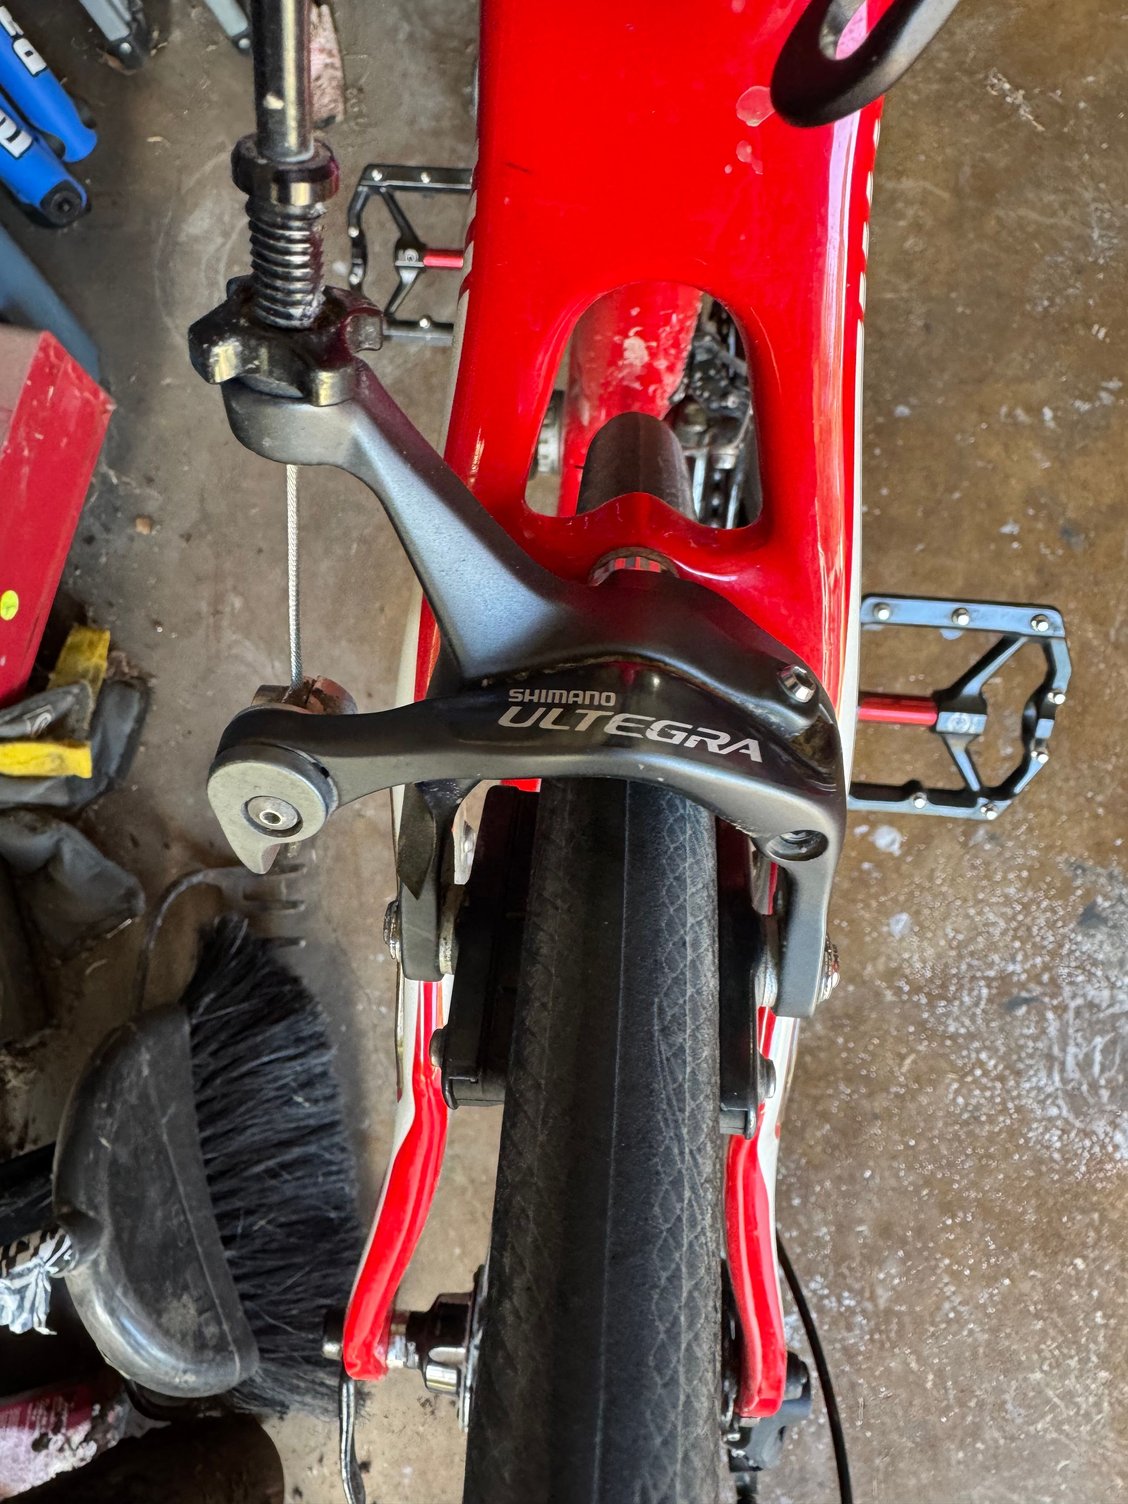
Someone mentioned what series Ultegra it is. It cam on my �13 Spec Roubaix. I have no idea what series that is. Here is a pic.
06-23-25 | 07:35 PM
#9
Senior Member
Joined: Jan 2009
Posts: 4,437
Likes: 1,698
From: San Diego, CA
In the photo above you can see a small chromed Allen head screw just above and to the right of the "A" in Ultegra. That is for fine tuning the centering of the brake pads. You can see them get closer/further away from the rim as you screw it in or out.
06-23-25 | 07:51 PM
#10
Method to My Madness
Joined: Nov 2020
Posts: 4,753
Likes: 2,086
From: Orange County, California
Bikes: Trek FX 2, Cannondale Synapse x2, Cannondale CAAD4, Santa Cruz Stigmata 3
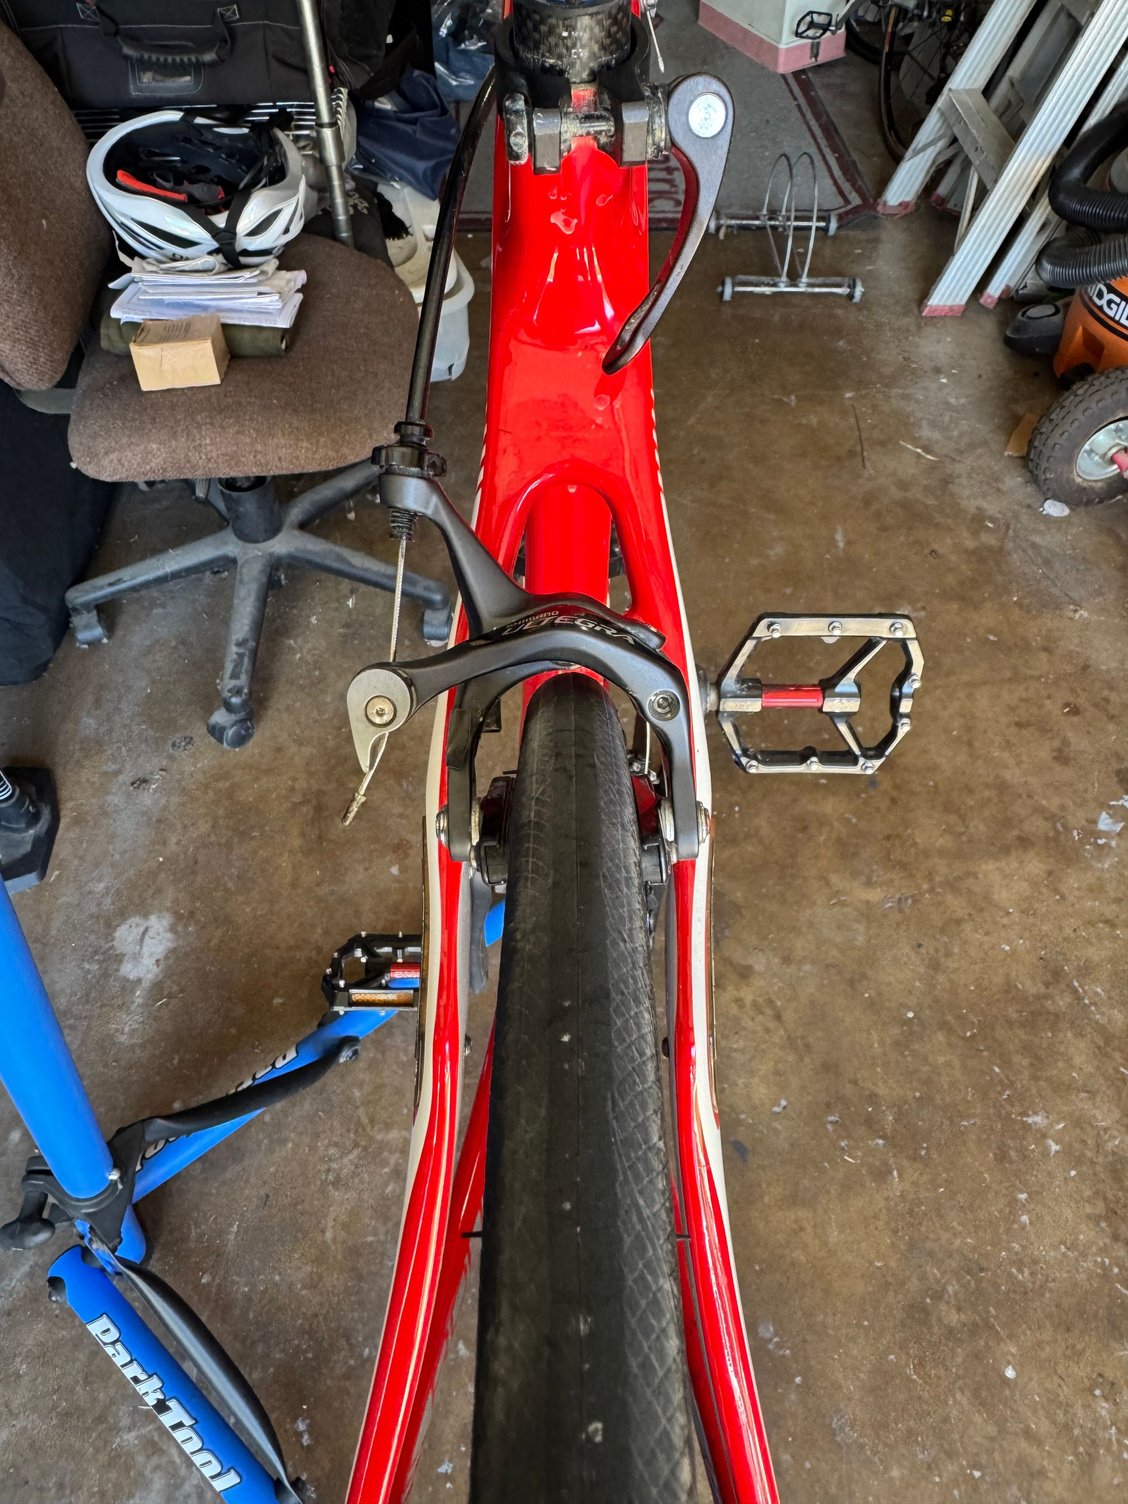
From your photo, the cable adjustment nut (see dealer manual at step 5) seems to be too far up. Screw it back down and pull the cable further down into the pinch bolt. You may also want to consider steps 4 and 7.
06-23-25 | 08:09 PM
#11
Thread Starter
old newbie
Joined: Nov 2009
Posts: 1,806
Likes: 1,142
From: Fort Worth, Texas
Bikes: Specialized Roubaix
It was me in post #4. Your brake caliper appears to be a BR-6700. Dealer manual: SI-8G60A-003-ENG.pdf
From your photo, the cable adjustment nut (see dealer manual at step 5) seems to be too far up. Screw it back down and pull the cable further down into the pinch bolt. You may also want to consider steps 4 and 7.
From your photo, the cable adjustment nut (see dealer manual at step 5) seems to be too far up. Screw it back down and pull the cable further down into the pinch bolt. You may also want to consider steps 4 and 7.
06-23-25 | 08:18 PM
#12

Senior Member

Joined: Jul 2005
Posts: 4,992
Likes: 712
From: Boulder County, CO
Bikes: '80 Masi Gran Criterium, '12 Trek Madone, early '60s Frejus track
2013 and 10-speed equals 6700. But it really doesn't matter. Check that the pads are hitting the rim squarely. It looks like the right-hand pad is half way into the spokes.
The small allen-head bolt on the right side is a centering screw. It's been loosened so much that it might fall out soon. You have to tighten this before that happens. Tighten it so you can't see the threads anymore, and give it an extra turn. Then re-center your caliper as Kontact told you to. Then tighten the allen-head mounting nut on the other side of the bridge.Then re-adjust the pad height so they both hit the rim squarely. Then fine-adjust the cable tension if necessary. Then fine-adjust the centering using that centering screw, so both pads hit the rim from opposite sides at the same time. You shouldn't have to give it more than a quarter turn in one direction or another.You can tell it's right when you feel a solid "thunk" of the pads hitting the rim simultaneously. Also, the rim won't move sideways when you apply the brake. And if you did everything right, you've done a better brake job than the average shop pro. The reason I instructed you to do it in this order is because that centering screw affects cable tension and pad level.
The small allen-head bolt on the right side is a centering screw. It's been loosened so much that it might fall out soon. You have to tighten this before that happens. Tighten it so you can't see the threads anymore, and give it an extra turn. Then re-center your caliper as Kontact told you to. Then tighten the allen-head mounting nut on the other side of the bridge.Then re-adjust the pad height so they both hit the rim squarely. Then fine-adjust the cable tension if necessary. Then fine-adjust the centering using that centering screw, so both pads hit the rim from opposite sides at the same time. You shouldn't have to give it more than a quarter turn in one direction or another.You can tell it's right when you feel a solid "thunk" of the pads hitting the rim simultaneously. Also, the rim won't move sideways when you apply the brake. And if you did everything right, you've done a better brake job than the average shop pro. The reason I instructed you to do it in this order is because that centering screw affects cable tension and pad level.
06-23-25 | 09:35 PM
#13
Thread Starter
old newbie
Joined: Nov 2009
Posts: 1,806
Likes: 1,142
From: Fort Worth, Texas
Bikes: Specialized Roubaix
2013 and 10-speed equals 6700. But it really doesn't matter. Check that the pads are hitting the rim squarely. It looks like the right-hand pad is half way into the spokes.
The small allen-head bolt on the right side is a centering screw. It's been loosened so much that it might fall out soon. You have to tighten this before that happens. Tighten it so you can't see the threads anymore, and give it an extra turn. Then re-center your caliper as Kontact told you to. Then tighten the allen-head mounting nut on the other side of the bridge.Then re-adjust the pad height so they both hit the rim squarely. Then fine-adjust the cable tension if necessary. Then fine-adjust the centering using that centering screw, so both pads hit the rim from opposite sides at the same time. You shouldn't have to give it more than a quarter turn in one direction or another.You can tell it's right when you feel a solid "thunk" of the pads hitting the rim simultaneously. Also, the rim won't move sideways when you apply the brake. And if you did everything right, you've done a better brake job than the average shop pro. The reason I instructed you to do it in this order is because that centering screw affects cable tension and pad level.
The small allen-head bolt on the right side is a centering screw. It's been loosened so much that it might fall out soon. You have to tighten this before that happens. Tighten it so you can't see the threads anymore, and give it an extra turn. Then re-center your caliper as Kontact told you to. Then tighten the allen-head mounting nut on the other side of the bridge.Then re-adjust the pad height so they both hit the rim squarely. Then fine-adjust the cable tension if necessary. Then fine-adjust the centering using that centering screw, so both pads hit the rim from opposite sides at the same time. You shouldn't have to give it more than a quarter turn in one direction or another.You can tell it's right when you feel a solid "thunk" of the pads hitting the rim simultaneously. Also, the rim won't move sideways when you apply the brake. And if you did everything right, you've done a better brake job than the average shop pro. The reason I instructed you to do it in this order is because that centering screw affects cable tension and pad level.
06-24-25 | 12:02 AM
#14
Method to My Madness
Joined: Nov 2020
Posts: 4,753
Likes: 2,086
From: Orange County, California
Bikes: Trek FX 2, Cannondale Synapse x2, Cannondale CAAD4, Santa Cruz Stigmata 3
Just curious how you were able to determine that it is 10-speed. Ultegra 6800 was released in 2013, so going by model year that I had pulled the BR-6800 manual in post #4.
Might as well start with new brake pads too. Hard to tell if one side is more worn than the other from the angle of the photo, but if they were misaligned for a long time, uneven wear may have occurred.
Might as well start with new brake pads too. Hard to tell if one side is more worn than the other from the angle of the photo, but if they were misaligned for a long time, uneven wear may have occurred.
06-24-25 | 08:31 AM
#15
Thread Starter
old newbie
Joined: Nov 2009
Posts: 1,806
Likes: 1,142
From: Fort Worth, Texas
Bikes: Specialized Roubaix
Just curious how you were able to determine that it is 10-speed. Ultegra 6800 was released in 2013, so going by model year that I had pulled the BR-6800 manual in post #4.
Might as well start with new brake pads too. Hard to tell if one side is more worn than the other from the angle of the photo, but if they were misaligned for a long time, uneven wear may have occurred.
Might as well start with new brake pads too. Hard to tell if one side is more worn than the other from the angle of the photo, but if they were misaligned for a long time, uneven wear may have occurred.
It is an 11 speed.
06-24-25 | 11:44 AM
#16
Thread Starter
old newbie
Joined: Nov 2009
Posts: 1,806
Likes: 1,142
From: Fort Worth, Texas
Bikes: Specialized Roubaix
I adjusted it this morning. I used the balance adjustment screw and watched to make sure the pads touched the rim at the same time. I moved the right pad up slightly and set it more level. I set the cable adjustment to match the front. It was at the end of its adjustment range. I will buy new pads. These don�t look really bad but they are probable old and it�s cheap peace of mind. One pad did look like it was worn at a slight angle.
06-24-25 | 01:14 PM
#17
Senior Member
Joined: Jul 2005
Posts: 4,992
Likes: 712
From: Boulder County, CO
Bikes: '80 Masi Gran Criterium, '12 Trek Madone, early '60s Frejus track
My mistake, good catch. I'd long forgotten when 6800 came out, but I should have guessed by the shape and anodizing pattern on that caliper.
06-24-25 | 01:23 PM
#18
Senior Member
Joined: Jul 2005
Posts: 4,992
Likes: 712
From: Boulder County, CO
Bikes: '80 Masi Gran Criterium, '12 Trek Madone, early '60s Frejus track
I adjusted it this morning. I used the balance adjustment screw and watched to make sure the pads touched the rim at the same time. I moved the right pad up slightly and set it more level. I set the cable adjustment to match the front. It was at the end of its adjustment range. I will buy new pads. These don�t look really bad but they are probable old and it�s cheap peace of mind. One pad did look like it was worn at a slight angle.
06-24-25 | 01:44 PM
#19
Thread Starter
old newbie
Joined: Nov 2009
Posts: 1,806
Likes: 1,142
From: Fort Worth, Texas
Bikes: Specialized Roubaix
Riders will continually knock the caliper to one side when they replace the wheel, and then recenter it using the screw. Some mechanics will do this too, I've noticed. After a few of these adjustments, one pad will be too high and the other too low, and the screw will bottom out or fall out. It's best to center the caliper like Kontact said, and then use the screw for fine adjustment, like after a few hundred miles of pad wear.
One pad was at the correct height but the other was low.
I know what to watch for now.
06-24-25 | 05:29 PM
#21
Method to My Madness
Joined: Nov 2020
Posts: 4,753
Likes: 2,086
From: Orange County, California
Bikes: Trek FX 2, Cannondale Synapse x2, Cannondale CAAD4, Santa Cruz Stigmata 3
Hmmm?
Now I am confused. The photo shows a BR-6700 based on the location of the centering adjustment bolt. Maybe pepperbelly has a mismatched groupset? (Nothing wrong with that. My main road bike is a mish mosh too.)
06-24-25 | 05:48 PM
#22
Thread Starter
old newbie
Joined: Nov 2009
Posts: 1,806
Likes: 1,142
From: Fort Worth, Texas
Bikes: Specialized Roubaix
Hmmm?
Now I am confused. The photo shows a BR-6700 based on the location of the centering adjustment bolt. Maybe pepperbelly has a mismatched groupset? (Nothing wrong with that. My main road bike is a mish mosh too.)
Now I am confused. The photo shows a BR-6700 based on the location of the centering adjustment bolt. Maybe pepperbelly has a mismatched groupset? (Nothing wrong with that. My main road bike is a mish mosh too.)
I have no idea why I was thinking it was an 11 speed all this time. I must have miscounted when I first got it.
I have passed up deals on spare parts because they were for a 10 speed.
06-24-25 | 08:10 PM
#23
Method to My Madness
Joined: Nov 2020
Posts: 4,753
Likes: 2,086
From: Orange County, California
Bikes: Trek FX 2, Cannondale Synapse x2, Cannondale CAAD4, Santa Cruz Stigmata 3
Well, Shimano 11-speed non-Di2 drivetrain components are now relatively inexpensive, and work with your existing 10-speed crank and chain rings. (Like I said, my main road bike is a mish mosh.)
06-24-25 | 09:22 PM
#24
Thread Starter
old newbie
Joined: Nov 2009
Posts: 1,806
Likes: 1,142
From: Fort Worth, Texas
Bikes: Specialized Roubaix
I don�t need to replace anything right now but I passed on a Shimano 10spd Dura Ace cassette for a steal- new in box.