


Attempted straightening of bent fork
 01-22-14 | 08:22 AM
#1

Thread Starter
Full Member

Joined: Oct 2013
Posts: 423
Likes: 123
Attempted straightening of bent fork
To continue the story from this thread at C&V:
https://www.bikeforums.net/showthread...10)?highlight=
Out of curiosity I attempted straightening the fork that was bent at the crown, as shown in the pictures--before, during, and after. Side-to-side alignment looks okay with a known wheel clamped in. If it was just me I would go ahead and ride it, but it is for my oldest friend and am not willing to send back something risky. Still, I notice what seems to be a reinforcing tube inside the lower segment of the steering tube, running from above the crown down to the bottom of the crown, so it seems to have some built-in strength redundancy. Impressions? I have a new 27" fork on order just in case (the inside diameter of the steerer tube in the photos is 22.2mm fyi, as is the od of the original stem from this 1981 Peugeot).


https://www.bikeforums.net/showthread...10)?highlight=
Out of curiosity I attempted straightening the fork that was bent at the crown, as shown in the pictures--before, during, and after. Side-to-side alignment looks okay with a known wheel clamped in. If it was just me I would go ahead and ride it, but it is for my oldest friend and am not willing to send back something risky. Still, I notice what seems to be a reinforcing tube inside the lower segment of the steering tube, running from above the crown down to the bottom of the crown, so it seems to have some built-in strength redundancy. Impressions? I have a new 27" fork on order just in case (the inside diameter of the steerer tube in the photos is 22.2mm fyi, as is the od of the original stem from this 1981 Peugeot).
 01-22-14 | 08:37 AM
#2
Senior Member
Joined: Nov 2009
Posts: 2,025
Likes: 154
From: Boston area
Bikes: 1984 Bridgestone 400 1985Univega nouevo sport 650b conversion 1993b'stone RBT 1985 Schwinn Tempo
I would not ride with it. A broken fork is about as bad a thing as can happen on a bike. Wait for the new fork. Also, check the frame especially where the don and head tubes join the head tube.
01-22-14 | 08:47 AM
#3
Senior Member
Joined: Feb 2011
Posts: 154
Likes: 0
From: Garden City South Carolina
Bikes: Colnago Master. Cannondale caad4
actually I am pretty impressed
Now I am not a frame builder but I do not see the area where the bend occurred as being a area subject of high stress while riding and I would think its fine
Now I am not a frame builder but I do not see the area where the bend occurred as being a area subject of high stress while riding and I would think its fine
01-22-14 | 09:54 AM
#5

Senior Member

Joined: Feb 2012
Posts: 19,373
Likes: 5,515
From: Rochester, NY
Bikes: Stewart S&S coupled sport tourer, Stewart Sunday light, Stewart Commuting, Stewart Touring, Co Motion Tandem, Stewart 3-Spd, Stewart Track, Fuji Finest, Mongoose Tomac ATB, GT Bravado ATB, JCP Folder, Stewart 650B ATB
This fork looks to be off a low cost Peugeot from the late 1970s. If so they were made with pretty mild grade steel. As long as there are no lingering kinks or ripples present and you don't discover any cracks or brazing failures I'd say use it. BUT you should periodical inspect the fork. (Actually this is good advice for modern carbon frames and forks independent of accidents).
The interior to the steerer reinforcing tube is just that. the steerer is likely not a butted one (again, low cost) so Peugeot just brazes in another inexpensive tube to mimic the butting found in nicer steerers. The 1st photo didn't seem to show any steerer bending had happened. if is had bent this would have been the hardest aspect to realign well and one where i might draw the line. Going for you with just the blades being the bent parts is that there are two of them. So if one should fail the other will help the "situation" not get too catastrophic. I've broken a drop out long ago while just starting up and it was no big deal to slow and stop, thankfully.
The interior to the steerer reinforcing tube is just that. the steerer is likely not a butted one (again, low cost) so Peugeot just brazes in another inexpensive tube to mimic the butting found in nicer steerers. The 1st photo didn't seem to show any steerer bending had happened. if is had bent this would have been the hardest aspect to realign well and one where i might draw the line. Going for you with just the blades being the bent parts is that there are two of them. So if one should fail the other will help the "situation" not get too catastrophic. I've broken a drop out long ago while just starting up and it was no big deal to slow and stop, thankfully.
01-22-14 | 10:01 AM
#6


Decrepit Member
Joined: Aug 2005
Posts: 10,488
Likes: 92
From: Santa Rosa, California
Bikes: Waterford 953 RS-22, several Paramounts
Nice work.
You've basically cold set the fork blades back to their original bend, and one of the nice things about steel is that small bends like this can be cold set without compromising the strength of the structure as long as it's carefully done. As long as the fork blade walls didn't get wrinkled or buckled, and the brazing between the crown and the blades shows no cracking along the crown shorelines, it should be fine. This is the kind of repair most framebuilders avoid like the plague because of potential liability.
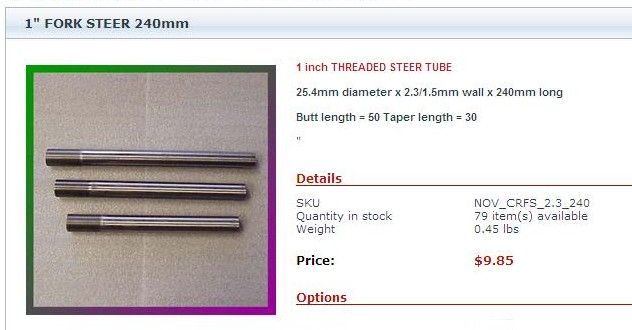
The steerer tube reinforcement at the crown is normal butting; there is a taper between the thinner tube walls at the top of the steerer and the thicker walled butted bottom end where it's brazed into the crown.
This is pretty typical of threaded steel steerers with 1.5mm wall thickness at the top, a 30mm transition taper, and a 50mm butted section that has 2.3mm thick walls.
You've basically cold set the fork blades back to their original bend, and one of the nice things about steel is that small bends like this can be cold set without compromising the strength of the structure as long as it's carefully done. As long as the fork blade walls didn't get wrinkled or buckled, and the brazing between the crown and the blades shows no cracking along the crown shorelines, it should be fine. This is the kind of repair most framebuilders avoid like the plague because of potential liability.
The steerer tube reinforcement at the crown is normal butting; there is a taper between the thinner tube walls at the top of the steerer and the thicker walled butted bottom end where it's brazed into the crown.
This is pretty typical of threaded steel steerers with 1.5mm wall thickness at the top, a 30mm transition taper, and a 50mm butted section that has 2.3mm thick walls.
 01-22-14 | 10:44 AM
#7

Si Senior
Joined: Nov 2004
Posts: 2,669
Likes: 11
From: Naperville, Illinois
Bikes: Too Numerous (not)
Maybe I'm crazy, but I've seen so many older forks with that same bend (as shown in the first photo) that I've assumed it was intentional. I've personally had 2 or 3 but I'm thinking I've seen bike photos of many more that seemed to show that same backward bend. Curious.
[Addition: some perspective: Some years back I built up an older bianchi for my kids who promptly had a head-on with post on a multi-use trial. It severly bent and buckled the downtube and top tube but did nothing to the fork. I have sssumed that forks would not bend so easily --and therefore any such bend would be intentional and not the result of a head-on incident]
[Addition: some perspective: Some years back I built up an older bianchi for my kids who promptly had a head-on with post on a multi-use trial. It severly bent and buckled the downtube and top tube but did nothing to the fork. I have sssumed that forks would not bend so easily --and therefore any such bend would be intentional and not the result of a head-on incident]
Last edited by dbg; 01-22-14 at 10:54 AM.
01-22-14 | 10:50 AM
#8
Thread Starter
Full Member
Joined: Oct 2013
Posts: 423
Likes: 123
I applied the push centrally on the crown by tightening the big clamp shown in the second photograph. So I think the force was approximately equally divided between the stays and the steering column. That was a judgment call, I thought about spacing the lower blocks unequally from the crown (and I also thought about immobilizing the crown with one clamp, leaving the forks free in space facing down, and then applying the clamp to the back of the forks alone). I did realize that the force the forks received wouldn't (necessarily) be equally divided between the two, so I checked them against each other as shown with my cheapo "home brew" alignment gauge/tool in the third photo--but with only a very minor tweak that seemed okay.
01-22-14 | 11:22 AM
#9
I AM AI
Joined: Aug 2013
Posts: 4,288
Likes: 1,170
From: Tucson, AZ
Bikes: 2008 S-Works Roubaix SL, 1979 Raleigh Comp GS, 1978 Schwinn Volare
Who's making a mental note of your method?
This guy!
Way to think through the problem and get it solved. Excellent DIY.
This guy!
Way to think through the problem and get it solved. Excellent DIY.
__________________
A race bike in any era is a highly personal choice that at its "best" balances the requirements of fit, weight, handling, durability and cost tempered by the willingness to toss it and oneself down the pavement at considerable speed. ~Bandera
A race bike in any era is a highly personal choice that at its "best" balances the requirements of fit, weight, handling, durability and cost tempered by the willingness to toss it and oneself down the pavement at considerable speed. ~Bandera
01-22-14 | 11:32 AM
#10
Senior Member
Joined: Feb 2011
Posts: 154
Likes: 0
From: Garden City South Carolina
Bikes: Colnago Master. Cannondale caad4
01-22-14 | 12:13 PM
#11
Thread Starter
Full Member
Joined: Oct 2013
Posts: 423
Likes: 123
Thank you! FWIW, you may notice in the second photo that I did shove a piece of unthreaded pipe into the steerer tube, until it hit the internal reinforcing tube, as a bit of reinforcement (not sure how this would work out if the steerer tube was higher quality butted cro-mo steel!). Ultimately knowing where that extra internal tube ended helped inform where I placed the block--I put the block on a segment of the steerer tube that contained the internal reinforcing tube (so perhaps the pipe was superfluous). I did visually inspect and saw no ripples or bulges on the steerer tube, and no visible cracks anywhere. But I will be taking a close look at everything again, giving this some more thought, and if it is returned to the finished bike for regular riding it will surely be subject to a warning to monitor it closely!
01-29-14 | 10:40 AM
#12
Thread Starter
Full Member
Joined: Oct 2013
Posts: 423
Likes: 123
I noticed this earlier post, and it has pictures of the REAL tools, and a link to a chapter on frame & fork alignment: https://www.bikeforums.net/showthread...ligning-a-fork

 01-29-14 | 01:19 PM
#15
Senior Member
Joined: Jul 2006
Posts: 3,135
Likes: 108
From: Middle of the road, NJ
I would take that fork to the nearest scrap yard, maybe they'd give you $1.98 for it. NFW I would ride it, even though it looks ok.
I had a fork break at the steerer\crown junction. I was lucky I was almost stopped. I got away with two black eyes, and leaving the left side of my face on the road. It hurt. It was messy. And I can still find the notch in my 'stash from the scar. I did get lots of 'sympathy' from my girl friend (always a bright side).
Don't take the chance.
Other than that, nice job.
I had a fork break at the steerer\crown junction. I was lucky I was almost stopped. I got away with two black eyes, and leaving the left side of my face on the road. It hurt. It was messy. And I can still find the notch in my 'stash from the scar. I did get lots of 'sympathy' from my girl friend (always a bright side).
Don't take the chance.
Other than that, nice job.

Thread
Thread Starter
Forum
Replies
Last Post
Phil_gretz
Classic and Vintage Bicycles: Whats it Worth? Appraisals.
4
05-16-15 09:50 AM
