


How to remove brake levers?
 05-18-15 | 08:46 AM
#1
Thread Starter
Full Member

Joined: Feb 2015
Posts: 387
Likes: 11
From: Dallas, TX
Bikes: 1986 Univega Gran Rally 1993 Univega Gran Premio 1995 Univega Alpina 501 Univega Nuovo Sport Univega Viva Sport
How to remove brake levers?
Any special instructions on how to remove those extra brake levers or whatever they are called? I want to put white hoods on the brake housing is that do-able?
 05-18-15 | 08:50 AM
#2

Senior Member
Joined: Feb 2013
Posts: 1,472
Likes: 11
From: Near St. Louis, Missouri
Bikes: Giant Defy Advanced, Breezer Doppler Team, Schwinn Twinn Tandem, Windsor Tourist, 1954 JC Higgens
Well you can just remove the screws; remove the extra levers; then put the screws back in. However it leaves the pin sticking out about a 1/3". I've ridden them that way back in the day. You could get the correct pivot pin and replace it.
05-18-15 | 08:53 AM
#3

Still learning
Joined: May 2012
Posts: 11,529
Likes: 88
From: North of Canada, Adirondacks
Bikes: Still a garage full
For the cost of a pair of hoods, @wrk101 recommends something like these.
Winzip Right Rear Road Bike Brake Lever 147G | eBay
Well padded quality TEKTRO levers RL340 are only $21 a pair.
Winzip Right Rear Road Bike Brake Lever 147G | eBay
Well padded quality TEKTRO levers RL340 are only $21 a pair.
05-18-15 | 08:59 AM
#4
Junior Member
Joined: May 2015
Posts: 181
Likes: 31
From: roads & trails
Bikes: 1972 Raleigh international, 1975 Raleigh professional, 1978 ALAN criterium, 1981 Pinnarello Traviso
remove the screw securing the extension lever's, and the extension levers,
then carefully use a hacksaw to cut the boss that the extension lever fit on flush with the brake lever
clean up the end with a fine file, or some emery paper till it is smooth and flush, and fit your new hoods
your bike will thank you
then carefully use a hacksaw to cut the boss that the extension lever fit on flush with the brake lever
clean up the end with a fine file, or some emery paper till it is smooth and flush, and fit your new hoods
your bike will thank you
05-18-15 | 09:41 AM
#5
Thread Starter
Full Member
Joined: Feb 2015
Posts: 387
Likes: 11
From: Dallas, TX
Bikes: 1986 Univega Gran Rally 1993 Univega Gran Premio 1995 Univega Alpina 501 Univega Nuovo Sport Univega Viva Sport
remove the screw securing the extension lever's, and the extension levers,
then carefully use a hacksaw to cut the boss that the extension lever fit on flush with the brake lever
clean up the end with a fine file, or some emery paper till it is smooth and flush, and fit your new hoods
your bike will thank you
then carefully use a hacksaw to cut the boss that the extension lever fit on flush with the brake lever
clean up the end with a fine file, or some emery paper till it is smooth and flush, and fit your new hoods
your bike will thank you
05-18-15 | 09:51 AM
#6
Thread Starter
Full Member
Joined: Feb 2015
Posts: 387
Likes: 11
From: Dallas, TX
Bikes: 1986 Univega Gran Rally 1993 Univega Gran Premio 1995 Univega Alpina 501 Univega Nuovo Sport Univega Viva Sport
Brake line coming out of top of brakes...how do I work the hoods over/on that?
05-18-15 | 10:08 AM
#7

Old fart


Joined: Nov 2004
Posts: 26,359
Likes: 5,271
From: Appleton WI
Bikes: Several, mostly not name brands.
Remove the cable from the lever before installing the hood. With natural gum rubber hoods, it's often safer to remove the entire lever from the bar and slip the hood over the back of the body, rather than trying to wrestle the hood over the lever blade and body together and risk tearing the hood.
05-18-15 | 10:18 AM
#8
Thread Starter
Full Member
Joined: Feb 2015
Posts: 387
Likes: 11
From: Dallas, TX
Bikes: 1986 Univega Gran Rally 1993 Univega Gran Premio 1995 Univega Alpina 501 Univega Nuovo Sport Univega Viva Sport
Remove the cable from the lever before installing the hood. With natural gum rubber hoods, it's often safer to remove the entire lever from the bar and slip the hood over the back of the body, rather than trying to wrestle the hood over the lever blade and body together and risk tearing the hood.
05-18-15 | 10:22 AM
#9
Old fart
Joined: Nov 2004
Posts: 26,359
Likes: 5,271
From: Appleton WI
Bikes: Several, mostly not name brands.
Yes, if you're careful to buy a hood designed for that cable routing. Many modern brake levers route the cable out the back of the lever and under the bar tape, and so the hoods do not have a hole for the cable to exit.
05-18-15 | 12:41 PM
#10
Thread Starter
Full Member
Joined: Feb 2015
Posts: 387
Likes: 11
From: Dallas, TX
Bikes: 1986 Univega Gran Rally 1993 Univega Gran Premio 1995 Univega Alpina 501 Univega Nuovo Sport Univega Viva Sport
If not, maybe make a small hole and that way it will form fit to the brake cable?
05-18-15 | 12:55 PM
#11
Banned
Joined: Jun 2010
Posts: 43,586
Likes: 1,380
From: NW,Oregon Coast
Bikes: 8
Squeeze the Lever and behind the cable is a screw that loosens the Band Clamp to take the whole lever off the handlebar.
then you can shop for a different Brake Lever. Getting one not made 35+ years ago will make the lever and Hood included purchase more realistic.
then you can shop for a different Brake Lever. Getting one not made 35+ years ago will make the lever and Hood included purchase more realistic.
05-18-15 | 01:47 PM
#12
Thread Starter
Full Member
Joined: Feb 2015
Posts: 387
Likes: 11
From: Dallas, TX
Bikes: 1986 Univega Gran Rally 1993 Univega Gran Premio 1995 Univega Alpina 501 Univega Nuovo Sport Univega Viva Sport
https://www.amazon.com/Dia-Compe-Cree...hoods+non-aero
These will work...
Would I have to upgrade and get new brakes in order to make them streamlined (aero)?
These will work...
Would I have to upgrade and get new brakes in order to make them streamlined (aero)?
05-18-15 | 02:36 PM
#13
Old fart
Joined: Nov 2004
Posts: 26,359
Likes: 5,271
From: Appleton WI
Bikes: Several, mostly not name brands.
https://www.amazon.com/Dia-Compe-Cree...hoods+non-aero
These will work...
Would I have to upgrade and get new brakes in order to make them streamlined (aero)?
These will work...
Would I have to upgrade and get new brakes in order to make them streamlined (aero)?
05-18-15 | 02:53 PM
#14

Senior Member

Joined: Mar 2010
Posts: 6,970
Likes: 59
From: Catskills/Brooklyn, NY
Bikes: See sig
I'd just replace them with these: wiggle.com | Dia-Compe DC204N Road Brake Levers | Brake Levers
05-19-15 | 09:46 AM
#15
Thread Starter
Full Member
Joined: Feb 2015
Posts: 387
Likes: 11
From: Dallas, TX
Bikes: 1986 Univega Gran Rally 1993 Univega Gran Premio 1995 Univega Alpina 501 Univega Nuovo Sport Univega Viva Sport
I'd just replace them with these: wiggle.com | Dia-Compe DC204N Road Brake Levers | Brake Levers
05-19-15 | 10:17 AM
#16

Senior Member
Joined: Oct 2012
Posts: 2,722
Likes: 1,698
From: Berkeley CA
Bikes: 1981 Ron Cooper, 1974 Cinelli Speciale Corsa, 1975 Alex Singer, 2000 Gary Fisher Sugar 1, 1986 Miyata 710, 1982 Raleigh "International", 1985 Trek 720
Your old stuff will work. However, unless you know that your cables have been replaced in the recent past it will likely result in a large braking improvement to replace them and the housings. The housings of older cables are unlined and have far more friction than newer types. Also, many of the newer cables are coated whereas the older ones weren't. This is a major part of the reason why people complain about the braking power of older brake sets. The friction in the housing can significantly reduce the amount of force that gets applied to the brake pads.
05-19-15 | 12:16 PM
#17
Old fart
Joined: Nov 2004
Posts: 26,359
Likes: 5,271
From: Appleton WI
Bikes: Several, mostly not name brands.
The housings of older cables are unlined and have far more friction than newer types. Also, many of the newer cables are coated whereas the older ones weren't. This is a major part of the reason why people complain about the braking power of older brake sets. The friction in the housing can significantly reduce the amount of force that gets applied to the brake pads.
 05-19-15 | 01:15 PM
#19
I AM AI
Joined: Aug 2013
Posts: 4,287
Likes: 1,168
From: Tucson, AZ
Bikes: 2008 S-Works Roubaix SL, 1979 Raleigh Comp GS, 1978 Schwinn Volare
Match the saddle.
__________________
A race bike in any era is a highly personal choice that at its "best" balances the requirements of fit, weight, handling, durability and cost tempered by the willingness to toss it and oneself down the pavement at considerable speed. ~Bandera
A race bike in any era is a highly personal choice that at its "best" balances the requirements of fit, weight, handling, durability and cost tempered by the willingness to toss it and oneself down the pavement at considerable speed. ~Bandera
05-19-15 | 01:17 PM
#20
Thread Starter
Full Member
Joined: Feb 2015
Posts: 387
Likes: 11
From: Dallas, TX
Bikes: 1986 Univega Gran Rally 1993 Univega Gran Premio 1995 Univega Alpina 501 Univega Nuovo Sport Univega Viva Sport
05-19-15 | 02:20 PM
#21

Ride, Wrench, Swap, Race
Joined: Jan 2010
Posts: 9,818
Likes: 1,790
From: Northern California
Bikes: Cheltenham-Pedersen racer, Boulder F/S Paris-Roubaix, Varsity racer, '52 Christophe, '62 Continental, '92 Merckx, '75 Limongi, '76 Presto, '72 Gitane SC, '71 Schwinn SS, etc.
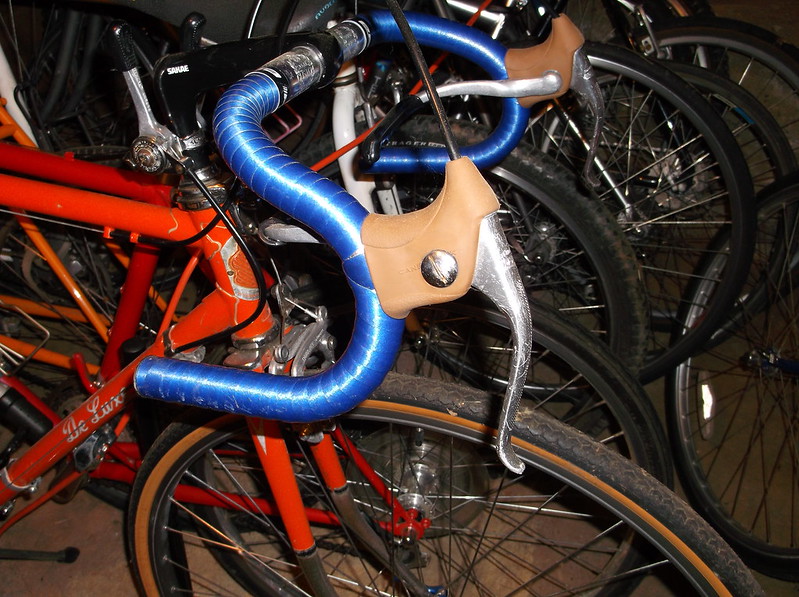
I like to keep the aux. levers handy for more comfortably going downhill, and for some added safety when following in even a loose paceline.
I usually cut fully around the big washer that goes over the protruding pivot stud, which helps to preserve free lever movement with the screw more fully tightened, and I add Loctite threadlocker to the screw threads so that I can somewhat adjust the tension, again for free lever movement. I start with a smaller hole, install the hood, and then fine-tune the "neat" hole (using a razor) that I cut around the stud and washer.
So here are a couple of examples of putting hoods on with the safety levers.
Note I always slide on the hood from the front, using a spritz of rubbing alcohol from the spray bottle I keep handy.
A twisting motion gets the hood more willing to slide over.
Lastly, the ferrule gets forced down into the snout on the hood, and the cable re-attached once the hood and ferrule are back in place. I sometimes keep the ferrule on the cable with the housing, so then just have to force the cable end with the housing and ferrule down into the snout and hook the cable end inside of the lever, which will require that the other end of the cable be un-clamped or at least un-hooked from whatever kind of brake that it's attached to (center-pull or side-pull, whatever).
Squeezing the caliper together with the wheel removed or with the QR lever open might allow the cable end to be removed and replaced from the lever, but is definitely more difficult and might not be so friendly to the caliper springs. Fully removing the cables allows greasing of the cables and correcting any bends, and also allows crushed/bent original housings ends to be clipped off for a straighter exit from the lever (and for better braking).
It's also a good idea to trim a couple of millimeters from the front edge of the lever body for some added lever throw and cable pull, while the cables and hoods aren't in the way.
Lastly, look inside of the levers to see if the tangs of the lever are bent together from taking a side-blow, and if so the lever needs to come apart, so as to spread the tangs back apart and inspect/restore the bushings as needed.
Last edited by dddd; 05-19-15 at 02:40 PM.
05-19-15 | 02:48 PM
#22
I AM AI
Joined: Aug 2013
Posts: 4,287
Likes: 1,168
From: Tucson, AZ
Bikes: 2008 S-Works Roubaix SL, 1979 Raleigh Comp GS, 1978 Schwinn Volare
Get a colored saddle! 
Other preferred option for tape is to match with a contrasting decal color. What color are those decals? Plain ol' boring white? Hmmmm. Rock and a hard place. Go with a natural tan color to complement the skinwall tires. Doesn't get as messy as white, but still offers a bit of contrast against the red frame without fighting the saddle.
Ta daaa!
__________________
A race bike in any era is a highly personal choice that at its "best" balances the requirements of fit, weight, handling, durability and cost tempered by the willingness to toss it and oneself down the pavement at considerable speed. ~Bandera
A race bike in any era is a highly personal choice that at its "best" balances the requirements of fit, weight, handling, durability and cost tempered by the willingness to toss it and oneself down the pavement at considerable speed. ~Bandera
Last edited by Fahrenheit531; 05-19-15 at 02:58 PM.
05-19-15 | 03:51 PM
#24

Sunshine
Joined: Aug 2014
Posts: 18,706
Likes: 10,240
From: Des Moines, IA
Bikes: '18 class built steel roadbike, '19 Fairlight Secan, '88 Schwinn Premis , Black Mountain Cycles Monstercross V4, '89 Novara Trionfo
If the frame is a solid main color, back tape seems to usually look best, especially when the saddle is black. Black tape, housing, and saddle to offset the bold color frame.
If a frame is black though, I like to sometimes match the housing to the accent color, and then tape matching the housing if possible. So black frame with red lettering would get red cable housing and red bar tape(cinelli on Amazon isn't expensive, good quality, and color).
A white frame can get away, in my opinion, with the same idea as a black frame- matching the housing and tape to the accent color.
I did up a navy blue Puch last fall with new decals- I picked orange since that contrasts well with the blue. After adding orange bar tape to match the lettering, I realized I had just built up a Chicago Bears themed bike!

Thread
Thread Starter
Forum
Replies
Last Post
lotekmod
Classic & Vintage
10
02-01-15 06:29 AM
