


Dynamo wiring
 11-03-16 | 01:25 PM
#1

Thread Starter
aka Tom Reingold


Joined: Jan 2009
Posts: 44,160
Likes: 6,381
From: New York, NY, and High Falls, NY, USA
Bikes: 1962 Rudge Sports, 1971 Raleigh Super Course, 1971 Raleigh Pro Track, 1974 Raleigh International, 1975 Viscount Fixie, 1982 McLean, 1996 Lemond (Ti), 2002 Burley Zydeco tandem
Dynamo wiring
Do you have pictures or descriptions of your wiring for your dynamo lights (or wiring for anything, really)? It's hard to do a neat job of it. I remember [MENTION=137164]southpawboston[/MENTION] showing some very clever techniques, but they require more skill than I have (or more time than I am willing to spend).
Once again, I'm trying to use blobs of silicone glue on the frame and fork and embedding the wires in them. I hold the wires on for a few days with zip ties.
Also, how much extra slack do you leave? Ideally, there should be none, but I'm always afraid of cutting them too short, so I leave them too long and coil the excess which is ugly.
__________________
Tom Reingold, tom@noglider.com
New York City and High Falls, NY
Blogs: The Experienced Cyclist; noglider's ride blog
�When man invented the bicycle he reached the peak of his attainments.� � Elizabeth West, US author
Please email me rather than PM'ing me. Thanks.
Tom Reingold, tom@noglider.com
New York City and High Falls, NY
Blogs: The Experienced Cyclist; noglider's ride blog
�When man invented the bicycle he reached the peak of his attainments.� � Elizabeth West, US author
Please email me rather than PM'ing me. Thanks.
 11-03-16 | 01:34 PM
#2

Senior Member

Joined: Jan 2006
Posts: 6,566
Likes: 1,064
From: Berwyn PA
Bikes: I hate bikes!
From the Velo Lumino website: Velo Lumino - Online : About
Pro tip: how to create an elastic coiled wire for dynamo wiring
August 27, 2015August 27, 2015 somervillebikesLeave a comment
One tricky place for wiring is between the fork and the frame, regardless if you are running the wire internally or externally to the frame. Unless your bike has a carbon brush in the steerer � la Ren� Herse, the wire has to pass externally from the fork crown or the fender to a hole in the downtube. What’s more, the wire has to have slack in it to allow the fork to turn without pulling the wire. I’ve seen all sorts of solutions to this, but none of them are perfect. The best approach I’ve seen is a wire that coils like an old fashioned telephone cord. Most of the Installations I’ve seen this way get it wrong. You can coil wire around a pencil or something similar, but it won’t keep its shape: one pull and it the coil straightens back out. That’s because when wire is made, the plastic coating is melted on and fused while the wire is held straight and taut, and then cooled rapidly. So even when the wire gets wound onto a spool for distribution, the plastic has “memory” and wants to straighten. Depending on the formulation of the plastic wire wrapping, it’s possible to “re-train” it keep the coil shape simply by heating it enough but not too much– or it will melt. Here’s what you’ll need: wire, a narrow rod like a fender stay (you can even use one on your bike without removing it), and a heat gun (a hair dryer doesn’t get hot enough).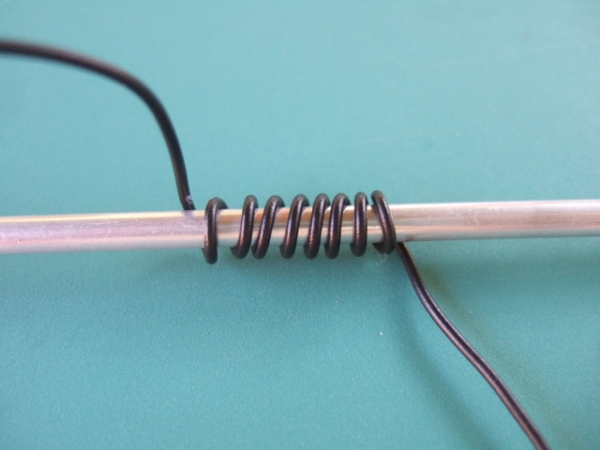
- coil the wire tightly around a narrow rod, like a fender stay (you can even do this on the bike!). Pencils and pens are too thick (and pens might melt).
- hold the ends in place or tape them in place so the coil doesn’t unravel when you let go.
- use the heat gun to heat the wire evenly– test a small piece beforehand to make sure it doesn’t melt.
- allow the wire to cool. Sometimes cooling it rapidly by running it under cold water for a few seconds helps the wire learn its new shape.
11-03-16 | 02:03 PM
#3
Senior Member
Joined: Dec 2007
Posts: 895
Likes: 10
From: columbus, ohio
Bikes: Soma Saga, 1980 Schwinn Voyageur 11.8, New Albion Privateer
I just loosely wrap the wire around the fork where it comes up from the hub and maybe a zip tie along the way at some point. For the rear light, I loosely wray under the top tube along the brake cable housing and then loosely under the rear rack attached with a zip tie. The wire is hardly noticeable and blends in with other cables. If you want some extra slack make a couple extra wraps here or there.
11-03-16 | 02:23 PM
#4
Senior Member
Joined: Jun 2013
Posts: 1,642
Likes: 6
From: Cedar Rapids, IA
Bikes: 1997 Rivendell Road Standard 650b conversion (tourer), 1988 Schwinn Project KOM-10 (gravel/tour), 2013 Foundry Auger disc (CX/gravel), 2016 Cannondale Fat CAAD 2 (MTB/winter), 2011 Cannondale Flash 29er Lefty (trail MTB)
Tom, I glued the wires on my '88 Schwinn KOM earlier this year. I used the same technique; glue and zip tie, remove zip ties later.
I used Shoe Goo, which is nice because any excess globs (or after removal) can be rolled up off the frame easily with my fingers.
My wires are glued up the fork leg to the light (on the side of the front rack), zipped to the rack, then glued under the fork to the down tube (about 2" of slack here), under the BB (a little slack here, for cables), along the NDS chainstay, and up the rack strut to the tail light.
I like [MENTION=46029]fender1[/MENTION]'s suggestion of coiling the slack between the fork and downtube; I'll do that next time.
Mine had a little slack at the tail light end, so I wrapped the (black) wire around the (black) rack about 4 times before going into the tail light.
I have about ~300 miles on this setup, including plenty of gravel and dirt, and the wires have stayed in place and intact.
Since this has worked so well, I'll probably do glue the wires to my Rivendell next time I do an overhaul. At the same time, I'll install the Honjo fenders (and run the taillight wire in the fender edge) that have been sitting on my shelf for over a year.
(I got a killer deal on them, and the Velo Orange fenders currently on the bike work fine for now).
11-03-16 | 02:31 PM
#5

Senior Member
Joined: Mar 2010
Posts: 6,970
Likes: 59
From: Catskills/Brooklyn, NY
Bikes: See sig
I just use zip ties the same color as the frame (red) and clear ones for the racks. I try to hide the cable under / behind tubes, racks, fenders, etc as much as possible. At places where it needs to flex (say, the transition from the head tube to the top tube) I wind it around a pencil to make a little spring.
11-03-16 | 08:00 PM
#6

Senior Member
Joined: Aug 2012
Posts: 345
Likes: 3
Bikes: Black Beauty; The Lone Ranger; Samsquantch
I used "Cobra Flexroute" (Flexroute Cable Management Solution - Cobra Cable Ties | Cobra Products) and some carbon fiber tubing used for model airplanes I picked up from the hobby shop (I think it was 3/16" od). The wire fit snugly inside and doesn't rattle around. It worked out real good and is very discreet. For a vintage bike, I would of probably used the cable route rings and polished some aluminum tubing, but it's on a modern bike, so really not much an issue.
11-03-16 | 08:30 PM
#7
Senior Member
Joined: Jan 2006
Posts: 6,566
Likes: 1,064
From: Berwyn PA
Bikes: I hate bikes!
Tom, I glued the wires on my '88 Schwinn KOM earlier this year. I used the same technique; glue and zip tie, remove zip ties later.
I used Shoe Goo, which is nice because any excess globs (or after removal) can be rolled up off the frame easily with my fingers.
My wires are glued up the fork leg to the light (on the side of the front rack), zipped to the rack, then glued under the fork to the down tube (about 2" of slack here), under the BB (a little slack here, for cables), along the NDS chainstay, and up the rack strut to the tail light.
I like [MENTION=46029]fender1[/MENTION]'s suggestion of coiling the slack between the fork and downtube; I'll do that next time.
Mine had a little slack at the tail light end, so I wrapped the (black) wire around the (black) rack about 4 times before going into the tail light.
I have about ~300 miles on this setup, including plenty of gravel and dirt, and the wires have stayed in place and intact.
Since this has worked so well, I'll probably do glue the wires to my Rivendell next time I do an overhaul. At the same time, I'll install the Honjo fenders (and run the taillight wire in the fender edge) that have been sitting on my shelf for over a year.
(I got a killer deal on them, and the Velo Orange fenders currently on the bike work fine for now).
I used Shoe Goo, which is nice because any excess globs (or after removal) can be rolled up off the frame easily with my fingers.
My wires are glued up the fork leg to the light (on the side of the front rack), zipped to the rack, then glued under the fork to the down tube (about 2" of slack here), under the BB (a little slack here, for cables), along the NDS chainstay, and up the rack strut to the tail light.
I like [MENTION=46029]fender1[/MENTION]'s suggestion of coiling the slack between the fork and downtube; I'll do that next time.
Mine had a little slack at the tail light end, so I wrapped the (black) wire around the (black) rack about 4 times before going into the tail light.
I have about ~300 miles on this setup, including plenty of gravel and dirt, and the wires have stayed in place and intact.
Since this has worked so well, I'll probably do glue the wires to my Rivendell next time I do an overhaul. At the same time, I'll install the Honjo fenders (and run the taillight wire in the fender edge) that have been sitting on my shelf for over a year.
(I got a killer deal on them, and the Velo Orange fenders currently on the bike work fine for now).
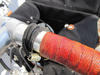
[IMG]
 [/IMG]
The wire on the NDS fork leg is for an old computer.
11-04-16 | 06:12 AM
#8

multimodal commuter
Joined: Nov 2006
Posts: 19,810
Likes: 597
From: NJ, NYC, LI
Bikes: 1940s Fothergill, 1959 Allegro Special, 1963? Claud Butler Olympic Sprint, Lambert 'Clubman', 1974 Fuji "the Ace", 1976 Holdsworth 650b conversion rando bike, 1983 Trek 720 tourer, 1984 Counterpoint Opus II, 1993 Basso Gap, 2010 Downtube 8h, and...
I have not tried these, but they might be good for this application.

https://www.amazon.com/Jagwire-Alloy.../dp/B004EDIJUC
https://www.amazon.com/Jagwire-Alloy.../dp/B004EDIJUC
__________________
www.rhmsaddles.com.
www.rhmsaddles.com.
11-04-16 | 07:47 AM
#9

Bike Butcher of Portland

Joined: Jul 2014
Posts: 12,444
Likes: 7,978
From: Portland, OR
Bikes: It's complicated.
I've studied Anton's flickr site for hours. It's not just one thing he does that makes his wiring so good, it's the cumulation of little things. I especially like his use of 2mm banana plugs. This allows you to disconnect the wiring from front to rear so one can remove the front fork, for example, without having to rewire. Soldering skills are required.
I do all of my lighting jobs that way now.
I do all of my lighting jobs that way now.
__________________
If someone tells you that you have enough bicycles and you don't need any more, stop talking to them. You don't need that kind of negativity in your life.
If someone tells you that you have enough bicycles and you don't need any more, stop talking to them. You don't need that kind of negativity in your life.
11-04-16 | 08:46 AM
#10

Senior Member
Joined: Feb 2008
Posts: 5,309
Likes: 4,809
From: Peoria, IL
I've studied Anton's flickr site for hours. It's not just one thing he does that makes his wiring so good, it's the cumulation of little things. I especially like his use of 2mm banana plugs. This allows you to disconnect the wiring from front to rear so one can remove the front fork, for example, without having to rewire. Soldering skills are required.
I do all of my lighting jobs that way now.
I do all of my lighting jobs that way now.
Anton does like the 2mm plugs, so I assume he has been getting good results. As an electrical engineer who has dealt with connector issues in the fields of aviation and earthmoving equipment, I'd like these plugs better if I knew who made them or what their intended applications are.
Personally, I've been using some Amphenol (formerly Deutsch) pins and sockets for dynamo wiring for about 16 years or so.
The pins are found here at Digikey (a package of 10):
AT60-202-20NKIT Amphenol Sine Systems Corp | Connectors, Interconnects | DigiKey
and the sockets are here:
AT62-201-20NKIT Amphenol Sine Systems Corp | Connectors, Interconnects | DigiKey
These are machined pins, which are a bit fancy, I suppose. There are stamped versions, which are a tad cheaper.
AT60-16-0122 Amphenol Sine Systems Corp | Connectors, Interconnects | DigiKey
AT62-16-0122 Amphenol Sine Systems Corp | Connectors, Interconnects | DigiKey
Gold plated versions are available too, but these are only required for low current signals (a few mA). For bike lights, the nickle plating is very reliable and more durable than the gold.
Not saying that the 2mm bananas aren't good enough... just saying that some of us want to know the details of the parts that we use. Chalk it up to a career as an engineer that had to worry about every detail.

Steve in Peoria
11-04-16 | 09:42 AM
#11

Senior Member
Joined: Dec 2009
Posts: 8,343
Likes: 16
From: Louisville
I have not tried these, but they might be good for this application.
https://www.amazon.com/Jagwire-Alloy.../dp/B004EDIJUC
https://www.amazon.com/Jagwire-Alloy.../dp/B004EDIJUC
I agree with Mark that the really tidy and classy wiring setups are the culmination of several methods/parts/tools.
That said, some judicious use of electrical tape or helicopter tape can do a pretty satisfactory job. I bought wire and banana plugs for my next setup from VeloLumino.
11-04-16 | 12:29 PM
#12

Senior Member
Joined: Aug 2008
Posts: 4,134
Likes: 192
From: Somerville, MA and Catskill Mtns
Hey Steve,
The intended use for these connectors is model railroad applications and for RF-controlled cars and planes. They're definitely not military grade connectors, and they're made in China, but for outdoor biking applications they are a dream. They do not corrode and they never loosen on their own. They have no built in strain relief mechanism but I haven't had a single report from the field of a failure. Sinewave Cycles also uses them for their dynamo-driven USB charger (they're the folks who made me aware of them), and they've reported not having any problems with them.
The intended use for these connectors is model railroad applications and for RF-controlled cars and planes. They're definitely not military grade connectors, and they're made in China, but for outdoor biking applications they are a dream. They do not corrode and they never loosen on their own. They have no built in strain relief mechanism but I haven't had a single report from the field of a failure. Sinewave Cycles also uses them for their dynamo-driven USB charger (they're the folks who made me aware of them), and they've reported not having any problems with them.
There are a lot of "recommended practices" for reliable wiring, and while bike lighting isn't the most hostile environment, it certainly does benefit from adopting a number of them. Reliable connectors, strain relief at the connectors, proper soldering practices, proper crimping methods for any connector contacts (and this usually requires pricey tools), support of the wire bundle at frequent intervals, etc.
Anton does like the 2mm plugs, so I assume he has been getting good results. As an electrical engineer who has dealt with connector issues in the fields of aviation and earthmoving equipment, I'd like these plugs better if I knew who made them or what their intended applications are.
Personally, I've been using some Amphenol (formerly Deutsch) pins and sockets for dynamo wiring for about 16 years or so.
The pins are found here at Digikey (a package of 10):
AT60-202-20NKIT Amphenol Sine Systems Corp | Connectors, Interconnects | DigiKey
and the sockets are here:
AT62-201-20NKIT Amphenol Sine Systems Corp | Connectors, Interconnects | DigiKey
These are machined pins, which are a bit fancy, I suppose. There are stamped versions, which are a tad cheaper.
AT60-16-0122 Amphenol Sine Systems Corp | Connectors, Interconnects | DigiKey
AT62-16-0122 Amphenol Sine Systems Corp | Connectors, Interconnects | DigiKey
Gold plated versions are available too, but these are only required for low current signals (a few mA). For bike lights, the nickle plating is very reliable and more durable than the gold.
Not saying that the 2mm bananas aren't good enough... just saying that some of us want to know the details of the parts that we use. Chalk it up to a career as an engineer that had to worry about every detail.
Steve in Peoria
11-04-16 | 01:03 PM
#13
Senior Member
Joined: Feb 2008
Posts: 5,309
Likes: 4,809
From: Peoria, IL
Hey Steve,
The intended use for these connectors is model railroad applications and for RF-controlled cars and planes. They're definitely not military grade connectors, and they're made in China, but for outdoor biking applications they are a dream. They do not corrode and they never loosen on their own. They have no built in strain relief mechanism but I haven't had a single report from the field of a failure. Sinewave Cycles also uses them for their dynamo-driven USB charger (they're the folks who made me aware of them), and they've reported not having any problems with them.
The intended use for these connectors is model railroad applications and for RF-controlled cars and planes. They're definitely not military grade connectors, and they're made in China, but for outdoor biking applications they are a dream. They do not corrode and they never loosen on their own. They have no built in strain relief mechanism but I haven't had a single report from the field of a failure. Sinewave Cycles also uses them for their dynamo-driven USB charger (they're the folks who made me aware of them), and they've reported not having any problems with them.
Soldering is a lot easier to master than brazing a lug, but there is still a bit of skill and experience required. Do most people just buy a wire harness with all connectors installed, or do people seem to get good results when soldering the connectors and installing the heatshrink strain relief themselves?
As a person who went through the learning curve when working on aircraft, I've probably made all of the mistakes that can be made. That's the only reason that I'm thinking of what can go wrong with people doing their own work on dynamo wiring.
Steve in Peoria
11-04-16 | 01:34 PM
#14
Senior Member
Joined: Jun 2013
Posts: 1,642
Likes: 6
From: Cedar Rapids, IA
Bikes: 1997 Rivendell Road Standard 650b conversion (tourer), 1988 Schwinn Project KOM-10 (gravel/tour), 2013 Foundry Auger disc (CX/gravel), 2016 Cannondale Fat CAAD 2 (MTB/winter), 2011 Cannondale Flash 29er Lefty (trail MTB)
any thoughts on how well the average cyclist does when soldering connectors like these?
Soldering is a lot easier to master than brazing a lug, but there is still a bit of skill and experience required. Do most people just buy a wire harness with all connectors installed, or do people seem to get good results when soldering the connectors and installing the heatshrink strain relief themselves?
As a person who went through the learning curve when working on aircraft, I've probably made all of the mistakes that can be made. That's the only reason that I'm thinking of what can go wrong with people doing their own work on dynamo wiring.
Steve in Peoria
11-04-16 | 02:13 PM
#15
Senior Member
Joined: Jan 2006
Posts: 6,566
Likes: 1,064
From: Berwyn PA
Bikes: I hate bikes!
any thoughts on how well the average cyclist does when soldering connectors like these?
Soldering is a lot easier to master than brazing a lug, but there is still a bit of skill and experience required. Do most people just buy a wire harness with all connectors installed, or do people seem to get good results when soldering the connectors and installing the heatshrink strain relief themselves?
As a person who went through the learning curve when working on aircraft, I've probably made all of the mistakes that can be made. That's the only reason that I'm thinking of what can go wrong with people doing their own work on dynamo wiring.
Steve in Peoria
Soldering is a lot easier to master than brazing a lug, but there is still a bit of skill and experience required. Do most people just buy a wire harness with all connectors installed, or do people seem to get good results when soldering the connectors and installing the heatshrink strain relief themselves?
As a person who went through the learning curve when working on aircraft, I've probably made all of the mistakes that can be made. That's the only reason that I'm thinking of what can go wrong with people doing their own work on dynamo wiring.
Steve in Peoria
Ummmm...overthink things much?
 I have soldered connections, I have no training and have had no issues. Bicycles are not comparable to aircraft when it come to this type of wiring application.
11-04-16 | 02:30 PM
I have soldered connections, I have no training and have had no issues. Bicycles are not comparable to aircraft when it come to this type of wiring application.
11-04-16 | 02:30 PM
#16
Senior Member
Joined: Mar 2010
Posts: 6,970
Likes: 59
From: Catskills/Brooklyn, NY
Bikes: See sig
11-04-16 | 02:50 PM
#17
Senior Member
Joined: Dec 2009
Posts: 8,343
Likes: 16
From: Louisville
A baby could do it.
 11-04-16 | 03:15 PM
#18
Bike Butcher of Portland
Joined: Jul 2014
Posts: 12,444
Likes: 7,978
From: Portland, OR
Bikes: It's complicated.
any thoughts on how well the average cyclist does when soldering connectors like these?
Soldering is a lot easier to master than brazing a lug, but there is still a bit of skill and experience required. Do most people just buy a wire harness with all connectors installed, or do people seem to get good results when soldering the connectors and installing the heatshrink strain relief themselves?
As a person who went through the learning curve when working on aircraft, I've probably made all of the mistakes that can be made. That's the only reason that I'm thinking of what can go wrong with people doing their own work on dynamo wiring.
Steve in Peoria
Soldering is a lot easier to master than brazing a lug, but there is still a bit of skill and experience required. Do most people just buy a wire harness with all connectors installed, or do people seem to get good results when soldering the connectors and installing the heatshrink strain relief themselves?
As a person who went through the learning curve when working on aircraft, I've probably made all of the mistakes that can be made. That's the only reason that I'm thinking of what can go wrong with people doing their own work on dynamo wiring.
Steve in Peoria
I've gone a full season using Anton's banana plugs, no issues whatsoever.
__________________
If someone tells you that you have enough bicycles and you don't need any more, stop talking to them. You don't need that kind of negativity in your life.
If someone tells you that you have enough bicycles and you don't need any more, stop talking to them. You don't need that kind of negativity in your life.
11-04-16 | 05:06 PM
#19
Thread Starter
aka Tom Reingold
Joined: Jan 2009
Posts: 44,160
Likes: 6,381
From: New York, NY, and High Falls, NY, USA
Bikes: 1962 Rudge Sports, 1971 Raleigh Super Course, 1971 Raleigh Pro Track, 1974 Raleigh International, 1975 Viscount Fixie, 1982 McLean, 1996 Lemond (Ti), 2002 Burley Zydeco tandem
[MENTION=137164]southpawboston[/MENTION], thanks for chiming in!
I'm not particularly good at soldering, but I'm good enough.
I guess my trick is deciding how neat I want the installation to be. It won't be as spiffy as Anton's, but it will be better than my previous jobs.
I'm not particularly good at soldering, but I'm good enough.
I guess my trick is deciding how neat I want the installation to be. It won't be as spiffy as Anton's, but it will be better than my previous jobs.
__________________
Tom Reingold, tom@noglider.com
New York City and High Falls, NY
Blogs: The Experienced Cyclist; noglider's ride blog
�When man invented the bicycle he reached the peak of his attainments.� � Elizabeth West, US author
Please email me rather than PM'ing me. Thanks.
Tom Reingold, tom@noglider.com
New York City and High Falls, NY
Blogs: The Experienced Cyclist; noglider's ride blog
�When man invented the bicycle he reached the peak of his attainments.� � Elizabeth West, US author
Please email me rather than PM'ing me. Thanks.
11-04-16 | 05:44 PM
#20
Senior Member
Joined: Feb 2008
Posts: 5,309
Likes: 4,809
From: Peoria, IL
And just in case anyone cares, putting a connector pin on a wire on an aircraft isn't done with solder. You have to crimp them on, because soldering is not a very reliable process. The key issue with soldering is that the solder wicks up the wire and creates a stress riser where the solder ends. This promotes a break unless it is properly strain relieved. This is the purpose of sliding heatshrink over the pin and having it extend a distance up the wire.
Again, a connector failure isn't the end of the world, but I really don't enjoy ending up in the dark when riding the bike home from work in the middle of January. ... or possibly losing a taillight and not knowing that it quit working. If I was building bikes for other people, like Gugie is, I'd hate to hurt my professional reputation by having a customer upset over this sort of failure.
Since Anton is selling the connectors, I'm still curious about whether he's seen customers have issues with installing them. That's all my question was about. I've seen plenty of people screw up some basic soldering.. glad to know that the members of this forum aren't similarly afflicted.
Steve in Peoria
11-05-16 | 05:39 AM
#21

Senior Member
Joined: Feb 2005
Posts: 2,584
Likes: 107
From: Scranton, PA, USA
Bikes: '77 Centurion "Pro Tour"; '67 Carlton "The Flyer"; 1984 Ross MTB (stored at parents' house)
Does anyone even have the correct tool for those little spade connectors that are used with the typical two-strand wires? I have a pretty typical cheap AWG-sized stripper/crimping tool, but end up carefully using a knife to strip the insulation and then generally mangle the crimp.
As a process engineer, I know it's not right or proper, like the candle I use to activate the heat-shrink ;-), but I've never seen a tool that works with wires with a gauge as small as these.
As a process engineer, I know it's not right or proper, like the candle I use to activate the heat-shrink ;-), but I've never seen a tool that works with wires with a gauge as small as these.
11-05-16 | 06:10 AM
#22
Senior Member
Joined: Feb 2008
Posts: 5,309
Likes: 4,809
From: Peoria, IL
Does anyone even have the correct tool for those little spade connectors that are used with the typical two-strand wires? I have a pretty typical cheap AWG-sized stripper/crimping tool, but end up carefully using a knife to strip the insulation and then generally mangle the crimp.
As a process engineer, I know it's not right or proper, like the candle I use to activate the heat-shrink ;-), but I've never seen a tool that works with wires with a gauge as small as these.
As a process engineer, I know it's not right or proper, like the candle I use to activate the heat-shrink ;-), but I've never seen a tool that works with wires with a gauge as small as these.
my longer answer is: the correct crimper is usually specified by the manufacturer of the connector. These crimpers generally are rather expensive, since the crimping process requires a fairly tight tolerance on the degree of compression of the wire strands.
Personally, I just solder the SON spade connectors to the wires and then use heatshrink tubing to provide strain relief. As you note, it's not a well controlled process, but it is better than having a $200 crimper that you only use a dozen times.
Steve in Peoria
11-05-16 | 07:22 AM
#23
Senior Member
Joined: Feb 2005
Posts: 2,584
Likes: 107
From: Scranton, PA, USA
Bikes: '77 Centurion "Pro Tour"; '67 Carlton "The Flyer"; 1984 Ross MTB (stored at parents' house)
my short answer is: no.
my longer answer is: the correct crimper is usually specified by the manufacturer of the connector. These crimpers generally are rather expensive, since the crimping process requires a fairly tight tolerance on the degree of compression of the wire strands.
Personally, I just solder the SON spade connectors to the wires and then use heatshrink tubing to provide strain relief. As you note, it's not a well controlled process, but it is better than having a $200 crimper that you only use a dozen times.
Steve in Peoria
I just did some lookin' around, and apparently there are some cheaper ratcheting tools available that might be nicer, found on e-bay. For $20-30, it might just work better than the lousy, but perfectly acceptable job, that I do (on my own bikes!).
11-05-16 | 07:24 AM
#24

Half way there
Joined: Sep 2015
Posts: 2,967
Likes: 895
From: North Carolina
Bikes: Many, and the list changes frequently
Man, I really have to get control of my life. I can see now that I just don't measure up. On my commuter, the wire from the fork crown mounted headlight just wraps spiral-fashion down to the hub. The wire to the rear taillight is just tied with tarred marline to the bare under-tube brake cable and zip tied on my rack for tension. It's tied loosely to allow the brake cable to move without probability of abrading the wire. Clearly inelegant and yes, I've wanted to clean it up for years. Too many bikes and too many little projects (and a high tolerance for unfinished jobs).
Sincere thanks for showing me the way, but somewhat sarcastic thanks for the guilt.
Sincere thanks for showing me the way, but somewhat sarcastic thanks for the guilt.
11-05-16 | 09:51 AM
#25
Bike Butcher of Portland
Joined: Jul 2014
Posts: 12,444
Likes: 7,978
From: Portland, OR
Bikes: It's complicated.
For me, that's part of the appeal of bicycles, especially vintage ones. There's a human touch, an art to it. I solder my connectors because you can't crimp 2mm banana plugs. I use 2mm banana plugs because they're small, elegant, and easy to hide. I use connectors so I can remove my rear fender or my front fork without having to remove all of the wiring. I don't use tie wraps because I like to hide my wiring.
Yeah, it a lot harder than just using the length of wiring that comes with the bike, winding it around fork blades and tie wrapping it with a service loop somewhere. Functionally, that method works just fine, and one can do a nice, neat job of it. That's what I'd recommend to most anyone.
I like the aesthetic of hidden wiring, and am reminded of this quote:
�Perhaps it's good for one to suffer. Can an artist do anything if he's happy? Would he ever want to do anything? What is art, after all, but a protest against the horrible inclemency of life?�
Aldous Huxley
gugie, wannabe artiste and construteur
__________________
If someone tells you that you have enough bicycles and you don't need any more, stop talking to them. You don't need that kind of negativity in your life.
If someone tells you that you have enough bicycles and you don't need any more, stop talking to them. You don't need that kind of negativity in your life.