


Simplex SLJ rear mounting bolt?
 08-12-18 | 04:25 PM
#1
Thread Starter
Full Member

Joined: Jul 2017
Posts: 245
Likes: 46
From: Santa Barbara, California
Bikes: 2018 Trek Domane SL5; 1965 Peugeot PX10; 1974 Peugeot PX10E
Simplex SLJ rear mounting bolt?
If I understand the process correctly the rear mounting bolt of a Simplex SLJ needs to be wound counter clockwise to tighten it. Well the bolt on my recently purchased SLJ is cracked warped etc. Thus it slips when I attempt tighten it. No fix for this that I can think of other than a replacement bolt. I can easily find replacement rear mounting bolts for derailleurs with a claw hanger attachment but that’s not what I need for my PX10.
Question: anyone know of a source for replacement bolts (apparently not eBay) other than complete SLJ derailleurs? Will rear mounting bolts from lesser Simplex derailleurs work? My guess is no.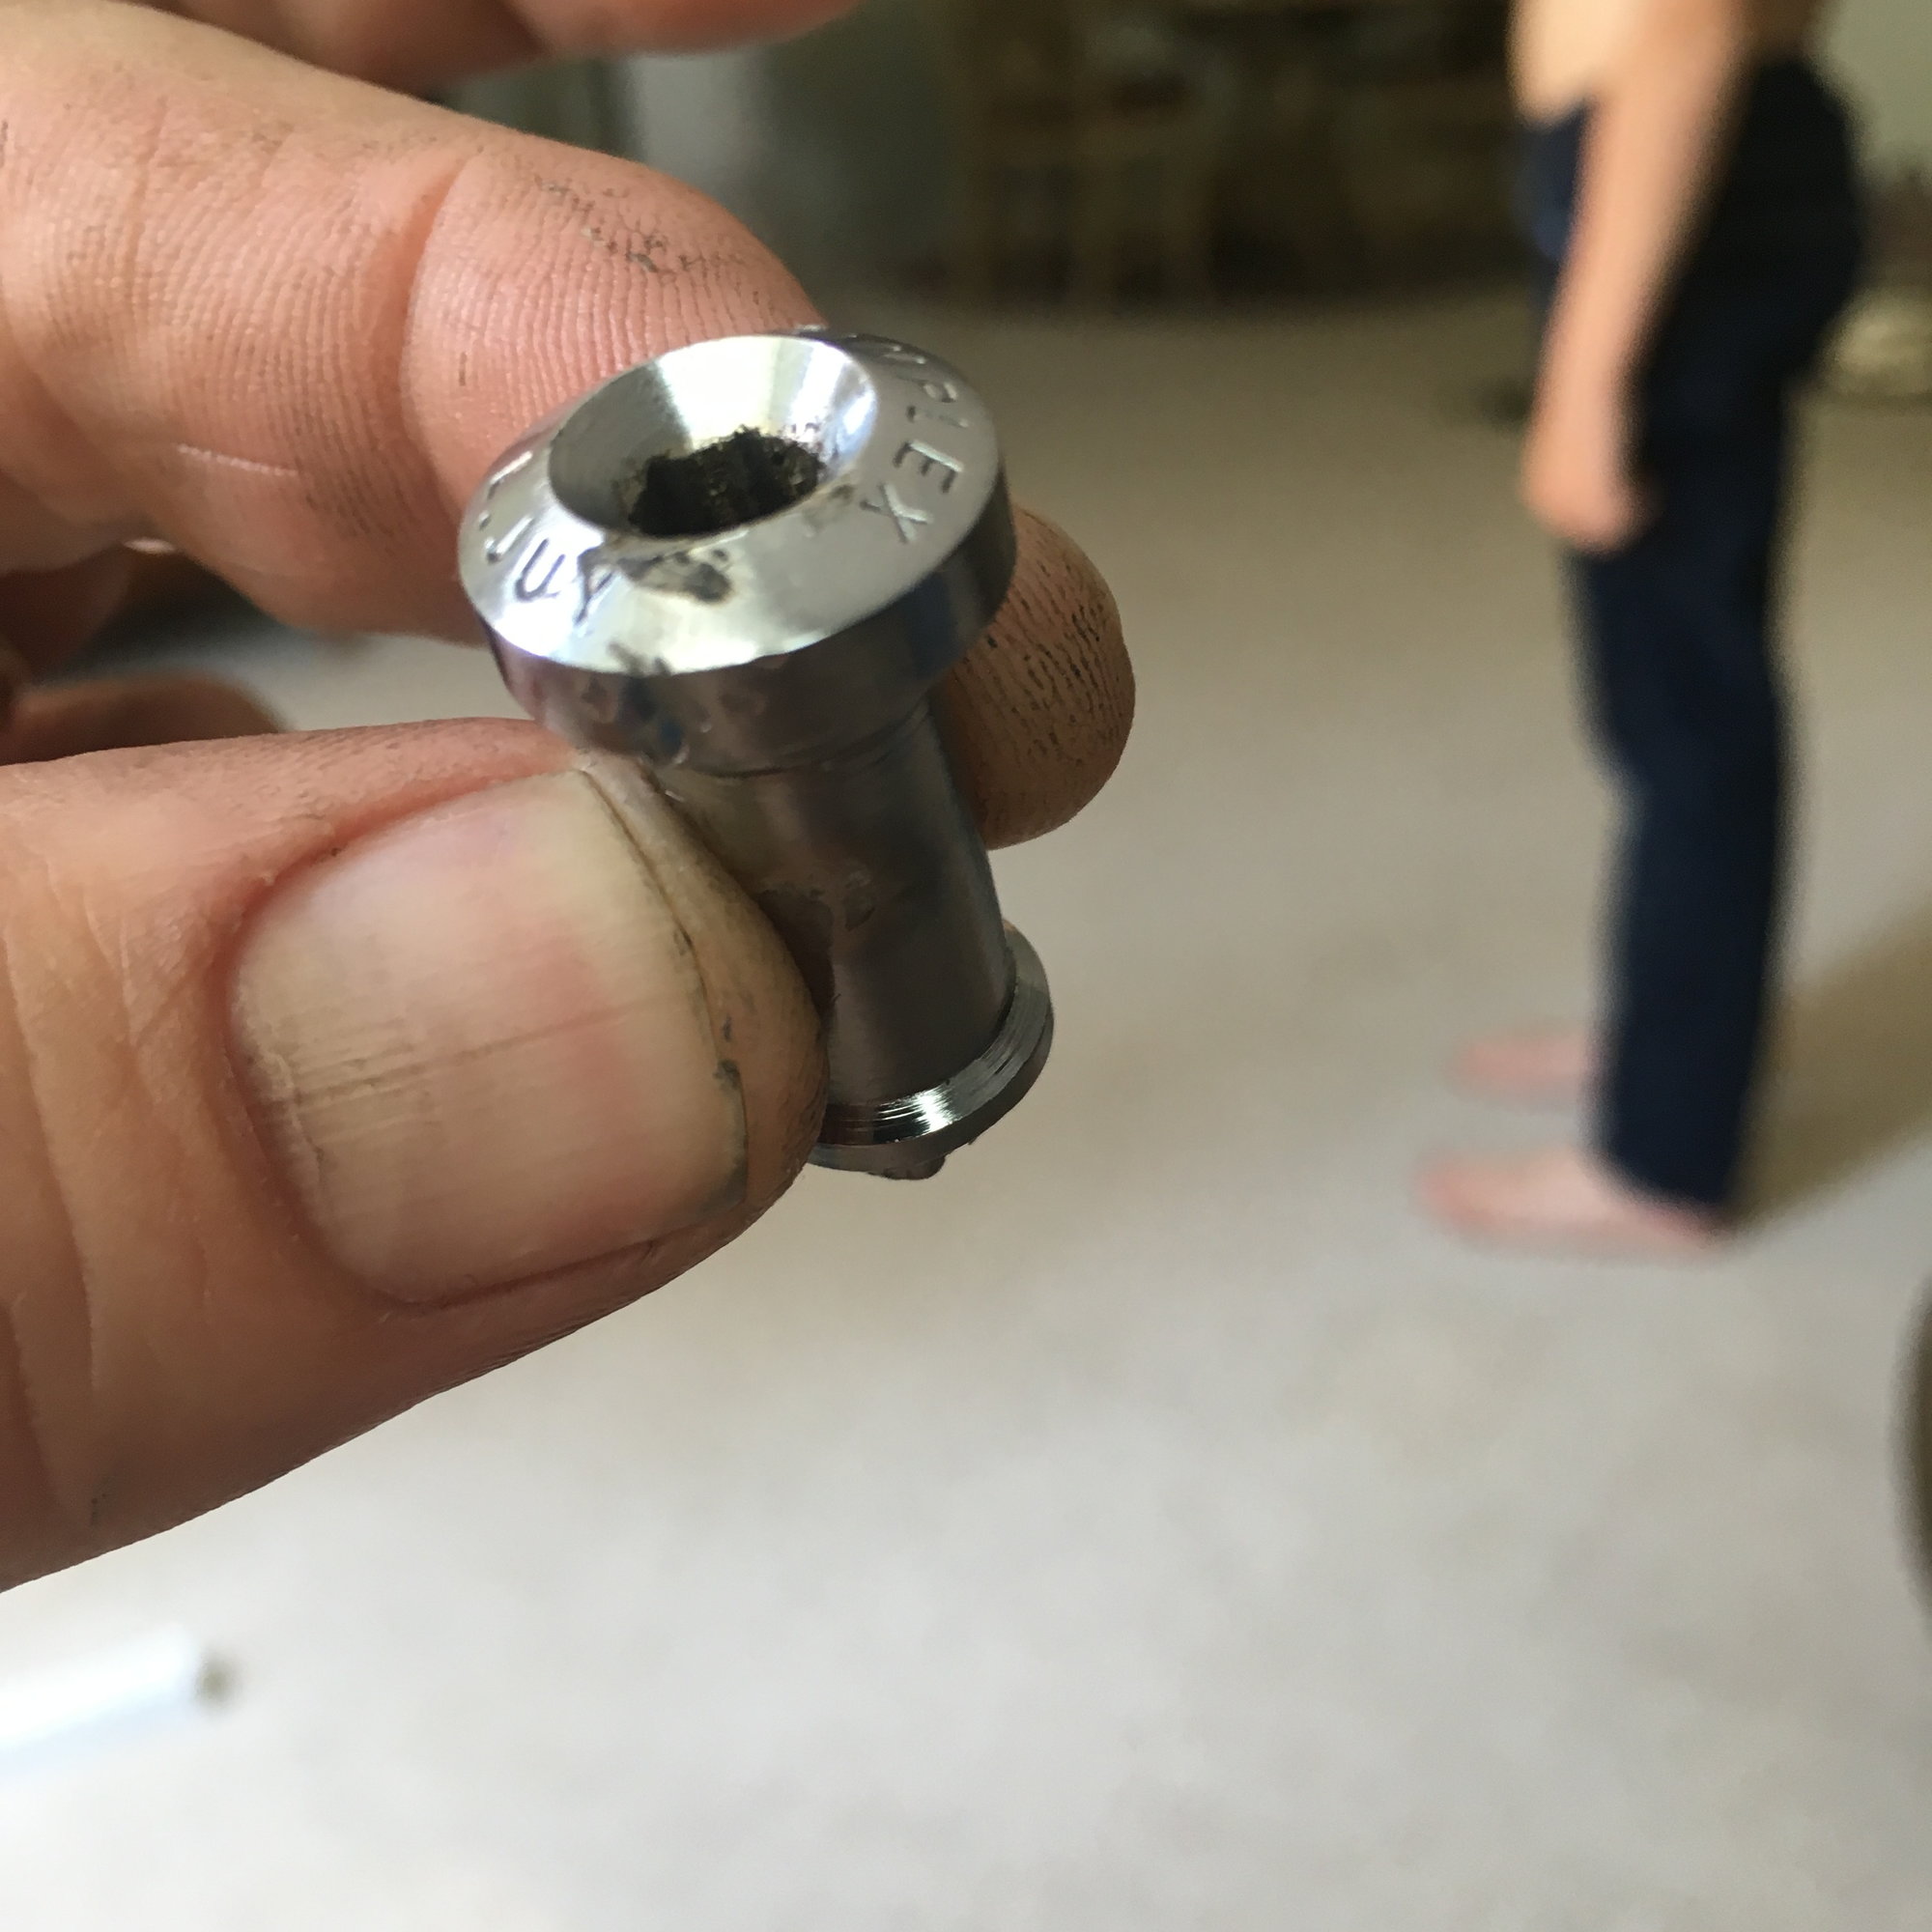
Question: anyone know of a source for replacement bolts (apparently not eBay) other than complete SLJ derailleurs? Will rear mounting bolts from lesser Simplex derailleurs work? My guess is no.
Last edited by SB_Greg; 08-12-18 at 04:39 PM.
 08-15-18 | 06:33 AM
#2

verktyg
Joined: Jul 2006
Posts: 4,034
Likes: 1,272
From: SF Bay Area
Bikes: Current favorites: 1988 Peugeot Birraritz, 1984 Gitane Super Corsa, 1980s DeRosa, 1981 Bianchi Campione Del Mondo, 1992 Paramount OS, 1988 Colnago Technos, 1985 RalieghUSA SBDU Team Pro
Simplex Upper Pivot Bolts
Chas. to the rescue... 
I started composing a response but the $%^(%&*(#$#@#%$ website ate my message so here goes again.
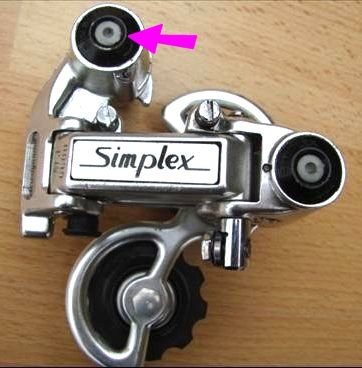
When I was a little kid visiting French speaking in-laws in Maine, the first thing that I learned was NE TOUCHE PAS! (Don't Touch). I'm referring to the 6mm hex sockets in the upper and lower pivot bolts in Simplex rear derailleurs.
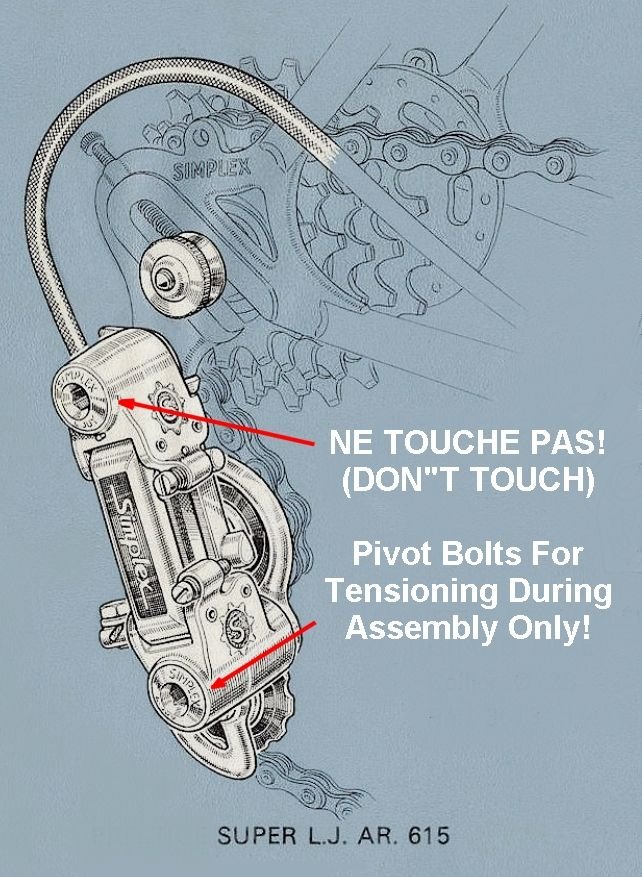
You may have a first generation Simplex Super LJ AR 615 derailleur. These were introduced in 1972-73. They were superior in almost all respects to Campagnolo Nuovo Record derailleurs with one exception: the travel stop plate in the rear of the derailleur upper pivot.
In a perfect world it should look like this when new.

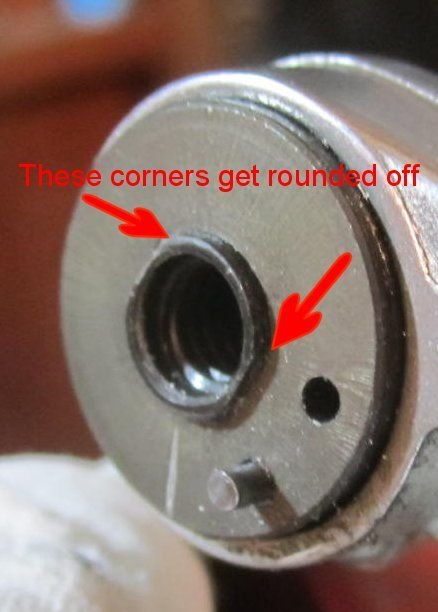

This is a weak, urine impoverished design because the corners of the upper pivot bolt get easily rounded off and no longer function as a limit to derailleur front to rear rotation.
That's the problem with your derailleur. The flats are really munged up.

It happens whenever someone uses the 6mm hex in the upper pivot to try to remove the derailleur rather than the non logical bolt in the rear. Simplex used variations of this design from the mid 1960's until the 1980's
Most, (maybe all) modern direct mount derailleurs are attached to the dropout hanger with a small bolt or screw accessed from the outside...except for Simplex!
I've used this fix with a small taper point punch on a number of derailleurs were the bolts were not as messed up as yours.
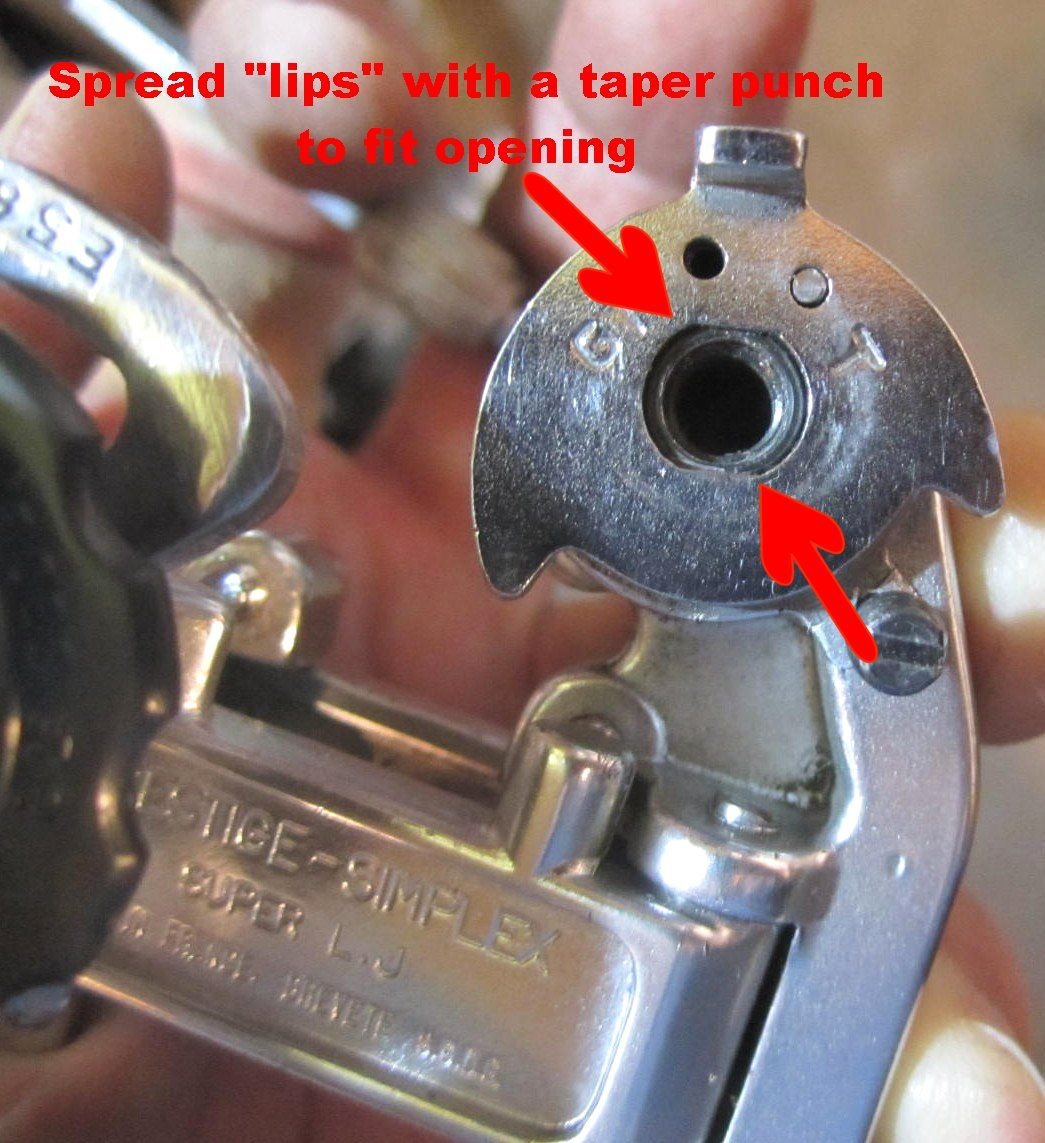
Finding a replacement is going to be very difficult. The part number is 3557.
The first generation SLJs were not that common because for one thing they sold for up to $100 at a time when you could get a Campy Nuovo Record RD for $29-$39. Secondly they were cursed with the image of cheap Delrin plastic derailleurs.
One thing that you could try is to have someone who is good a brazing, build up some material on the en and then filing it down to size. You'll probably have to re-tap the hole. A word of caution, brazing or welding chrome plating releases toxic fumes.
BTW, The Delrin Simplex Prestige and Criterium derailleurs had red plastic plugs in the hex holes in the pivots to discourage people from misusing them.

The later 5500/6600 derailleurs have nylon plugs in the holes. I have some nylon plugs if anyone need some for free.
Is it wrong... or justFrench Simplex???
verktyg
I started composing a response but the $%^(%&*(#$#@#%$ website ate my message so here goes again.
When I was a little kid visiting French speaking in-laws in Maine, the first thing that I learned was NE TOUCHE PAS! (Don't Touch). I'm referring to the 6mm hex sockets in the upper and lower pivot bolts in Simplex rear derailleurs.
You may have a first generation Simplex Super LJ AR 615 derailleur. These were introduced in 1972-73. They were superior in almost all respects to Campagnolo Nuovo Record derailleurs with one exception: the travel stop plate in the rear of the derailleur upper pivot.
In a perfect world it should look like this when new.
This is a weak, urine impoverished design because the corners of the upper pivot bolt get easily rounded off and no longer function as a limit to derailleur front to rear rotation.
That's the problem with your derailleur. The flats are really munged up.
It happens whenever someone uses the 6mm hex in the upper pivot to try to remove the derailleur rather than the non logical bolt in the rear. Simplex used variations of this design from the mid 1960's until the 1980's
Most, (maybe all) modern direct mount derailleurs are attached to the dropout hanger with a small bolt or screw accessed from the outside...except for Simplex!
I've used this fix with a small taper point punch on a number of derailleurs were the bolts were not as messed up as yours.
Finding a replacement is going to be very difficult. The part number is 3557.
The first generation SLJs were not that common because for one thing they sold for up to $100 at a time when you could get a Campy Nuovo Record RD for $29-$39. Secondly they were cursed with the image of cheap Delrin plastic derailleurs.
One thing that you could try is to have someone who is good a brazing, build up some material on the en and then filing it down to size. You'll probably have to re-tap the hole. A word of caution, brazing or welding chrome plating releases toxic fumes.
BTW, The Delrin Simplex Prestige and Criterium derailleurs had red plastic plugs in the hex holes in the pivots to discourage people from misusing them.
The later 5500/6600 derailleurs have nylon plugs in the holes. I have some nylon plugs if anyone need some for free.
Is it wrong... or just
verktyg
__________________
Don't believe everything you think! History is written by those who weren't there....
Chas. ;-)
Don't believe everything you think! History is written by those who weren't there....
Chas. ;-)
Last edited by verktyg; 08-15-18 at 06:56 AM.
 08-15-18 | 01:08 PM
#4

Freshman Member


Joined: Mar 2014
Posts: 5,872
Likes: 4,162
From: City of Angels
Bikes: A few too many
Op, I was in the same situation a while ago and tried all the "repair" suggestion to no avail, buying another one may reveal that it has the same problem.
There was a person selling on ebay but they were 25.00 as I recall so....
I wish you luck, Ben
There was a person selling on ebay but they were 25.00 as I recall so....
I wish you luck, Ben
__________________
"EVERY PERSON IS GUILTY OF ALL THE GOOD THEY DID NOT DO"
Voltaire
Voice recognition may sometimes create odd spelling and grammatical errors
"EVERY PERSON IS GUILTY OF ALL THE GOOD THEY DID NOT DO"
Voltaire
Voice recognition may sometimes create odd spelling and grammatical errors
11-09-19 | 07:04 AM
#5
Full Member
Joined: Oct 2017
Posts: 424
Likes: 175
From: Rotterdam, The Netherlands
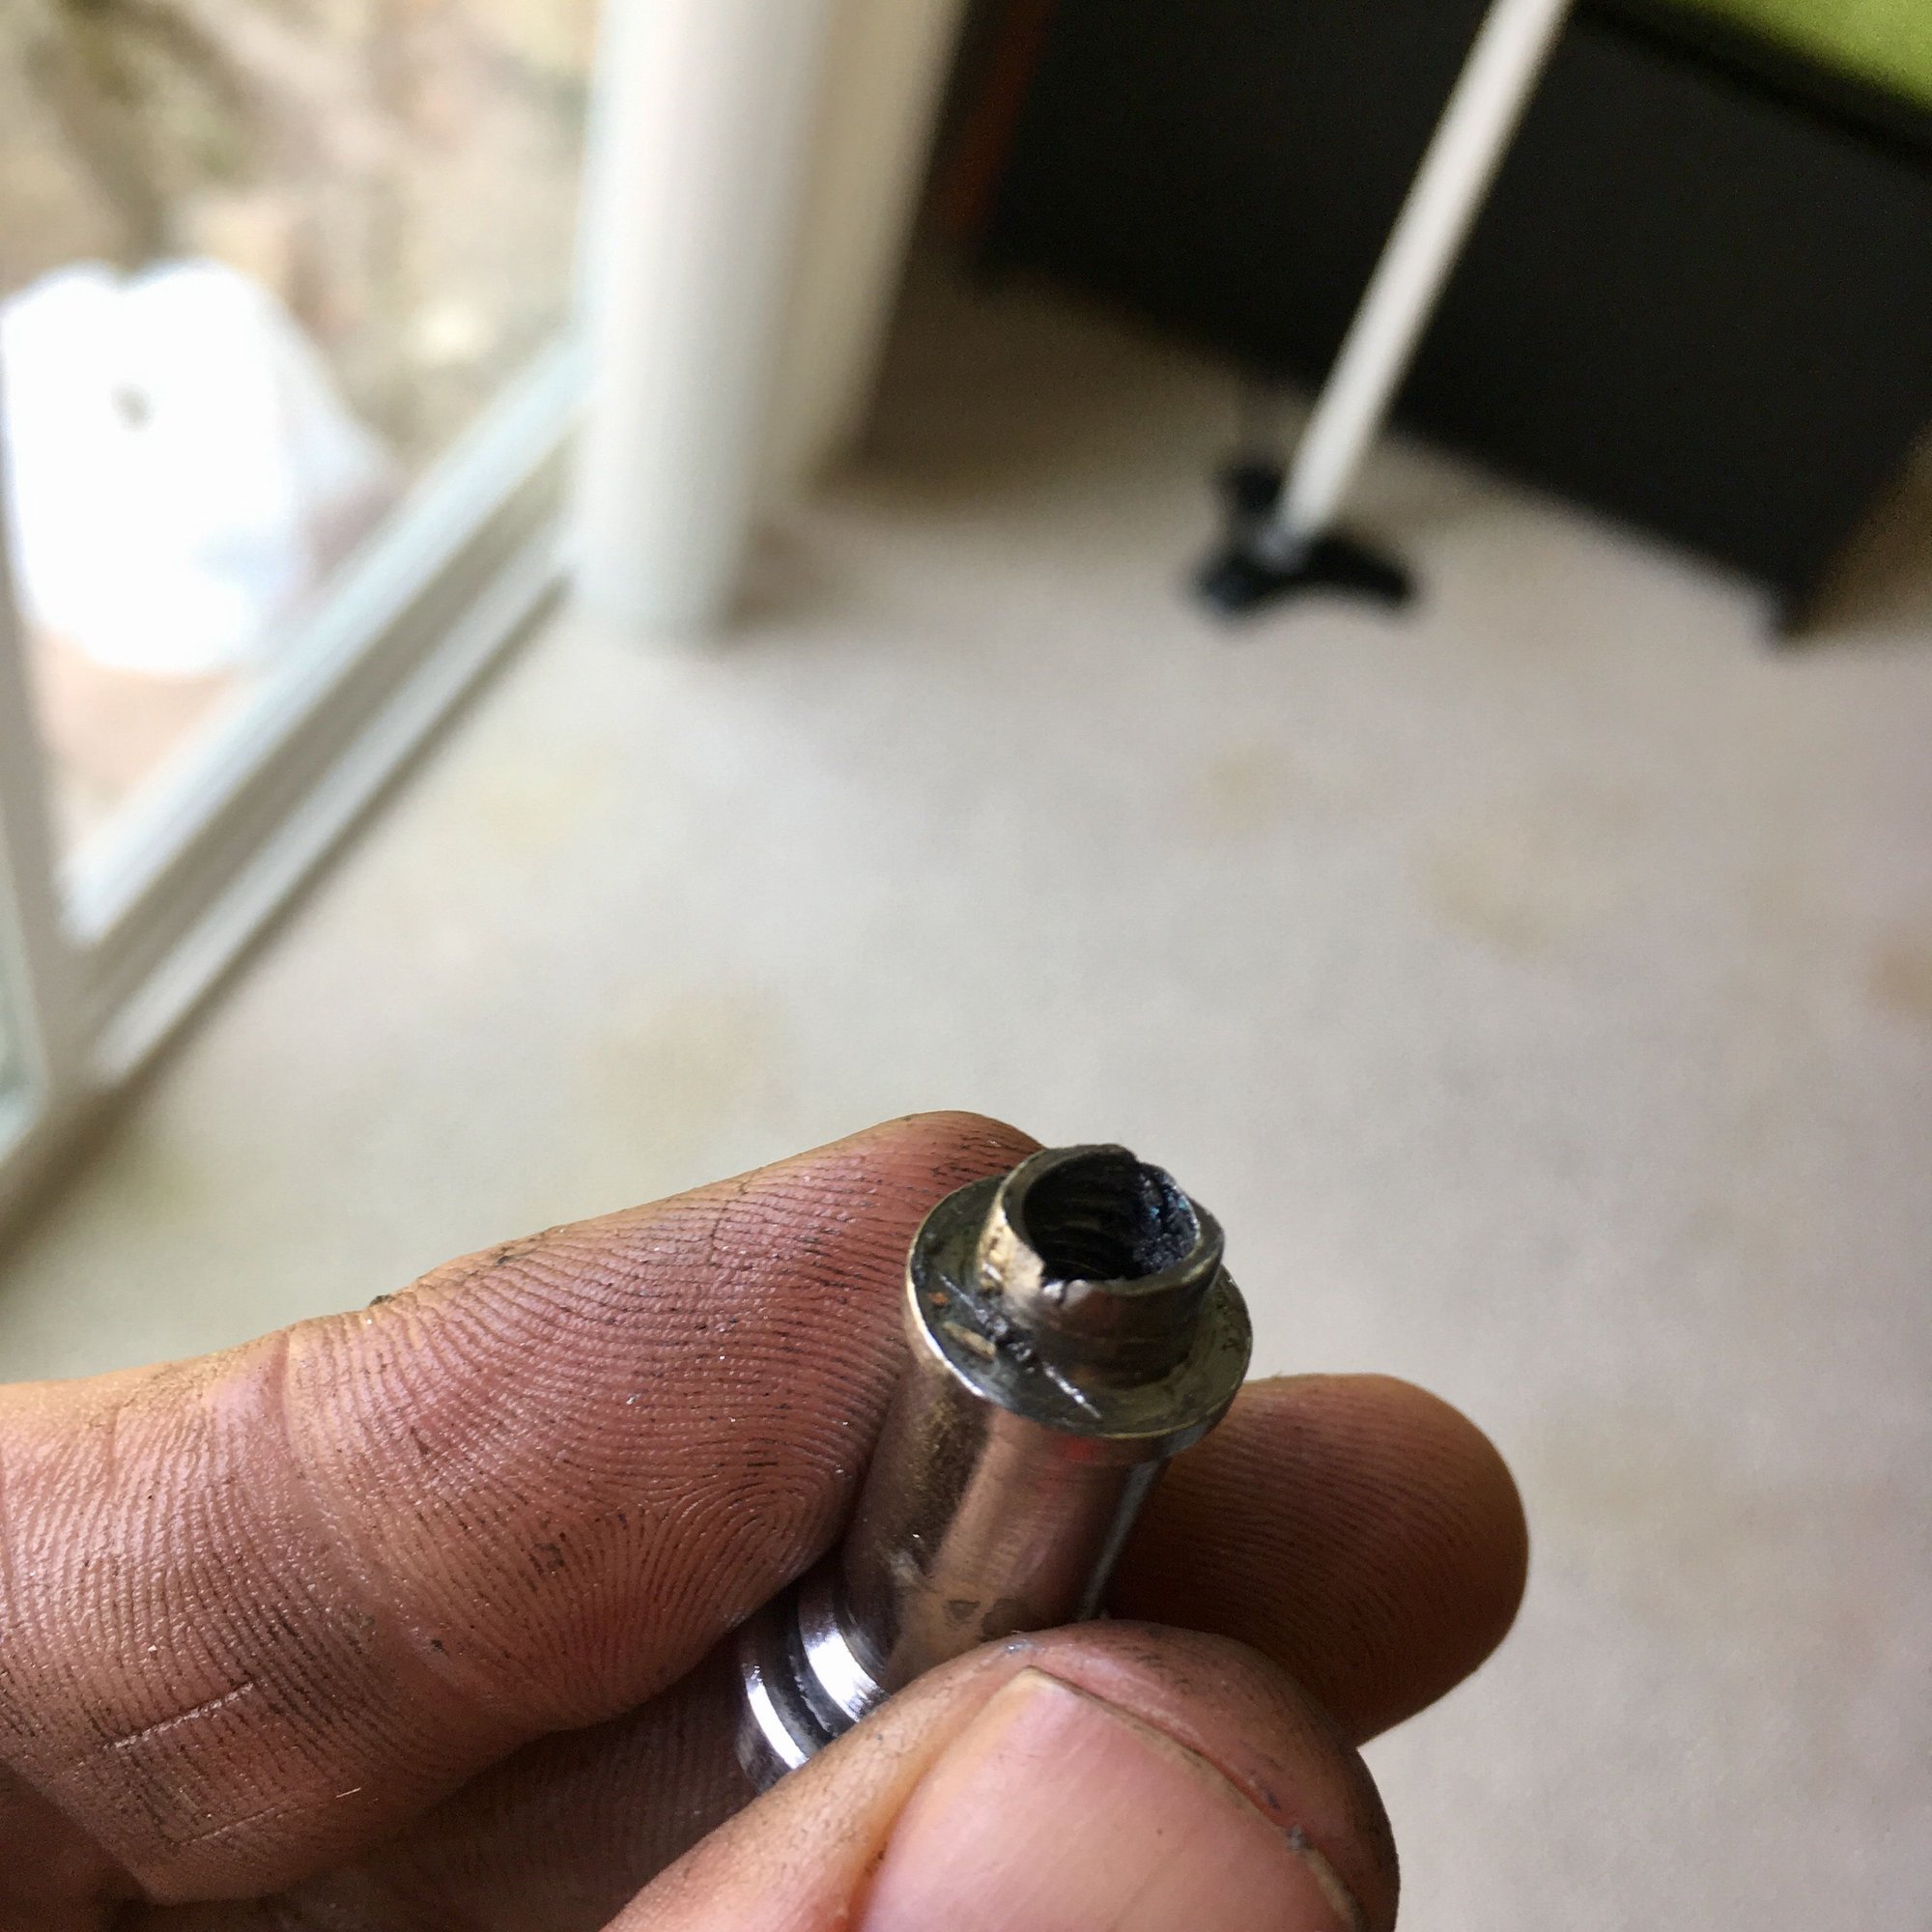
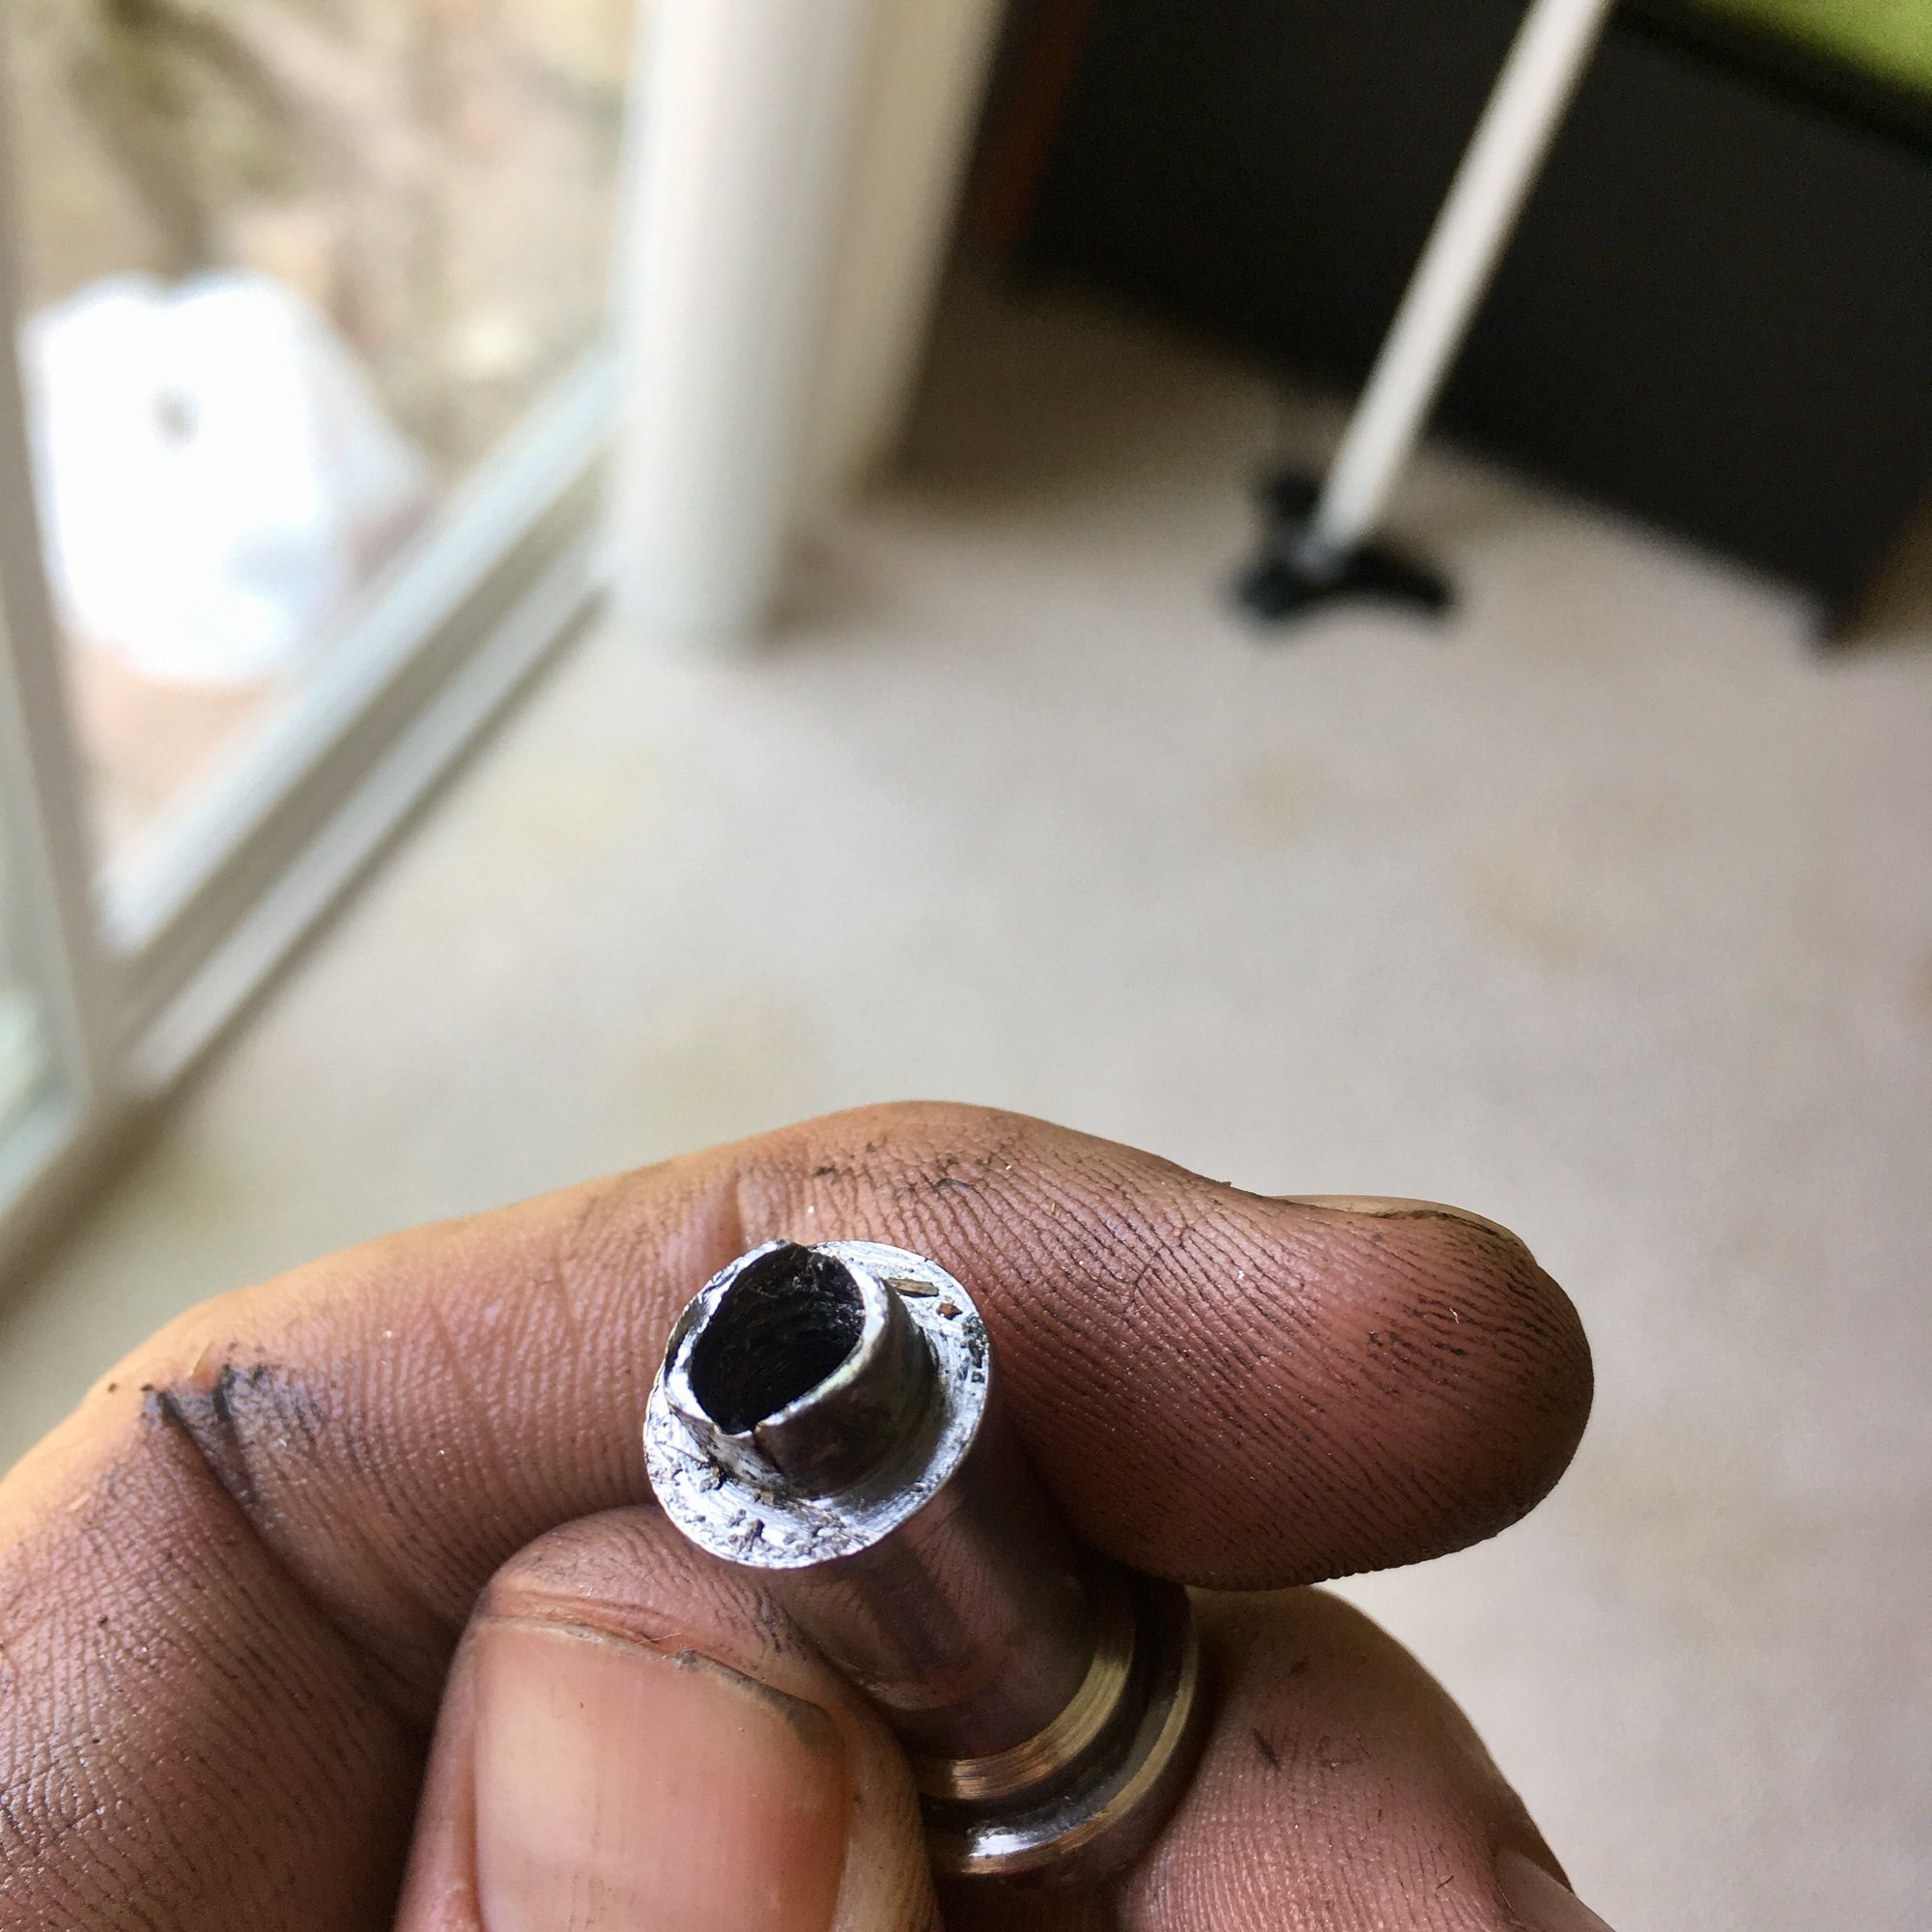
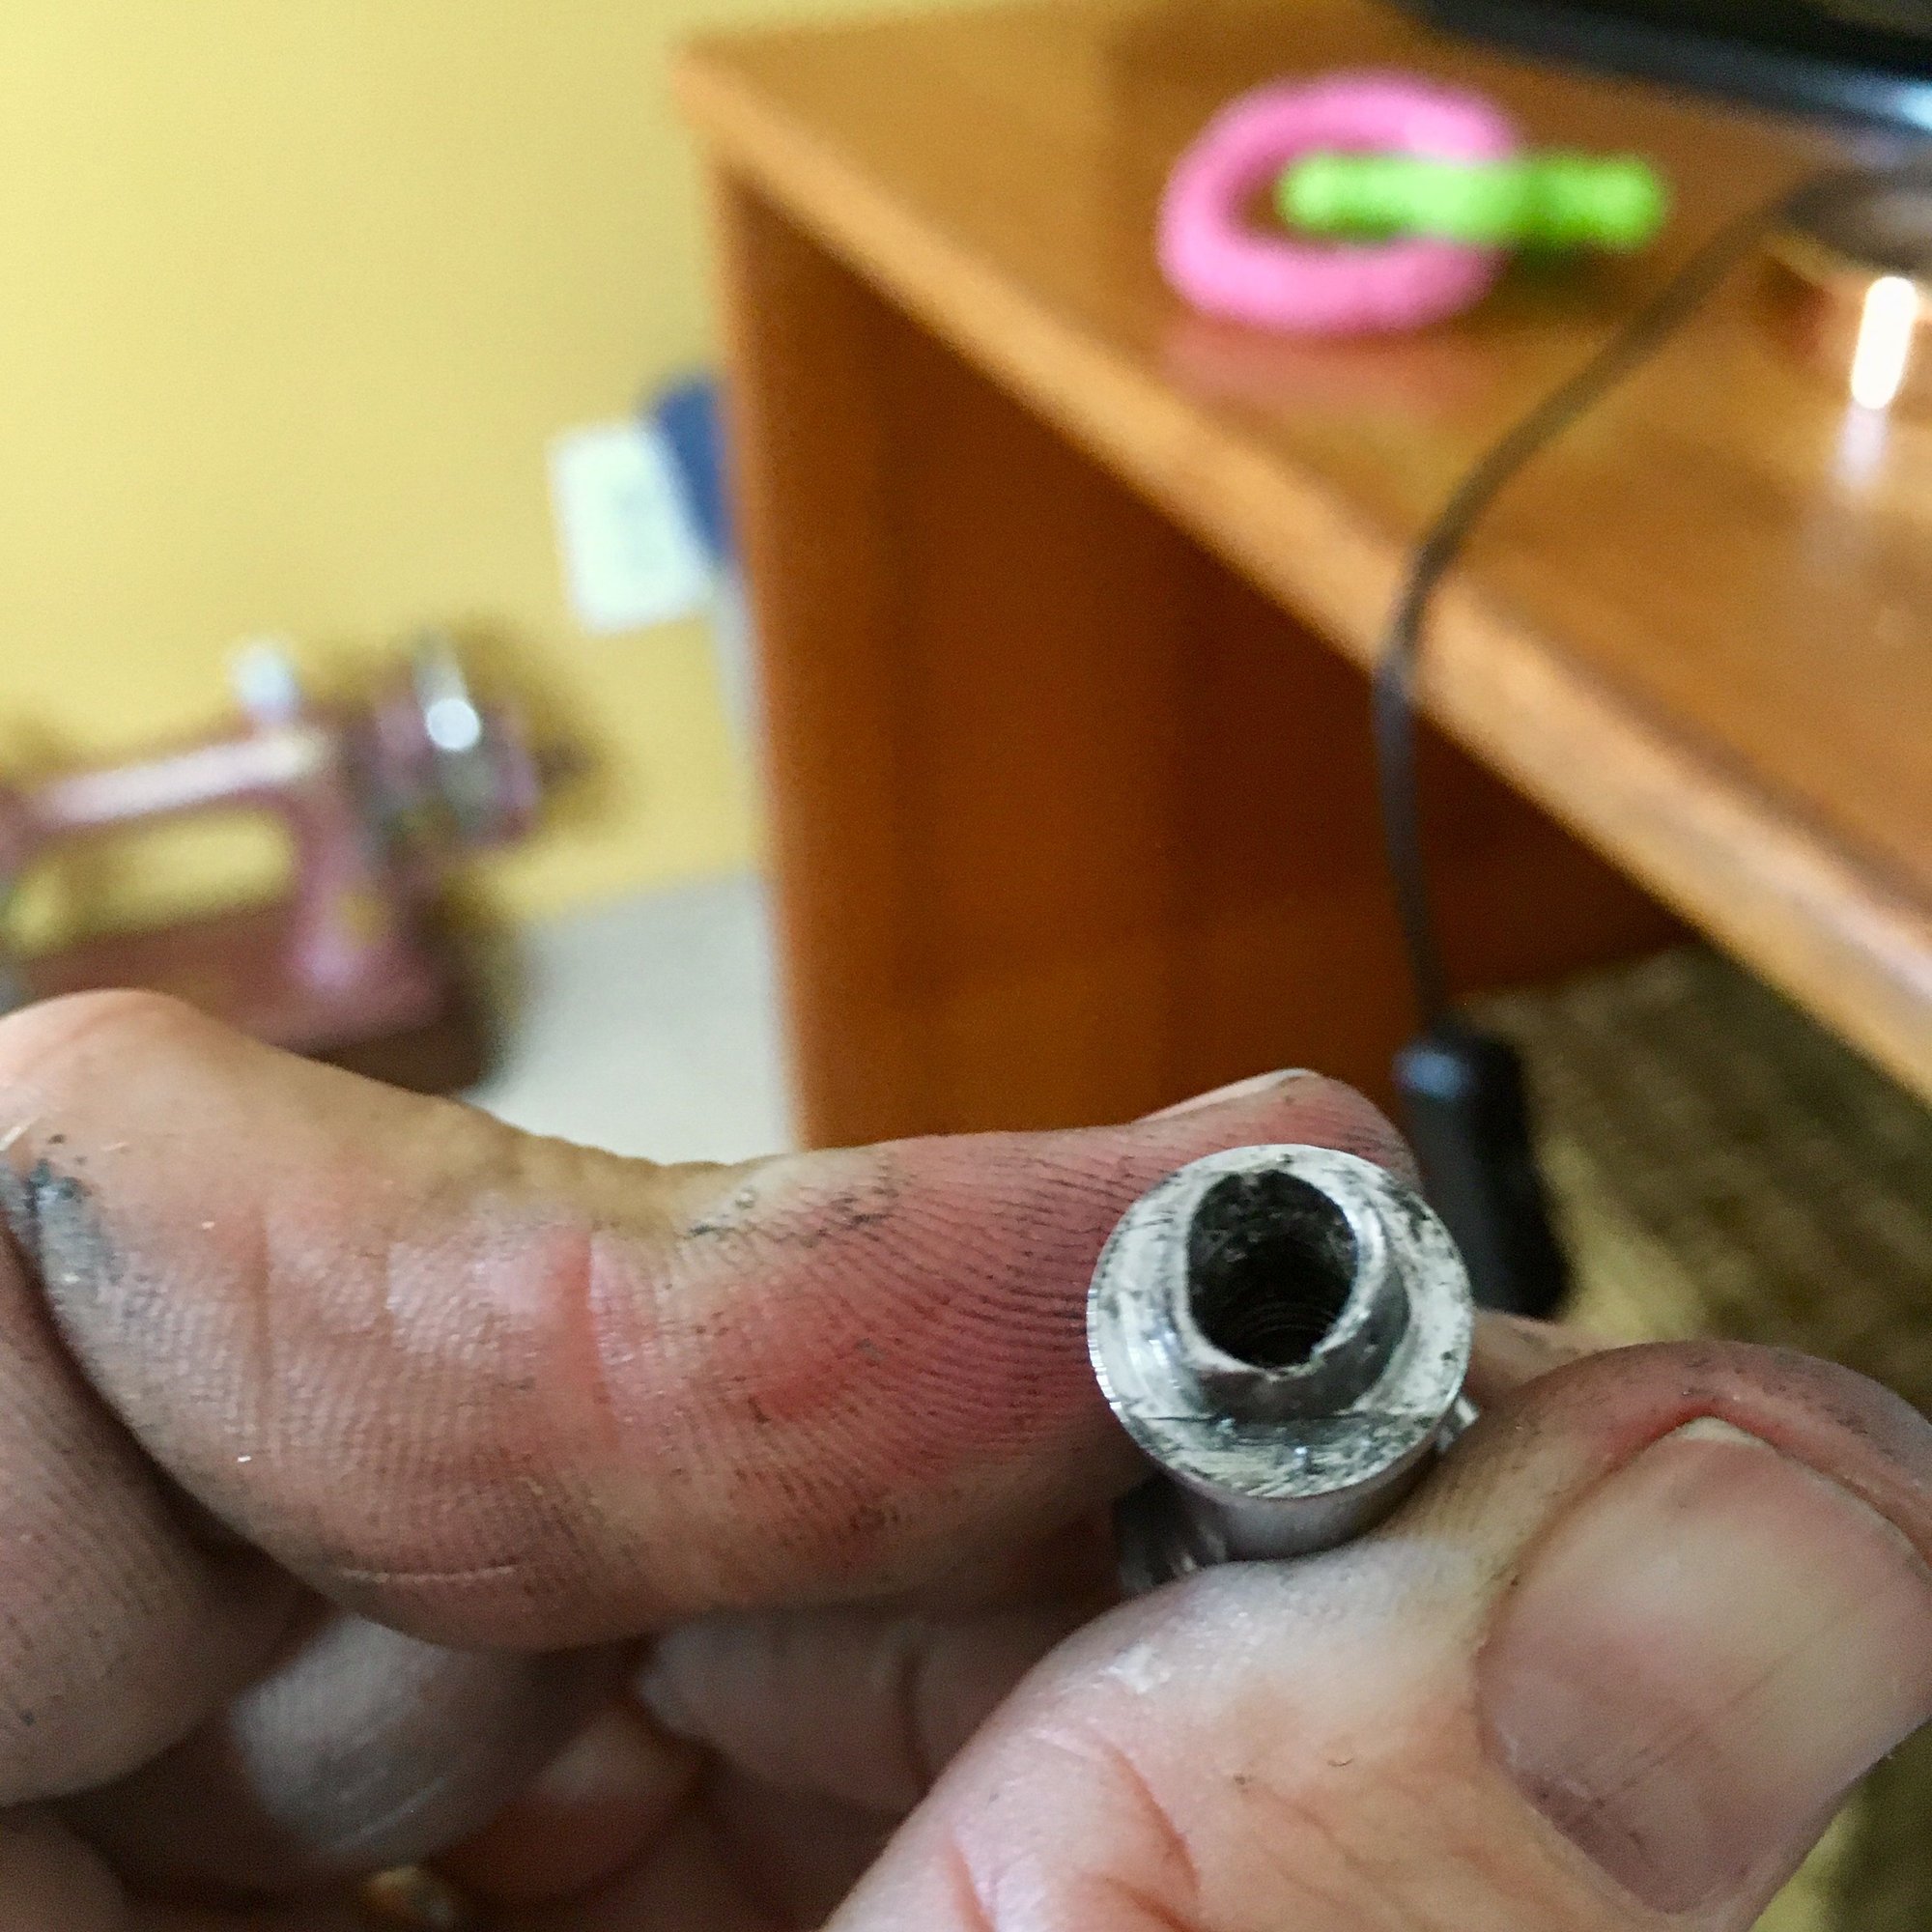
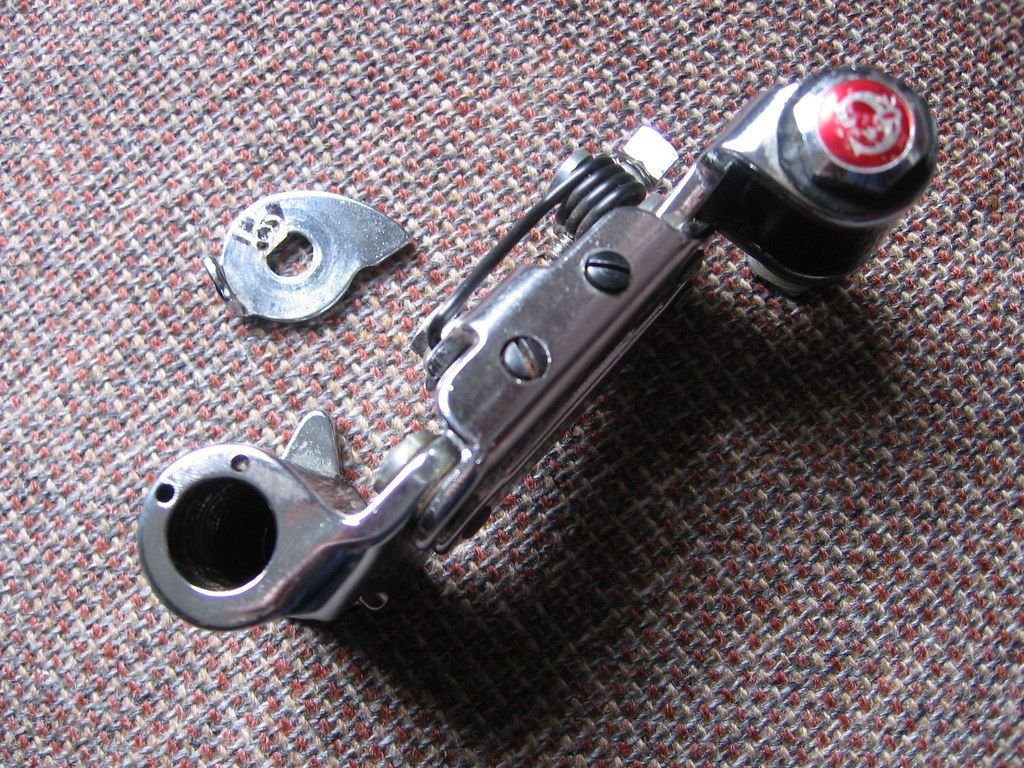
I didn't want to start a new thread about the same problem so I am posting it here. I am working on a couple of Peugeot bikes and tried to overhaul supposedly an SX 410 rear derailleur. I shouldn't have touched it because I didn't do it properly! Anyway, the flats on the upper pivot bolt are now gone.Well, maybe it had been already like that before disassemble, I don't know. The bolt looks perfectly round I can see only some remnants of the flats on it. I can still thread the black mounting bolt in it so technically the derailleur can be reassembled and mounted. Would the derailleur still work with deformed flats though? I guess the answer is no, right?..

The rear derailleur

Upper pivot bolt with the washer

Some traces of the flats

The flats are gone
The rear derailleur
Upper pivot bolt with the washer
Some traces of the flats
The flats are gone
11-09-19 | 07:31 AM
#6

Senior Member
Joined: Sep 2014
Posts: 604
Likes: 18
From: Irvine, CA
Saw this trick somewhere on BF
(edit - looks like the slj spring mounts into the body instead of the pivot bolt, but the basic concept should still work)
Last edited by jcb3; 11-09-19 at 07:35 AM. Reason: addl note
11-09-19 | 09:32 AM
#7
Full Member
Joined: Oct 2017
Posts: 424
Likes: 175
From: Rotterdam, The Netherlands
My experience (not with a LJ but lesser models, but I expect the result will be the same) is if you loosely assemble the pivot bolt (front) , spring, mounting plate (thing with the tab), and attachment bolt (rear) on the frame and in the correct position for the mounting plate, then rotate the pivot bolt (front side) with an allen wrench to apply proper pivot spring tension (I believe you are correct counterclockwise) then, while holding the tension, tighten the attachment bolt (rear), it should all hold together just fine.
Saw this trick somewhere on BF
(edit - looks like the slj spring mounts into the body instead of the pivot bolt, but the basic concept should still work)
Saw this trick somewhere on BF
(edit - looks like the slj spring mounts into the body instead of the pivot bolt, but the basic concept should still work)
This won't work anymore once the pivot bolt is out of its original shape with no flats, will it?
11-09-19 | 10:30 AM
#8

Ride, Wrench, Swap, Race

Joined: Jan 2010
Posts: 9,834
Likes: 1,811
From: Northern California
Bikes: Cheltenham-Pedersen racer, Boulder F/S Paris-Roubaix, Varsity racer, '52 Christophe, '62 Continental, '92 Merckx, '75 Limongi, '76 Presto, '72 Gitane SC, '71 Schwinn SS, etc.
Since there are variations as to whether the stationary end of the spring fits in a hole in the mounting plate (that is keyed to the pivot bolt) or fits in a slot in the pivot bolt head, I won't over-generalize here, but you want to first verify that the bolt and plate are held stationary against rotation once the little bolt has been torqued down into the larger, hollow pivot bolt.
Tensioning the upper pivot will of course require turning the pivot bolt and plate clockwise.
Where the plate/bolt interface has been stripped out, the plate won't turn on it's own against spring tension simply by turning the bolt, so it will have to be turned manually using perhaps a plier, screwdriver or whatever depending on how such tools might be used here.
So, with the plate rotated to effect the desired level of spring tension adjustment (first try may be only an approximation), the rear little bolt should secure the adjustment by preventing the plate and pivot bolt from turning with resultant loss of spring tension.
If I'm right about the level of security holding the plate and bolt from turning, the only downside to having a stripped plate/bolt interface will be the added step of tensioning the spring using the plate manually.
Note that it is the lower pivot, not the upper pivot, where turning the bolt counter-clockwise will tension the spring. Upper spring tension requires turning the bolt and plate clockwise.
Some similar derailers peg the stationary end of the spring into a hole or slot in the bolt head, which leaves the plate to only have to limit the derailer body's swing arc instead of effecting spring tension. So tensioning one of these that has been damaged requires turning the plate into correct position before tightening the little bolt (or locknut) without having to fight the spring's tension (turning the pivot bolt itself will do that).
Note also that in some cases, a loss of upper pivot tension might indicate that one end of the spring has either yielded or broken.
Capagnolo's Gran Turismo rear derailer similarly featured a sprung upper pivot using a bolt that was pegged into the plate using a single flat, and which was similarly subject to mounting error damage. I was able to restore one of these because unlike the french design the bolt was solid, secured with a little nut instead of a little bolt. This meant that simply staking the plate adjacent to the failed flat moved metal back into place thus engaging the undamaged flat on the solid bolt. See picture below.
I guess then that it was Shimano that figured out how to employ the upper pivot spring without introducing such a novice-mechanic-unfriendly feature where the parts might be damaged upon removal. Their lack of tension adjustment on either sprung pivot was a design shortcoming but nothing that couldn't be fixed (as with the Gran Turismo) by the drilling of alternate-position holes for the end of either pivot's spring.
Picture showing repaired plate and with additional spring anchor hole drilled into the body intended to increase the cage pivot spring tension:
Last edited by dddd; 11-09-19 at 10:45 AM.
11-09-19 | 11:14 AM
#9

Extraordinary Magnitude
Joined: Aug 2009
Posts: 14,085
Likes: 2,141
From: Waukesha WI
Bikes: 1978 Trek TX700; 1978/79 Trek 736; 1984 Specialized Stumpjumper Sport; 1984 Schwinn Voyageur SP; 1985 Trek 620; 1985 Trek 720; 1986 Trek 400 Elance; 1987 Schwinn High Sierra; 1990 Miyata 1000LT
Easy fix: Buy a Suntour Cyclone. Call it a "Le Cyclone." Done.
__________________
*Recipient of the 2006 Time Magazine "Person Of The Year" Award*
Commence to jigglin� huh?!?!
"But hey, always love to hear from opinionated amateurs." -says some guy to Mr. Marshall.
Commence to jigglin� huh?!?!
"But hey, always love to hear from opinionated amateurs." -says some guy to Mr. Marshall.
11-09-19 | 12:45 PM
#10

PM me your cotters
Joined: Jun 2015
Posts: 3,280
Likes: 631
From: ATL
It looks like you made the exact mistake I warned about in the "tips for newbies" thread, over here: Do's and Don'ts when restoring a vintage bike.
Inside the post I just linked is a link to some possible solution. I wish I could share this with every person who touches French hardware, I've found and fixed so many mangled Simplex derailleurs over the years!
Inside the post I just linked is a link to some possible solution. I wish I could share this with every person who touches French hardware, I've found and fixed so many mangled Simplex derailleurs over the years!
I didn't want to start a new thread about the same problem so I am posting it here. I am working on a couple of Peugeot bikes and tried to overhaul supposedly an SX 410 rear derailleur. I shouldn't have touched it because I didn't do it properly! Anyway, the flats on the upper pivot bolt are now gone.Well, maybe it had been already like that before disassemble, I don't know. The bolt looks perfectly round I can see only some remnants of the flats on it. I can still thread the black mounting bolt in it so technically the derailleur can be reassembled and mounted. Would the derailleur still work with deformed flats though? I guess the answer is no, right?..
The rear derailleur
Upper pivot bolt with the washer
Some traces of the flats
The flats are gone
The rear derailleur
Upper pivot bolt with the washer
Some traces of the flats
The flats are gone
11-09-19 | 04:21 PM
#11
Ride, Wrench, Swap, Race
Joined: Jan 2010
Posts: 9,834
Likes: 1,811
From: Northern California
Bikes: Cheltenham-Pedersen racer, Boulder F/S Paris-Roubaix, Varsity racer, '52 Christophe, '62 Continental, '92 Merckx, '75 Limongi, '76 Presto, '72 Gitane SC, '71 Schwinn SS, etc.
Badge-engineered replacement for a damaged Simplex Prestige:

David Snyder
Auburn, California usa
David Snyder
Auburn, California usa
11-09-19 | 05:07 PM
#12
Full Member
Joined: Oct 2017
Posts: 424
Likes: 175
From: Rotterdam, The Netherlands
It looks like you made the exact mistake I warned about in the "tips for newbies" thread, over here: Do's and Don'ts when restoring a vintage bike.
Inside the post I just linked is a link to some possible solution. I wish I could share this with every person who touches French hardware, I've found and fixed so many mangled Simplex derailleurs over the years!
Inside the post I just linked is a link to some possible solution. I wish I could share this with every person who touches French hardware, I've found and fixed so many mangled Simplex derailleurs over the years!
I'd seen your post in that thread but it was already too late at that point. I've learned my lesson though.
Which link with possible solutions do you mean? I can't find it anywhere..
11-09-19 | 05:11 PM
#13
Full Member
Joined: Oct 2017
Posts: 424
Likes: 175
From: Rotterdam, The Netherlands
Since there are variations as to whether the stationary end of the spring fits in a hole in the mounting plate (that is keyed to the pivot bolt) or fits in a slot in the pivot bolt head, I won't over-generalize here, but you want to first verify that the bolt and plate are held stationary against rotation once the little bolt has been torqued down into the larger, hollow pivot bolt.
Tensioning the upper pivot will of course require turning the pivot bolt and plate clockwise.
Where the plate/bolt interface has been stripped out, the plate won't turn on it's own against spring tension simply by turning the bolt, so it will have to be turned manually using perhaps a plier, screwdriver or whatever depending on how such tools might be used here.
So, with the plate rotated to effect the desired level of spring tension adjustment (first try may be only an approximation), the rear little bolt should secure the adjustment by preventing the plate and pivot bolt from turning with resultant loss of spring tension.
If I'm right about the level of security holding the plate and bolt from turning, the only downside to having a stripped plate/bolt interface will be the added step of tensioning the spring using the plate manually.
Note that it is the lower pivot, not the upper pivot, where turning the bolt counter-clockwise will tension the spring. Upper spring tension requires turning the bolt and plate clockwise.
Some similar derailers peg the stationary end of the spring into a hole or slot in the bolt head, which leaves the plate to only have to limit the derailer body's swing arc instead of effecting spring tension. So tensioning one of these that has been damaged requires turning the plate into correct position before tightening the little bolt (or locknut) without having to fight the spring's tension (turning the pivot bolt itself will do that).
Note also that in some cases, a loss of upper pivot tension might indicate that one end of the spring has either yielded or broken.
Capagnolo's Gran Turismo rear derailer similarly featured a sprung upper pivot using a bolt that was pegged into the plate using a single flat, and which was similarly subject to mounting error damage. I was able to restore one of these because unlike the french design the bolt was solid, secured with a little nut instead of a little bolt. This meant that simply staking the plate adjacent to the failed flat moved metal back into place thus engaging the undamaged flat on the solid bolt. See picture below.
I guess then that it was Shimano that figured out how to employ the upper pivot spring without introducing such a novice-mechanic-unfriendly feature where the parts might be damaged upon removal. Their lack of tension adjustment on either sprung pivot was a design shortcoming but nothing that couldn't be fixed (as with the Gran Turismo) by the drilling of alternate-position holes for the end of either pivot's spring.
Picture showing repaired plate and with additional spring anchor hole drilled into the body intended to increase the cage pivot spring tension:
Tensioning the upper pivot will of course require turning the pivot bolt and plate clockwise.
Where the plate/bolt interface has been stripped out, the plate won't turn on it's own against spring tension simply by turning the bolt, so it will have to be turned manually using perhaps a plier, screwdriver or whatever depending on how such tools might be used here.
So, with the plate rotated to effect the desired level of spring tension adjustment (first try may be only an approximation), the rear little bolt should secure the adjustment by preventing the plate and pivot bolt from turning with resultant loss of spring tension.
If I'm right about the level of security holding the plate and bolt from turning, the only downside to having a stripped plate/bolt interface will be the added step of tensioning the spring using the plate manually.
Note that it is the lower pivot, not the upper pivot, where turning the bolt counter-clockwise will tension the spring. Upper spring tension requires turning the bolt and plate clockwise.
Some similar derailers peg the stationary end of the spring into a hole or slot in the bolt head, which leaves the plate to only have to limit the derailer body's swing arc instead of effecting spring tension. So tensioning one of these that has been damaged requires turning the plate into correct position before tightening the little bolt (or locknut) without having to fight the spring's tension (turning the pivot bolt itself will do that).
Note also that in some cases, a loss of upper pivot tension might indicate that one end of the spring has either yielded or broken.
Capagnolo's Gran Turismo rear derailer similarly featured a sprung upper pivot using a bolt that was pegged into the plate using a single flat, and which was similarly subject to mounting error damage. I was able to restore one of these because unlike the french design the bolt was solid, secured with a little nut instead of a little bolt. This meant that simply staking the plate adjacent to the failed flat moved metal back into place thus engaging the undamaged flat on the solid bolt. See picture below.
I guess then that it was Shimano that figured out how to employ the upper pivot spring without introducing such a novice-mechanic-unfriendly feature where the parts might be damaged upon removal. Their lack of tension adjustment on either sprung pivot was a design shortcoming but nothing that couldn't be fixed (as with the Gran Turismo) by the drilling of alternate-position holes for the end of either pivot's spring.
Picture showing repaired plate and with additional spring anchor hole drilled into the body intended to increase the cage pivot spring tension:
Thanks for these instructions, dddd! This gives me some hope that the derailleur is not completely ruined. I will reassemble it and see if I can still mount it properly.
11-09-19 | 07:42 PM
#14
PM me your cotters
Joined: Jun 2015
Posts: 3,280
Likes: 631
From: ATL
I realized after-the-fact that the repair thread is actually this one - see post 2. But I swear there's another one. [MENTION=185430]dddd[/MENTION] actually puts out another good one. Combine the method [MENTION=61614]verktyg[/MENTION] suggests with a tapered punch and what [MENTION=185430]dddd[/MENTION] is showing, you probably have a winner.
I've also had some luck hammering the washer on an anvil to close the hole a bit.
Another thread popped up on this topic in the past. Another Simplex SX10 problem
But I swear there was yet another on this... I guess maybe one of us needs to create a "repairing Simplex pivot bolts" thread eh? Combine all this into one place.
11-10-19 | 07:15 AM
#15
Senior Member
Joined: Sep 2014
Posts: 604
Likes: 18
From: Irvine, CA
Seems to all lock together once tightened.
11-10-19 | 12:06 PM
#16
Full Member
Joined: Oct 2017
Posts: 424
Likes: 175
From: Rotterdam, The Netherlands
Hard lesson to learn. This is just one of many quirks from days past, don't sweat it.
I realized after-the-fact that the repair thread is actually this one - see post 2. But I swear there's another one. [MENTION=185430]dddd[/MENTION] actually puts out another good one. Combine the method [MENTION=61614]verktyg[/MENTION] suggests with a tapered punch and what [MENTION=185430]dddd[/MENTION] is showing, you probably have a winner.
I've also had some luck hammering the washer on an anvil to close the hole a bit.
Another thread popped up on this topic in the past. Another Simplex SX10 problem
But I swear there was yet another on this... I guess maybe one of us needs to create a "repairing Simplex pivot bolts" thread eh? Combine all this into one place.
11-10-19 | 12:09 PM
#17
Full Member
Joined: Oct 2017
Posts: 424
Likes: 175
From: Rotterdam, The Netherlands
Worked for me on models where the spring is keyed to the pivot bolt (so by turning the pivot bolt, you apply tension), you just need to create and hold the spring tension with one hand while tightening the fastening bolt with the other hand.
Seems to all lock together once tightened.
Seems to all lock together once tightened.
Then it should work for me as well! The derailleur in question is an SX 410.

Thread
Thread Starter
Forum
Replies
Last Post
rootboy
Classic & Vintage
80
05-14-22 06:14 PM
msl109
Bicycle Mechanics
10
04-25-15 09:07 AM
