


Bent rear stay?
 10-04-18, 06:28 PM
#26

Senior Member
Just strip the paint already. Don't worry about the PC yet; worst case is you need to wash the frame after stripping. You need to find out what's going on. I see those bumps that looked kind of like distortion are brass. It's unlikely IMO that those are just slop. Too much brass there. More likely the tops of the seatstays cracked or came loose, and the brass blobs are a sloppy brazed repair.
 10-04-18, 08:01 PM
#27
Senior Member
Thread Starter

Join Date: Jun 2018
Posts: 733
Mentioned: 12 Post(s)
Tagged: 0 Thread(s)
Quoted: 213 Post(s)
Likes: 0
Liked 6 Times
in
5 Posts
Stripper is Lready on it haha
let it set for half hour and the primer didnt come off. I'm leaving it on over night and trying it again in the morning.
let it set for half hour and the primer didnt come off. I'm leaving it on over night and trying it again in the morning.
10-04-18, 08:03 PM
#28


Randomhead
Join Date: Aug 2008
Location: Happy Valley, Pennsylvania
Posts: 24,397
Mentioned: 0 Post(s)
Tagged: 0 Thread(s)
Quoted: 4 Post(s)
Liked 3,698 Times
in
2,518 Posts
I'm no expert, but I think a lot of strippers work better when they are wet. I think the usual procedure is to cover with plastic wrap.
10-04-18, 09:02 PM
#30
Senior Member
There was a thread not too long ago about a Raleigh Super Course build which included minor frame damage to the seat stay cap. During the rebuild process, the owner decided to stretch/set the rear triangles a little wider and when the triangles were stretched, pop goes the seat cap. General consensus, as I recall, was that it was a cosmetic problem mostly and the owner went to a local metal worker (welder or brazer, not sure) who patched that sucker up good as new. Bike was destined for a repaint anyway. During the discussion, it was mentioned that Raleigh seat stay caps cracking from the stay, it's not unknown problem. The moral to this whole digression is that what you are seeing very well may be the result of a ham-handed repair. They'll sell those wire feed welders to anyone, you know., Even I have one though I use it to make a mess out of the wrought iron fence rather than bicycles -- I'm not that much of a wanker.
Just out of curiosity, is this the same frame that had the expertly attached derailleur hanger? If so, maybe done by the same person.
Can't really be too critical, I suppose. Got a torch, got some gas, might as well get a cheap damageed bike frame and see what happens. Cheap fun.
Here's the thread I referred to.
Lots of good stuff in there.
As to your question about sanding. I don't think it's possible to structurally damage a bike frame hand sanding. Files and rasps and power tools, but not with sand paper by hand. Not in one lifetime, anyway. Well, I don't think I could do it. I've sanded tubes pretty aggresively smoothing out epoxy filler using 100 grit or so (I'm not licensed for anything coarser) and it just scratches the metal -- doesn't remove much metal material.
10-04-18, 09:13 PM
#31
Senior Member
Thread Starter
Join Date: Jun 2018
Posts: 733
Mentioned: 12 Post(s)
Tagged: 0 Thread(s)
Quoted: 213 Post(s)
Likes: 0
Liked 6 Times
in
5 Posts
This is the frame with the attached derailur!
I was actually thinking about that as you mentioned that somone may have had work done on it.
It doesn't feel out of the realm of possibilities that somone with the know how to attach a derailur with an ugly bead would do some blobing of brass on a popped seststay cap.
As to the sanding I was actually concerned that the paint stripper would cause problems for the powder coating process. I had read that its toug to get off but I imagine that refers to people who perform a full strip not just spot strips such as this.
Thanks for the link to the thread, I'll check that out for sure!
Last edited by Buellster; 10-04-18 at 09:41 PM.
10-11-18, 01:15 PM
#32
Senior Member
Thread Starter
Join Date: Jun 2018
Posts: 733
Mentioned: 12 Post(s)
Tagged: 0 Thread(s)
Quoted: 213 Post(s)
Likes: 0
Liked 6 Times
in
5 Posts
Update again!
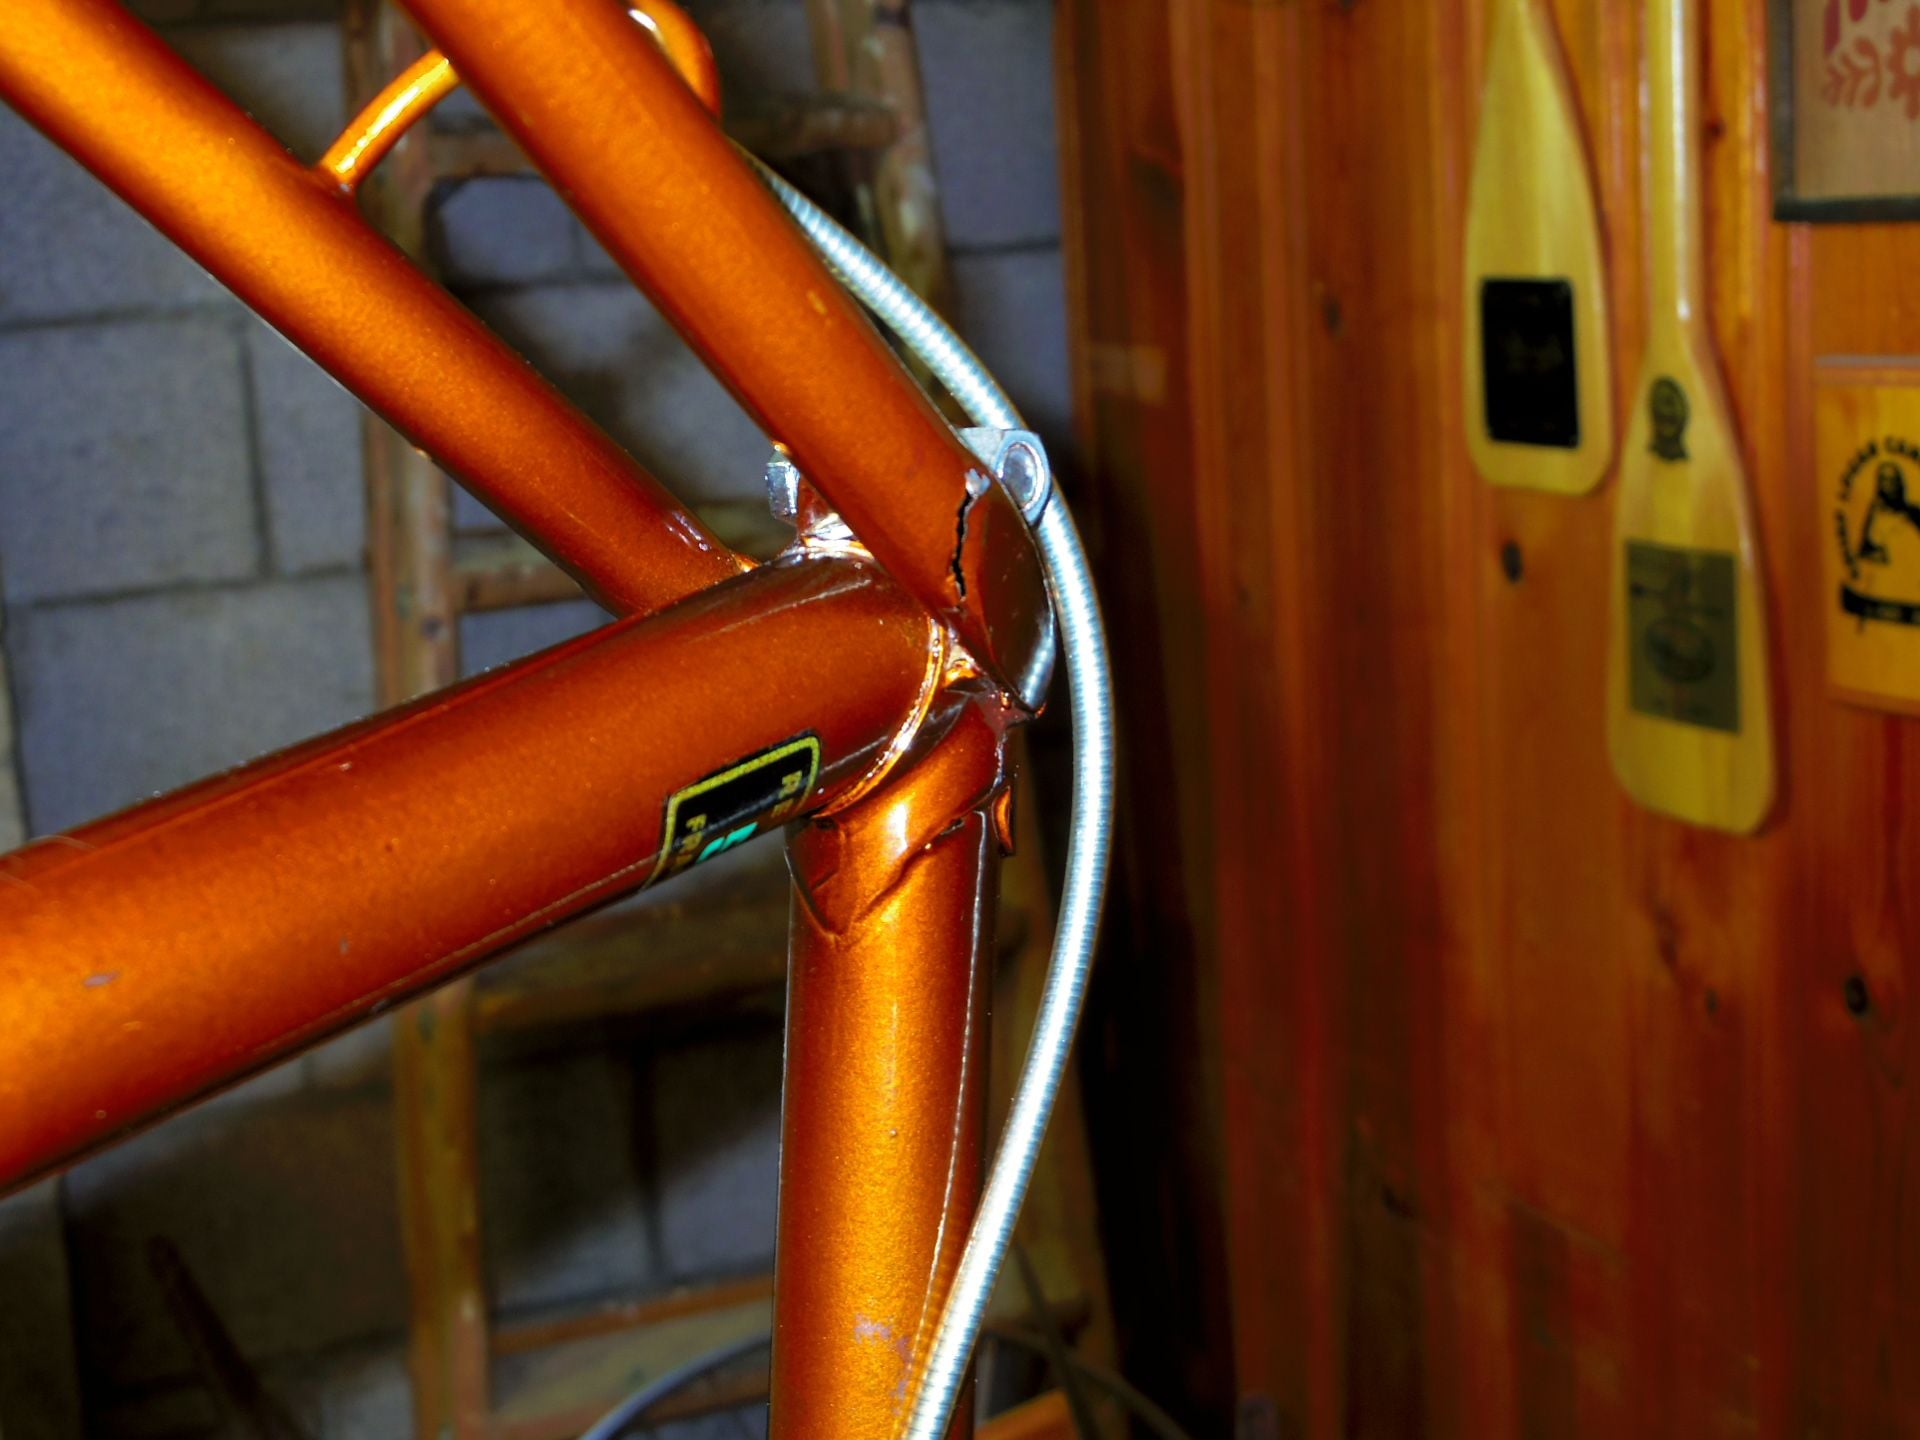
Okay so I've got down to a lot more. I've laid the paint stripper on A few more times, once leaving it overnight wrapped in plastic and this is as far down as I could get things. Coarse grit sand paper and some work with a sanding wheel (which worked well untill I clipped the stay with the metal wheel, I went back to hand sanding after that haha)
It looks to me like what some previous posters had thought; a blobby brass repair of a seat stay cap.
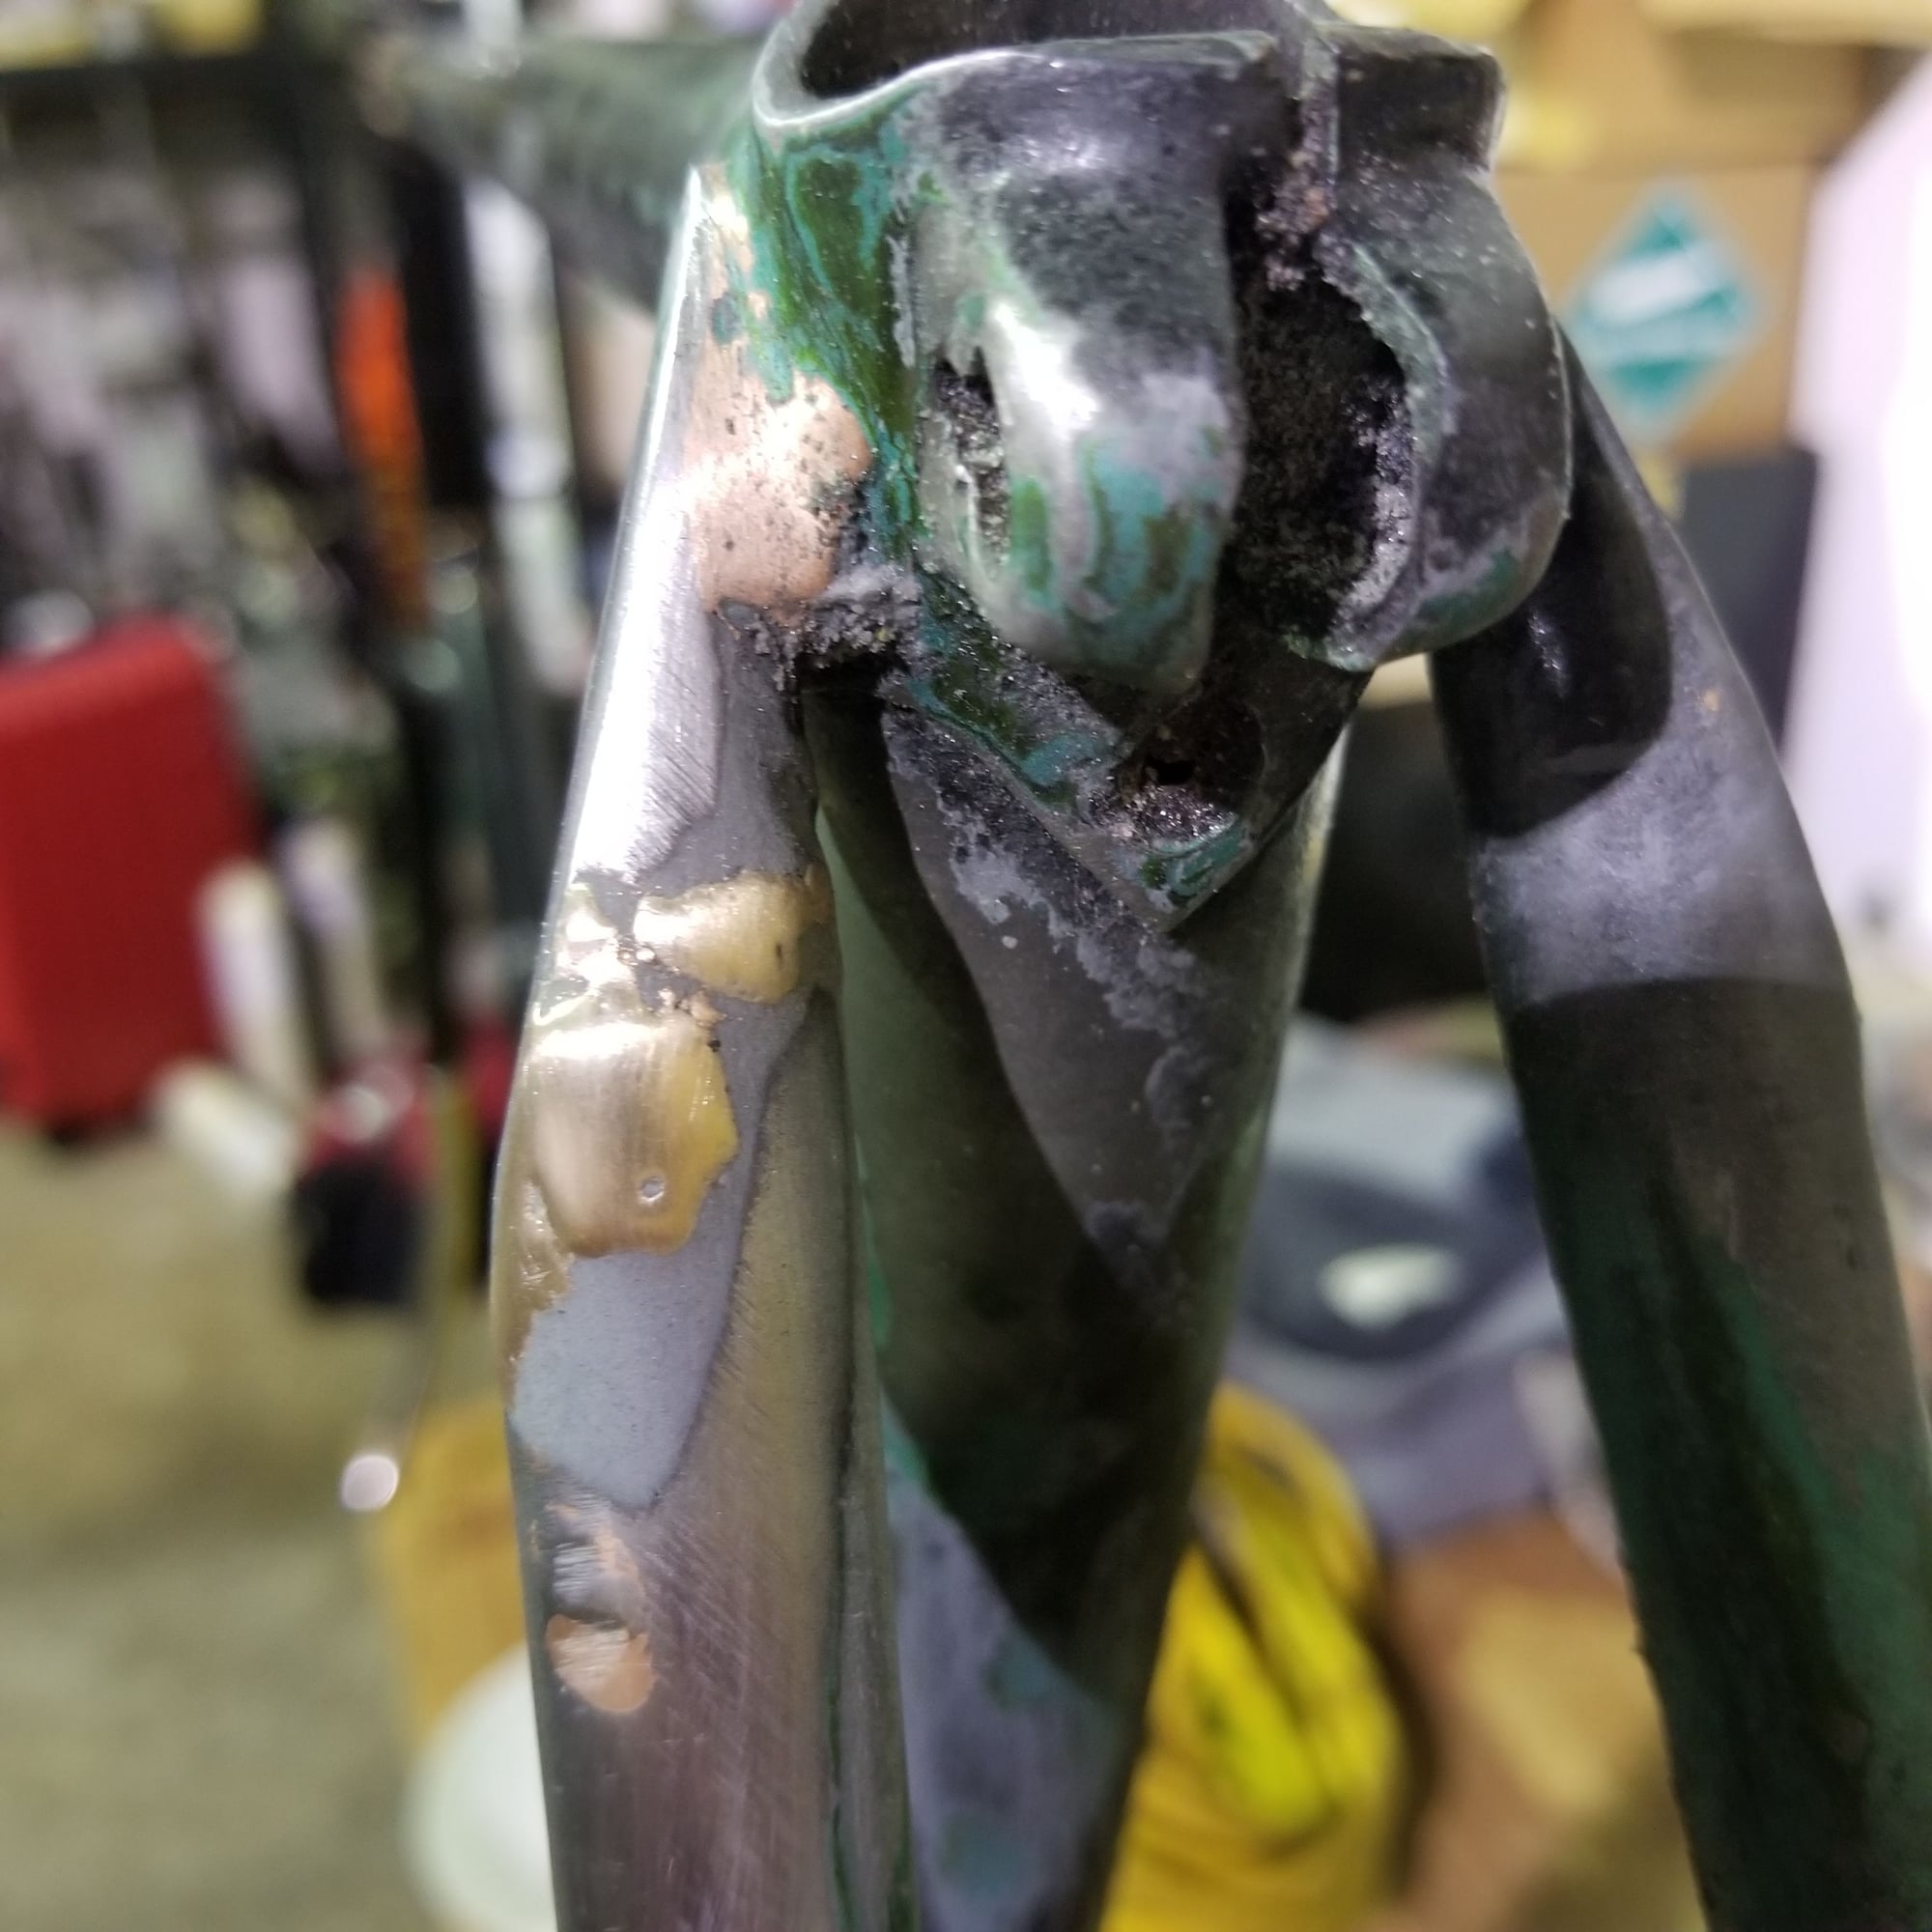
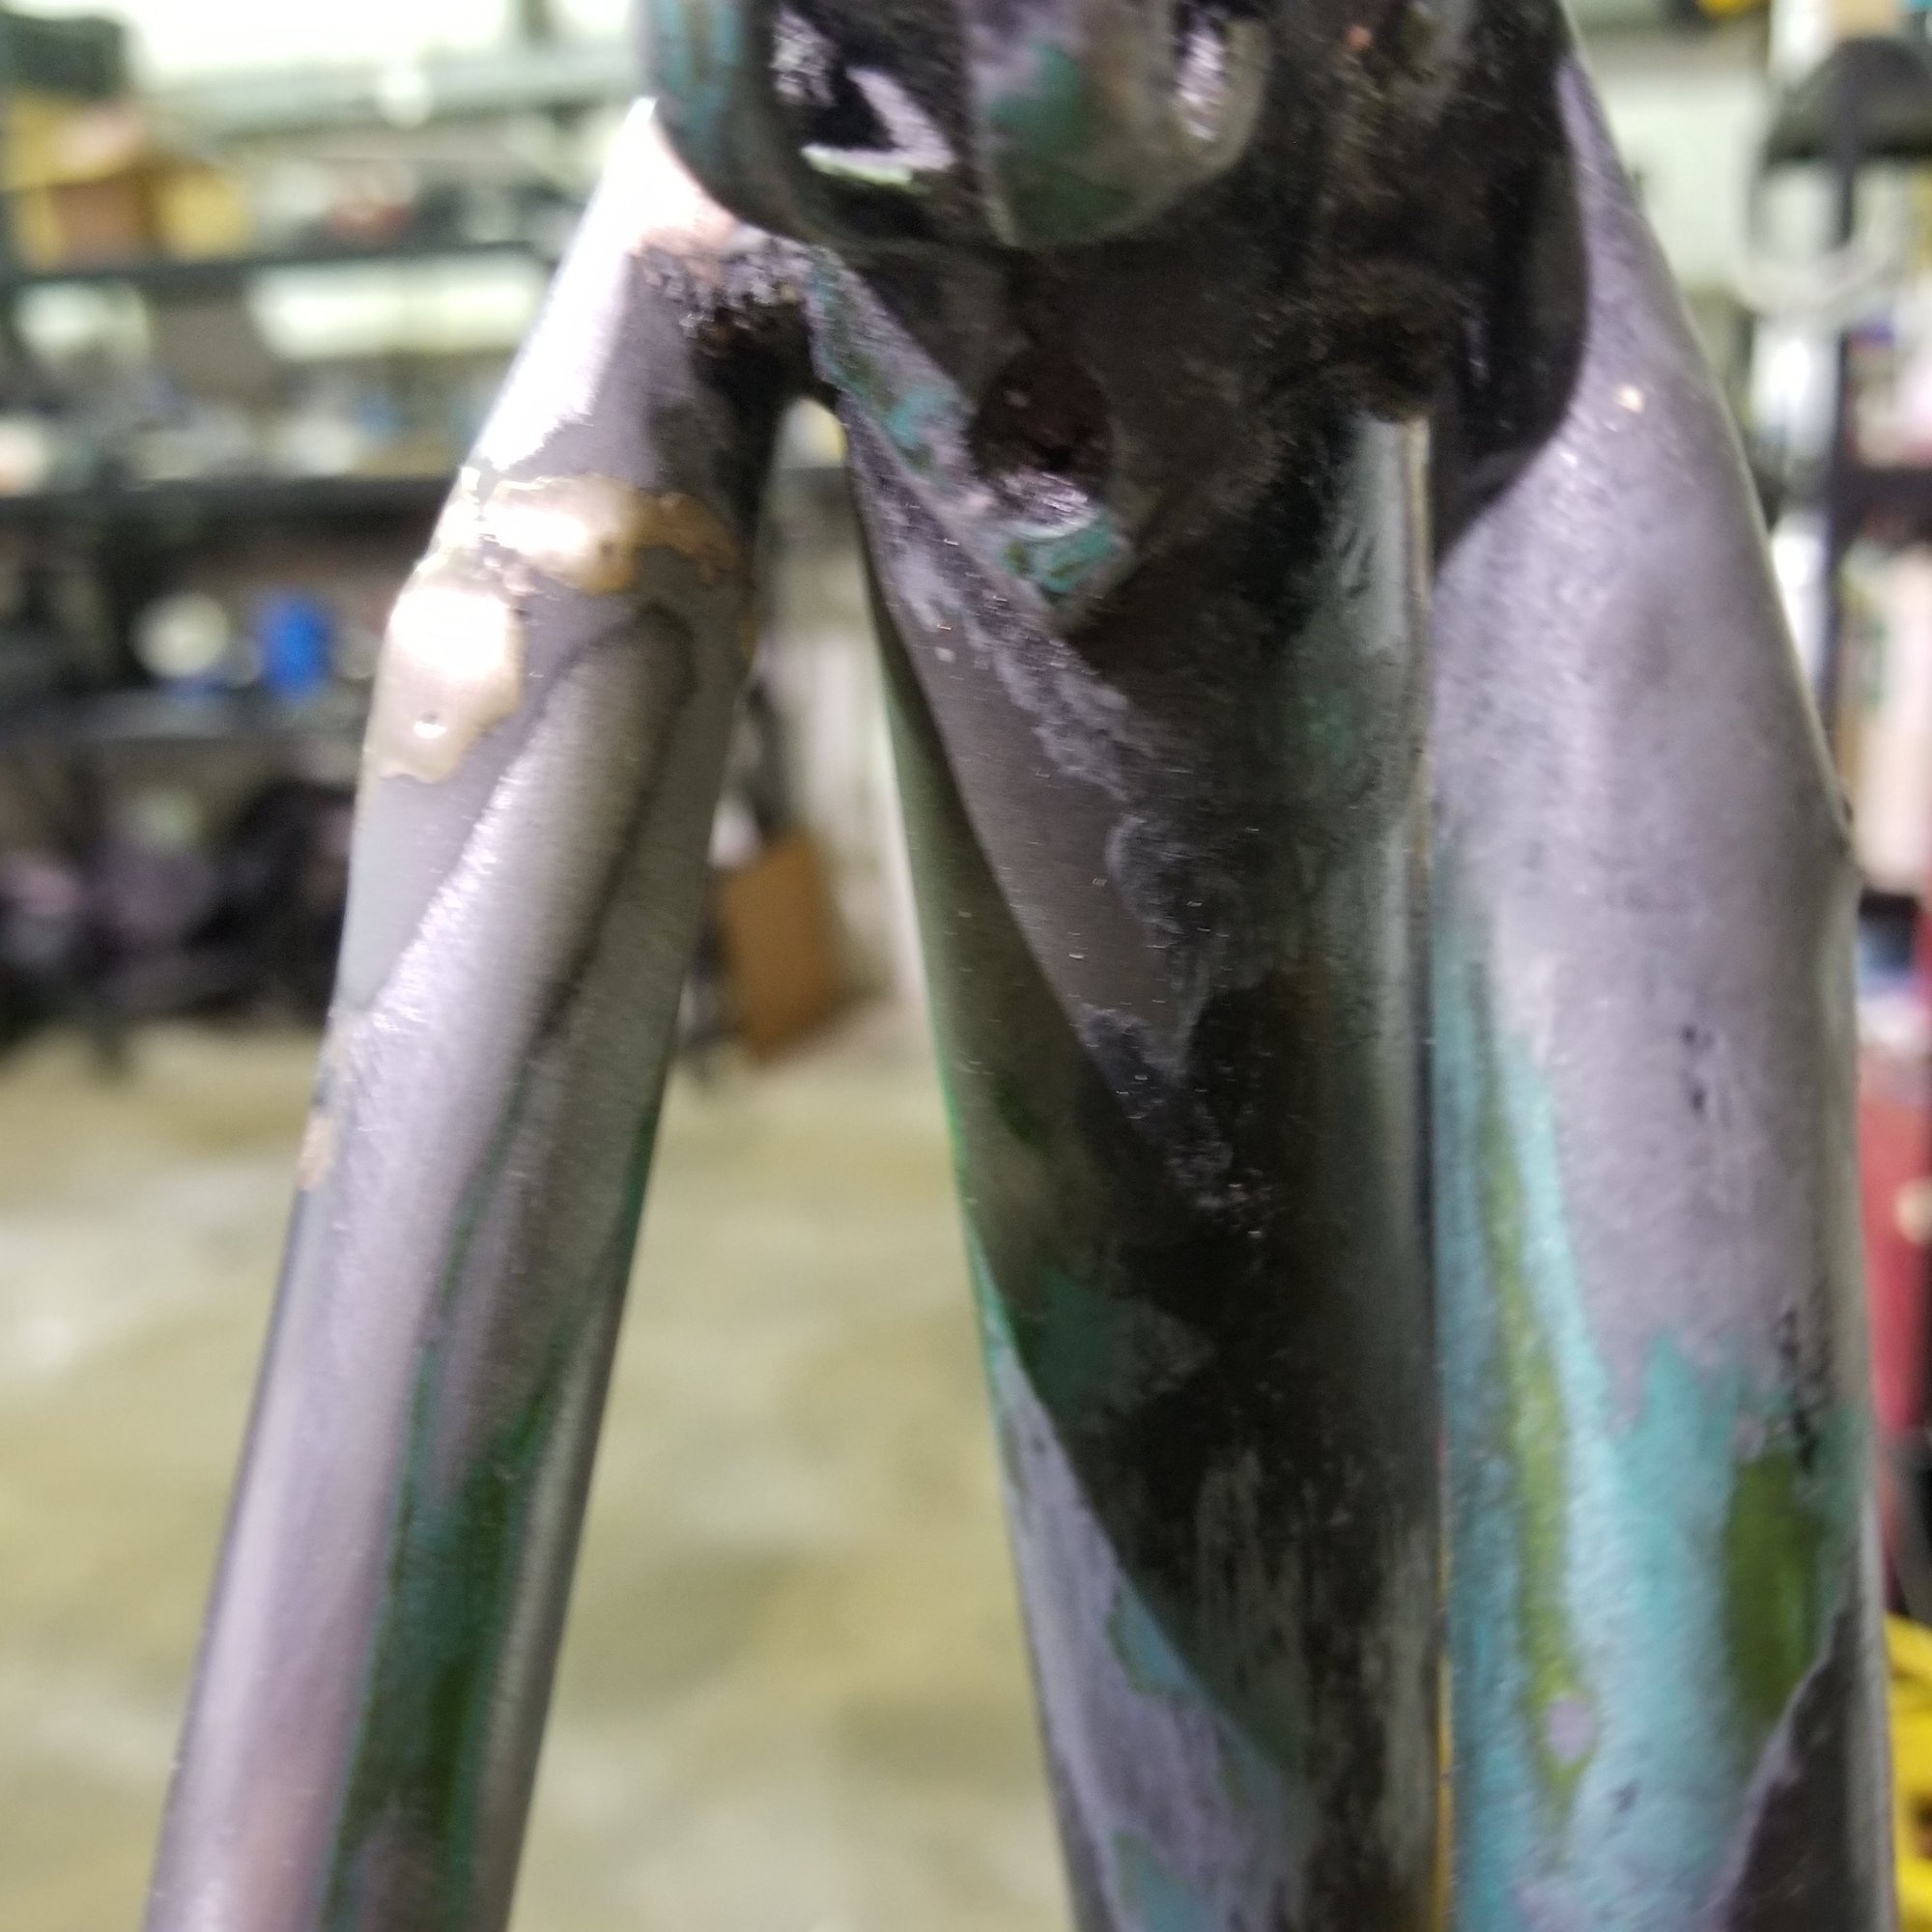
You can see the knick i put in it with the grinding wheel a few cm below the lower blob
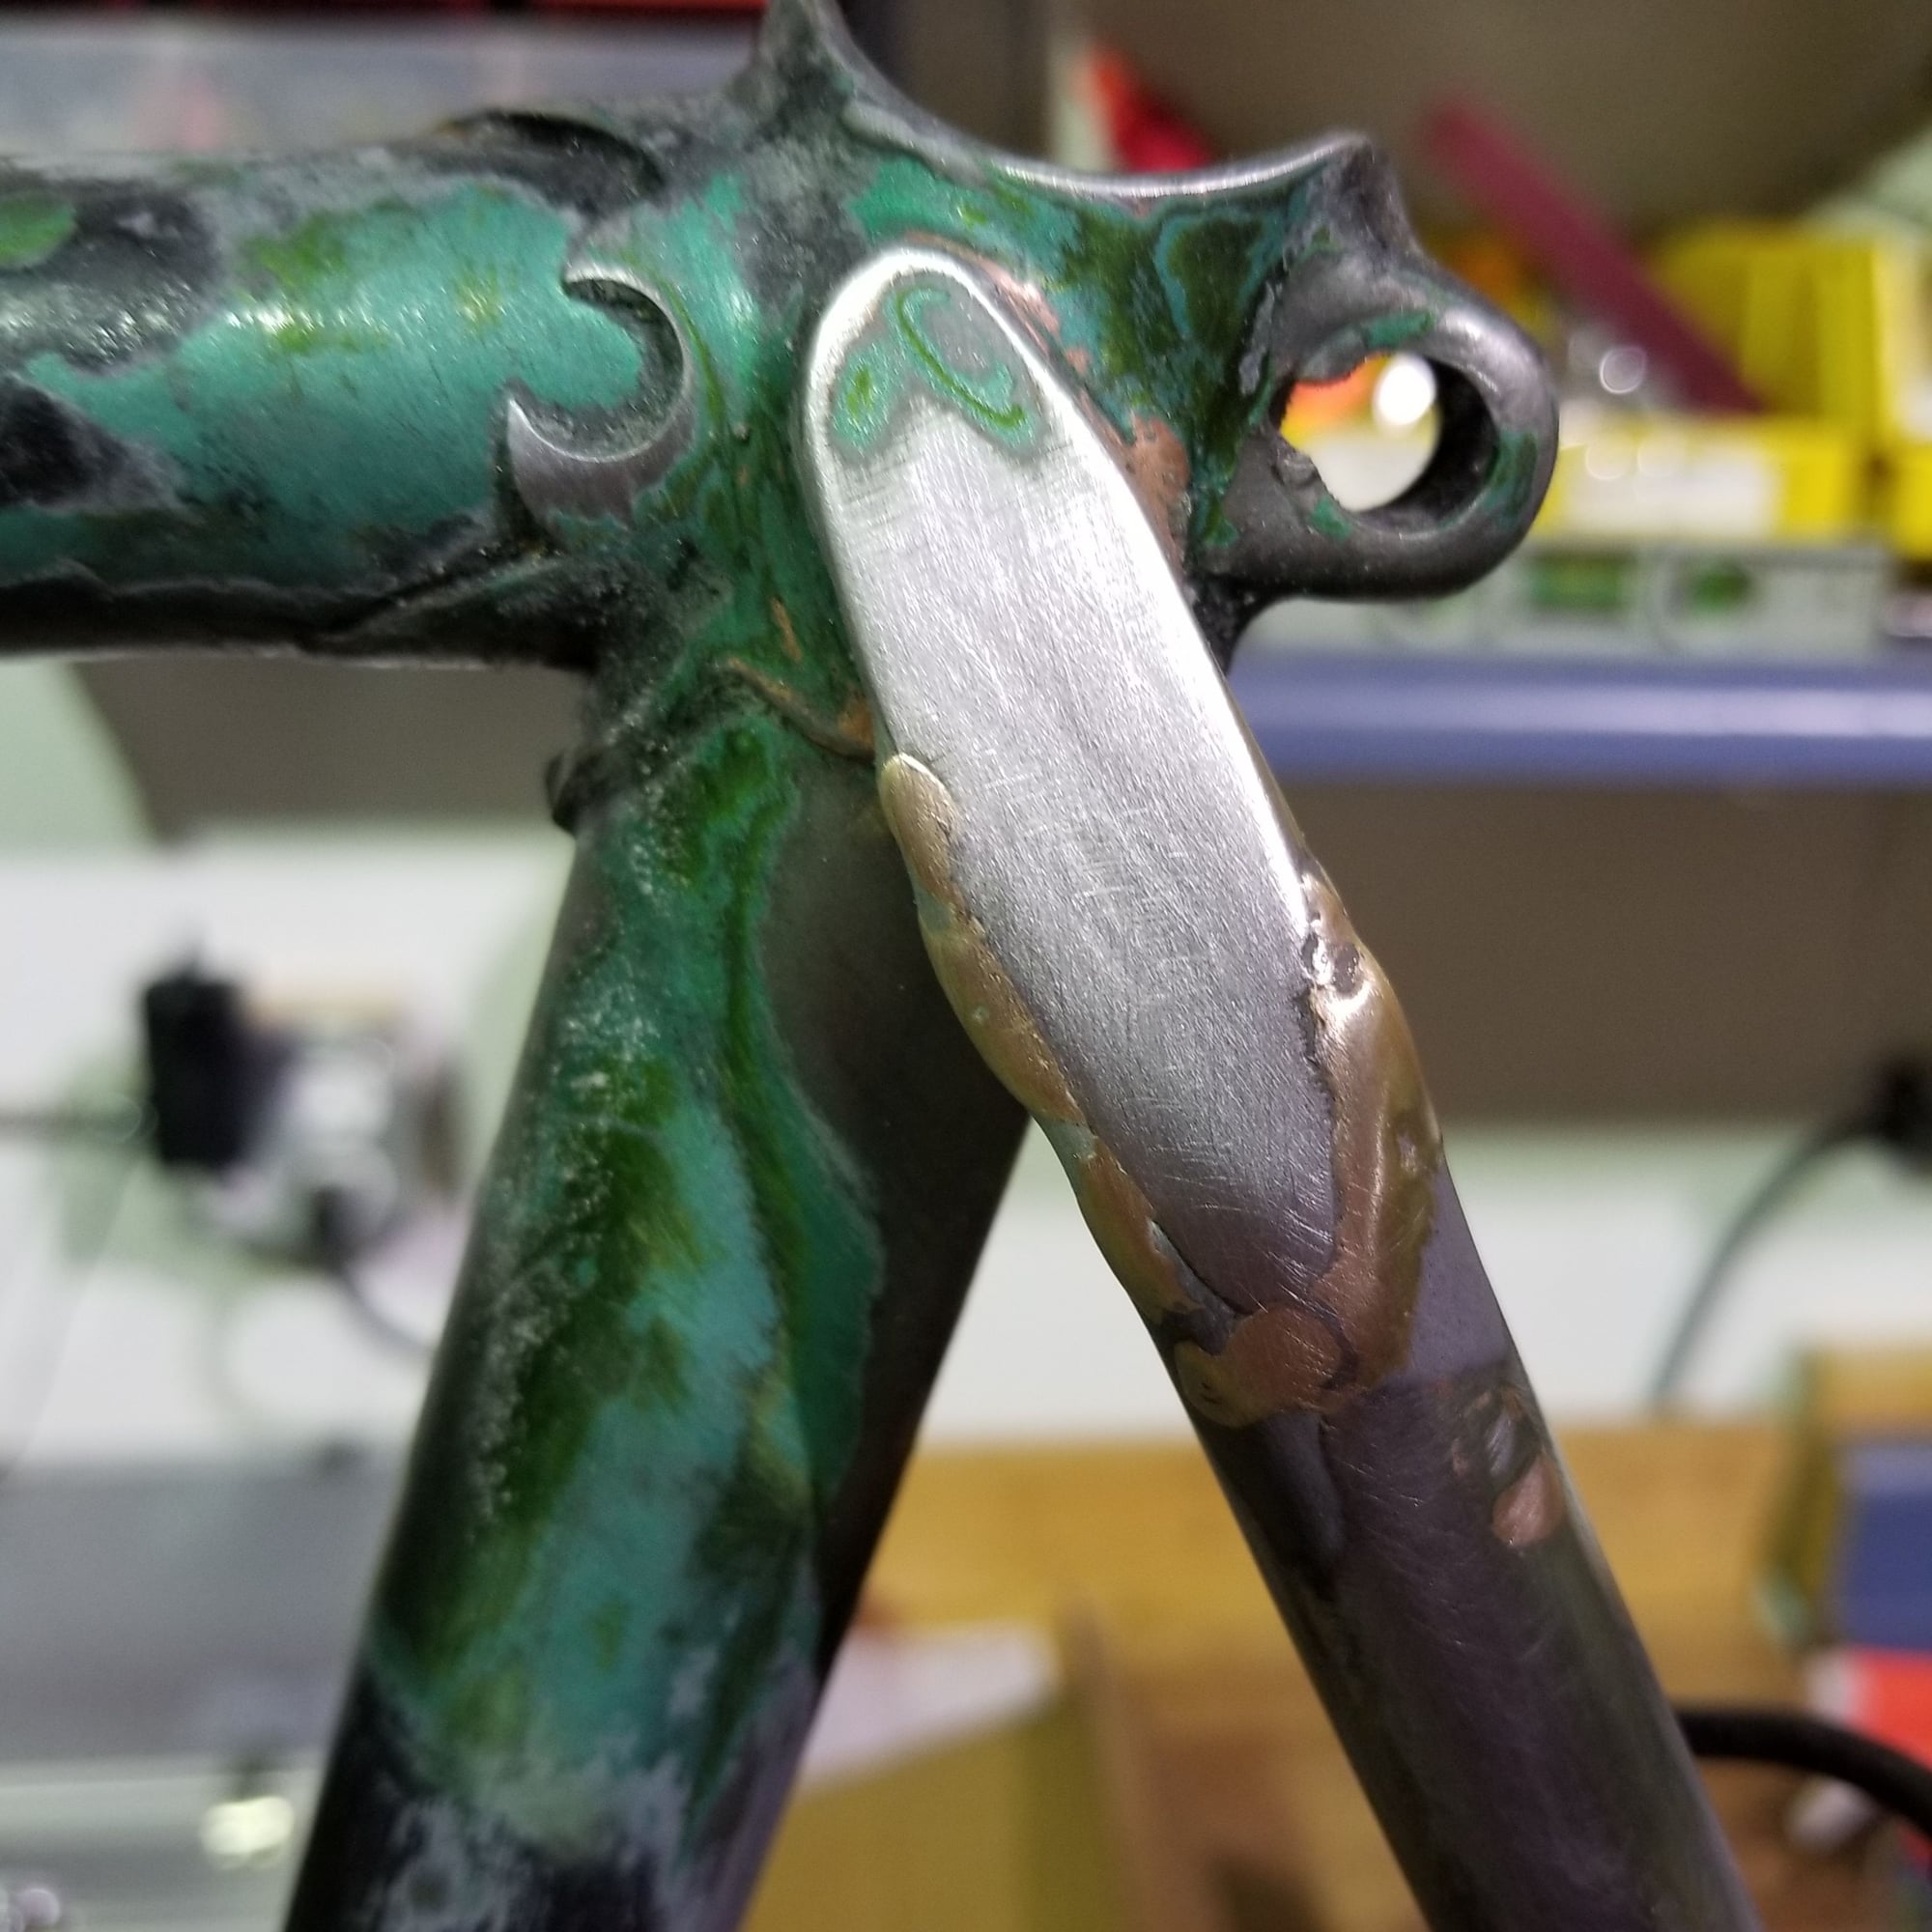
Front view I can see a the blobs of brass tracing the lower portion of the cap
Little line goes part way around the back but i dont see any cracks.
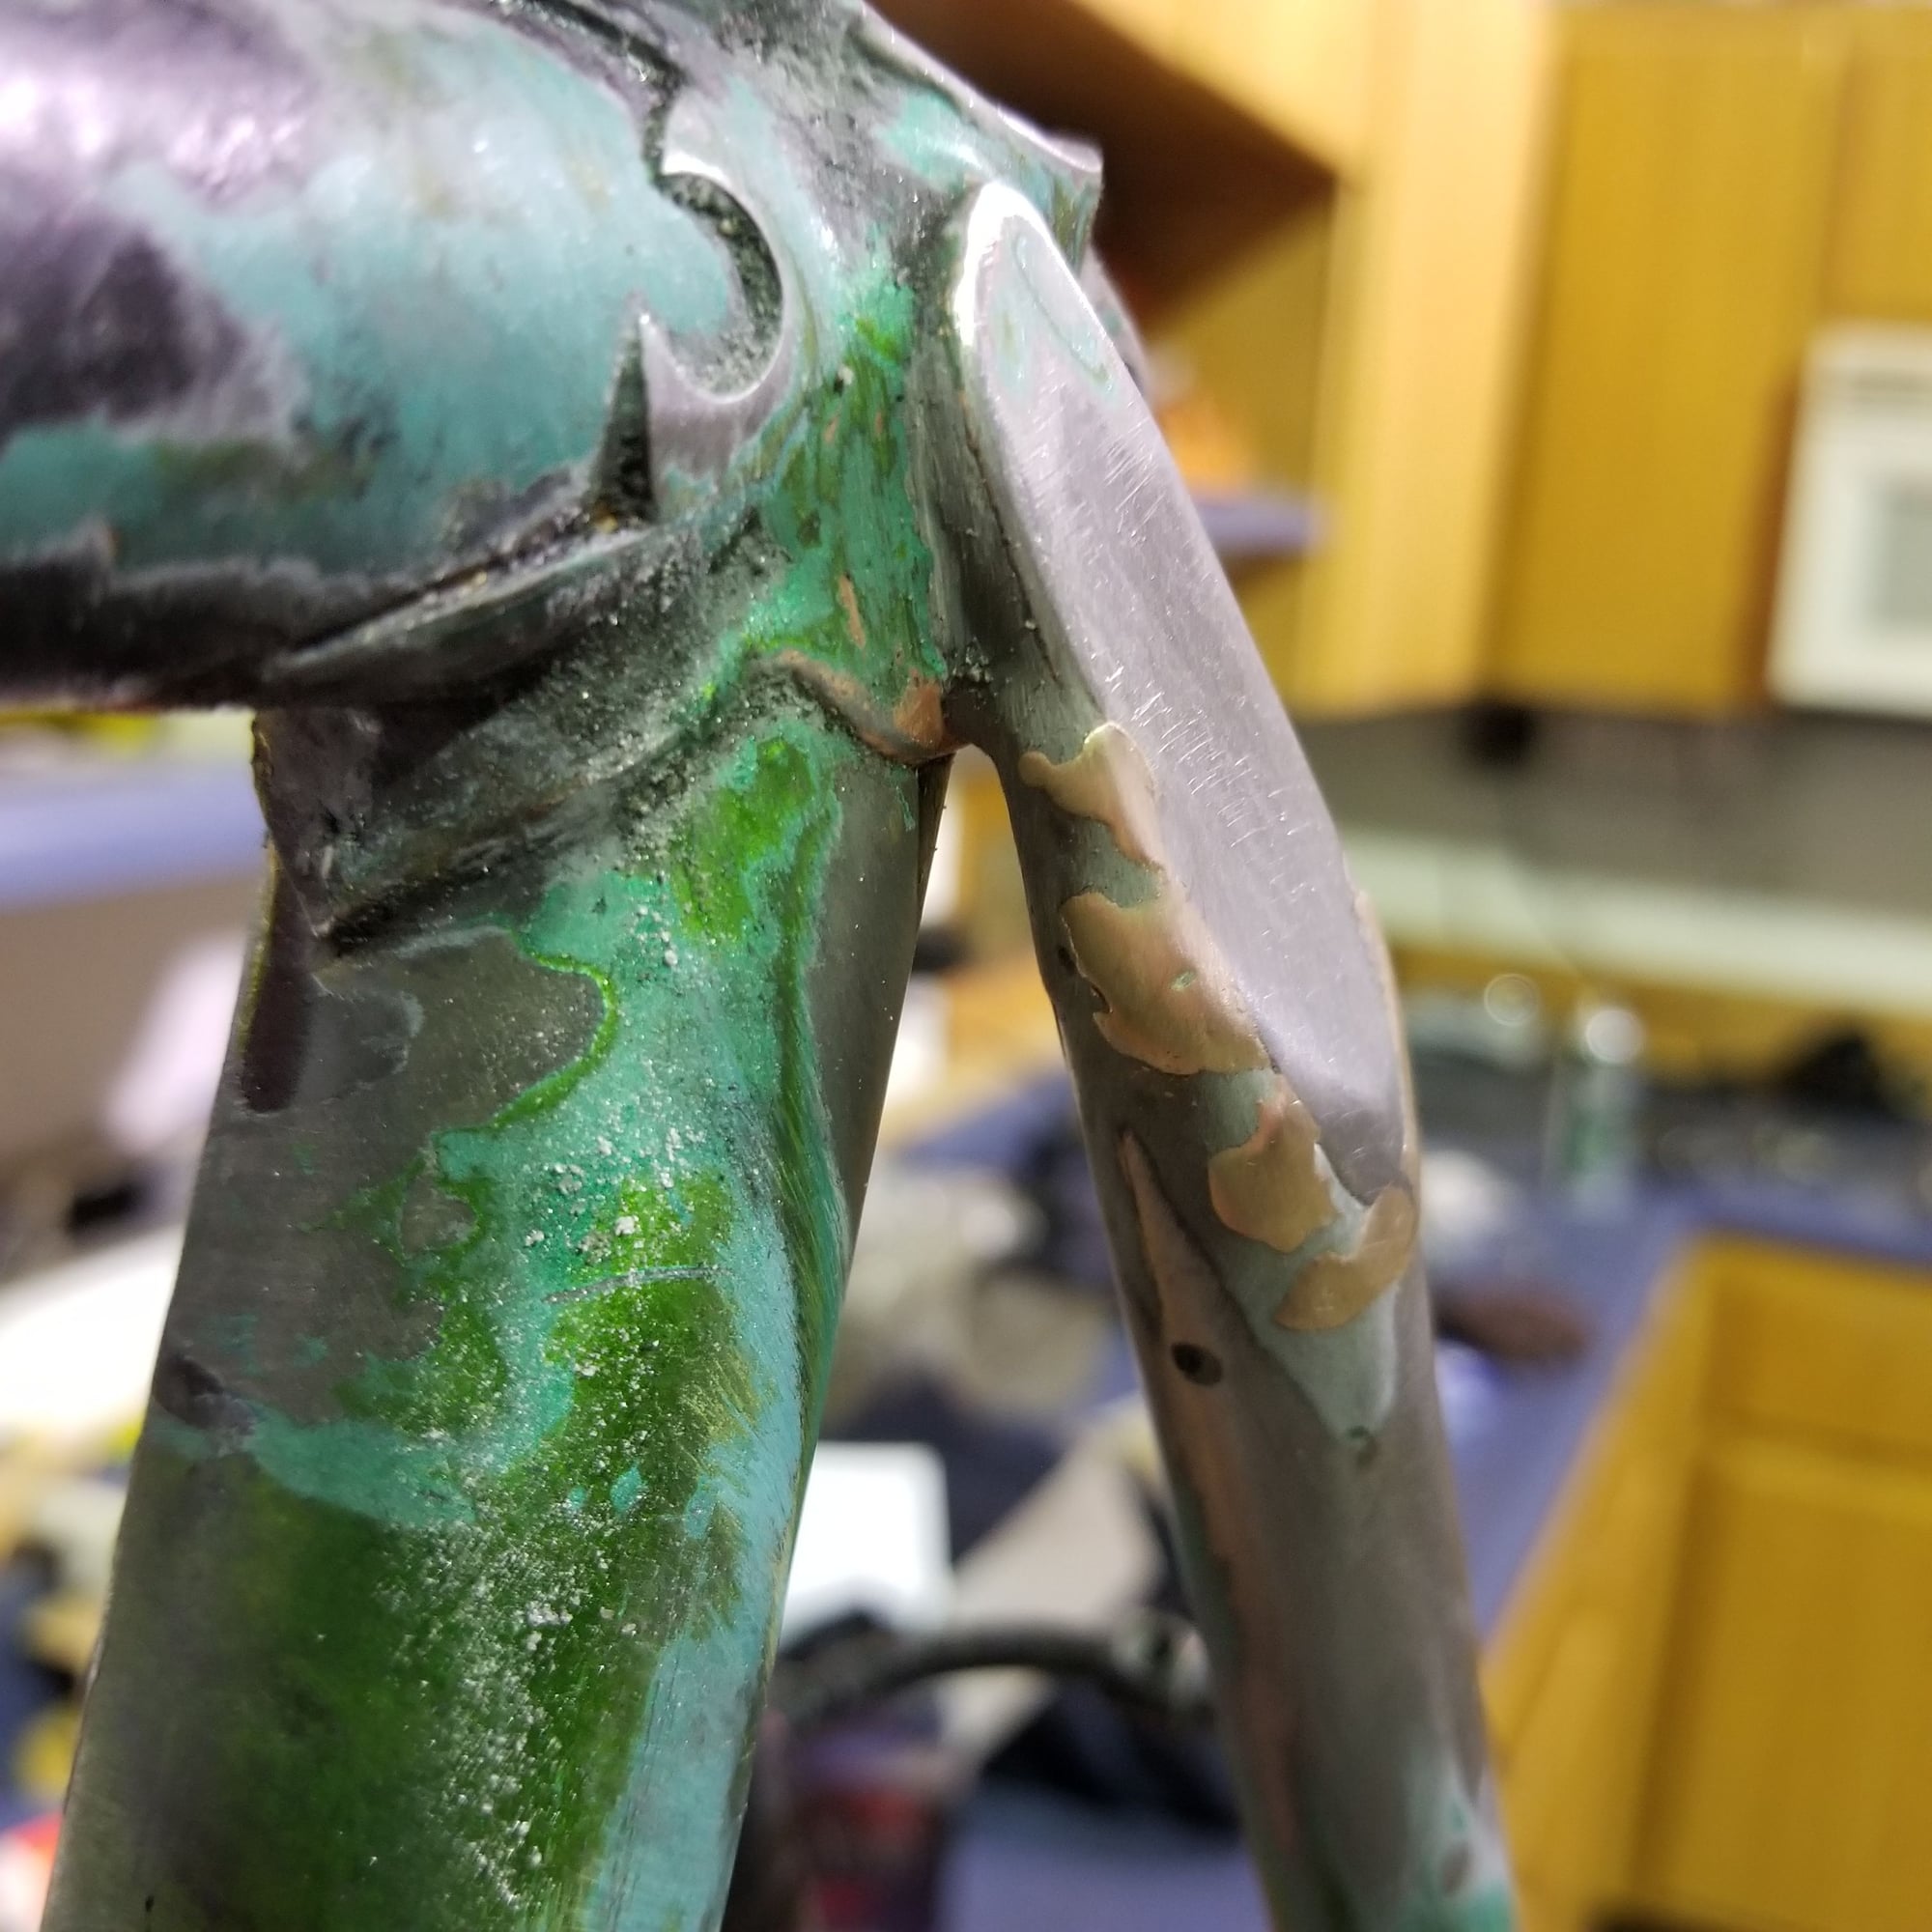
View from left
It looks to me like what some previous posters had thought; a blobby brass repair of a seat stay cap.
You can see the knick i put in it with the grinding wheel a few cm below the lower blob
Front view I can see a the blobs of brass tracing the lower portion of the cap
Little line goes part way around the back but i dont see any cracks.
View from left
10-11-18, 01:49 PM
#33
Senior Member
I think you're fine. The brass on the inside between the stay end and the seat lug makes me suspect that there was a crack there too. Seat stays do crack loose there on occasion, despite, or perhaps because of, the oft repeated mantra that seatstays aren't under any stress.
Clean up the blobs with a file, rat tail file, and emery. I'd leave as much as possible of the repair brass fillet to the seat lug. Just get it smooth. Try not to sand the steel anymore. Inspect again for cracks. Should be good to go.
PS if you hold the file lightly against and parallel to the stay, it should just grab the soft brass high spots and maintain the shape.
10-11-18, 03:40 PM
#34
Senior Member
Thread Starter
Join Date: Jun 2018
Posts: 733
Mentioned: 12 Post(s)
Tagged: 0 Thread(s)
Quoted: 213 Post(s)
Likes: 0
Liked 6 Times
in
5 Posts
Honestly I worry I would do more harm than good. It doesnt look too noticable with the paint on. I ddint see it untill I was really investigating. I think I'll probably just leave it as is. This is how it's been structarly sound so I'm thinking it should perhaps stay this way haha
I'm just happy its repair not damage. Means I can still have this bad boy powder coated!
I'm just happy its repair not damage. Means I can still have this bad boy powder coated!
10-13-18, 12:55 PM
#35
Senior Member
My guess - a broken/incomplete braze joint at the seat stay cap. Ham-handed brake job at a remedy. Blobs of braze were aesthetically unacceptable. Bondo added attempting to hide the big blobs of braze alloy (rather than filing them off).
This is what is commonly referred to as a "hack job by Bubba".
Frame looks like a Raleigh Competition to me.
What would I do?
File the excess braze material off. If this reveals hidden damage, get it repaired properly.
P.S. - You need to remove all the Bondo before you try to powder coat the frame.
This is what is commonly referred to as a "hack job by Bubba".
Frame looks like a Raleigh Competition to me.
What would I do?
File the excess braze material off. If this reveals hidden damage, get it repaired properly.
P.S. - You need to remove all the Bondo before you try to powder coat the frame.
10-13-18, 01:16 PM
#36
Senior Member
This is really pretty easy, but if you don't feel confident with a file, entice a craftsman/friend with pizza and beer. Do not use power tools. IMO dumb idea to powder coat without spending 5 minutes filing.
10-13-18, 03:33 PM
#37
Senior Member
Thread Starter
Join Date: Jun 2018
Posts: 733
Mentioned: 12 Post(s)
Tagged: 0 Thread(s)
Quoted: 213 Post(s)
Likes: 0
Liked 6 Times
in
5 Posts
So wait...
am I filing the brass down to make it aesthetically pleasing or am I filling all of it off to find a crack?
if I expose the crack under the brass arnt I just undoing the repair?
sorry I am very new to dealing these kinds of ad hoc repairs
am I filing the brass down to make it aesthetically pleasing or am I filling all of it off to find a crack?
if I expose the crack under the brass arnt I just undoing the repair?
sorry I am very new to dealing these kinds of ad hoc repairs
10-13-18, 04:18 PM
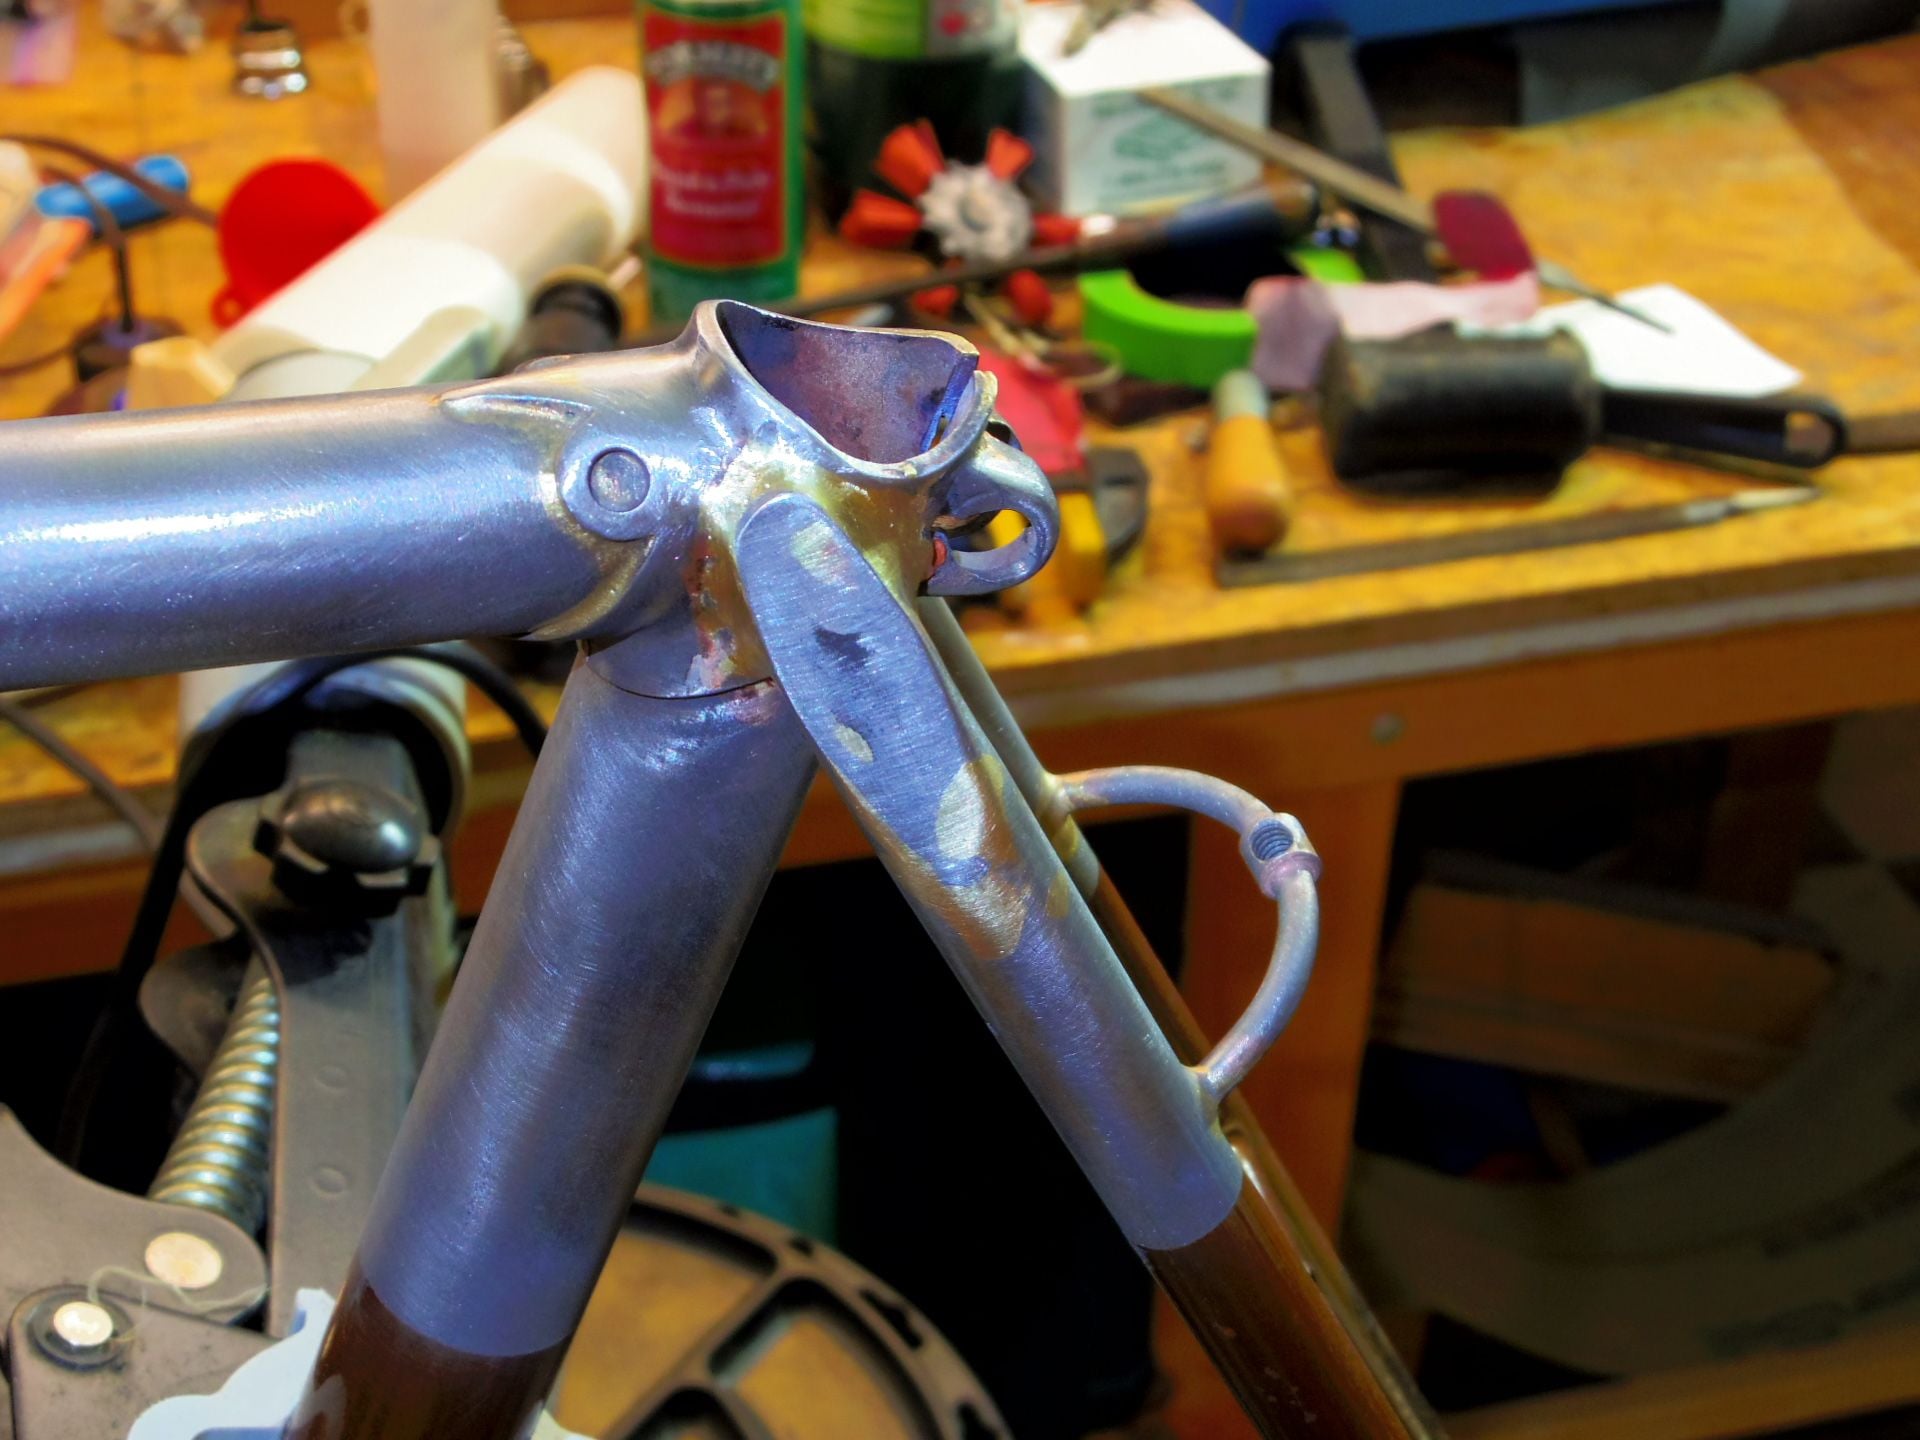
#38
Senior Member
You do want to be careful not to file off any more steel. I can see you ground into the steel a bit on the lower corner of the stay cap. Avoid this area.
The inside blob between the stay and the seat lug is structural. Do not remove it. File the brass there a bit smoother only. The lower edge that's concealed by crud should be filed to clean it up. You need to make sure there are no cracks and the joint is solid. A small rat tail and some emery cloth cut into thin strips will work for this.
10-13-18, 08:50 PM
#39
Senior Member
Thread Starter
Join Date: Jun 2018
Posts: 733
Mentioned: 12 Post(s)
Tagged: 0 Thread(s)
Quoted: 213 Post(s)
Likes: 0
Liked 6 Times
in
5 Posts
Okay I think I get it.
what I should find is a line of brass that has bonded the two pieces of metal. Like wise around the back of the seststay I'll likey find a crack with brass binding it together. I need to remove the blobs on top to be sure the cracks are bonded with brass and just covered with a blob of it?
yeah the spot you see there below there seat stay cap was just poor decision making on my part. I was pulling paint off by lightly touching a sander wheel to it, and when I turned it on its side to get at an angle the metal wheel caught the seat stay. I'm going to stick with hand tools from here on out.
10-13-18, 09:20 PM
#40
Ride, Wrench, Swap, Race

Join Date: Jan 2010
Location: Northern California
Posts: 9,194
Bikes: Cheltenham-Pedersen racer, Boulder F/S Paris-Roubaix, Varsity racer, '52 Christophe, '62 Continental, '92 Merckx, '75 Limongi, '76 Presto, '72 Gitane SC, '71 Schwinn SS, etc.
Mentioned: 132 Post(s)
Tagged: 0 Thread(s)
Quoted: 1565 Post(s)
Liked 1,296 Times
in
866 Posts
It is possible that the expected bond line between cap and stay doesn't exist, and that the external blobs are holding things together.
That is one possibility with such hasty or unskilled workers having built or repaired this frame.
Might be best to merely reduce the thickness of the blobs to a uniform thickness instead of filing them away and finding little else holding the cap in place.
That is one possibility with such hasty or unskilled workers having built or repaired this frame.
Might be best to merely reduce the thickness of the blobs to a uniform thickness instead of filing them away and finding little else holding the cap in place.
10-13-18, 09:37 PM
#41
Senior Member
Thread Starter
Join Date: Jun 2018
Posts: 733
Mentioned: 12 Post(s)
Tagged: 0 Thread(s)
Quoted: 213 Post(s)
Likes: 0
Liked 6 Times
in
5 Posts
It is possible that the expected bond line between cap and stay doesn't exist, and that the external blobs are holding things together.
That is one possibility with such hasty or unskilled workers having built or repaired this frame.
Might be best to merely reduce the thickness of the blobs to a uniform thickness instead of filing them away and finding little else holding the cap in place.
That is one possibility with such hasty or unskilled workers having built or repaired this frame.
Might be best to merely reduce the thickness of the blobs to a uniform thickness instead of filing them away and finding little else holding the cap in place.
would these blobs, if not done correctly, actually be holding things together well enough to leave?
10-14-18, 09:55 AM
#42
Senior Member
Anyhow, "digging" should be avoided. A single cut flat file with no handle is what I'd suggest, using the stay as a guide to keep it flush. You could put a couple layers of tape on the lower half of the file. That way the file won't quite touch the steel.
10-14-18, 10:22 AM
#43
Bike Butcher of Portland

Join Date: Jul 2014
Location: Portland, OR
Posts: 11,639
Bikes: It's complicated.
Mentioned: 1299 Post(s)
Tagged: 0 Thread(s)
Quoted: 4682 Post(s)
Liked 5,800 Times
in
2,284 Posts
I gotta weigh in here. Just take a fine file and shape the brass down to the metal. After that some 80 grit garnet to remove any file marks you might leave.
Somebody did a poor repair job. Half of the bike boom Raleigh's I've worked on have cracks on the seat stay caps. The proper way to fix those is to take a hacksaw blade and carefully clean out the crack until you get to base metal then silver braze and fill the crack. It's a 5 minute job. What somebody did here is slap some brass on the surface. Maybe it penetrated the crack, maybe not, but at any rate, it's cosmetic. All of the structural strength is between the tube and the seat lug. There's usually crappy workmanship there as well, but somehow they don't fall apart.
Somebody did a poor repair job. Half of the bike boom Raleigh's I've worked on have cracks on the seat stay caps. The proper way to fix those is to take a hacksaw blade and carefully clean out the crack until you get to base metal then silver braze and fill the crack. It's a 5 minute job. What somebody did here is slap some brass on the surface. Maybe it penetrated the crack, maybe not, but at any rate, it's cosmetic. All of the structural strength is between the tube and the seat lug. There's usually crappy workmanship there as well, but somehow they don't fall apart.
__________________
If someone tells you that you have enough bicycles and you don't need any more, stop talking to them. You don't need that kind of negativity in your life.
If someone tells you that you have enough bicycles and you don't need any more, stop talking to them. You don't need that kind of negativity in your life.
10-14-18, 11:46 AM
#44
Senior Member
Join Date: Mar 2018
Posts: 136
Mentioned: 9 Post(s)
Tagged: 0 Thread(s)
Quoted: 70 Post(s)
Likes: 0
Liked 0 Times
in
0 Posts
Have you checked the rear triangle alignment (string test)? One of your photos shows the stay cap is not flat, but twisted which would indicate a possible bent seat stay that twisted the cap out of alignment? I had a similar issue with a Super Course. The stay caps are not attached very well at the factory as they are really just cosmetic. Mine were slightly cracked, but came loose when I was aligning the the frame. I had a friend re-braze the caps, and added a little more brass to the main stay/seat tube joint. The repair left a pretty big gob of brass that took quite awhile to file and sand smooth.
After checking the alignment, If you file most of the brass off, and there is cracks showing at the cap joint, you could just use JB weld to fill the gaps, and smooth the area. Re-brazing is probably not necessary if the main joint is intact. I stripped my frame with Aircraft paint stripper. I then media blasted the frame with Garnet, followed by sanding with 180 grit sand screen ripped into narrow strips.


After checking the alignment, If you file most of the brass off, and there is cracks showing at the cap joint, you could just use JB weld to fill the gaps, and smooth the area. Re-brazing is probably not necessary if the main joint is intact. I stripped my frame with Aircraft paint stripper. I then media blasted the frame with Garnet, followed by sanding with 180 grit sand screen ripped into narrow strips.

Thread
Thread Starter
Forum
Replies
Last Post
zukahn1
Classic & Vintage
39
01-15-13 04:49 PM
Oldpeddaller
Classic & Vintage
17
12-08-09 05:44 PM
