


Sugino AT Bottom Bracket service
 11-15-20 | 09:20 AM
#1
Thread Starter
Senior Member


Joined: Mar 2016
Posts: 1,044
Likes: 260
From: North of Boston
Bikes: 2003 Lemond Alpe D' Huez... plus a " few" more :)
Sugino AT Bottom Bracket service
Hi,
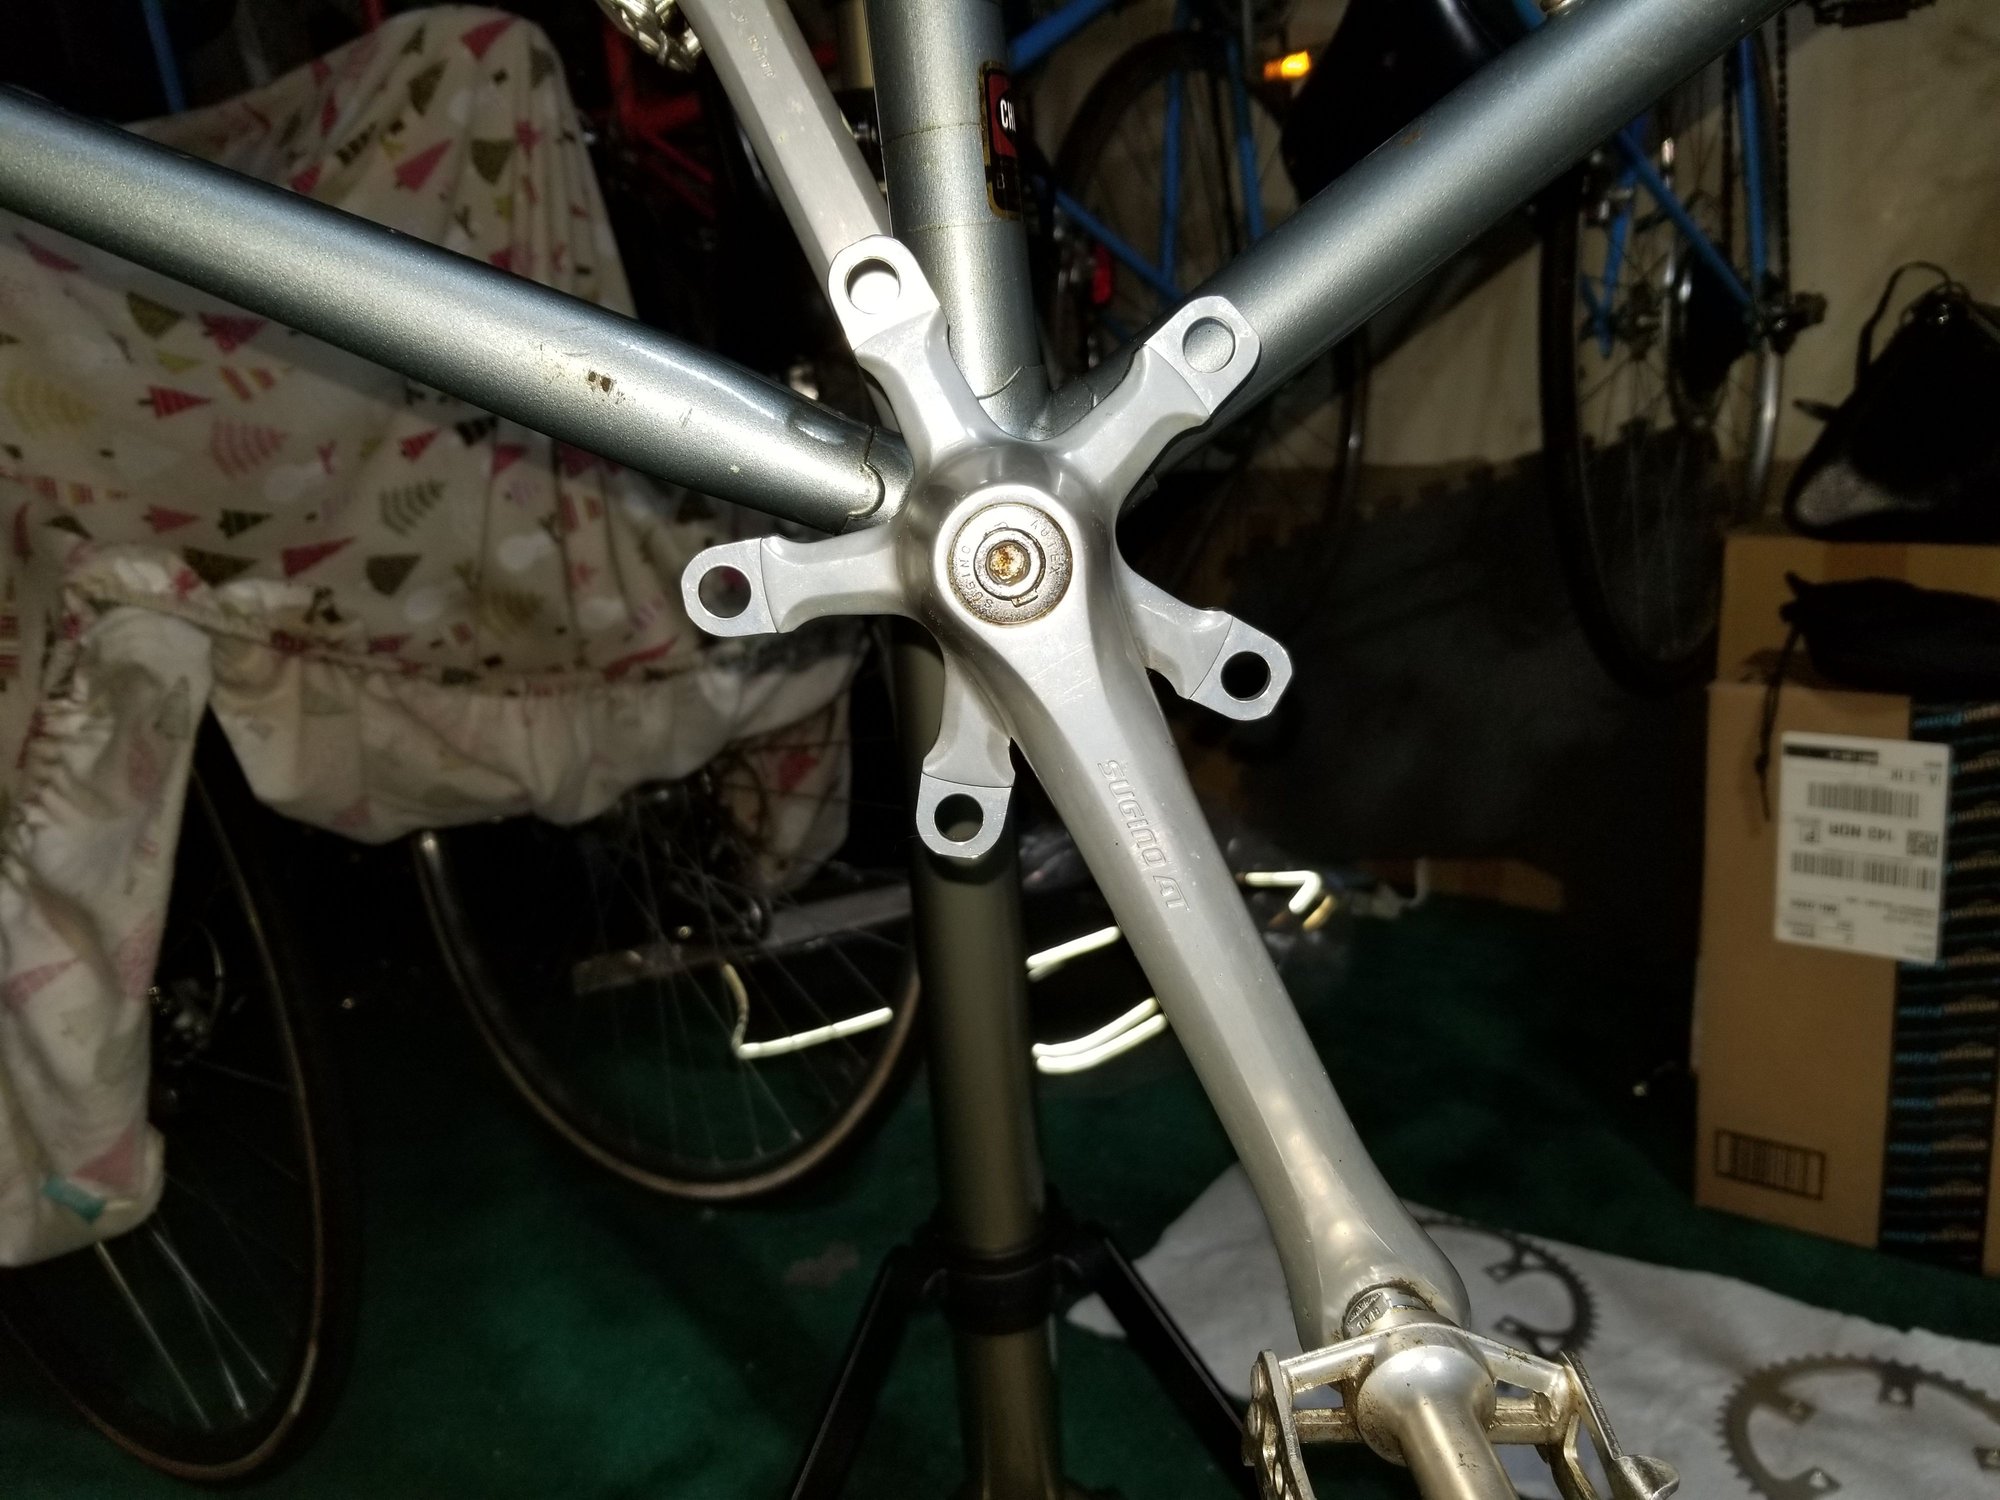
Just wondering how exactly the pedal arm(s) come off. I have done this for Shimano, but this looks completely different.
I turned the bolt with an Allen wrench but only turns about 1/8. I do not want to strip it .
So I am hoping someone here knows what to do.
This forum has given me so much help and information, and it is greatly appreciated
 11-15-20 | 09:35 AM
#2

Senior Member

Joined: Feb 2008
Posts: 5,321
Likes: 4,834
From: Peoria, IL
This is the Sugino Autex crank self-extractor.
details here:
Sugino Autex self-extracting crank bolt
You should just be able to turn the bolt counter-clockwise... but things might be pretty tight and sticky.
An alternative would be to take out the self-extractor, and just use a regular crank puller.
Steve in Peoria
details here:
Sugino Autex self-extracting crank bolt
You should just be able to turn the bolt counter-clockwise... but things might be pretty tight and sticky.
An alternative would be to take out the self-extractor, and just use a regular crank puller.
Steve in Peoria
11-15-20 | 09:43 AM
#3
2k miles from the midwest
Joined: Feb 2005
Posts: 1,963
Likes: 944
From: Washington
Bikes: ~'75 Colin Laing, '80s Schwinn SuperSport 650b, ex-Backroads ti project...
It looks kinda dry. I'd spray it with a penetrating oil of some kind and let it set for a few hours before I put a wrench on it.
11-15-20 | 10:38 AM
#4

Senior Member
Joined: Jan 2012
Posts: 1,475
Likes: 655
From: Joisey
Yeah, the Sugino Autex auto-extractor is supposed to let you auto-extract the arms with just a hex wrench. They did not always perform as designed. I don't remember specifics, just a vague memory of seeing a couple of problems on repair bikes and swearing to myself I'd never use one on my bikes.
If you can get a pin tool of some sort to let you back out that outer plate, then you can just pull the bolt and use a regular extractor. Problem is that plate is thin, they like to get stuck, and if they're tight/stuck a pin tool may just tear up the slots. They did ship with a little insert of some sort to install the outer plates, with tabs that correctly fit the slots.
Proceed with caution.
__________________
Fuggedaboutit!
Fuggedaboutit!
11-15-20 | 10:54 AM
#5
Thread Starter
Senior Member
Joined: Mar 2016
Posts: 1,044
Likes: 260
From: North of Boston
Bikes: 2003 Lemond Alpe D' Huez... plus a " few" more :)
Thank you for all the great replies
I'll put some PB Blaster in there and see what happens.
the crank moves well.
Fast and smooth.....but I thought since I have the chain rings off..why not proceed with BB service....
I'll keep you posted...it may be a few days after the oil gets in there.
I may just end up leaving it alone since it rotates quick without any hitches...
We'll see
Thank you again
11-15-20 | 09:14 PM
#6

Ride, Wrench, Swap, Race
Joined: Jan 2010
Posts: 9,835
Likes: 1,816
From: Northern California
Bikes: Cheltenham-Pedersen racer, Boulder F/S Paris-Roubaix, Varsity racer, '52 Christophe, '62 Continental, '92 Merckx, '75 Limongi, '76 Presto, '72 Gitane SC, '71 Schwinn SS, etc.
No need to remove the threaded rings, they should be Loctited in place.
If heavy loosening torque doesn't pull the arm off, then leave the bolt in it's reverse-torqed state and then jump on the pedals with the cranks horizontal.
Reverse the cranks 180 degrees and repeat, then repeat again.
This will allow further turning of the bolt and the cranks can be pulled without damaging the bolt or wrench.
When the bolts have only 6mm hex sockets, it's hard to get torqued to near 30 ft-lbs, so better to torque the arms once, then jump on the pedals and torque them again. Just as with the loosening process, this will allow further turning of the bolts without exceeding prudent torque on the wimpy 6mm hex key.
I've used these methods over the years which have spared me from broken tools such as crank pullers and hex keys. Tools breaking can get ugly (bloody).
I've seen the results of over-torquing first hand, watched one "gorilla" take the handle right off of my Park puller, had to laugh even though it was my puller!
11-16-20 | 06:58 AM
#7
Thread Starter
Senior Member
Joined: Mar 2016
Posts: 1,044
Likes: 260
From: North of Boston
Bikes: 2003 Lemond Alpe D' Huez... plus a " few" more :)
That's VERY interesting way dddd !!!!!
Ingenious !!!!!!!! Great to use " body " weight !!!!!
I will keep that in mind.
The crank turns without any " hitches" already. VERY smooth .with no noise.
I may just leave it, but I am intrigued about dddd method
Thank YOU !!!
Ingenious !!!!!!!! Great to use " body " weight !!!!!
I will keep that in mind.
The crank turns without any " hitches" already. VERY smooth .with no noise.
I may just leave it, but I am intrigued about dddd method
Thank YOU !!!
11-16-20 | 12:53 PM
#8

(rhymes with spook)
Joined: Aug 2009
Posts: 2,786
Likes: 749
From: Winslow, AR
Bikes: '83 univega gran turismo x2, '85 schwinn super le tour,'89 miyata triple cross, '91 GT tequesta, '90 yokota grizzly peak, '94 GT backwoods, '95'ish scott tampico, '98 bonty privateer, '93 mongoose crossway 625, '98 parkpre ariel, 2k'ish giant fcr3
something to consider; i've used a product from o'reilly called freeze off in situations like this where you have dissimilar metals and/or over tightening. penetrant won't help with over tightening. just rust
09-23-25 | 06:03 PM
#9
Senior Member
Joined: Nov 2013
Posts: 1,970
Likes: 1,141
From: Southern California
Bikes: 1981 Univega Super Special, '80s Custom Chris Pauley, 1972 Fuji 'The Finest'
dddd
Saved yet again by one of your forum posts, dddd. I think at this point the number of beers I owe you is into the double digits!
Today I had to remove some cranks with these god-forsaken crank bolts and would have given up if not for your tip. Watching the little 6mm allen key bend was not confidence inspiring...but I walked away mostly unscathed and the cranks successfully removed.
09-23-25 | 06:28 PM
#10

Insane Bicycle Mechanic

Joined: Mar 2008
Posts: 10,168
Likes: 1,135
From: other Vancouver
dddd
Saved yet again by one of your forum posts, dddd. I think at this point the number of beers I owe you is into the double digits!
Today I had to remove some cranks with these god-forsaken crank bolts and would have given up if not for your tip. Watching the little 6mm allen key bend was not confidence inspiring...but I walked away mostly unscathed and the cranks successfully removed.
Saved yet again by one of your forum posts, dddd. I think at this point the number of beers I owe you is into the double digits!
Today I had to remove some cranks with these god-forsaken crank bolts and would have given up if not for your tip. Watching the little 6mm allen key bend was not confidence inspiring...but I walked away mostly unscathed and the cranks successfully removed.
After rebuilding the bottom bracket, reinstall them with a hex bit on a torque wrench. You�ll see how much that poor little Allen wrench had to put up with. A better idea might be to remove them entirely (there was a special tool for the ring) and use a standard bolt.
__________________
Jeff Wills
Comcast nuked my web page. It will return soon..
Jeff Wills
Comcast nuked my web page. It will return soon..
09-23-25 | 07:17 PM
#11
Senior Member
Joined: Nov 2013
Posts: 1,970
Likes: 1,141
From: Southern California
Bikes: 1981 Univega Super Special, '80s Custom Chris Pauley, 1972 Fuji 'The Finest'
Good for you. Back when those were a new thing (late Jurassic period, IIRC), those were responsible for a number of ruined BMX cranks. Kids would buy the cranks, put them on at home, and never get them tight enough. A few weeks down the road, they�d come loose and the crank would be ruined. It�s a testament to the original installer that they�re still intact after 40+ years.
After rebuilding the bottom bracket, reinstall them with a hex bit on a torque wrench. You�ll see how much that poor little Allen wrench had to put up with. A better idea might be to remove them entirely (there was a special tool for the ring) and use a standard bolt.
After rebuilding the bottom bracket, reinstall them with a hex bit on a torque wrench. You�ll see how much that poor little Allen wrench had to put up with. A better idea might be to remove them entirely (there was a special tool for the ring) and use a standard bolt.
09-23-25 | 10:41 PM
#12
Insane Bicycle Mechanic
Joined: Mar 2008
Posts: 10,168
Likes: 1,135
From: other Vancouver
The �tool� is shown at this link (top center). It�s a very small piece of bent metal, easily lost.
https://www.worthpoint.com/worthoped...ting-135463592
https://www.worthpoint.com/worthoped...ting-135463592
__________________
Jeff Wills
Comcast nuked my web page. It will return soon..
Jeff Wills
Comcast nuked my web page. It will return soon..
09-24-25 | 12:09 PM
#13
Senior Member
Joined: Nov 2013
Posts: 1,970
Likes: 1,141
From: Southern California
Bikes: 1981 Univega Super Special, '80s Custom Chris Pauley, 1972 Fuji 'The Finest'
The �tool� is shown at this link (top center). It�s a very small piece of bent metal, easily lost.
https://www.worthpoint.com/worthoped...ting-135463592
https://www.worthpoint.com/worthoped...ting-135463592
09-25-25 | 03:09 PM
#14
Ride, Wrench, Swap, Race
Joined: Jan 2010
Posts: 9,835
Likes: 1,816
From: Northern California
Bikes: Cheltenham-Pedersen racer, Boulder F/S Paris-Roubaix, Varsity racer, '52 Christophe, '62 Continental, '92 Merckx, '75 Limongi, '76 Presto, '72 Gitane SC, '71 Schwinn SS, etc.
I've always been surprised that my "jump on the pedals" method for removing AND securing crankarms wasn't included in the operating instructions for self-extracting cranks.
Nutted bottom brackets especially are easily damaged when trying for full/adequate tightness in one swoop of tightening, because the spindle's threaded stud metal isn't tough like the threads on a real bolt are (probably why the nut and stud are 10mm instead of 8mm?). So I always re-tighten these after a good jump (and reverse jump) on the pedals!!! The coarser threads of a nutted spindle already require much greater wrench torque to achieve any particular level of tension against the crankarm versus a regular, fine-threaded crankarm bolt, so tightening in two stages is just about mandatory if a solid attachment is desired! The serrated integral washer on the nut (as well as the larger frictional diameter of the threads!) are both further contributing to the need for additional tightening efforts, which is likely why the nuts got their added one-way serrations added to their integral washer.
I've used a similar method for removing stubborn cotters, applying a cotter press and then jumping on the cranks, repeating as needed. Has spared me having to locate precious original cotters (made of hardened material) in the size I needed after bending a cotter's threaded stud.
Oh, and in a similar sort of way, I get headset top nuts tighter (or looser) without using excessive (damaging) wrench force, simply by repositioning the wrench on a different set of flats (a couple of times) during the tightening or loosening process. I found loooong ago that I had to do this in order to keep the keyed reflector bracket and/or cable hanger from trying to rotate along with the nut, turning it off-center and possibly damaging it's key and the key-way (there was "like" no other way). I can thus use my other hand/palm to easily hold the bracket/hanger from turning as long as the nut's bottom surface and better yet washer is greased. I do use an elbow against the bar and/or a knee against the front tire to assist with the application of needed resisting force.
Lastly (whew), on the subject of sufficient tightening, I "pre-adjust" a bottom bracket's adjustable cup so that, upon final tightening, the lock ring and cup can be made to rotate together into a desired adjustment, which keeps things from later loosening by having the greater width of cup threads in the shell moving while under maximum tension/force, so as to better settle the thread engagement against the usual rusting, paint and particulate surface irregularity that tends to invade these threads.
Last edited by dddd; 09-25-25 at 03:18 PM.
