


Bent chainring
 02-16-21 | 07:27 AM
#1
Thread Starter
Full Member

Joined: Feb 2021
Posts: 225
Likes: 133
From: Ukraine
Bikes: Union Sakai
Bent chainring
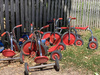
Hi allLarge chainring on this is slightly bent on it of frame in one quarter of rotation.
should I try to straighten it out search for new one.
Not of great importance but this is french threaded.

should I try to straighten it out search for new one.
Not of great importance but this is french threaded.
 02-16-21 | 07:42 AM
#2
Senior Member

Joined: Jan 2013
Posts: 3,136
Likes: 875
Bikes: too many sparkly Italians, some sweet Americans and a couple interesting Japanese
Bicycle Research makes a special tool for a bent chainring but I have used an adjustable wrench or a large screwdriver to pry it over straight.
Good luck fining a new one if needed.
Good luck fining a new one if needed.
02-16-21 | 07:43 AM
#3
Zip tie Karen
Joined: Aug 2009
Posts: 7,005
Likes: 1,546
From: Fair Oaks Ranch, TX
Bikes: '13 Motobecane Fantom29 HT, '16 Motobecane Turino Pro Disc, '18 Velobuild VB-R-022, '21 Tsunami SNM-100
Do you have a solid bench vise? A straightedge? A large adjustable wrench? A keen eye?
Work slowly and measure often. It won't take much to straighten this. You should be able to complete the job in 10 minutes.
Work slowly and measure often. It won't take much to straighten this. You should be able to complete the job in 10 minutes.


 02-16-21 | 09:37 AM
#5
Senior Member


Joined: Feb 2020
Posts: 3,992
Likes: 2,310
As well, yes mount the crank (is the BB adjusted?) - but without the rings, and like truing a wheel put something on the chainstay - a bit of stiff card clamped will do - and check the arms are true; then mount the rings, if possible singly, and do them.
02-16-21 | 10:31 AM
#6
Banned.
Joined: Oct 2016
Posts: 854
Likes: 334
From: Cambridge UK
Bikes: 1903 24 spd Sunbeam, 1927 Humber, 3 1930 Raleighs, 2 1940s Sunbeams, 2 1940s Raleighs, Rudge, 1950s Robin Hood, 1958 Claud Butler, 2 1973 Colnago Supers, Eddie Merckx, 2 1980 Holdsworth, EG Bates funny TT bike, another 6 or so 1990s bikes
Errrh ....just a thought. From the foto it looks like the crank is kaput. The hole at the base of the crank where the spindle rests appears to be badly eccentric. It is supposed to be perfectly round and a tight fit on the spindle prior to being secured by a cotter pin. Hopefully it is a optical illusion but it appears to be badly worn and no amount of chain-ring straightening will fix that.
02-16-21 | 02:21 PM
#7
Senior Member
Joined: Feb 2020
Posts: 3,992
Likes: 2,310
Errrh ....just a thought. From the foto it looks like the crank is kaput. The hole at the base of the crank where the spindle rests appears to be badly eccentric. It is supposed to be perfectly round and a tight fit on the spindle prior to being secured by a cotter pin. Hopefully it is a optical illusion but it appears to be badly worn and no amount of chain-ring straightening will fix that.
[1] absent violent impact, of which there is no sign.
02-16-21 | 02:35 PM
#8
Thread Starter
Full Member
Joined: Feb 2021
Posts: 225
Likes: 133
From: Ukraine
Bikes: Union Sakai
It's not oval for sure. It was tight mounted on BB. I noticed that chainring is bent only in upside down position after the wheels removal. In general I've ridden it few minutes and didn't notice anything bad with shifts on front.
BTW it's not rust but some very old grease. I think previous owners used grease as chain lube.
BTW it's not rust but some very old grease. I think previous owners used grease as chain lube.
02-16-21 | 07:36 PM
#9

PM me your cotters
Joined: Jun 2015
Posts: 3,280
Likes: 631
From: ATL
Stupid question, but being these are basically like what Nervar was putting out forever, have you tried rotating the suspect ring to the next mount? I've found several times where someone took it apart at one point and bent one of the arms fore/back, or someone used the proper tool to adjust the ring, so it was no longer straight unless mounted in the correct orientation. It's a tedious 15 minutes loosening, shifting the rings, tightening, mounting, rotating, but ... meh.
Also, depending on how well-seated and fit the cotter is, the crank can have a pitch making things wobble off-center.
If you find no matter which position the rings are mounted, it still isn't straight, then get it to the best possible orientation to straight, and if you don't have the correct VAR or Park or other ring adjustment tool, use a big adjustable wrench like this except you'll want to slide the wrench until the teeth contact the back of the wrench's throat. If you have not one large enough, But you have a circular saw, you can cut a 1" slit into a 2x4 and use it in the same manner as this tool.
RJ shows the proper tool being used here:
__________________
███████████████
███████████████
02-17-21 | 08:47 AM
#10
PM me your cotters
Joined: Jun 2015
Posts: 3,280
Likes: 631
From: ATL
PS Spellscape : Another trick I've learned over the years. If you want to make sure the right part is being corrected instead of bending wantonly, it's easy to determine whether it's the chainring that's bent, or one of the three crank arms. Like I mention, it's really easy for those three short crank arms to bend, believe it or not. If bent, they'll throw your rings out through 1/3 of your crank rotation which isn't far off from the 1/4 rotation you claim. This trick will also help you isolate where you need to make your correction if it's the rings, you can isolate the high spot, mark it, re-mount the rings, then use a proper tool for the job..
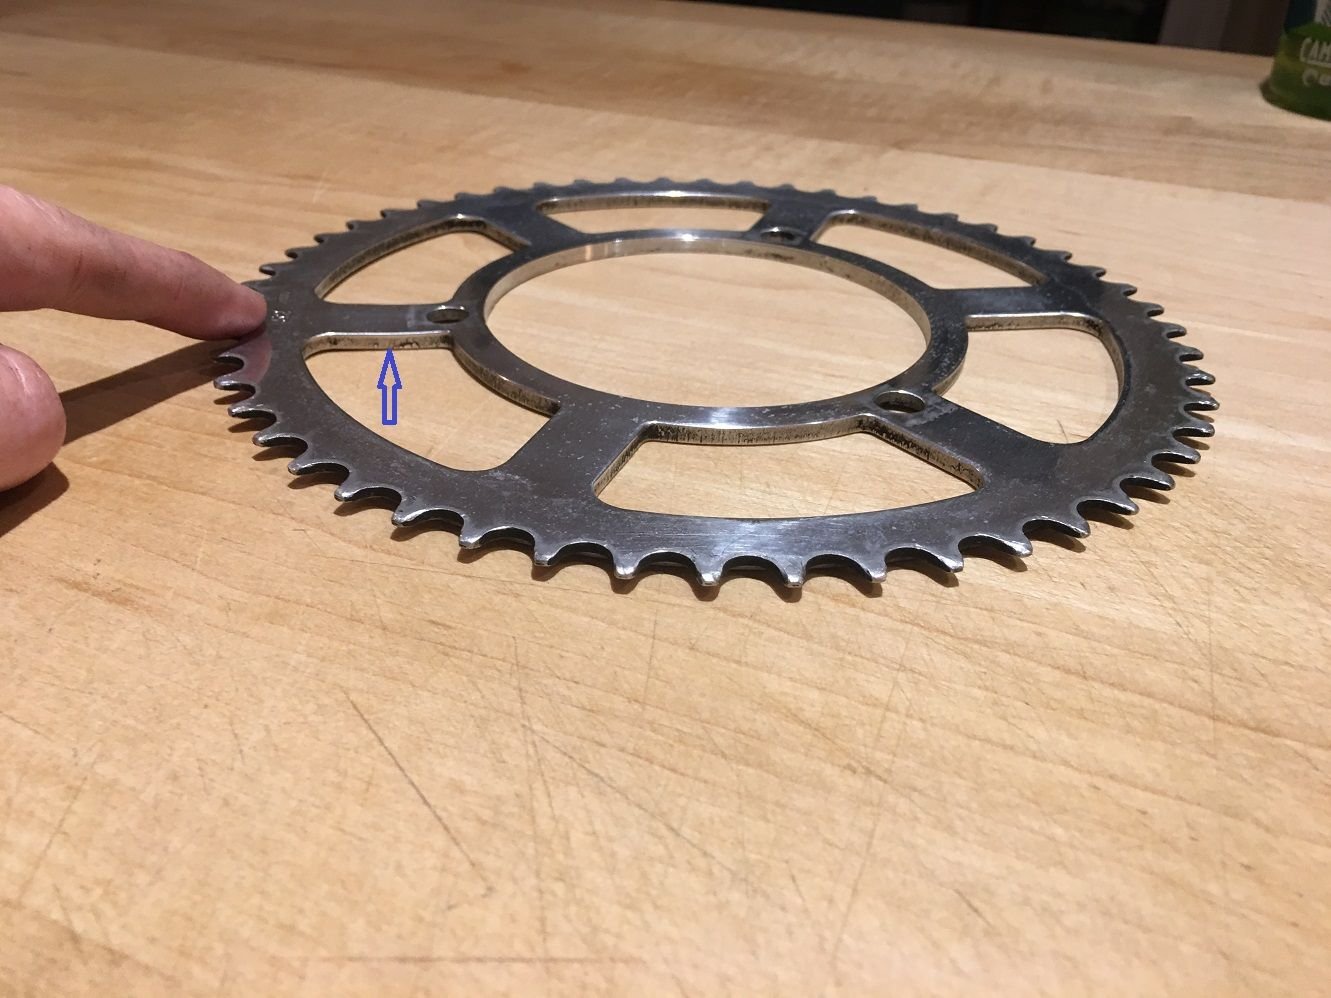
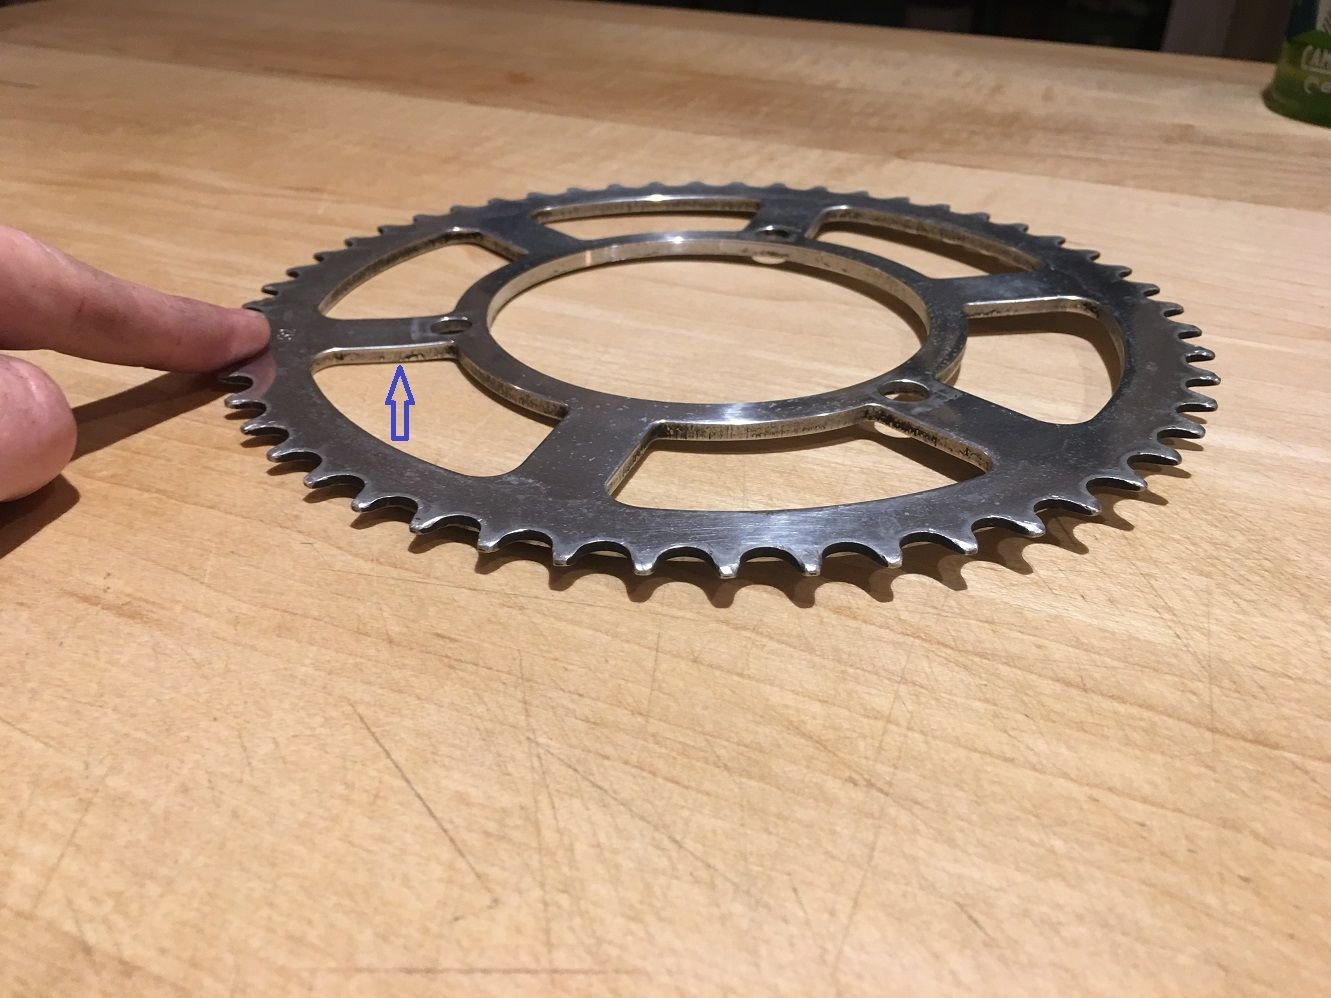
Remove the rings. Take them to a known-flat surface with good lighting. Lay each ring down. Push down on the ring at the 3, 6, 9 and 12 o'clock positions and see if the opposite side lifts up at all. If not, flip the ring over and repeat. If you push down on any given spot and the other side of the ring lifts off the flat surface, you know it's the ring that's bent. If you prove the rings aren't bent, you know it's an issue of the crank arm itself, either its orientation to the spindle, or one of the three arms (it's usually the lone arm pointing up) that's bent. This is so utterly common with this style of crank.
To show an example of checking the rings, here's an example from some minty T.A. 3-arm rings I've got listed in the sales forum. Someone corrected these, probably incorrectly, when a crank arm was probably the culprit. The arrow is where the correction was done. Keep your eyes peeled on the right-hand side of the ring, how much if lifts off my butcher block counter when I push down left of the arrow. Notice before pushing, there was less than 1mm of shadow under the ring to the left of the arrow. Notice how much lift the right-hand side gets out of that <1mm correction.
__________________
███████████████
███████████████
02-17-21 | 12:17 PM
#11

Ride, Wrench, Swap, Race

Joined: Jan 2010
Posts: 9,809
Likes: 1,783
From: Northern California
Bikes: Cheltenham-Pedersen racer, Boulder F/S Paris-Roubaix, Varsity racer, '52 Christophe, '62 Continental, '92 Merckx, '75 Limongi, '76 Presto, '72 Gitane SC, '71 Schwinn SS, etc.
This^^^^^, you need to determine what is bent before effecting any corrections.
Especially if the small ring is still running true, then the big ring itself is almost certainly the culprit.
Bending metal is a practiced art, one has to have a feel for how and where the metal tends to flex and at what point it bends/yields in a way that doesn't just spring back.
It gets trickier yet when bending frame tubing, which has a buckling mode looming wherever/whenever the tubing is near the yield point.
So it's always good to approach the force needed for bending very gradually, perhaps ten or more times so as not to over-correct. Minor corrections of excess corrective bending are not problematical, and actually serve to stress-relieve the metal into more-stable dimensions, but gross over-corrections can result in unusable parts or can damage adjacent parts of the structure/assembly.
02-17-21 | 12:28 PM
#12
Ride, Wrench, Swap, Race
Joined: Jan 2010
Posts: 9,809
Likes: 1,783
From: Northern California
Bikes: Cheltenham-Pedersen racer, Boulder F/S Paris-Roubaix, Varsity racer, '52 Christophe, '62 Continental, '92 Merckx, '75 Limongi, '76 Presto, '72 Gitane SC, '71 Schwinn SS, etc.
Note that the OP's crank is tricky in regard to having the small ring attach to the large ring, instead of to the spider. This complicates assuming that the spider is straight just because the small ring may be running straight.
Note also that a longer wrench, clamped onto the outer hoop/ring of the big ring, will effect more of a pure twisting force, which would better localize the corrective bending to the outer hoop versus the spider. This is what I would do here if the small ring and spider appear to be running true.
This is the opposite of what I usually do while truing chainring runout on cotterless alloy cranks, where I typically use a 3# hammer and wooden dowel drift to impact directly on the chainring bolts or nuts. Alloy chainrings tend to be both strong and springy, and bending them with a wrench can snap the tabs off of a cast crank's spider.
But there are always a lot of different possibilities why a chainring doesn't run true, hence my deferral to francophile's methods above.
Last edited by dddd; 02-17-21 at 12:38 PM.
02-17-21 | 01:22 PM
#13
Senior Member
Joined: Jan 2007
Posts: 2,831
Likes: 847
From: Ontario
I recently went through a similar exercise.....long story short my issue was not the rings themselves (though I took them off and did as above to check them for flatness), and not the spiders, but the crank arm itself had been slightly bent inwards and the pedal end twisted enough that I could feel it when riding. It took a lot of patience to set up a way of hold the centre part of the spider steady while exerting both a bending and twisting force on the other end of the arm to get it realigned. as dddd noted you have to be aware of what the metal wants to do (that said I am not "experienced" like some on this forum).
In the end I was successful but not without a bunch of cursing (mostly because the bolts holding the rings on were not coming off easily and I needed the rings out of the way to effect the repair on the arm).
Also to dddd 's point - I think I'd remove the small ring from the big one before trying anything and check them both for flatness.
03-08-21 | 01:14 PM
#15
Senior Member
Joined: Jan 2007
Posts: 2,831
Likes: 847
From: Ontario
Did you check your 3 spider arms are perpendicular to the BB axle line? Assuming (a big assumption mind you) that the hole for the spindle is drilled properly, you could try a carpenter's square to see if the line of the BB axle is 90degrees to the spiders when you lay them flat on a surface. Its a quick check but perhaps worth trying as that "wow" is too much in my mind.
03-08-21 | 04:11 PM
#17
Senior Member
Joined: Jan 2007
Posts: 2,831
Likes: 847
From: Ontario
Spellscape Spider arms are the easiest to fix! I mean if you want to go cotterless by all means but you should be able to get your existing crank working well.
03-08-21 | 04:39 PM
#19

Phyllo-buster
Joined: Jan 2010
Posts: 9,261
Likes: 2,685
From: Nova Scotia
Bikes: roadsters, club bikes, fixed and classic
It's possible, not likely that the drive side crank bore is not correct. I see the axle spinning correctly but the whole thing seems out of kilter. imo
03-08-21 | 05:34 PM
#20
Senior Member
Joined: Feb 2020
Posts: 3,992
Likes: 2,310
Take the crank off and make sure the spindle is correctly adjusted.
Mount the crank without any rings. Turn it once, measuring how far each arm is from the chainstay. If they are all the same it then mount each ring alone, and measure them the same way.
If arms are not the same bend them until they are - bend them on the bike, you can check your work each time right away.
If the rimgs are not true they are best bent unmounted, with a flat shiny surface to check against - a mirror or a bit of granite countertop will be flat enough, though if you have a surface plate by all means use it.
03-08-21 | 07:31 PM
#23
Phyllo-buster
Joined: Jan 2010
Posts: 9,261
Likes: 2,685
From: Nova Scotia
Bikes: roadsters, club bikes, fixed and classic
Yeah, I'd take the small ring off, whack the large ring with mallet and hardwood blocks. It it straightens up, put the small ring back on. Otherwise, new crank.
03-09-21 | 08:18 AM
#24
PM me your cotters
Joined: Jun 2015
Posts: 3,280
Likes: 631
From: ATL
You are over-thinking this (and perhaps so are some others).
Take the crank off and make sure the spindle is correctly adjusted.
Mount the crank without any rings. Turn it once, measuring how far each arm is from the chainstay. If they are all the same it then mount each ring alone, and measure them the same way.
If arms are not the same bend them until they are - bend them on the bike, you can check your work each time right away.
If the rimgs are not true they are best bent unmounted, with a flat shiny surface to check against - a mirror or a bit of granite countertop will be flat enough, though if you have a surface plate by all means use it.
Big ring usually isn't swaged on these three-arm cottered cranks from Solida and the Nervarr cranks too.. The three-arm spider typically is swaged, large ring held on by three bolts, small ring held to large ring by three bolts.
__________________
███████████████
███████████████