How to tighten bottom bracket - drivetrain side [preferably without special tool(s)]?
 09-30-23 | 06:41 AM
#26
Thread Starter
Senior Member
Joined: Jul 2021
Posts: 787
Likes: 387
The good news is that if you order the proper tools now, you will save a ton of money later.
I would not ride on this bike until you get the BB area sorted out.
If in a hurry, a nearby bike co-op will likely help you do it cheaply (maybe a donation).
A 12�-15� adjustable can be used for the DS fixed cup, but a spanner is better.
Lockring tool, pin spanner, crank extractor tool, 15mm socket wrench will get you there.
Will get the lockring tool and crank puller. Have the 15mm socket wrench. Do I need a pin spanner though, for my bike?
 09-30-23 | 06:46 AM
#27
SE Wis

Joined: Apr 2005
Posts: 11,556
Likes: 4,334
From: Milwaukee, WI
Bikes: '68 Raleigh Sprite, '02 Raleigh C500, '84 Raleigh Gran Prix, '91 Trek 400, 2013 Novara Randonee, 1990 Trek 970
09-30-23 | 07:04 AM
#28

Old fart


Joined: Nov 2004
Posts: 26,411
Likes: 5,350
From: Appleton WI
Bikes: Several, mostly not name brands.
Do I need a pin spanner though, for my bike?
 09-30-23 | 07:29 AM
#29
Senior Member

Joined: May 2008
Posts: 10,106
Likes: 2,762
From: Fredericksburg, Va
Bikes: ? Proteous, '65 Frejus TDF, '73 Bottecchia Giro d'Italia, '83 Colnago Superissimo, '84 Trek 610, '84 Trek 760, '88 Pinarello Veneto, '88 De Rosa Pro, '89 Pinarello Montello, 'Litespeed Catalyst'94 Burley Duet, 97 Specialized RockHopper, 2010 Langster
I doubt the adjustable cup has hex flats. The crank is very close to the cup on that side. Likely pin holes.
 P1050698 on Flickr
P1050698 on Flickr
__________________
Bikes don't stand alone. They are two tired.
Bikes don't stand alone. They are two tired.
09-30-23 | 08:07 AM
#30
Thread Starter
Senior Member
Joined: Jul 2021
Posts: 787
Likes: 387
You can see the cup has wrench flats. If you can get a wrench in there without removing the drive side crankset you could probably tighten it down with a large adjustable wrench. Keep in mind on this frame the drive side cup will have left-hand threads, so go counter-clockwise to tighten.
However based on the photos the drivetrain does really need a disassembly, cleaning, re-packing with grease, and re-assembly. For this you will need a crank puller to pull the cranks off the bottom bracket spindle, and a hooked spanner for removing the non-driveside bottom bracket lockring. Both bicycle-specific tools unfortunately.
If you don't do this, you run the risk of ruining your bottom bracket bearings and cups, which will be a more expensive repair than simple disassembly and cleaning of your existing BB. If there is a bike coop nearby you can borrow the tools mentioned above and look up the Park Tools video on bottom bracket install and removal. Otherwise please bring it to a bike shop for service.
On a separate note, there is some rust on the frame that you should remove. And PLEASE spray some lubricant into the bottle bosses on the downtube and plug them with the appropriate M5 or M6 bolt. Letting the internal and external rust continue will eventually cause the tubes to fracture which could result in a catastrophic road accident.
Thank you everyone for your time and help. 🙏
09-30-23 | 08:13 AM
#31

Senior Member
Joined: Jul 2008
Posts: 3,288
Likes: 4,243
From: The Le Grande HQ
Bikes: G�ngl, Trek 938, Raleigh Professional, Paramount, Allez, Guerciotti, Specialized Stumpjumper, Trek 750, Miyata 1000 < Huffy
I�m gonna go out on a limb and say that even if the OP doesn�t have all the proper tools, based on what he does have or will be getting (crank extractor) he�ll probably be okay. Yes the proper tools made for the specific job are ideal but we�ve all been there.
Working on the Allez, I couldn�t find my round head pin spanner when getting out the BB, so I instead used a punch and gently tapped from the side to loosen it. Worked just fine.
I don�t think anyone should go on a 70mi ride with the BB half hanging out of the bike lol, but if he can get the cups tight, the bearings greased, and the spindle spinning smooth, he�ll be alright
Last edited by AdventureManCO; 09-30-23 at 08:17 AM.
09-30-23 | 09:58 AM
#33
Senior Member
Joined: Jul 2010
Posts: 1,788
Likes: 722
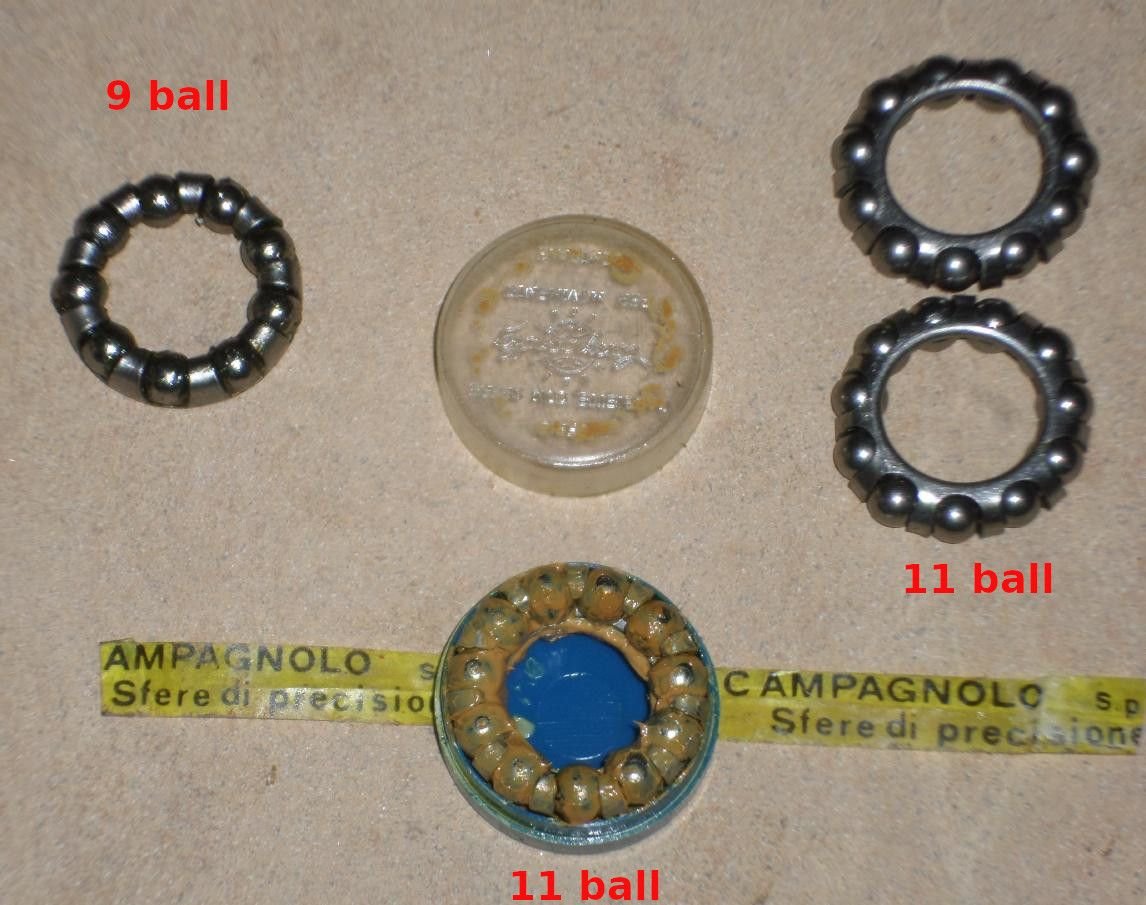
Pro tip; doing away with the cage and adding an extra bearing gives you more bearing surface to distribute the load.
09-30-23 | 07:23 PM
#35
Thread Starter
Senior Member
Joined: Jul 2021
Posts: 787
Likes: 387

 09-30-23 | 07:37 PM
#36

Edumacator


Joined: Jan 2018
Posts: 9,705
Likes: 5,195
From: Goose Creek, SC
Bikes: More than the people who ride them...oy.
https://www.ebay.com/itm/26641591284...Bk9SR7SAiY7dYg
__________________
1987 Crest C'dale, 1987 Basso Gap, 1992 Rossin EL, 1990 Van Tuyl, 1985 Trek 670, 2003 Pinarello Surprise, 1990ish MBK Atlantique, 1987 Peugeot Isoard, 1987 Nishiki Tri-A, 1981 Faggin, 1996 C'dale M500, 1984 Mercian Pro, 1982 AD SuperLeicht, 1985 Massi ?, 1988 Daccordi Griffe , 1989 Fauxsin MTB, 1981 Ciocc Mockba, 1992 Bianchi Giro, 1977 Colnago Super, 1971 Raleigh Internat'l, 1998 Corratec U+D, 1991 Peugeot Slimestone, 1987 Bianchi Volpe, 1995 Trek 750
1987 Crest C'dale, 1987 Basso Gap, 1992 Rossin EL, 1990 Van Tuyl, 1985 Trek 670, 2003 Pinarello Surprise, 1990ish MBK Atlantique, 1987 Peugeot Isoard, 1987 Nishiki Tri-A, 1981 Faggin, 1996 C'dale M500, 1984 Mercian Pro, 1982 AD SuperLeicht, 1985 Massi ?, 1988 Daccordi Griffe , 1989 Fauxsin MTB, 1981 Ciocc Mockba, 1992 Bianchi Giro, 1977 Colnago Super, 1971 Raleigh Internat'l, 1998 Corratec U+D, 1991 Peugeot Slimestone, 1987 Bianchi Volpe, 1995 Trek 750
09-30-23 | 08:00 PM
#37
Senior Member
Joined: Jul 2008
Posts: 3,288
Likes: 4,243
From: The Le Grande HQ
Bikes: G�ngl, Trek 938, Raleigh Professional, Paramount, Allez, Guerciotti, Specialized Stumpjumper, Trek 750, Miyata 1000 < Huffy
So you survived the bike ride? And the bike survived!? Some members were sure your bike was about to burst into flames
 09-30-23 | 08:01 PM
#38
Senior Member


Joined: Oct 2015
Posts: 16,191
Likes: 9,578
From: PDX
Bikes: Merz x 5 + Specialized Merz Allez x 2, Strawberry/Newlands/DiNucci/Ti x3, Gordon, Fuso/Moulton x2, Bornstein, Paisley,1958-74 Paramounts x3, 3rensho, 74 Moto TC, 73-78 Raleigh Pro's x5, Marinoni x2, 1960 Cinelli SC, 1980 Bianchi SC, PX-10 X 2
These look like replacement is in order so you could just use whatever to bust them out and then clean the threads well so the arm puller will thread in all the way and get them off if they are stubborn without causing any damage.

Glad you're going all in as it will help you to wrangle many of these challenges as they come up.
 09-30-23 | 08:21 PM
#39


Does anyone else have the impression that this is a troll?
09-30-23 | 10:40 PM
#40
Senior Member
Joined: Oct 2015
Posts: 16,191
Likes: 9,578
From: PDX
Bikes: Merz x 5 + Specialized Merz Allez x 2, Strawberry/Newlands/DiNucci/Ti x3, Gordon, Fuso/Moulton x2, Bornstein, Paisley,1958-74 Paramounts x3, 3rensho, 74 Moto TC, 73-78 Raleigh Pro's x5, Marinoni x2, 1960 Cinelli SC, 1980 Bianchi SC, PX-10 X 2
") 10-01-23 | 01:45 AM
10-01-23 | 01:45 AM
#41
Senior Member
Joined: Jan 2004
Posts: 6,169
Likes: 1,799
From: Madison, WI USA
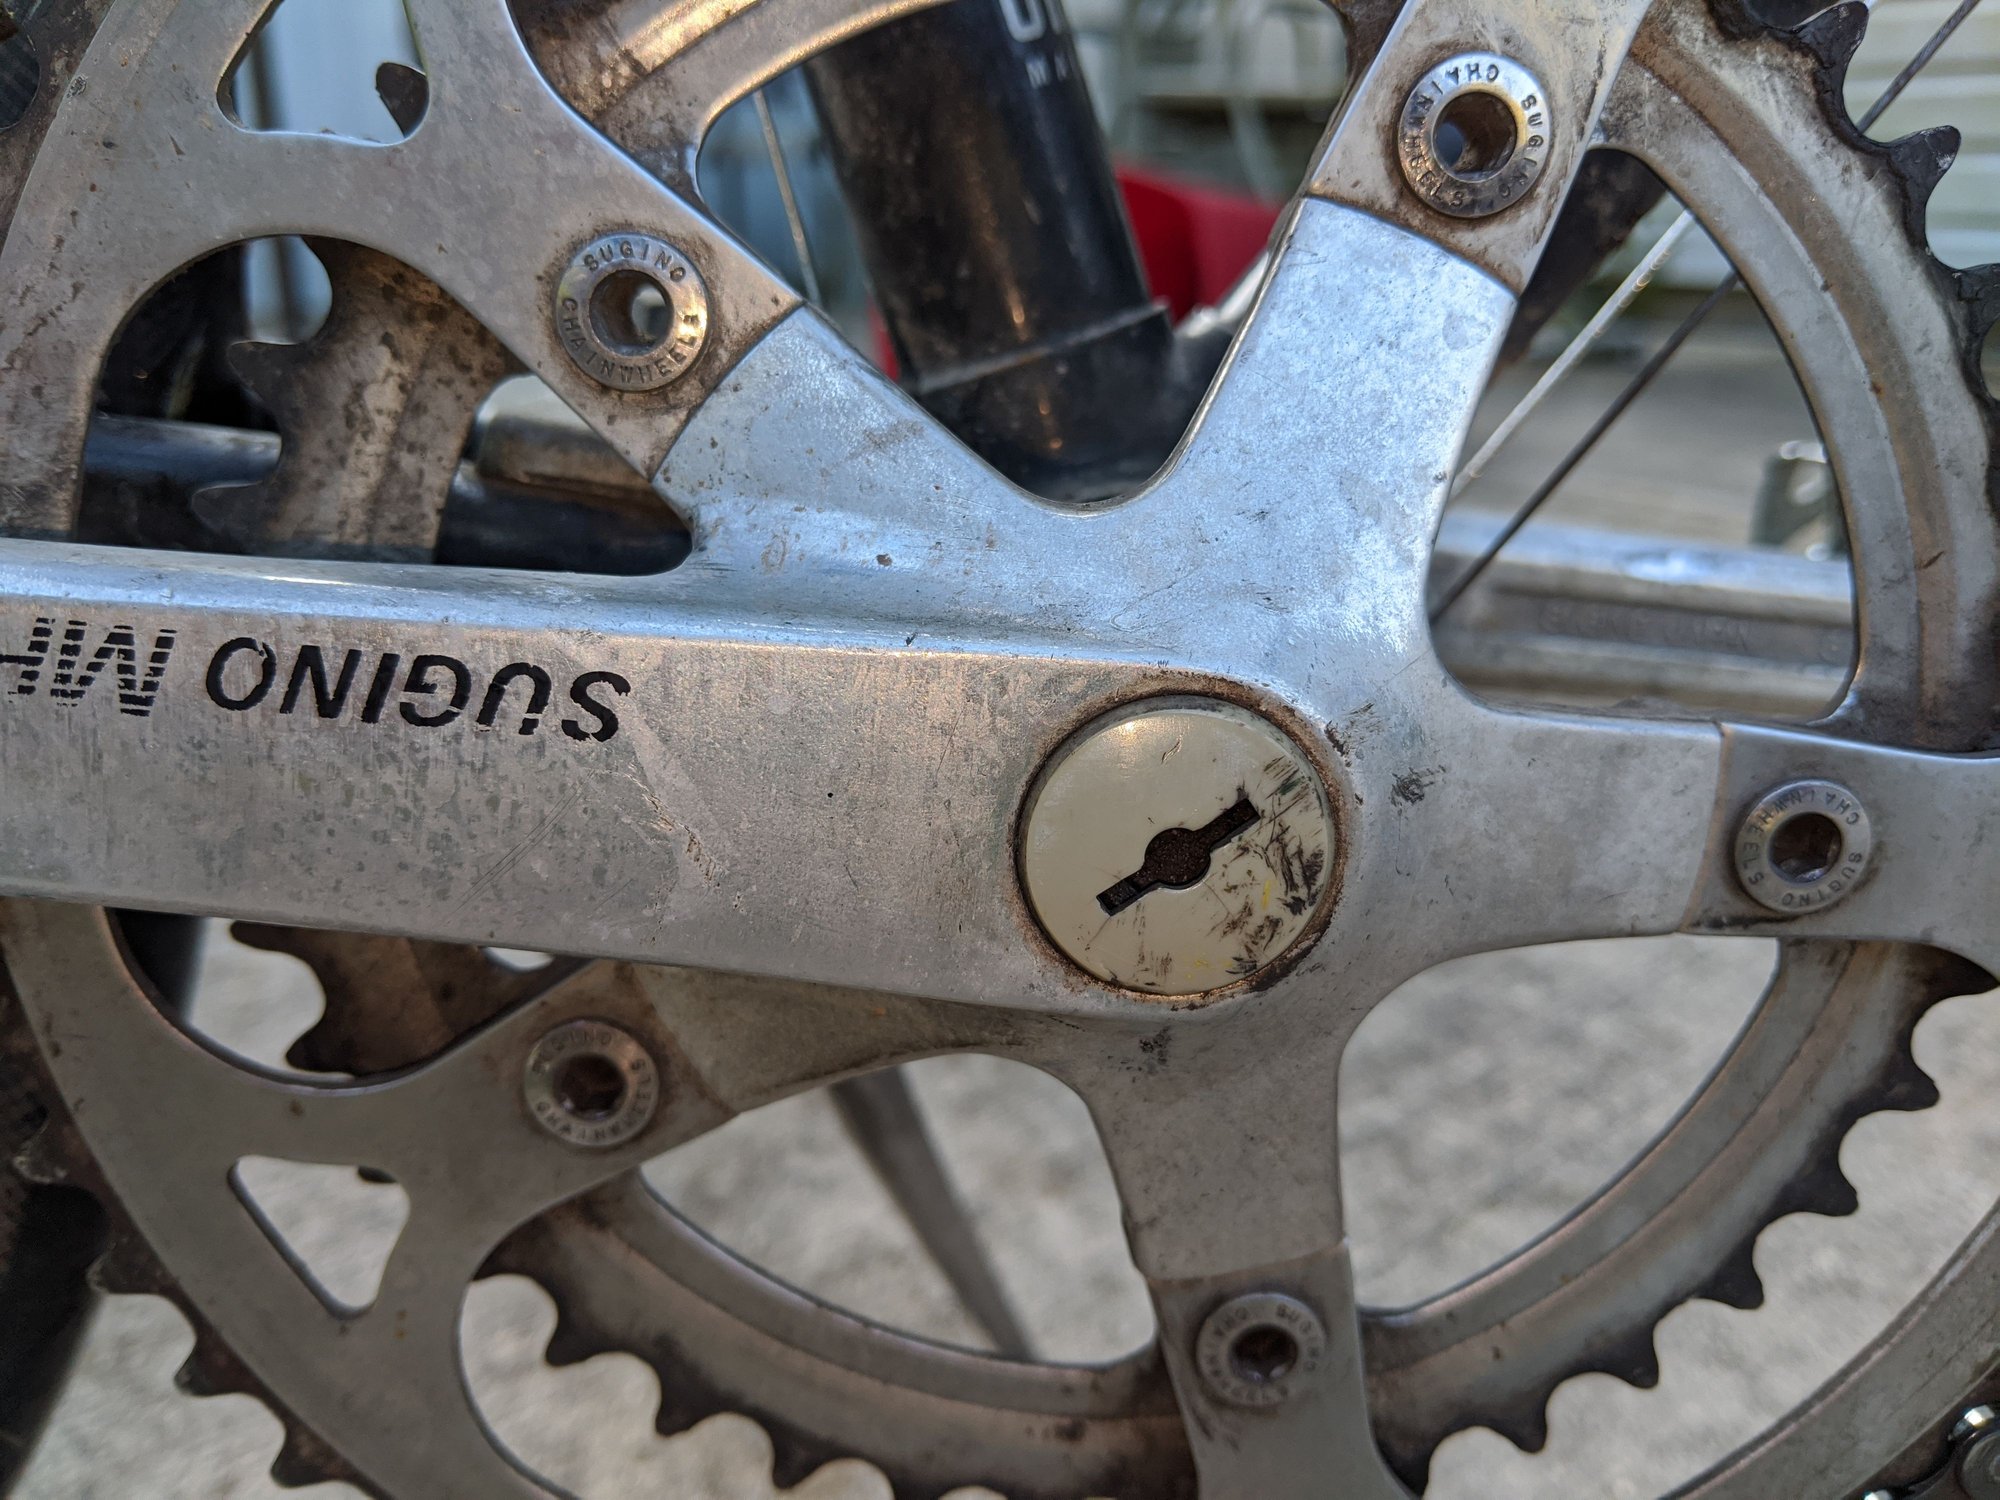
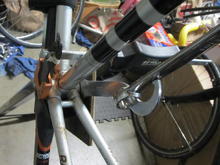
The reason the arm is so close is that the spindle is too far to the right. The adjustable cup was most likely turned way too far in, to compensate for the fact that the fixed cup is so far out. This shifts the spindle to the right. For this reason, it's entirely possible that the bearings are NOT extremely loose in the assembly as speculated/concerned above, so there may not be damage to the bearing surfaces. From what I can tell, the most likely damage will be to the threads on the drive side.
 10-01-23 | 02:26 AM
#42
Thread Starter
Senior Member
Joined: Jul 2021
Posts: 787
Likes: 387
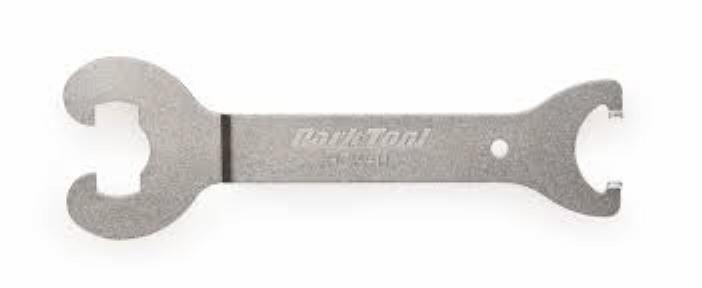
I just use my biggest flat head screwdriver...it�s a big one. The park 14,15,16 crank wrench has one built in.
https://www.ebay.com/itm/26641591284...Bk9SR7SAiY7dYg
https://www.ebay.com/itm/26641591284...Bk9SR7SAiY7dYg
And make no mistake there would be folks who would buy that thing for the sole purpose of removing the dust cap as well, for their own peace of mind, for preventing a catastrophe, and for a variety of other reasons. Water under the bridge, but tightening it may have been a bad idea. You might actually have been saved by not being able to tighten it further. Here's why:
Look closely at the top of the pic below. Focus on the distance between the "head" of the fixed cup and the face of the shell on the frame, comparing the "aft" side (left side of photo) with the forward side (right side of photo). The aft side is closer, indicating that the cup is not in straight, i.e. cross-threaded. Threading it in further may well have damaged the threads, either on the cup or on the shell.
The reason the arm is so close is that the spindle is too far to the right. The adjustable cup was most likely turned way too far in, to compensate for the fact that the fixed cup is so far out. This shifts the spindle to the right. For this reason, it's entirely possible that the bearings are NOT extremely loose in the assembly as speculated/concerned above, so there may not be damage to the bearing surfaces. From what I can tell, the most likely damage will be to the threads on the drive side.
Thank you for your comment, nevertheless. 🙏
10-01-23 | 05:40 AM
#43
Senior Member
Joined: Aug 2012
Posts: 637
Likes: 843
From: Upper third of the central USA
Bikes: N+1
While you're at it go ahead and clean that poor bike by hand with soapy water and old rags -- looking it over carefully while and after cleaning it you might find more "deferred" maintenance issues that should be addressed -- like the empty bottle boss holes pointed out earlier. You've proven that you CAN ride a bike which badly needs mechanical attention 70 miles (congratulations?), but your rides will be a lot better if the bike is in good mechanical condition, and the bike will last longer, too.
10-01-23 | 08:21 AM
#44
Old fart
Joined: Nov 2004
Posts: 26,411
Likes: 5,350
From: Appleton WI
Bikes: Several, mostly not name brands.
 10-01-23 | 01:26 PM
#45
Thread Starter
Senior Member
Joined: Jul 2021
Posts: 787
Likes: 387
While you're at it go ahead and clean that poor bike by hand with soapy water and old rags -- looking it over carefully while and after cleaning it you might find more "deferred" maintenance issues that should be addressed -- like the empty bottle boss holes pointed out earlier. You've proven that you CAN ride a bike which badly needs mechanical attention 70 miles (congratulations?), but your rides will be a lot better if the bike is in good mechanical condition, and the bike will last longer, too.
FYI, this old bike was neglected, disregarded, abused, mistreated, and manhandled by its original and previous owner(s), and feels much better in my hands. When I acquired this bike, the front wheel was wobbling and shaking like a squirrel on a roller coaster and producing a squeaking noise that could rival the chorus of rubber ducks. However, I took matters into my own hands, disassembled the front wheel and bestowed upon it fresh bearings and generous slathering of grease, and the wheel now glides with the grace of a swan and emits a sound so melodious that birds on the side of the trials fly in envy................despite its appearance.
10-01-23 | 02:08 PM
#46

Senior Member
Joined: Nov 2015
Posts: 4,900
Likes: 1,125
My
My brother is having a similar problem with the Italian threaded fixed cup on his Guerciotti.
He said the cup started unscrewing itself off the BB shell towards the end of two recent rides.
He said he thoroughly cleaned the threads of the BB shell and fixed cup and screwed it on as tight as possible with the proper tools, but the problem persists happening again in the next ride he took.
I suspect the bearings put enough rolling stress on the fixed cup to unscrew it when he pedaled.
would Locktite be the right thing to use to keep the fixed cup from unscrewing again??
Should he use blue or the stronger, red Locktite?
__________________
72 Line Seeker
83 Davidson Signature
84 Peugeot PSV
84 Peugeot PY10FC
84 Gitane Tour de France.
85 Vitus Plus Carbone 7
86 ALAN Record Carbonio
86 Medici Aerodynamic (Project)
88 Pinarello Montello
89 Bottecchia Professional Chorus SL
95 Trek 5500 OCLV (Project)
72 Line Seeker
83 Davidson Signature
84 Peugeot PSV
84 Peugeot PY10FC
84 Gitane Tour de France.
85 Vitus Plus Carbone 7
86 ALAN Record Carbonio
86 Medici Aerodynamic (Project)
88 Pinarello Montello
89 Bottecchia Professional Chorus SL
95 Trek 5500 OCLV (Project)
10-01-23 | 05:35 PM
#47
Senior Member
Joined: Oct 2015
Posts: 16,191
Likes: 9,578
From: PDX
Bikes: Merz x 5 + Specialized Merz Allez x 2, Strawberry/Newlands/DiNucci/Ti x3, Gordon, Fuso/Moulton x2, Bornstein, Paisley,1958-74 Paramounts x3, 3rensho, 74 Moto TC, 73-78 Raleigh Pro's x5, Marinoni x2, 1960 Cinelli SC, 1980 Bianchi SC, PX-10 X 2
My brother is having a similar problem with the Italian threaded fixed cup on his Guerciotti.
He said the cup started unscrewing itself off the BB shell towards the end of two recent rides.
He said he thoroughly cleaned the threads of the BB shell and fixed cup and screwed it on as tight as possible with the proper tools, but the problem persists happening again in the next ride he took.
I suspect the bearings put enough rolling stress on the fixed cup to unscrew it when he pedaled.
would Locktite be the right thing to use to keep the fixed cup from unscrewing again??
Should he use blue or the stronger, red Locktite?
He said the cup started unscrewing itself off the BB shell towards the end of two recent rides.
He said he thoroughly cleaned the threads of the BB shell and fixed cup and screwed it on as tight as possible with the proper tools, but the problem persists happening again in the next ride he took.
I suspect the bearings put enough rolling stress on the fixed cup to unscrew it when he pedaled.
would Locktite be the right thing to use to keep the fixed cup from unscrewing again??
Should he use blue or the stronger, red Locktite?
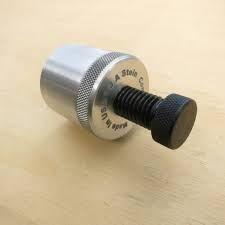
Wrench held in place with cheater to lean in?
I would use Super Glue and this,
 10-01-23 | 07:22 PM
#48

Senior Member
Joined: Nov 2010
Posts: 22,994
Likes: 10,499
From: Sacramento, CA
Bikes: old ones
My brother is having a similar problem with the Italian threaded fixed cup on his Guerciotti.
He said the cup started unscrewing itself off the BB shell towards the end of two recent rides.
He said he thoroughly cleaned the threads of the BB shell and fixed cup and screwed it on as tight as possible with the proper tools, but the problem persists happening again in the next ride he took.
I suspect the bearings put enough rolling stress on the fixed cup to unscrew it when he pedaled.
would Locktite be the right thing to use to keep the fixed cup from unscrewing again??
Should he use blue or the stronger, red Locktite?
He said the cup started unscrewing itself off the BB shell towards the end of two recent rides.
He said he thoroughly cleaned the threads of the BB shell and fixed cup and screwed it on as tight as possible with the proper tools, but the problem persists happening again in the next ride he took.
I suspect the bearings put enough rolling stress on the fixed cup to unscrew it when he pedaled.
would Locktite be the right thing to use to keep the fixed cup from unscrewing again??
Should he use blue or the stronger, red Locktite?
10-01-23 | 07:39 PM
#49
Old fart
Joined: Nov 2004
Posts: 26,411
Likes: 5,350
From: Appleton WI
Bikes: Several, mostly not name brands.
My brother is having a similar problem with the Italian threaded fixed cup on his Guerciotti.
He said the cup started unscrewing itself off the BB shell towards the end of two recent rides.
He said he thoroughly cleaned the threads of the BB shell and fixed cup and screwed it on as tight as possible with the proper tools, but the problem persists happening again in the next ride he took.
[�] Should he use blue or the stronger, red Locktite?
10-01-23 | 07:59 PM
#50
Senior Member

Joined: Dec 2005
Posts: 18,839
Likes: 11,733