Shimano UG/HG Freebody replacement won‘t work
 05-23-24, 11:59 AM
#26
Senior Member

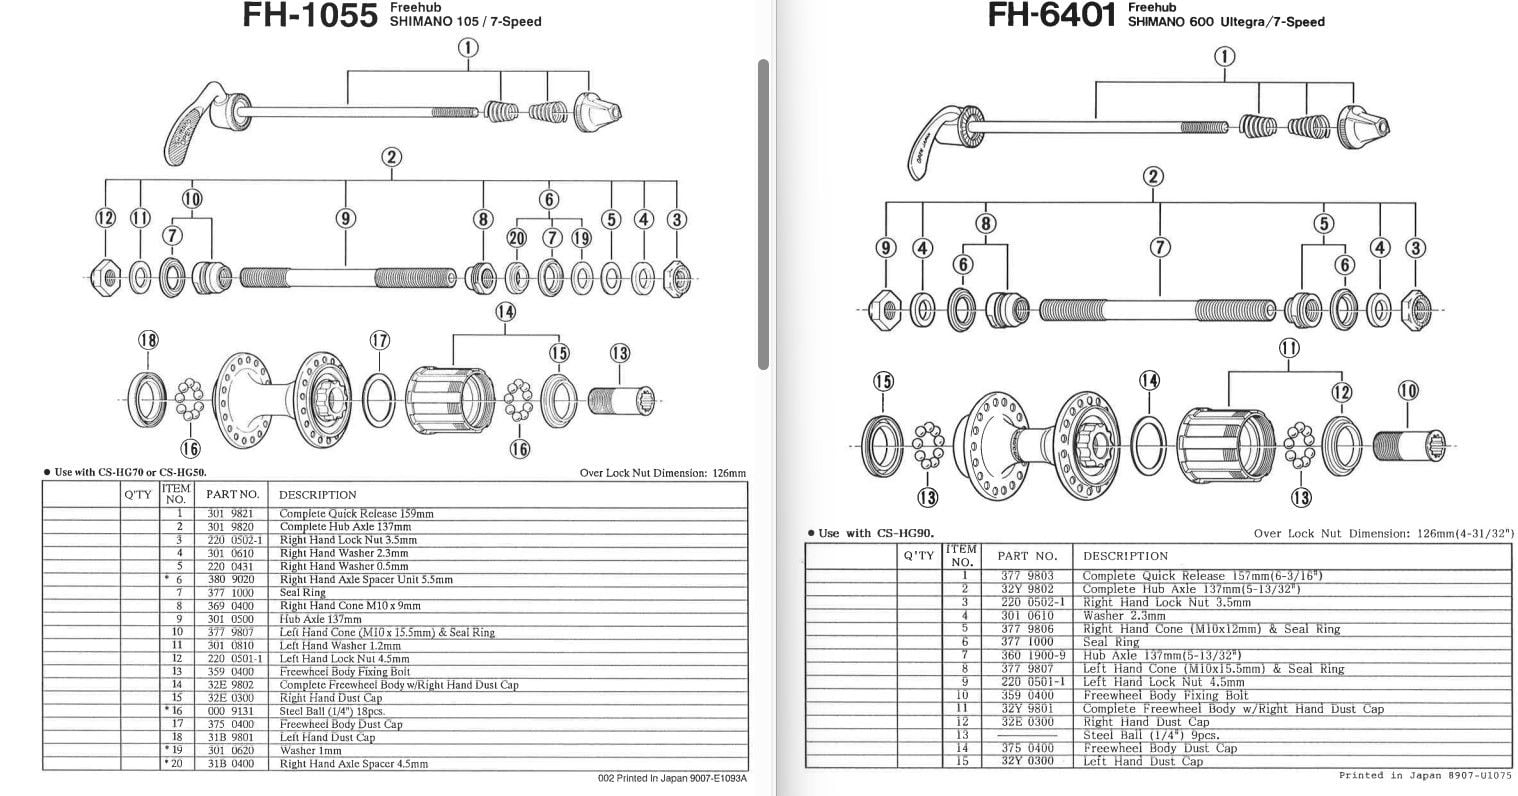
EV-FH-Q620-0506D.pdf (shimano.com)
A little older than the R105 that was posted earlier. The freehub body attachment method is the same for both, and seems to use the same press fit method.
The original freehub body for the Q620 was UG only, so the HG/UG body that you removed was a prior replacement.

Likes For KCT1986:
06-02-24, 10:26 AM
#27
Newbie
Thread Starter
If your original post is correct, the link is for the spec sheet. This seems to be the only 105 that used that freehub attachment style.
SI-M-98-000-00-ENG.pdf (shimano.com)
The original freehub body was 'press-fit' onto the hub shell.
As mentioned previously, the freehub body that you removed was not original. It was a HG style with one narrow spline out the outside for cassette alignment, a HG feature.
The body that you removed may not have been designed for a press-fit and just slid on the shell. Did you have to use the tool to pull it off? See how the original body was removed per the linked doc. If the tool was not needed, then the balls/cone was the only thing holding the freehub body against the hub shell.
If the body that you are now trying to install is going part way onto the shell and meeting resistance, it may need to be pressed on per the instructions. Per the instructions, this is done by using the 2 washer included with the removal tool. The washers go between the cone on the axle and the bearing cup without the ball bearings installed. The cones are tightened to push the freehub body onto the hub shell. The force used was not very high, see the torque spec, (relatively low). The cones/axle is then removed and ball bearings installed.
Of course, this was with the original freehub body designed for the hub. With the freehub body that you have, this may not work.
06-02-24, 11:18 AM
#28

Senior Member
Join Date: Sep 2013
Location: Portland, Cascadia
Posts: 524
Mentioned: 5 Post(s)
Tagged: 0 Thread(s)
Quoted: 229 Post(s)
Liked 280 Times
in
118 Posts
Not sure if this helps, but when I "Hyperglided" a first gen 600 UG hub (with different splines) I made a hybrid free hub body with the two.
Meaning I opened up both free hub bodies and out the HG "outer" over the UG "inner" and it worked! Pawls aligned well and everything.
Absolutely zero promise that it would work on a different set if hubs though.
Meaning I opened up both free hub bodies and out the HG "outer" over the UG "inner" and it worked! Pawls aligned well and everything.
Absolutely zero promise that it would work on a different set if hubs though.
Likes For jPrichard10:
06-02-24, 11:23 AM
#29
Newbie
Thread Starter
Not sure if this helps, but when I "Hyperglided" a first gen 600 UG hub (with different splines) I made a hybrid free hub body with the two.
Meaning I opened up both free hub bodies and out the HG "outer" over the UG "inner" and it worked! Pawls aligned well and everything.
Absolutely zero promise that it would work on a different set if hubs though.
Meaning I opened up both free hub bodies and out the HG "outer" over the UG "inner" and it worked! Pawls aligned well and everything.
Absolutely zero promise that it would work on a different set if hubs though.
06-02-24, 01:21 PM
#30
Senior Member
Hey there, jep. This is exactly what the friend of mine, whom I bought this bike from, did. The only thing being still a mistery to me: how come this UG inner part (from the older FH I used to have in the beginning) be so loose that you don’t need to press it on the rear hub, but just put it on as a sock.
If there is looseness between the old inner body and the hub shell, then bearing race/cone/BBs is probably under more pressure than normal.
If the inner body is reasonably secure to the hub shell and the outer body is loose, then the adjustment needs to be made by adding/swapping the adjustment washers under the bearing race, (see the EV doc posted.
With the 'new' freehub unit, don't know where the 'resistance' is occurring. These units may not have been designed to be installed this way.
Likes For KCT1986:
06-02-24, 04:06 PM
#31
blahblahblah chrome moly

Join Date: Apr 2009
Location: Seattle
Posts: 2,104
Mentioned: 96 Post(s)
Tagged: 0 Thread(s)
Quoted: 1231 Post(s)
Liked 2,752 Times
in
1,144 Posts
The "good" freehubs of that era had a bulge in the member between the flanges, a larger diameter only on the right side, which provided the "meat" for the threads where the hollow bolt secured the freewheel to the hub.
Well, Dura-Ace had it's own style, not a hollow bolt, but the freewheel core still threads into the alloy hub shell.
Your hubshell is made for press-fit of the freewheel core, which is a bad design. So ya gotta rebuild the wheel with a better hub or realistically, just replace the entire wheel, unless that rim has sentimental value.
Let's get those bad old hubs out of circulation!
Likes For bulgie:
06-03-24, 12:18 AM
#32
Newbie
Thread Starter
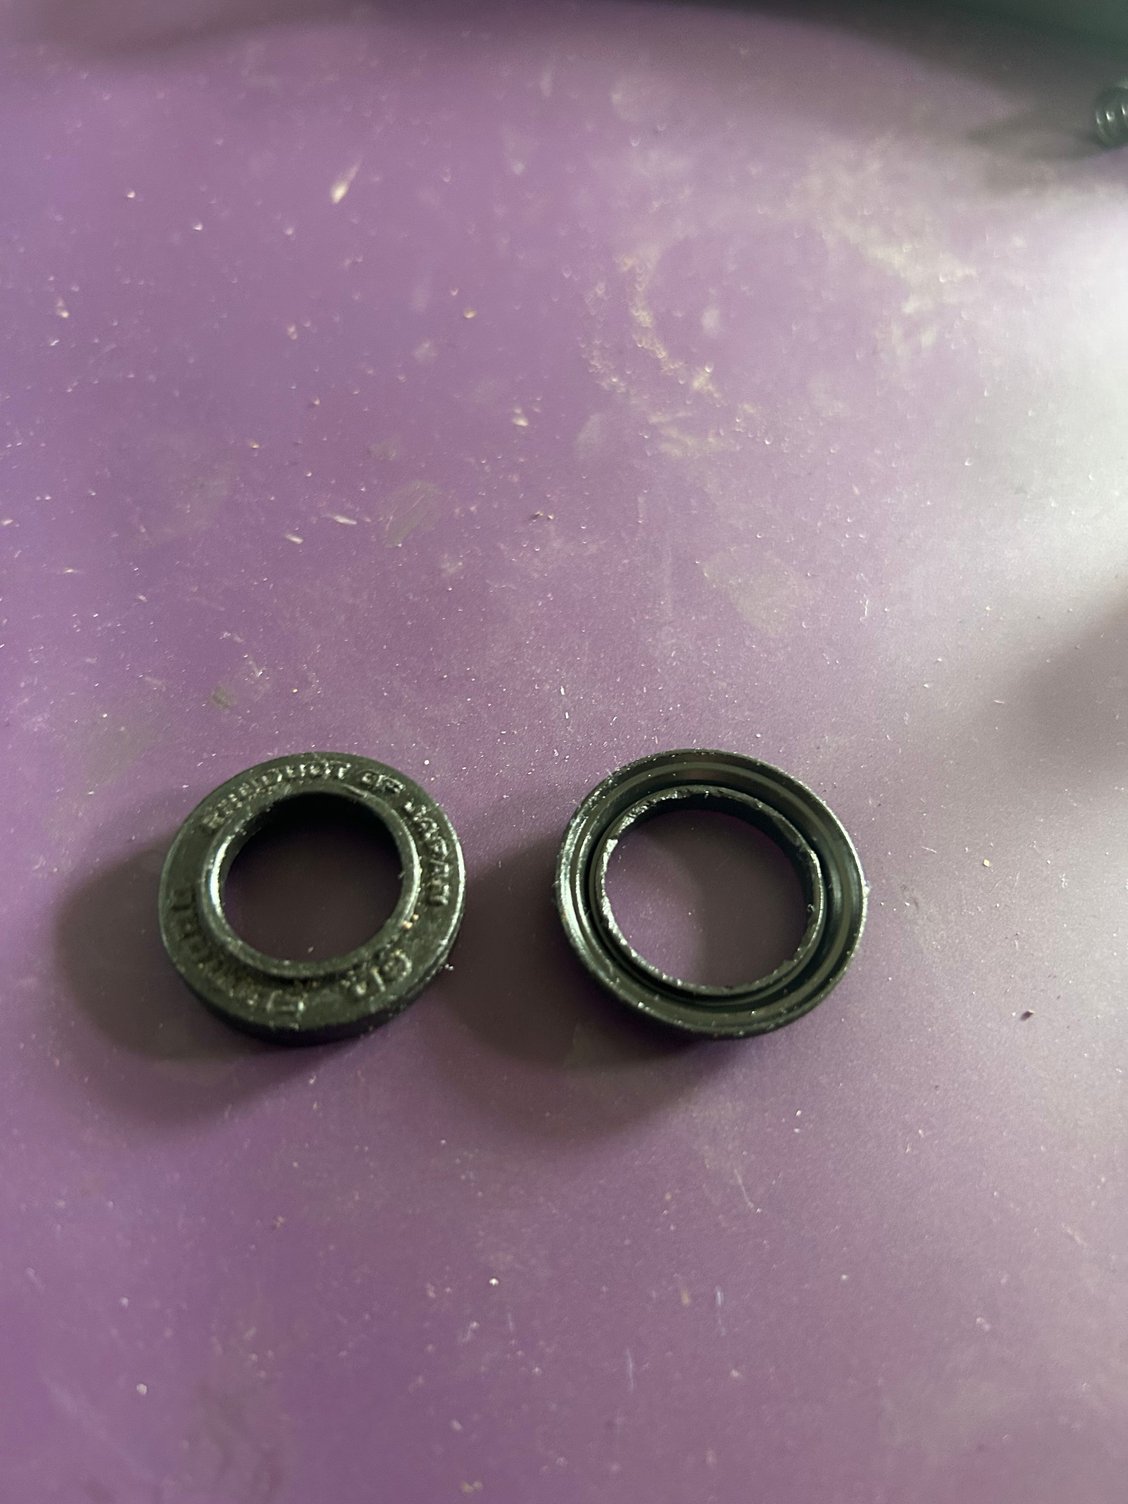
There is one more thing I’ve almost forgotten. The older FH has a rubber ring placed on top (left on the picture). During assembly, the cone disappears in the inner opening, a thick washer comes on top (it‘s a bit wider in diameter than the inner opening, so it effectively seals everything) and a nut comes on top.
Now, there is this plastic ring on the newer FH (which I decided against after I had mounted the new FH on the rear hub). Is it not disadvantageous to the rubber seal? The inner opening is wider and leaves the FH bearings exposed to dust and dirt. Or is it meant to be used with a wider cone?
Now, there is this plastic ring on the newer FH (which I decided against after I had mounted the new FH on the rear hub). Is it not disadvantageous to the rubber seal? The inner opening is wider and leaves the FH bearings exposed to dust and dirt. Or is it meant to be used with a wider cone?
06-03-24, 11:22 AM
#33
Senior Member
After that, the freehub pressed on nicely, and then I rode that wheel for who knows how many miles. After a few years, the fit between the freehub and the 'protrusion' became a little loose, so a deep clean of the freehub/hub interface and some red Loctite fixed that.
Likes For Dave Mayer:
06-03-24, 12:48 PM
#34
Ride, Wrench, Swap, Race

Join Date: Jan 2010
Location: Northern California
Posts: 9,222
Bikes: Cheltenham-Pedersen racer, Boulder F/S Paris-Roubaix, Varsity racer, '52 Christophe, '62 Continental, '92 Merckx, '75 Limongi, '76 Presto, '72 Gitane SC, '71 Schwinn SS, etc.
Mentioned: 133 Post(s)
Tagged: 0 Thread(s)
Quoted: 1574 Post(s)
Liked 1,317 Times
in
877 Posts
There is one more thing I’ve almost forgotten. The older FH has a rubber ring placed on top (left on the picture). During assembly, the cone disappears in the inner opening, a thick washer comes on top (it‘s a bit wider in diameter than the inner opening, so it effectively seals everything) and a nut comes on top.
Now, there is this plastic ring on the newer FH (which I decided against after I had mounted the new FH on the rear hub). Is it not disadvantageous to the rubber seal? The inner opening is wider and leaves the FH bearings exposed to dust and dirt. Or is it meant to be used with a wider cone?
Now, there is this plastic ring on the newer FH (which I decided against after I had mounted the new FH on the rear hub). Is it not disadvantageous to the rubber seal? The inner opening is wider and leaves the FH bearings exposed to dust and dirt. Or is it meant to be used with a wider cone?
It can be the cone or it can be a spacer.
Any very small clearance can be closed down by fitting heat-shrink tubing over the cone or spacer as needed.
This is the exact situation that usually comes up when swapping parts on a freehub, why I try to keep any/all axle hardware together with the freehub body that I am robbing from one freehub to use on another.
Hopefully your sprocket positioning will end up distanced properly/optimally from the spokes and from the dropout, something that isn't a given when performing freehub swaps.
I think it's cool though to have the 7s HG freehub body on the old-style hubshell with the decorative oil port clip, the clips adding a vintage vibe and the 7s FH body giving albeit limited capability to run certain 10s cassettes.
Likes For dddd:
06-03-24, 01:21 PM
#35
Senior Member
There is one more thing I’ve almost forgotten. The older FH has a rubber ring placed on top (left on the picture). During assembly, the cone disappears in the inner opening, a thick washer comes on top (it‘s a bit wider in diameter than the inner opening, so it effectively seals everything) and a nut comes on top.
Now, there is this plastic ring on the newer FH (which I decided against after I had mounted the new FH on the rear hub). Is it not disadvantageous to the rubber seal? The inner opening is wider and leaves the FH bearings exposed to dust and dirt. Or is it meant to be used with a wider cone?
Now, there is this plastic ring on the newer FH (which I decided against after I had mounted the new FH on the rear hub). Is it not disadvantageous to the rubber seal? The inner opening is wider and leaves the FH bearings exposed to dust and dirt. Or is it meant to be used with a wider cone?
See the attached for this design.