
So, the saga of the stuck crankset on the PPPKN-10, (for those who are not me, that's my probably a 1981 Peugeot PKN-10, sticker bomb, frankenbike) came to an end this evening, after: (Skip the whole list if you don't care; the much shorter question is at the bottom if this excessively long and self-revealing post.)
So what I'm wondering is this:
Is this what you'd get if somebody forced a British BB into a Swiss-threaded shell, and, if so, what are my options now? I ordered a new 110mm UN-300, but I don't want to bugger the frame by force-screwing it in there. The dude I bought it from already did that once and seemed to get away with it, but twice?
The frame is in that transitional period when a French bike could be damned well anything, thread-wise.
My other option would be one of the Sunlite threadless ones, if any shop around here has the chamfering tool that I expect they need.
Thanks, all!
--Shannon
- Stripping the threads of both arms.
- Buying and using a cheap-buttocked set of chuck wedges and a Park shop hammer. This removed the non-drive arm in pretty short order. The drive side? Well...
- Tried the wedges. Set came with four. I destroyed two.
- Ordered a hacksaw. Waited a day.
- Commence to hacksawing. Slots between arms. This is made substantially more difficult by the 26t granny ring, which, of course, can't be removed with the crankarm still attached. Even if you
- Saw off the 110mm mounting tabs.
- So, tape it as far out of the way as I can, and try not to saw into it.
- Saw, wedge, saw. Saw, wedge, curse, saw. Saw, wedge, hammer, saw, curse. Saw, wedge, fail. Saw wedge fail.
- Go to AutoZone. On the bus. In the rain.
- Rent gear puller. 2-arm and 3-arm convertible. Return home. (See above.)
- Find secure attachment of puller to crankarm. This takes a really, really long time, and involves moving and reversing every arm on the puller. More than once. And also requires Viole straps to hold all the linkages in place while I align the whole rig and start tightening it into the spindle. (With my two arms, hence the straps and the cursing and the hours and whatnot. Having three would help with more than just ski-boxing.)
- Welp, that didn't work.
- Order ball-joint separator kit, go to bed.
- Ball-joint kit delivered, commence to hammerin'.
- Crankarm refuses to move. At all. But what does happen is that the fork gets hammered into the aluminum of the arm, so I...
- Remove the front derailleur and use the crankarm as a bottom bracket tool and turn the whole assembly out of the frame. This doesn't take any more force than I'm used to with Shimano cartridge BBs, so I fugure that I'm done with the hard part.
So what I'm wondering is this:
Is this what you'd get if somebody forced a British BB into a Swiss-threaded shell, and, if so, what are my options now? I ordered a new 110mm UN-300, but I don't want to bugger the frame by force-screwing it in there. The dude I bought it from already did that once and seemed to get away with it, but twice?
The frame is in that transitional period when a French bike could be damned well anything, thread-wise.
My other option would be one of the Sunlite threadless ones, if any shop around here has the chamfering tool that I expect they need.
Thanks, all!
--Shannon
Piff
Senior Member
close


05-01-26
- Join DateNov 2013
- LocationSouthern California
- Posts:1,965
-
iTrader Positive Feedback0
-
iTrader Feedback Score(0)
-
Likes:1,384
-
Liked:1,136 Times in 623 Posts
No clue, but I am impressed by your perseverence, and weep in sympathy that your ordeal was not finished by removing the fixed cup. Hard pill to swallow after all that.
I should add that the non-drive cup came out easily, with no tight spots once it broke free. Which, as I said didn't take much force. Nor did the drive-side cup. It was a bit tighter than the left one, but not concerningly so.
At no pint did I I have to really reef on anything. The thought "Hmm... I don't want to bugger the threads." failed to cross my mind. (Small target, I know, but still.)
--Shannon
At no pint did I I have to really reef on anything. The thought "Hmm... I don't want to bugger the threads." failed to cross my mind. (Small target, I know, but still.)
--Shannon
1simplexnut
Senior Member
close
05-01-26
- Join DateJul 2014
- LocationNew Zealand
- Posts:1,232
-
iTrader Positive Feedback0
-
iTrader Feedback Score(0)
-
Likes:354
-
Liked:903 Times in 387 Posts
Quote:
My other option would be one of the Sunlite threadless ones, if any shop around here has the chamfering tool that I expect they need.
Thanks, all!
--Shannon
Yikes! what a saga ! Part of the joy of C&V I guess huh ? Originally Posted by ShannonM
So, the saga of the stuck crankset on the PPPKN-10, (My other option would be one of the Sunlite threadless ones, if any shop around here has the chamfering tool that I expect they need.
Thanks, all!
--Shannon
There are unthreaded BB cartridge setups out there that dont need a chamfer .
I have a couple in my stash of different sizes for that fateful day when I find a ruined BB thread .
From memory I got them from the UK .


rando_couche
Senior Member
close
05-01-26
- Join DateJul 2013
- Posts:1,439
-
iTrader Positive Feedback0
-
iTrader Feedback Score(0)
-
Likes:287
-
Liked:301 Times in 186 Posts
Quote:
How many pints did it take? ;-)Originally Posted by ShannonM
"At no pint did I I have to really reef on anything."

Offer of a Sugino triple with white crank arms and silver rings, or a Suntour X1 triple with black arms and black rings still stands.
Yours if you want them, however they are 175mm arms.
Yours if you want them, however they are 175mm arms.

bikemig
Senior Member
close


05-01-26
- Join DateApr 2012
- LocationMiddle Earth (aka IA)
- Posts:21,767
-
iTrader Positive Feedback0
-
iTrader Feedback Score(0)
-
Likes:8,541
-
Liked:5,668 Times in 2,921 Posts
You could go Italian threaded but threadless would be my first choice.
You do get C&V bonus points for persistence; what a pain.
You do get C&V bonus points for persistence; what a pain.
It has occurred to me that there may be nothing to lose by trying to screw the UN-300 into the shell... the Bad Idea being that if I strip the threads, I'll need to go threadless, which I'd have to do anyway. And I can't return the UN-300, so I'm already out that money.
I'm probably being an idiot.
--Shannon
I'm probably being an idiot.
--Shannon

noglider
aka Tom Reingold
close

05-01-26
- Join DateJan 2009
- LocationNew York, NY, and High Falls, NY, USA
- Posts:44,123
-
iTrader Positive Feedback0
-
iTrader Feedback Score(0)
-
Likes:6,956
-
Liked:6,340 Times in 3,398 Posts
I would have it tapped to Italian but it might be expensive. Those threadless setups scare me because I have no experience with them.

bulgie
Senior Member
close
05-02-26
- Join DateApr 2009
- LocationSeattle
- Posts:3,701
-
iTrader Positive Feedback0
-
iTrader Feedback Score(0)
-
Likes:2,546
-
Liked:5,480 Times in 2,179 Posts
Quote:
At that point I'd try just riding it, with the bolts out. You don't have to actually take it out on the road, just bounce on the pedals with the cranks horizontal, first right foot forward then left. Bouncing on the bottom pedal with cranks up and down might help too. Keep doing it and the cranks should quirm their way off, slowly at first. One any looseness is felt you must stop of course otherwise you could fall and hurt yourself.Originally Posted by ShannonM
So, the saga of the stuck crankset on the PPPKN-10, (for those who are not me, that's my probably a 1981 Peugeot PKN-10, sticker bomb, frankenbike) came to an end this evening, after: (Skip the whole list if you don't care; the much shorter question is at the bottom if this excessively long and self-revealing post.)- Stripping the threads of both arms.
After one crank loosens, you could re-install the fixing bolt on that side to keep going until the second one loosens.
I'm curious about how the threads got stripped. Was it from using a TA extractor, or the TA side of a multi-size tool like the old Park? A tool made to fit TA at 23.0 mm will seem to fit in a Stronglight, that wants a 23.35 mm extractor. Sometimes it'll even work to pull the crank, if it's not on too tight, leading some people to say the Park tool is a correct for for a SL crank. It isn't!
Like all manufactured things, the extractor threads on a SL have a tolerance, with some being a bit oversized and some under. Some folks here have sworn their SL cranks came with a 23.0 mm extractor thread, like that was one of the sizes SL made them in over the years. I don't know for sure, but I'm skeptical. We know SL switched to the Campy "standard" 22.0 mm extractor at some point (1980-ish?) but I have a hard time believing they made cranks with all three standards. Not on purpose anyway! But who knows, they're French...

unworthy1
Stop reading my posts!
close

05-01-26
- Join DateSep 2004
- Posts:13,990
-
iTrader Positive Feedback0
-
iTrader Feedback Score(0)
-
Likes:1,790
-
Liked:2,180 Times in 1,430 Posts
all I can add to this "wrenching saga" besides congrats on prevailing and getting the cups out of your Swiss BB shell,
I once came to work on a genuine vintage Swiss bike with Georg Fisher sandcast BB shell (so 100% was Swiss threading) that PO had installed a BSC (British/ISO) sealed BB unit into those Swiss threads. Alarmed at first I expected full tragic buggery but got the sealed unit out without any major struggle, maybe all due to it having alloy cups on both ends. Plus the BB threads in that Fisher shell did not appear much bodgered either and Swiss cups (actually Phil Wood Swiss steel "rings") could screw in and were "tight" but manageable.
as always with such "mix and match" experiments, YMMV
bikemig
Senior Member
close
05-01-26
- Join DateApr 2012
- LocationMiddle Earth (aka IA)
- Posts:21,767
-
iTrader Positive Feedback0
-
iTrader Feedback Score(0)
-
Likes:8,541
-
Liked:5,668 Times in 2,921 Posts
Quote:
I once came to work on a genuine vintage Swiss bike with Georg Fisher sandcast BB shell (so 100% was Swiss threading) that PO had installed a BSC (British/ISO) sealed BB unit into those Swiss threads. Alarmed at first I expected full tragic buggery but got the sealed unit out without any major struggle, maybe all due to it having alloy cups on both ends. Plus the BB threads in that Fisher shell did not appear much bodgered either and Swiss cups (actually Phil Wood Swiss steel "rings") could screw in and were "tight" but manageable.
as always with such "mix and match" experiments, YMMV
The one Swiss bike I have--a Cilo Pacer--came with a buggered up BB because the PO tried to force a BSC unit on. I picked up the frame for free though and had someone a lot more skilled than I am ream it out and tap it out to Itallian. It's been working great ever since.Originally Posted by unworthy1
all I can add to this "wrenching saga" besides congrats on prevailing and getting the cups out of your Swiss BB shell,I once came to work on a genuine vintage Swiss bike with Georg Fisher sandcast BB shell (so 100% was Swiss threading) that PO had installed a BSC (British/ISO) sealed BB unit into those Swiss threads. Alarmed at first I expected full tragic buggery but got the sealed unit out without any major struggle, maybe all due to it having alloy cups on both ends. Plus the BB threads in that Fisher shell did not appear much bodgered either and Swiss cups (actually Phil Wood Swiss steel "rings") could screw in and were "tight" but manageable.
as always with such "mix and match" experiments, YMMV
bulgie
Senior Member
close
05-02-26
- Join DateApr 2009
- LocationSeattle
- Posts:3,701
-
iTrader Positive Feedback0
-
iTrader Feedback Score(0)
-
Likes:2,546
-
Liked:5,480 Times in 2,179 Posts
Tapping to Ital and just leaving it like that is functionally fine, just a bit weird to have Ital thread and only 68 mm wide. Ital BBs are made for 70 mm shell width.
Another option is tap to Italian then use an Ital-Eng thread adaptor. If the thread is only bad on one side, you only need that one side done. Though if going from Swiss, I'd do both sides, so they can both be English/ISO. Having one side be Eng. and the other Metric could cause a future mechanic some excess stomach acid.
I have a set of those thread adaptors, they're a marvel of machining, Eng on the inside and Ital on the outside. The right side cup is left-hand thread on the inside, RHT on the outside. Got them from Ceeway in the UK.

They can be permanently loctited in place and then the frame is pretty much good as new, except Eng/ISO thread.
I also have the reamer and Ital taps to do this repair, in case anyone in the Seattle area needs it done. I'm not soliciting out of town work though, don't love the hassle of boxing and shipping. But if you bring it to me, I'll do it while you wait.
Theoretically, I could also make adapter rings to go from Ital to Swiss (or French). My lathe can make those threads, but it would be a very expensive repair. I am an inefficient amateur machinist, everything lakes me 3x as long as it would take a real machinist. I have made some pretty nice threads though. I might make French or Swiss adaptor rings someday, for a bike for me, as a hobby. Just to prove that I could do it. But if you had to pay me, it'd be too expensive, for most bikes. Well, maybe for some priceless holy grail frame. Hmm, if you have something like that, we can talk. Even then though, someone with a CNC (like Jim Merz) could knock out a pair in a fraction of how long it would take me.
Another option is tap to Italian then use an Ital-Eng thread adaptor. If the thread is only bad on one side, you only need that one side done. Though if going from Swiss, I'd do both sides, so they can both be English/ISO. Having one side be Eng. and the other Metric could cause a future mechanic some excess stomach acid.
I have a set of those thread adaptors, they're a marvel of machining, Eng on the inside and Ital on the outside. The right side cup is left-hand thread on the inside, RHT on the outside. Got them from Ceeway in the UK.
They can be permanently loctited in place and then the frame is pretty much good as new, except Eng/ISO thread.
I also have the reamer and Ital taps to do this repair, in case anyone in the Seattle area needs it done. I'm not soliciting out of town work though, don't love the hassle of boxing and shipping. But if you bring it to me, I'll do it while you wait.
Theoretically, I could also make adapter rings to go from Ital to Swiss (or French). My lathe can make those threads, but it would be a very expensive repair. I am an inefficient amateur machinist, everything lakes me 3x as long as it would take a real machinist. I have made some pretty nice threads though. I might make French or Swiss adaptor rings someday, for a bike for me, as a hobby. Just to prove that I could do it. But if you had to pay me, it'd be too expensive, for most bikes. Well, maybe for some priceless holy grail frame. Hmm, if you have something like that, we can talk. Even then though, someone with a CNC (like Jim Merz) could knock out a pair in a fraction of how long it would take me.
Thanks, all!
I think that, in this case, I'm just going to order the Sunlite / YST threadless repair BB. The non-drive side takes a Shimano adjustable cup just fine, even an aluminum one. And by "fine" I mean "spins all the way in with my fingers."
--Shannon
I think that, in this case, I'm just going to order the Sunlite / YST threadless repair BB. The non-drive side takes a Shimano adjustable cup just fine, even an aluminum one. And by "fine" I mean "spins all the way in with my fingers."
--Shannon
unworthy1
Stop reading my posts!
close
05-01-26
- Join DateSep 2004
- Posts:13,990
-
iTrader Positive Feedback0
-
iTrader Feedback Score(0)
-
Likes:1,790
-
Liked:2,180 Times in 1,430 Posts
Quote:
I think that, in this case, I'm just going to order the Sunlite / YST threadless repair BB. The non-drive side takes a Shimano adjustable cup just fine, even an aluminum one. And by "fine" I mean "spins all the way in with my fingers."
--Shannon
so if you decided NOT to use a Sunlite/YST unit (I have not been impressed by the quality of some of those products in the past, but maybe they have improved?)Originally Posted by ShannonM
Thanks, all!I think that, in this case, I'm just going to order the Sunlite / YST threadless repair BB. The non-drive side takes a Shimano adjustable cup just fine, even an aluminum one. And by "fine" I mean "spins all the way in with my fingers."
--Shannon
Here's my WAG since this is a thing that really needs to felt in-person, BUT
if it spins in that freely (just with fingers) I would definitely use LocTite on the very clean threads. Blue (medium strength) would be my choice to try first since Red (high strength) is a bigger commitment. If Blue works after test rides and time then you'll be set and the cup will be removable when it has to come out.
I was able to get the BB and crankarm separated... by taking them downstairs to the parking lot, setting the crank up with the ball joint fork on top and asphalt underneath, and whaling on the fork with the hammer.
I was hoping that I could at least salvage the bottom bracket, and maybe I did. It looks to be OK, although I don't know because I tried to screw it into the frame and... it no workee. Just like the new one. I don't know how Bike Builder Guy got it in there, but whatever he did won't work twice.
Oh, and the other thing? It's a 107. So the Sugino XD2, which wants a 113-118, just swallowed the spindle like its name was "Jonah." No wonder I couldn't get it off.
Time for the Sunlite. I called around, and a shop one bus ride away had one, a 116mm. Splits the difference between the various lengths assigned to the XD2 at birth. And I didn't have to wait a week or more.
And then, when I'd got it home and was getting set to try to install it, I failed again. The cartridge won't pass through the shell. A quick examination revealed:


The seat tube protrudes just far enough into the bottom bracket shell to stop the BB from sliding through.
So I've ordered a half-round file and 2nd BB tool, which will be here tomorrow.
--Shannon
I was hoping that I could at least salvage the bottom bracket, and maybe I did. It looks to be OK, although I don't know because I tried to screw it into the frame and... it no workee. Just like the new one. I don't know how Bike Builder Guy got it in there, but whatever he did won't work twice.
Oh, and the other thing? It's a 107. So the Sugino XD2, which wants a 113-118, just swallowed the spindle like its name was "Jonah." No wonder I couldn't get it off.
Time for the Sunlite. I called around, and a shop one bus ride away had one, a 116mm. Splits the difference between the various lengths assigned to the XD2 at birth. And I didn't have to wait a week or more.
And then, when I'd got it home and was getting set to try to install it, I failed again. The cartridge won't pass through the shell. A quick examination revealed:
The seat tube protrudes just far enough into the bottom bracket shell to stop the BB from sliding through.
So I've ordered a half-round file and 2nd BB tool, which will be here tomorrow.
--Shannon
noglider
aka Tom Reingold
close
05-01-26
- Join DateJan 2009
- LocationNew York, NY, and High Falls, NY, USA
- Posts:44,123
-
iTrader Positive Feedback0
-
iTrader Feedback Score(0)
-
Likes:6,956
-
Liked:6,340 Times in 3,398 Posts
Perseverance!
You're probably better off with a carbide bit or a rotary file in a die grinder. I've used a regular 3/8" drill in a pinch and it worked fine.
Ebay or Amazon have 5/8' carbide bits for cheap.
IMHO It will be really difficult to do with a file, although maybe a 1" grinding stone would clean things up some ?
Good luck - you've been through a real battle on this one . . .
Ebay or Amazon have 5/8' carbide bits for cheap.
IMHO It will be really difficult to do with a file, although maybe a 1" grinding stone would clean things up some ?
Good luck - you've been through a real battle on this one . . .
Quote:
Ebay or Amazon have 5/8' carbide bits for cheap.
IMHO It will be really difficult to do with a file, although maybe a 1" grinding stone would clean things up some ?
Good luck - you've been through a real battle on this one . . .
Unfortunately, I have no power tools and no money. The file was 10 bucks, and my time and sweat and annoyance are all free.Originally Posted by vintage cellar
You're probably better off with a carbide bit or a rotary file in a die grinder. I've used a regular 3/8" drill in a pinch and it worked fine.Ebay or Amazon have 5/8' carbide bits for cheap.
IMHO It will be really difficult to do with a file, although maybe a 1" grinding stone would clean things up some ?
Good luck - you've been through a real battle on this one . . .
So be it.
--Shannon
And look on the bright side... it looks like they got full brazing in there!
bulgie
Senior Member
close
05-02-26
- Join DateApr 2009
- LocationSeattle
- Posts:3,701
-
iTrader Positive Feedback0
-
iTrader Feedback Score(0)
-
Likes:2,546
-
Liked:5,480 Times in 2,179 Posts
Quote:
So I've ordered a half-round file
Wow, that's a framebuilder fail!Originally Posted by ShannonM
The seat tube protrudes just far enough into the bottom bracket shell to stop the BB from sliding through.So I've ordered a half-round file
The half-round file is a bit risky, danger of filing into the threads if you tip the file at all. A little tipping is inevitable, no one's perfect. I always tip at least 15%

Maybe protect the threads with a bit of tubing? A "half pipe" of tube maybe 1-1/4" in diameter could be placed on the threads on both sides of where you're filing. One way to get free pieces of tubing is saw out a hunk of head tube or down tube from a dumpster frame. If you're lucky enough to have a dumpster with bike frames near you. Stock up when you get a chance... Shade-tree mechanics should try to keep at least one dumpster frame on hand to cannibalize for tubing, dropouts or other frame parts.
EDIT: I see vintage cellar beat me to the following, and OP says he doesns't want to spend $$, but I wrote it so here it is anyway:
The fastest tool for that job is a die-grinder with a carbide burr ("rotary file"). A die-grinder is basically Dremel's big brother, designed to take larger tools, but you can also get a carbide burr for a Dremel if that's all you have available. Typical shank size on a Dremel is 1/8", versus the 1/4" shank typical on a die grinder. I see used die grinders on my local Craigslist under $50 and there's even a new one on ebay for $41 (&free shipping), maybe not the best quality!
The most useful burr is the shape usually called "flame", like this:

That goes through Cr-Mo steel like a hot knife thru buttah. Note, the chips it makes are tiny ultra-sharp needles. Good eye protection is a must. Get the needles off your skin before they stab you. Sweep them up and don't track them through the house. Your housemates and pets will thank you.
The half-round file is far cheaper and safer though, and also a supremely useful tool. Just a lot slower, and doesn't get into small/awkward places as well.
The threads are already borked, hence the repair BB, but I'm going to cover them anyway. Rag and / or electrical tape, just like I used to protect the granny ring from the hacksaw while I was failing to remove the crankarm.
I don't have to remove much metal. It's just the extra width of the threadless cartidge that makes it hit. The UN-72 is apparently just skinny enough that he was able to hork it in there. (A feat of hackery that still fills me with horrified awe.)
And, while it doesn't say much for Peugeot Q/C, a cup-n-cone BB wouldn't come close to being a problem. (Other than Phil, maybe, were there any cartridge bottom brackets in 1981?) So, sloppy, but good enough to sell.
--Shannon
noglider
aka Tom Reingold
close
05-01-26
- Join DateJan 2009
- LocationNew York, NY, and High Falls, NY, USA
- Posts:44,123
-
iTrader Positive Feedback0
-
iTrader Feedback Score(0)
-
Likes:6,956
-
Liked:6,340 Times in 3,398 Posts
Is there no bike coop nearby that has power tools?
Thanks to all who offered advice, and sympathy... and parts. Especially parts.
After some slow reps of file, fit, fail, repeat, the cartridge slipped through the frame. After greasing everything that touches anything else anywhere, and tightening things down from both sides, and then letting it all sit and get acquainted, and then giving everything a last, light taste of the wrench, I had this:
Non-drive, non-problematic side.
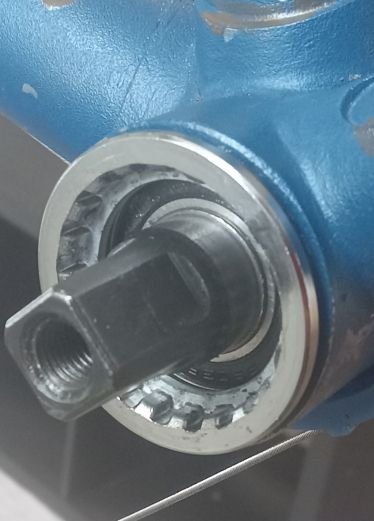
Very problematic drive side. The orange isn't rust, it's orange nail polish.

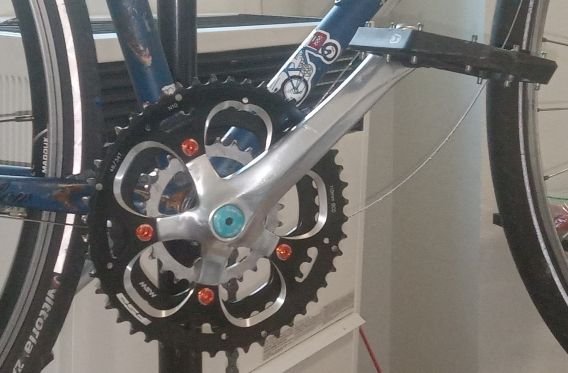
I then walked away from the bike, the tools, the room, and the apartment. Went outside. Walked around the 'hood. Came home. Greased tapers, greased bolts, installed crankset:
And then, because this is this project, and because it's being done by me, another snag.
The Campy Nuovo Gran Sport front derailleur won't swing the big ring. Hell, it won't even swing the middle ring.
Get mad. Get Campy 980 rear derailleur out of parts box. Install derailleur.
At least we've got a 39/26 double. I guess that 9 millimeters makes a difference, neh?
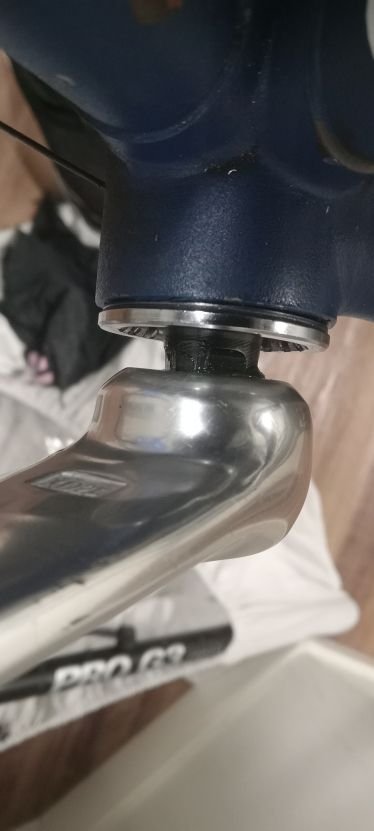
I guess I'll need a real triple front derailleur. Given the experience I just had, I don't want to go much shorter than this, at least not on the drive side:

There's just a little bit of taper showing between the arm and the lockring. Before, there was none... the flange on the arm almost touched the BB.
Lots more room on the left, don't know why:
BB sizing is still a bit of a mystery, even after 35 years. The Sheldon List sez 113-118, so at 116mm, I'm right in the middle. But the front derailleur doesn't like the triple anymore. Oh, well. Sometimes, when your pushing tolerances, they line up the right way, and you win. Other times, they don't, and you lose.
At least I've got a rideable bicycle.
Anybody got recommendations for a front derailleur? 48/39/26, 8 speed drive, 9 speed rings, friction shift, can be silver or black.
--Shannon
After some slow reps of file, fit, fail, repeat, the cartridge slipped through the frame. After greasing everything that touches anything else anywhere, and tightening things down from both sides, and then letting it all sit and get acquainted, and then giving everything a last, light taste of the wrench, I had this:
Non-drive, non-problematic side.
Very problematic drive side. The orange isn't rust, it's orange nail polish.
I then walked away from the bike, the tools, the room, and the apartment. Went outside. Walked around the 'hood. Came home. Greased tapers, greased bolts, installed crankset:
And then, because this is this project, and because it's being done by me, another snag.
The Campy Nuovo Gran Sport front derailleur won't swing the big ring. Hell, it won't even swing the middle ring.
Get mad. Get Campy 980 rear derailleur out of parts box. Install derailleur.
At least we've got a 39/26 double. I guess that 9 millimeters makes a difference, neh?
I guess I'll need a real triple front derailleur. Given the experience I just had, I don't want to go much shorter than this, at least not on the drive side:
There's just a little bit of taper showing between the arm and the lockring. Before, there was none... the flange on the arm almost touched the BB.
Lots more room on the left, don't know why:
BB sizing is still a bit of a mystery, even after 35 years. The Sheldon List sez 113-118, so at 116mm, I'm right in the middle. But the front derailleur doesn't like the triple anymore. Oh, well. Sometimes, when your pushing tolerances, they line up the right way, and you win. Other times, they don't, and you lose.
At least I've got a rideable bicycle.
Anybody got recommendations for a front derailleur? 48/39/26, 8 speed drive, 9 speed rings, friction shift, can be silver or black.
--Shannon
I used to set up triples with Campy Record front derailleurs - they were one of only a few fronts that would work (barely) with older TA cranks. But the chainlines were on the narrow side, your crank is probably farther out than the stuff I worked with eons ago.
Your set up might work well with an older Shimeeno 9-spd. triple front derailleur - 105 to Dura Ace, I think they were the 5503, 6503, and 7703 series ?
One advantage of these is that the cable pull is less than some other vintage fronts, IMHO a help when setting up with friction.
Your set up might work well with an older Shimeeno 9-spd. triple front derailleur - 105 to Dura Ace, I think they were the 5503, 6503, and 7703 series ?
One advantage of these is that the cable pull is less than some other vintage fronts, IMHO a help when setting up with friction.
Quote:
Your set up might work well with an older Shimeeno 9-spd. triple front derailleur - 105 to Dura Ace, I think they were the 5503, 6503, and 7703 series ?
One advantage of these is that the cable pull is less than some other vintage fronts, IMHO a help when setting up with friction.
Yeah, I've had a Suntour AR working on a Shimano Deore MT-60 (45/42/30, with a 118 BB), and an XD2 48/39/26 worked with both the 980 and the Nuovo Gran Sport... when the frame had a 107mm UN-72 horked into it. Like I said, they can't all be winners.Originally Posted by vintage cellar
I used to set up triples with Campy Record front derailleurs - they were one of only a few fronts that would work (barely) with older TA cranks. But the chainlines were on the narrow side, your crank is probably farther out than the stuff I worked with eons ago.Your set up might work well with an older Shimeeno 9-spd. triple front derailleur - 105 to Dura Ace, I think they were the 5503, 6503, and 7703 series ?
One advantage of these is that the cable pull is less than some other vintage fronts, IMHO a help when setting up with friction.
And, funny you should mention, but I've got a 9-speed Ultegra triple FD in my meager parts box. I've just got to work out how to get a 31.8 clamp onto a 28.0 seat tube. Oughta be fun, ya?
--Shannon