


Dropout adjusting screw direction
 03-23-26 | 08:10 AM
#1
Thread Starter
Full Member

Joined: Mar 2021
Posts: 200
Likes: 54
From: Los Angeles, CA
Bikes: 1981 Gazelle Champion Mondial, 1988(?) De Bernardi, 1985 Fuji Opus III, 1986 Bridgestone RB-2
Dropout adjusting screw direction
I just noticed that on one of my bikes, the dropout adjusting screws are screwed in with the heads facing the axles. I've never touched those screws on any of these 3 frames and bought them all used, so they all came like this.
Was it just an "oopsie" by the previous owner? Or are there valid reasons to screw them in this way? Like maybe having the large head face the axle provides a better stopping point?
The one difference is that this is a Japanese frame (Fuji), whereas the other 2 frames are Italian and Dutch, so maybe this was the Japanese standard back then for these screws?
 03-23-26 | 08:23 AM
#2

Dorkus Malorkus
Joined: Jul 2025
Posts: 114
Likes: 283
From: Oak Park, Illinois
Bikes: �80ish Zeus somethin�, �80 Centurion Semi-Pro, �83 Schwinn World Tourist, �88 Miyata 618GT, �90ish Pelizzoli Microf C 40 �Electronic Control�, �05 LeMond Buenos Aires
You�ve got me curious! FWIW all three of my bikes with dropout adjuster screws (one Italian, one Japanese, one Spanish) came with the screws installed with the head of the screw facing the BB and little threaded metal caps covering the ends facing the rear.

03-23-26 | 08:32 AM
#3

Edumacator


Joined: Jan 2018
Posts: 9,608
Likes: 5,101
From: Goose Creek, SC
Bikes: More than the people who ride them...oy.
The adjustment is made from inside the claw and the nub that often goes missing just protects threads and sharp edges�
I think.
__________________
1987 Crest C'dale, 1987 Basso Gap, 1992 Rossin EL, 1990 Van Tuyl, 1985 Trek 670, 2003 Pinarello Surprise, 1990ish MBK Atlantique, 1987 Peugeot Isoard, 1987 Nishiki Tri-A, 1981 Faggin, 1996 C'dale M500, 1984 Mercian Pro, 1982 AD SuperLeicht, 1985 Massi ?, 1988 Daccordi Griffe , 1989 Fauxsin MTB, 1981 Ciocc Mockba, 1992 Bianchi Giro, 1977 Colnago Super, 1971 Raleigh Internat'l, 1998 Corratec U+D, 1991 Peugeot Slimestone, 1987 Bianchi Volpe, 1995 Trek 750
1987 Crest C'dale, 1987 Basso Gap, 1992 Rossin EL, 1990 Van Tuyl, 1985 Trek 670, 2003 Pinarello Surprise, 1990ish MBK Atlantique, 1987 Peugeot Isoard, 1987 Nishiki Tri-A, 1981 Faggin, 1996 C'dale M500, 1984 Mercian Pro, 1982 AD SuperLeicht, 1985 Massi ?, 1988 Daccordi Griffe , 1989 Fauxsin MTB, 1981 Ciocc Mockba, 1992 Bianchi Giro, 1977 Colnago Super, 1971 Raleigh Internat'l, 1998 Corratec U+D, 1991 Peugeot Slimestone, 1987 Bianchi Volpe, 1995 Trek 750
03-23-26 | 08:37 AM
#4

aka Tom Reingold


Joined: Jan 2009
Posts: 44,127
Likes: 6,343
From: New York, NY, and High Falls, NY, USA
Bikes: 1962 Rudge Sports, 1971 Raleigh Super Course, 1971 Raleigh Pro Track, 1974 Raleigh International, 1975 Viscount Fixie, 1982 McLean, 1996 Lemond (Ti), 2002 Burley Zydeco tandem
Because that's the way it's always been done.
And that's quite an unsatisfying answer, isn't it? Now you got me curious. I don't really know.
Maybe it's because the screw-on nut may interfere if it is at the forward end of the screw?
And that's quite an unsatisfying answer, isn't it? Now you got me curious. I don't really know.
Maybe it's because the screw-on nut may interfere if it is at the forward end of the screw?
__________________
Tom Reingold, tom@noglider.com
New York City and High Falls, NY
Blogs: The Experienced Cyclist; noglider's ride blog
�When man invented the bicycle he reached the peak of his attainments.� � Elizabeth West, US author
Please email me rather than PM'ing me. Thanks.
Tom Reingold, tom@noglider.com
New York City and High Falls, NY
Blogs: The Experienced Cyclist; noglider's ride blog
�When man invented the bicycle he reached the peak of his attainments.� � Elizabeth West, US author
Please email me rather than PM'ing me. Thanks.

 03-23-26 | 09:04 AM
#6
Thread Starter
Full Member
Joined: Mar 2021
Posts: 200
Likes: 54
From: Los Angeles, CA
Bikes: 1981 Gazelle Champion Mondial, 1988(?) De Bernardi, 1985 Fuji Opus III, 1986 Bridgestone RB-2
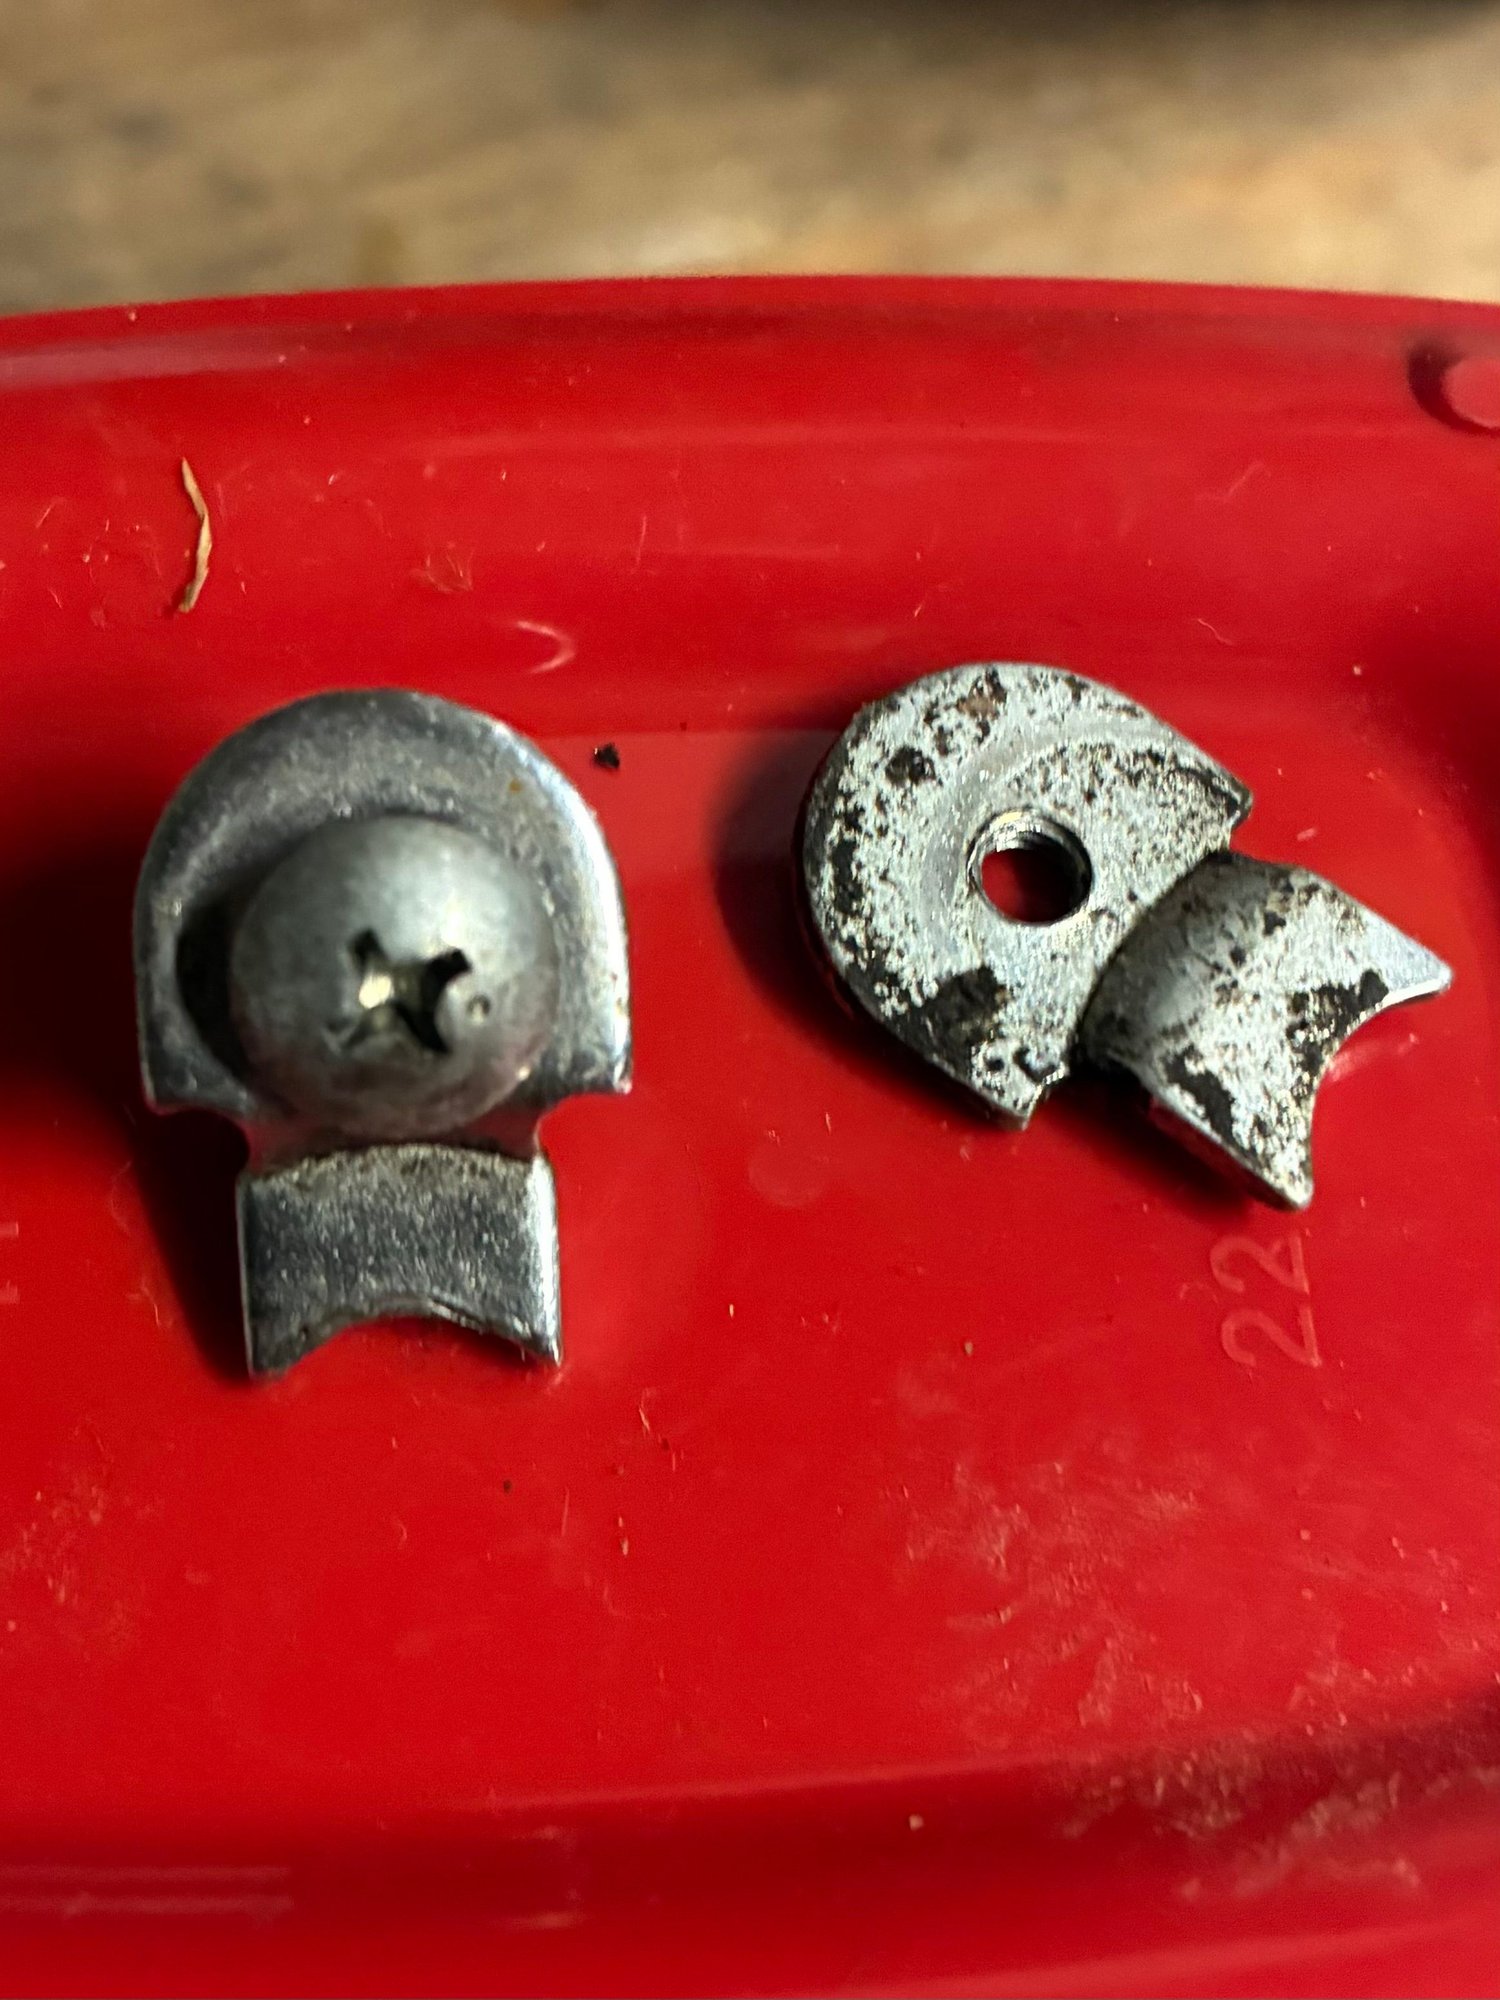
Are both pieces screwed onto the shaft? The wide silver barrel on the outside, and the flat piece on the inside?
03-23-26 | 09:06 AM
#7
Thread Starter
Full Member
Joined: Mar 2021
Posts: 200
Likes: 54
From: Los Angeles, CA
Bikes: 1981 Gazelle Champion Mondial, 1988(?) De Bernardi, 1985 Fuji Opus III, 1986 Bridgestone RB-2
On my Italian bike (2nd pic) it definitely has a slot for a flathead, but I assumed the other two were turned using your fingers on that large head, since it has knurling.
03-23-26 | 09:38 AM
#8
Senior Member
Joined: Jun 2020
Posts: 536
Likes: 565
From: Marin County, Alta California
Bikes: Our all steel stable: Rodriguez, Ritchey & Bruce Gordon road tandems; Burley pub crawler tandem; two XO-1s, two Fishers, a Comp & Mt Tam; two Gitane TeamPros; 60s Carre; 69-70 Gitane TdF and
Head of bolt AND spring inside dropout with end of bolt protruding out back and generally covered by a knurled metal cap or sometimes a flattened plastic piece that you can turn wit fingers.
03-23-26 | 09:39 AM
#9
Thread Starter
Full Member
Joined: Mar 2021
Posts: 200
Likes: 54
From: Los Angeles, CA
Bikes: 1981 Gazelle Champion Mondial, 1988(?) De Bernardi, 1985 Fuji Opus III, 1986 Bridgestone RB-2
Disregard, I think I get it when I looked again--so the flat part I'm seeing inside your claw is the flathead which gets adjusted using a screwdriver, and the little knurled barrel on the outside just screws on. On mine it's completely rusted on so it essentially acts like a thumbscrew you can use to turn the shaft. That also means on 2 of my 3 bikes, those little barrels are actually missing, and with those 2, one of them is backwards (the 2nd Italian bike). Does it matter? Should it be reversed so the head faces the axle?
03-23-26 | 09:40 AM
#10
Thread Starter
Full Member
Joined: Mar 2021
Posts: 200
Likes: 54
From: Los Angeles, CA
Bikes: 1981 Gazelle Champion Mondial, 1988(?) De Bernardi, 1985 Fuji Opus III, 1986 Bridgestone RB-2
03-23-26 | 09:52 AM
#11
Mister Geezer to you

Joined: Mar 2004
Posts: 1,234
Likes: 916
From: Glendora, CA
Bikes: Croll '94 & Cannondale Supersix '15
Use a wire brush to clean up the threads, as well as a tiny bit of acetone. Then apply some red Loctite before attaching the same knurled nut.
03-23-26 | 09:55 AM
#12

Senior Moment

Joined: Oct 2015
Posts: 185
Likes: 171
Bikes: '74 Eisentraut, '94 Univega Alpina Pro, KLR650, R1200RT
The knurled nut on the outside is supposed to be installed tightly. That way, you can make adjustments with it. You align the wheel using the Mark I Eyeball and the QR, then run the adjuster screw in with the knurled nut (or turn it out as needed). The head of the screw is against the axle and serves to hold the spring in place. The only time a screwdriver is used is for the initial installation and to install the knurled nut. We used to booger up one thread so that it would go on tightly, but then they invented Loctite.
Once set, it is pretty much set. I have been running around with one missing knurled nut for decades. I recently found a replacement, but it looks out of place because it's sorta shiny.
Once set, it is pretty much set. I have been running around with one missing knurled nut for decades. I recently found a replacement, but it looks out of place because it's sorta shiny.
__________________
Struggling to keep up with Malabrocca...
Struggling to keep up with Malabrocca...
03-23-26 | 10:08 AM
#13
aka Tom Reingold
Joined: Jan 2009
Posts: 44,127
Likes: 6,343
From: New York, NY, and High Falls, NY, USA
Bikes: 1962 Rudge Sports, 1971 Raleigh Super Course, 1971 Raleigh Pro Track, 1974 Raleigh International, 1975 Viscount Fixie, 1982 McLean, 1996 Lemond (Ti), 2002 Burley Zydeco tandem
Not only that, but also the end that butts up to the axle includes a slot for a flathead screwdriver to firmly hold it to secure the small knurled nut.
Use a wire brush to clean up the threads, as well as a tiny bit of acetone. Then apply some red Loctite before attaching the same knurled nut.
Use a wire brush to clean up the threads, as well as a tiny bit of acetone. Then apply some red Loctite before attaching the same knurled nut.
__________________
Tom Reingold, tom@noglider.com
New York City and High Falls, NY
Blogs: The Experienced Cyclist; noglider's ride blog
�When man invented the bicycle he reached the peak of his attainments.� � Elizabeth West, US author
Please email me rather than PM'ing me. Thanks.
Tom Reingold, tom@noglider.com
New York City and High Falls, NY
Blogs: The Experienced Cyclist; noglider's ride blog
�When man invented the bicycle he reached the peak of his attainments.� � Elizabeth West, US author
Please email me rather than PM'ing me. Thanks.
03-23-26 | 10:52 AM
#14
Thread Starter
Full Member
Joined: Mar 2021
Posts: 200
Likes: 54
From: Los Angeles, CA
Bikes: 1981 Gazelle Champion Mondial, 1988(?) De Bernardi, 1985 Fuji Opus III, 1986 Bridgestone RB-2
The knurled nut on the outside is supposed to be installed tightly. That way, you can make adjustments with it. You align the wheel using the Mark I Eyeball and the QR, then run the adjuster screw in with the knurled nut (or turn it out as needed). The head of the screw is against the axle and serves to hold the spring in place. The only time a screwdriver is used is for the initial installation and to install the knurled nut. We used to booger up one thread so that it would go on tightly, but then they invented Loctite.
Once set, it is pretty much set. I have been running around with one missing knurled nut for decades. I recently found a replacement, but it looks out of place because it's sorta shiny.
Once set, it is pretty much set. I have been running around with one missing knurled nut for decades. I recently found a replacement, but it looks out of place because it's sorta shiny.
03-23-26 | 01:31 PM
#16
Senior Member
Joined: Dec 2014
Posts: 5,345
Likes: 5,142
From: Central Virginia
Bikes: Numerous
I am also amazed we got a dozen posts out of this.
__________________
N = '96 Colnago C40, '04 Wilier Alpe D'Huez, '10 Colnago EPS, '85 Merckx Pro, '89 Merckx Century, '86 Tommasini Professional, '04 Teschner Aero FX Pro, '05 Alan Carbon Cross, '86 De Rosa Professional, '95 Gios Compact Pro, '95 Carrera Zeus, �81 Masi Gran Criterium, �81 Merckx Pro, �89 Cinelli Supercorsa, �83 Bianchi Specialissima, �VO Randonneur, Ritchey Breakaway Steel, Rivendell Rambouillet, Heron Randonneur, �92 Ci�cc Columbus EL
N = '96 Colnago C40, '04 Wilier Alpe D'Huez, '10 Colnago EPS, '85 Merckx Pro, '89 Merckx Century, '86 Tommasini Professional, '04 Teschner Aero FX Pro, '05 Alan Carbon Cross, '86 De Rosa Professional, '95 Gios Compact Pro, '95 Carrera Zeus, �81 Masi Gran Criterium, �81 Merckx Pro, �89 Cinelli Supercorsa, �83 Bianchi Specialissima, �VO Randonneur, Ritchey Breakaway Steel, Rivendell Rambouillet, Heron Randonneur, �92 Ci�cc Columbus EL
03-23-26 | 01:37 PM
#17
Senior Moment
Joined: Oct 2015
Posts: 185
Likes: 171
Bikes: '74 Eisentraut, '94 Univega Alpina Pro, KLR650, R1200RT
It's a critical piece of equipment. Without it, your wheelbase would be an inch longer, and we all know what that means.
__________________
Struggling to keep up with Malabrocca...
Struggling to keep up with Malabrocca...
03-23-26 | 01:39 PM
#18
Senior Member
Joined: Jan 2015
Posts: 1,185
Likes: 721
So, I’m not the only one confused about drop out adjusters. Most of the bikes that have come to me have had adjusters that are bent, broken or frozen. And I’ll admit that I’ve bent a couple myself, loading a stack of bikes into a car after a race.
The thing that I’ve never understood is why they were used in the first place. I get the function: quick wheel change, no need to futz with alignment, or even preventing wheel slip. It’s the design that baffles me: a small screw that is exposed to water and is in a spot where it can easily be damaged.
Before drop out screws were around there were spacers like one photoed below. PX 10s and others had them. Function is easy to understand, adjustment is fast, and even for the ham fisted, they are nearly impossible to destroy.
Drop out screw adjusters might have been a cool idea, but just because something is possible, but form follows function for a good design.
03-23-26 | 02:07 PM
#19
Thread Starter
Full Member
Joined: Mar 2021
Posts: 200
Likes: 54
From: Los Angeles, CA
Bikes: 1981 Gazelle Champion Mondial, 1988(?) De Bernardi, 1985 Fuji Opus III, 1986 Bridgestone RB-2
03-23-26 | 02:21 PM
#20
Edumacator
Joined: Jan 2018
Posts: 9,608
Likes: 5,101
From: Goose Creek, SC
Bikes: More than the people who ride them...oy.
When you say "nub", do you mean the wider round barrel piece at the backend on the outside of the claw? So that piece is screwed on? If so, how do you actually turn the screw? Is there a slot for a flathead screwdriver on the end inside the claw?
On my Italian bike (2nd pic) it definitely has a slot for a flathead, but I assumed the other two were turned using your fingers on that large head, since it has knurling.
On my Italian bike (2nd pic) it definitely has a slot for a flathead, but I assumed the other two were turned using your fingers on that large head, since it has knurling.
The spring maintains the tension I assume.
__________________
1987 Crest C'dale, 1987 Basso Gap, 1992 Rossin EL, 1990 Van Tuyl, 1985 Trek 670, 2003 Pinarello Surprise, 1990ish MBK Atlantique, 1987 Peugeot Isoard, 1987 Nishiki Tri-A, 1981 Faggin, 1996 C'dale M500, 1984 Mercian Pro, 1982 AD SuperLeicht, 1985 Massi ?, 1988 Daccordi Griffe , 1989 Fauxsin MTB, 1981 Ciocc Mockba, 1992 Bianchi Giro, 1977 Colnago Super, 1971 Raleigh Internat'l, 1998 Corratec U+D, 1991 Peugeot Slimestone, 1987 Bianchi Volpe, 1995 Trek 750
1987 Crest C'dale, 1987 Basso Gap, 1992 Rossin EL, 1990 Van Tuyl, 1985 Trek 670, 2003 Pinarello Surprise, 1990ish MBK Atlantique, 1987 Peugeot Isoard, 1987 Nishiki Tri-A, 1981 Faggin, 1996 C'dale M500, 1984 Mercian Pro, 1982 AD SuperLeicht, 1985 Massi ?, 1988 Daccordi Griffe , 1989 Fauxsin MTB, 1981 Ciocc Mockba, 1992 Bianchi Giro, 1977 Colnago Super, 1971 Raleigh Internat'l, 1998 Corratec U+D, 1991 Peugeot Slimestone, 1987 Bianchi Volpe, 1995 Trek 750
03-23-26 | 02:44 PM
#21
Senior Member
Joined: Apr 2009
Posts: 2,864
Likes: 1,896
From: NorCal
03-23-26 | 03:04 PM
#22
Wheelman
Joined: Aug 2021
Posts: 1,633
Likes: 1,593
From: Putney, London UK
Bikes: 1982 Holdsworth Avanti (531), 1961 Holdsworth Cyclone, 1953 Holdsworth Whirlwind
I've only got one of these but it needed replacing so I got to decide.
Bought a proper adjustment screw with spring and cap.
Bought some hex bolts.
I've got the cap against the axle and the head of the hex bolt at the rear.
That way I get to adjust it with a hex key with the wheel in place.
Bought a proper adjustment screw with spring and cap.
Bought some hex bolts.
I've got the cap against the axle and the head of the hex bolt at the rear.
That way I get to adjust it with a hex key with the wheel in place.
 03-23-26 | 04:02 PM
#23

Bike Butcher of Portland
Joined: Jul 2014
Posts: 12,431
Likes: 7,928
From: Portland, OR
Bikes: It's complicated.
I've only got one of these but it needed replacing so I got to decide.
Bought a proper adjustment screw with spring and cap.
Bought some hex bolts.
I've got the cap against the axle and the head of the hex bolt at the rear.
That way I get to adjust it with a hex key with the wheel in place.
Bought a proper adjustment screw with spring and cap.
Bought some hex bolts.
I've got the cap against the axle and the head of the hex bolt at the rear.
That way I get to adjust it with a hex key with the wheel in place.
__________________
If someone tells you that you have enough bicycles and you don't need any more, stop talking to them. You don't need that kind of negativity in your life.
If someone tells you that you have enough bicycles and you don't need any more, stop talking to them. You don't need that kind of negativity in your life.
03-23-26 | 05:02 PM
#24

Senior Member
Joined: Apr 2009
Posts: 3,702
Likes: 5,481
From: Seattle
I freakin hate the later Campy DOs that came with plastic there, bogus move, made me start to hate Campy a little. I always threw those away and used metal ones (typically bright-plated brass) specifically because you could get them tight enough to never loosen when you try to use as intended.
My strong recommendation, sorry if it's been mentioned already, is use the shortest screws possible, to have minimal stickout in back. If you move the wheel far back, then shorten the screws or remove them completely. The problem with screws sticking out the back is they frequently get bent, and then they can be difficult to remove from the frame. Even straightening a bent screw doesn't return the threads to perfect, so some manner of surgery is needed to get the screw out. That was one of the more common repairs we got in, back when I did frame repairs as part of my job. Some frames needed EDM to get the old screw out. We didn't have an EDM on the premises but the boss "knew a guy". It wasn't cheap, only worth it for a top-tier bike.
Keeping the screw shorter means less chance of whacking it on something, and less bending leverage when you do. Corrolary to this is take the screws out whenever it's just a frame, if it's going be kicked around for a while before assembly. Especially if you ship it in a box, those screws will get bent for sure, if left in.
Most people set the screw position once and never change it, so quick adjustment over the full range is not really a feature most people need. So consider the option of a screw put in from the back, run all the way forward until the head hits the dropout, then adjust the screw length until the wheel sits where you want it. No spring needed that way, with the head tight against the dropout it won't vibrate loose. You may need to take one of the screws out to fine-tune the length, like with a file or belt-sander, to make the wheel sit centered between the chainstays. Yeah you're making it non-adjustable, but the advantage is it will never get out of adjustment that way. And no unsafe stickout in back.
Bill Davidson, back in the '70s, used to counterbore the hole in back of the DO, so the head of a socket-head screw would nestle in flush with the back of the dropout. That looked super sano, but that's not a good place to be removing metal from the DO since they already tend to break there sometimes. Still I was tempted to do it on my frame just 'cuz it looked cool. But I didn't. Head of the screw being outside the dropout is OK with me.
Oh yeah, Shimano did that too, on their UF vertical DOs. Sometimes sold as "Dura Ace" dropouts. Trick, but they broke there where they were counterbored for the screw to hide. I repaired a few of those, and also pre-emptively filled the hole with nickle brazing alloy when building a frame with them, because that DO doesn't need an adjusting screw at all. They kinda smacked themselves in the face with that one. Cool dropout though, once you filled in the hole.
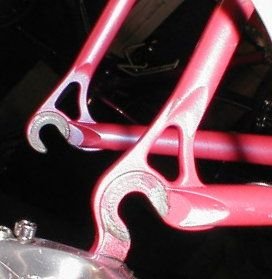
I liked adding a rack/fender eye right where the adjusting screw went, so the raised "land" around the hole looked like it served some purpose... Or I filed the land away, on a special extralight frame I made for my wife. These dropouts got severely lighted from every direction:
 03-23-26 | 05:13 PM
#25

Groupetto Dragon-Ass
Joined: May 2005
Posts: 1,026
Likes: 1,582
From: Lostin Austin, TX
I remember that if the little cap fell off the end, your bike would fail safety inspection at races.
That pointy little probe was likely to hurt somebody.
The race-day fix was to grab the pliers and snap off the protruding stub.
I'm surprised that any bikes still have their full adjusters.
That pointy little probe was likely to hurt somebody.
The race-day fix was to grab the pliers and snap off the protruding stub.
I'm surprised that any bikes still have their full adjusters.