


Frame Painters
 05-23-07 | 12:12 PM
#1
Thread Starter
Senior Member
Joined: Oct 2004
Posts: 1,608
Likes: 0
From: Derry, NH
Frame Painters
I'm surprised that there isn't already a sticky here of frame painters, it should be mandatory for everyone who's had their frames painted to post the info  , so...how bout you guys post it, help us newbies out a bit when looking for someone to paint our frames.
What to post:
-Two photos, before and after
-Who painted it
-Where they're located, any contact info if available
-Your review, service, speed, quality, etc.
-Price (if available?)
, so...how bout you guys post it, help us newbies out a bit when looking for someone to paint our frames.What to post:
-Two photos, before and after
-Who painted it
-Where they're located, any contact info if available
-Your review, service, speed, quality, etc.
-Price (if available?)
 05-23-07 | 12:21 PM
#2


Decrepit Member
Joined: Aug 2005
Posts: 10,488
Likes: 92
From: Santa Rosa, California
Bikes: Waterford 953 RS-22, several Paramounts
I agree; a sticky for frame painters in C&V would be a great idea. MODS??
As it is now, the search function works pretty well, but you get a lot of extraneous stuff along with what you're looking for.
As it is now, the search function works pretty well, but you get a lot of extraneous stuff along with what you're looking for.
 05-23-07 | 12:24 PM
#3
Senior Member
Joined: Sep 2006
Posts: 459
Likes: 0
From: Plaistow, NH
Bikes: '78 Chris Kvale, '87 Paramount
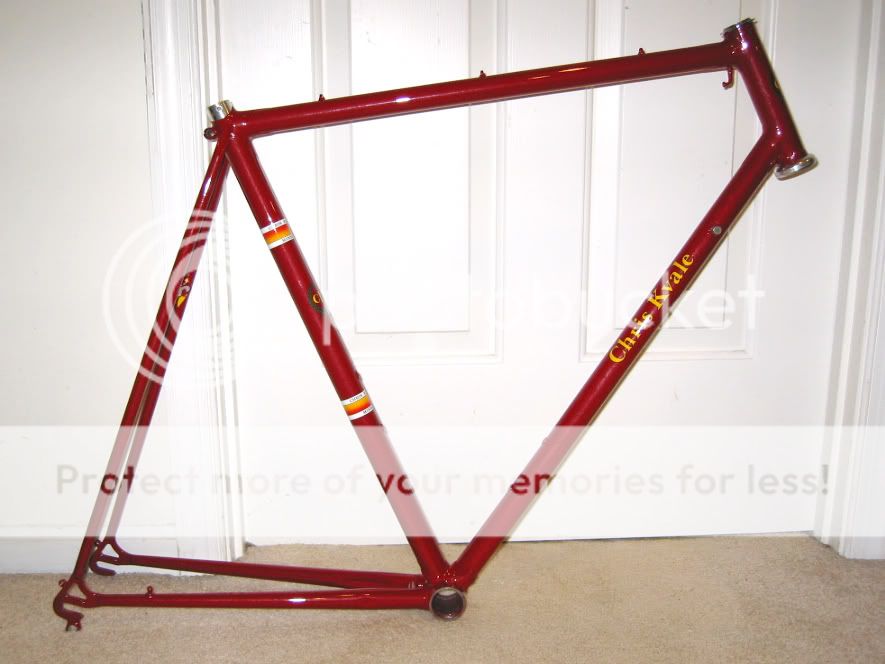
Chris Kvale before:
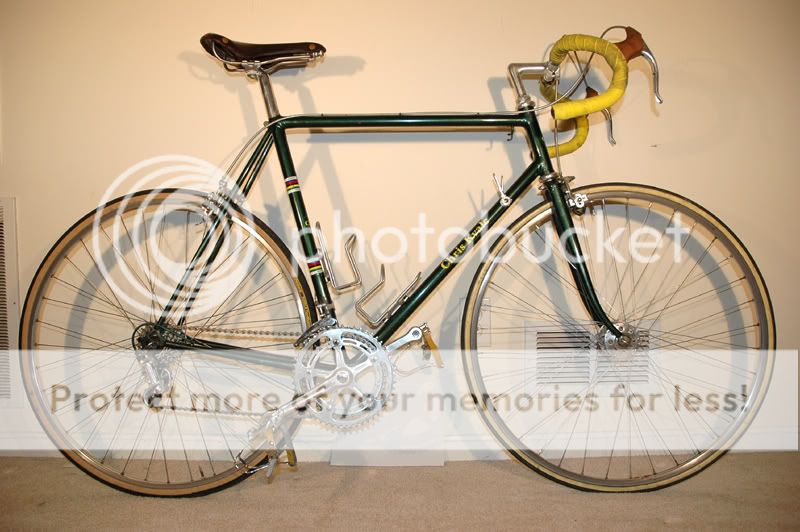
After:
-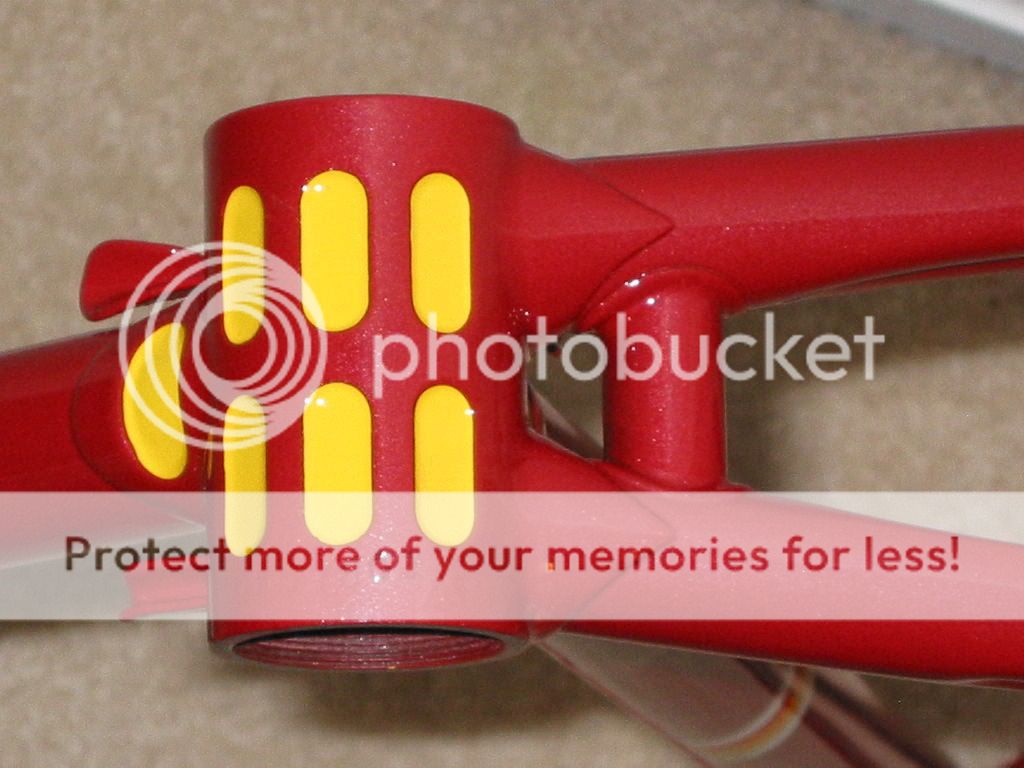
Excellent service. Turnaround time was less than a month. $449 to strip/paint with shipping, clear coat, decaling etc. A real craftsman. Also does brazeons etc. And builds frames. Takes summers off. Minneapolis. 612-724-8843
And I bet the good Dr. Deltron has something to add here
After:
-
Excellent service. Turnaround time was less than a month. $449 to strip/paint with shipping, clear coat, decaling etc. A real craftsman. Also does brazeons etc. And builds frames. Takes summers off. Minneapolis. 612-724-8843
And I bet the good Dr. Deltron has something to add here
05-23-07 | 12:45 PM
#4
If the original builder still paints bikes like Chris Kvale or you have a bike painted by Joe Bell (sachs) I think it is cool to get them to paint it. (I am not sure i would get a Marinoni painted by Marinoni; however, unless they would agree to use period reproduction decals; they usually update)
Dr. Deltron does excellent work and offers a competitive price. That Chris Kvale job seems like a really good price and I wonder if you only get that for his bikes.
I would also try and go with someone in your area to avoid shipping. Southwest frameworks does nice work (check out Cuda2k's serotta and Lotek's Pogliaghi pista). Cycle art is expensive, but can do almost anything including chrome and has a huge library of decals so probably has a quicker turn around if you have something obscure that needs hard to get reproductions.
I made the decision to go with Dr. Deltron because he does great work and the price was right, plus he was willing to do the painful decal repos which local painters were not willing to do.
__________________
1 Super Record bike, 1 Nuovo Record bike, 1 Pista, 1 Road, 1 Cyclocross/Allrounder, 1 MTB, 1 Touring, 1 Fixed gear
1 Super Record bike, 1 Nuovo Record bike, 1 Pista, 1 Road, 1 Cyclocross/Allrounder, 1 MTB, 1 Touring, 1 Fixed gear
05-23-07 | 01:10 PM
#5

Unique Vintage Steel


Joined: May 2005
Posts: 11,591
Likes: 287
From: Allen, TX
Bikes: Kirk Frameworks JKS-C, Serotta Nova, Gazelle AB-Frame, Fuji Team Issue, Surly Straggler
David Cheakas (SouthwestFrameworks.com)
Before:

After:


I've sticked this for the time being. Will probably eventually unsticky it and move the link into the C&V Link Sticky after we get a good list developed. Since we have so many stickies already I've at least temporarly dropped the "Where'd you Ride Today" sticky and added that link to the C&V Link thread's first post.
Before:
After:
I've sticked this for the time being. Will probably eventually unsticky it and move the link into the C&V Link Sticky after we get a good list developed. Since we have so many stickies already I've at least temporarly dropped the "Where'd you Ride Today" sticky and added that link to the C&V Link thread's first post.
 05-23-07 | 01:56 PM
#6

If I own it, I ride it
Joined: Nov 2005
Posts: 5,685
Likes: 820
From: Cardinal Country
Bikes: Lejeune(14), Raleigh, Raysport, Jan De Reus, Gazelle, Masi, B. Carr�(4), Springfield, Greg Lemond, Andre Bertin, Schwinn Paramount
Originally Posted by cyclotoine
If the original builder still paints bikes like Chris Kvale or you have a bike painted by Joe Bell (sachs) I think it is cool to get them to paint it. (I am not sure i would get a Marinoni painted by Marinoni; however, unless they would agree to use period reproduction decals; they usually update)
Dr. Deltron does excellent work and offers a competitive price. That Chris Kvale job seems like a really good price and I wonder if you only get that for his bikes.
I would also try and go with someone in your area to avoid shipping. Southwest frameworks does nice work (check out Cuda2k's serotta and Lotek's Pogliaghi pista). Cycle art is expensive, but can do almost anything including chrome and has a huge library of decals so probably has a quicker turn around if you have something obscure that needs hard to get reproductions.
I made the decision to go with Dr. Deltron because he does great work and the price was right, plus he was willing to do the painful decal repos which local painters were not willing to do.
Dr. Deltron does excellent work and offers a competitive price. That Chris Kvale job seems like a really good price and I wonder if you only get that for his bikes.
I would also try and go with someone in your area to avoid shipping. Southwest frameworks does nice work (check out Cuda2k's serotta and Lotek's Pogliaghi pista). Cycle art is expensive, but can do almost anything including chrome and has a huge library of decals so probably has a quicker turn around if you have something obscure that needs hard to get reproductions.
I made the decision to go with Dr. Deltron because he does great work and the price was right, plus he was willing to do the painful decal repos which local painters were not willing to do.
That said, Franklin Frame in Ohio is an excellent place to have your frame refinished.
05-23-07 | 02:03 PM
#7
59'er
Joined: Oct 2005
Posts: 3,307
Likes: 12
From: Alexandria, IN
Bikes: LeMond Maillot Jaune, Vintage Trek 520 (1985), 1976 Schwinn Voyageur 2, Miyata 1000 (1985)
Originally Posted by cuda2k
David Cheakas (SouthwestFrameworks.com)
Before:
After:
I've sticked this for the time being. Will probably eventually unsticky it and move the link into the C&V Link Sticky after we get a good list developed. Since we have so many stickies already I've at least temporarly dropped the "Where'd you Ride Today" sticky and added that link to the C&V Link thread's first post.
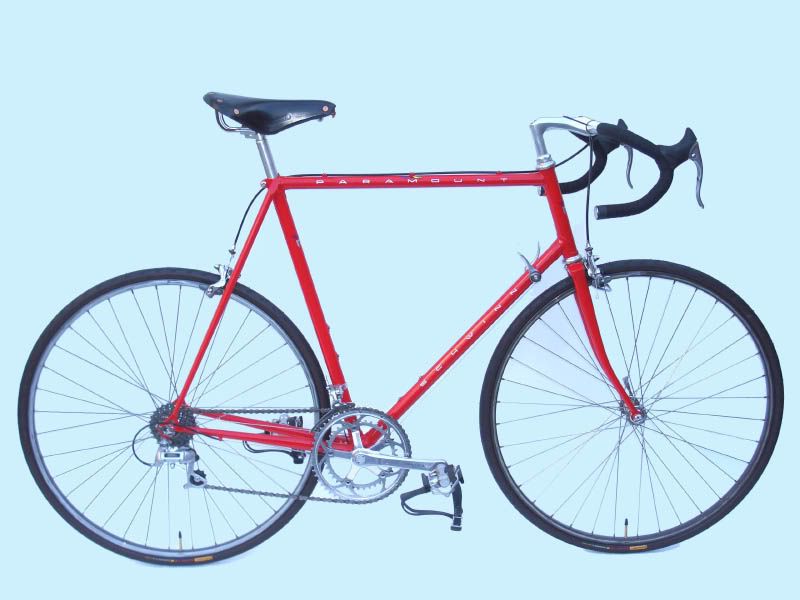
Whaaat? Not Blue?

Man, that's a pretty red.
__________________

05-23-07 | 03:00 PM
#8
Decrepit Member
Joined: Aug 2005
Posts: 10,488
Likes: 92
From: Santa Rosa, California
Bikes: Waterford 953 RS-22, several Paramounts
Before:
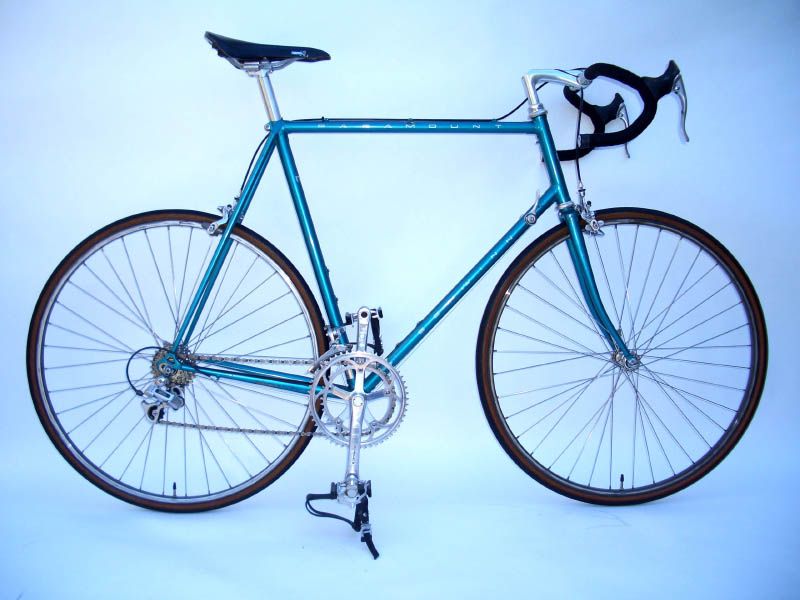
After:
Stripped, prepped, and painted by Mark Bunten (Dr.Deltron)
Located near Monterey, CA. Contact via BF PM.
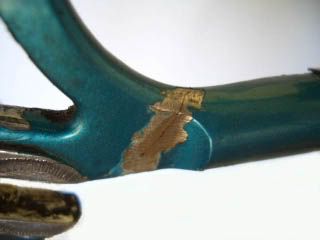
High quality work and reasonable pricing. It took a little longer than estimated, but Dr.D found a hairline crack in right rear dropout that needed repair and recommended Paul Sadoff (Rock Lobster Cycles) in Santa Cruz to perform the necessary surgery, which was done to perfection.
Highly recommended.
After:
Stripped, prepped, and painted by Mark Bunten (Dr.Deltron)
Located near Monterey, CA. Contact via BF PM.
High quality work and reasonable pricing. It took a little longer than estimated, but Dr.D found a hairline crack in right rear dropout that needed repair and recommended Paul Sadoff (Rock Lobster Cycles) in Santa Cruz to perform the necessary surgery, which was done to perfection.
Highly recommended.
Last edited by Scooper; 05-23-07 at 03:06 PM.
05-23-07 | 03:30 PM
#9
Guest
Posts: n/a
Originally Posted by rmikkelsen
And I bet the good Dr. Deltron has something to add here
All I can say is ... ho-hum.
It went from blue to red. It was ugly, now it's a nice single color. Etc, etc, etc.
Where's the creativity in THAT?!
I know, restore repops are the "bread & butter" of bike painting, but once in a while, a good painter needs to flex some creative muscles. And that's what separates the painters from the artists.
Granted, my life has always been, how shall I say, unusual!
I spent my formative, pre-teen years hanging out at my Dads bar. A biker bar at that. I was always amazed at the paint schemes I would see on the hogs parked out front. Paul at Rock Lobster Cycles says that I have a style unlike other painters, and those Hell's Angels bikes were part of that.
So I'm just at home with the "Angels" as I am working the Lodge at Pebble Beach or the Bohemian Grove.
I just have to shave & get a haircut before I do the latter.

(the wife says I "clean up well")
But back to painting. Mrs East Hill's Raleigh mixte is my next creative victim .. er ..patient!
It'll be the Queen of all Mixte's!
I'm still going through withdrawls about actually selling it.

But she sent money, so it IS hers now. And I want it to be as special for her as I wanted it to be for me.
Now I'm not very "web literate", so I haven't had the funds to have a web savvy person update my online portfolio, but here are the samples I do have posted.
https://mbent.net/cycles/paint_gallery/index.html
And back "in the day" I was well known for introducing the StickFace badges like the Gargoyle I did for Fender1's Trek. Brian Bayliss is a big fan of those too!
So when considering a "painter", check their portfolio to see what's possible.
And of course, shipping is a rapidly growing concern. It can run a C note to get a frame from one Coast to the other and back.
And the price of PAINT is going up, right along with the price of gasoline! YIKES!
$300 for a gallon of clear!

Sure, I could use "cheaper" paint, but that's what it is, cheaper paint!
I'm not going to spend the time I do in prep, to cover it with lesser quality paint!
Just the "snob" inme shining through.
")
Thanks for reading my rant! And THANK YOU to all who have/are sending ME their frame to paint!
And I think we DO have a paint "Sticky" in the works.
Now get off your computer and GO RIDE!!!!
05-24-07 | 08:08 AM
#12
Guest
Posts: n/a
Originally Posted by Freud
Anyone know of a good tutorial for painting the frame yourself?
Up along the top of the page is a "Search the Forums" option.
Search for "painting" and you'll find quite a bit.
Or you can search all my posts, but that might be too distracting.
I've answered MANY questions about painting a bike yourself.
Have FUN, amd don't be afraid to get creative!
05-24-07 | 09:53 AM
#13

The Improbable Bulk
Joined: Jul 2005
Posts: 8,379
Likes: 7
From: Wilkes-Barre, PA
Bikes: Many
Originally Posted by cyclotoine
I made the decision to go with Dr. Deltron because he does great work and the price was right, plus he was willing to do the painful decal repos which local painters were not willing to do.
You seem to have missed the part about before and after pic...
I still am amazed that you went through the expense of painting for 2 reasons.
1) You have never ridden the bike.
2) You have never even seen the bike in person... and my photographic skills are suspect at best!
I am glad for you that Dr. D didn't report finding damage under that ghastly rattle can paint the frame was hidden under.
__________________
Slow Ride Cyclists of NEPA
People do not seem to realize that their opinion of the world is also a confession of character.
- Ralph Waldo Emerson
Slow Ride Cyclists of NEPA
People do not seem to realize that their opinion of the world is also a confession of character.
- Ralph Waldo Emerson
05-24-07 | 11:11 AM
#14
Originally Posted by Little Darwin
I am glad for you that Dr. D didn't report finding damage under that ghastly rattle can paint the frame was hidden under.
And oh, did I forget to mention there was a typo in the decals when they got back from the printer? It's not so bad; you'll get to meet a lot of people explaining why your downtubes say "Cocky".
05-24-07 | 12:59 PM
#16
Guest
Posts: n/a
Why do I paint bikes?
This is just something I was calculating the other day.
I then asked myself, "what the heck am I doing?"
Answer is, What I love to do!
Taking the precision made center fixture of a highly eco-friendly mode of personal transportation and making it stand out in any gathering of said vehicles! Or anywhere, for that matter.
Bicycles!
Fancyshmancy bicycles.
It's what I do.
anyway . . . . . . . . . .here's my paint rant:
In order to quote the price of the paintjob,
I would say that
A) No matter who paints it, it'll easily run $300+ for a quality paintjob. Decals, if you can find them, can run $75+. And THAT particular color could add another hundred.
B) As it looks to be a carbon frame, the prep is HAND sanding. That would likely add to the price as well.
Painting a bike, when not done at the factory of origin, requires a fairly elaborate set-up, to do quality work. Broken down as follows;
How many frames do I have to paint, just to have a place to paint & make a buck?
Rent = $1,000/month. . . Primer =$250/gallon, Color = $100/pint, Clear = $300/gallon.
Overhead = $1,650
Basic single color = $300
1650 / 300 = 5.5
(round to 6) X $100 (average 10 hous of frame handling time @ $10/hr)
= $600 / $300 per frame = 2
That's 2 bikes/week for the MONTH @ $10/hour
That's the job description.
$10/hr, way out East by car, spraying VOC's for 20-30 hours a week.
The commute (by car ) is 30 miles, round trip, in the opposite direction from where the rest of my life is.
So I either take;
A) Toxic $10/hr bike job far away
or...
B) Paint kitchens & bathrooms for $40/hour, in my neighborhood.
ODD, ... you're NOT me!
Me? .. I'm ODD!
A)! Don't ask me why, I just have bicycle paint in my veins!

 . .
. .
Gad, I started this paint rant as a reply to an email inquiry!
But now we have a bike paint "sticky"!
and being a painter, I've taken it personally! . ARGH, I'm over limit on SMILEYS!!!!!!!!!!!!!!!!!
I then asked myself, "what the heck am I doing?"
Answer is, What I love to do!
Taking the precision made center fixture of a highly eco-friendly mode of personal transportation and making it stand out in any gathering of said vehicles! Or anywhere, for that matter.
Bicycles!
Fancyshmancy bicycles.
It's what I do.
anyway . . . . . . . . . .here's my paint rant:
In order to quote the price of the paintjob,
I would say that
A) No matter who paints it, it'll easily run $300+ for a quality paintjob. Decals, if you can find them, can run $75+. And THAT particular color could add another hundred.
B) As it looks to be a carbon frame, the prep is HAND sanding. That would likely add to the price as well.
Painting a bike, when not done at the factory of origin, requires a fairly elaborate set-up, to do quality work. Broken down as follows;
How many frames do I have to paint, just to have a place to paint & make a buck?
Rent = $1,000/month. . . Primer =$250/gallon, Color = $100/pint, Clear = $300/gallon.
Overhead = $1,650
Basic single color = $300
1650 / 300 = 5.5
(round to 6) X $100 (average 10 hous of frame handling time @ $10/hr)
= $600 / $300 per frame = 2
That's 2 bikes/week for the MONTH @ $10/hour
That's the job description.
$10/hr, way out East by car, spraying VOC's for 20-30 hours a week.
The commute (by car
) is 30 miles, round trip, in the opposite direction from where the rest of my life is.So I either take;
A) Toxic $10/hr bike job far away
or...
B) Paint kitchens & bathrooms for $40/hour, in my neighborhood.
ODD, ... you're NOT me!
Me? .. I'm ODD!
A)! Don't ask me why, I just have bicycle paint in my veins!
. . Gad, I started this paint rant as a reply to an email inquiry!
But now we have a bike paint "sticky"!
and being a painter, I've taken it personally! . ARGH, I'm over limit on SMILEYS!!!!!!!!!!!!!!!!!
05-24-07 | 01:42 PM
#17
Unique Vintage Steel
Joined: May 2005
Posts: 11,591
Likes: 287
From: Allen, TX
Bikes: Kirk Frameworks JKS-C, Serotta Nova, Gazelle AB-Frame, Fuji Team Issue, Surly Straggler
Dr. Deltron, you have all the respect in the world for me for doing what you love regardless of the financial compensation. If more people did that, it would be a better world over all. I've rattle-canned a frame of my own an know how much work and cost goes into that DIY job, so when I get quotes of $300 or higher that is completely reasonable. And oh do I know about extra paint costs. I had to go and pick a tri-coat color for the Serotta.
05-25-07 | 12:09 AM
#18
after reading that materials list you must paint a lot of bikes. the last 3 bikes I painted took a pint or less for each step(etch primer,primer , base color ,clear).I just wonder how mutch things will change when we have to use waterborn paints. I am lucky I work at a body shop with a full Dupont mixing system on site and I have painted cars for over 30 years so painting my bikes is fun and recreational. you do great work and I know you will continue to do so because you take pride in your work.Goodluck. p. s. I built Easthills commuter bike trailer.
05-25-07 | 01:15 PM
#19
Senior Member
Joined: Sep 2006
Posts: 459
Likes: 0
From: Plaistow, NH
Bikes: '78 Chris Kvale, '87 Paramount
Originally Posted by cyclotoine
That Chris Kvale job seems like a really good price and I wonder if you only get that for his bikes.
05-26-07 | 11:19 AM
#20

Senior Member

Joined: Jul 2006
Posts: 11,478
Likes: 4,884
From: San Jose (Willow Glen) Ca
Bikes: Kirk Custom JK Special, 86 De Rosa Pro, '84 Team Miyata,(dura ace old school) 80?? SR Semi-Pro 600 Arabesque
How to paint a frame? The best post i've found
Here is a long ago post from Dr. D.... I used it as a good guide for doing a rattle can paint job in my Nishiki project ( https://www.bikeforums.net/classic-vintage/293760-my-first-build-nishiki-international.html ) I translated from pro-auto paint to rattle can ....i.e PPG DPLF (Ditzler Primer Lead Free) = rattle can primer, but the prep and technique is the same
Here is a long ago post from Dr. D.... I used it as a good guide for doing a rattle can paint job in my Nishiki project ( https://www.bikeforums.net/classic-vintage/293760-my-first-build-nishiki-international.html ) I translated from pro-auto paint to rattle can ....i.e PPG DPLF (Ditzler Primer Lead Free) = rattle can primer, but the prep and technique is the same
Originally Posted by Dr.Deltron
OK, but what I use is NOT "relatively safe" by any means! It contains isocyanates (read CYANIDE)! But it sure is durable for paint. Powdercoatingis the most "durable" finish for a bike frame;i.e. harder than heck to chip!
1) I start by removing the old finish; Paint on steel, I have it sand blasted w/60 mesh. Aluminum or Ti, I use Jasco Paint & Epoxy remover. (also good for removing powdercoating as blasting will likely damage your frame because it's so abrasion resistant) Carbon fibre, hand sand with 60 grit for the brunt of the removal. Then 220. Then 320.
2) Then I spray a couple of coats of PPG DPLF (Ditzler Primer Lead Free) in an appropriate color. On blasted steel, do this AS SOON AS POSSIBLE! The more time between blasting & priming, the more likely rust will happen sooner!
3) Now that the first shot of primer is on, I can take my time and clean up all the ****ers. I use ultrafine spot putty to fill rust pits, brazing holes and the like. It's like Bondo, only a finer consistency. You have to make little batches because it hardens in about 5-10 minutes. (you add a catalyst, just like regular Bondo)
4) Once that's all on there, I use 320 wet/dry and sand all the bondo spots smooth. Then I work around the rest of the frame and make it all nice and smooth. I like to use tools like a rounded point paint mixing stick that has about a 3/8" diameter at the tip to go around lugs and such. I also ahve a set of Tadpole sanding blocks for all the other tricky areas. I usually tear the sheet of sandpaper into about 2"X2" squares for use with the Tadpoles.
5) Now the frame is cleaned with 3M Wax & Grease remover as per instructions on can. I wear latex gloves to keep that stuff off my skin AND the fingerprints off the frame.
6A) READY FOR PAINT. I start with a fresh coat of DPLF primer thinned about 10-20% with 860 or 870. The frame is mounted on a special stand that has a 1" peg on top that I slide the headtube over to hold it, starting with the frame upside down. I begin by spraying around the BB and then the rear drop-outs, the brake bridge and then the seat cluster. Then I go go back to the BB and connect them to the drop-outs, and then the seat stays. Next is the headtube area. Now I spray the downtube, the top tube and the seat tube.
6B) I go to the other side of the frame and repeat the process, starting at the BB.
7A) I put my fingers in the BB shell & the seat tube and carefully flip the frame right side up and put it back on the peg.
7B) I start on the left side of the frame and begin at the seat cluster. I do the brake bridge, drop-outs & top of the BB. Then connect the seat cluster to the drop-outs, and then the chainstays. Next I spray the seat tube, top tube, head tube and then the downtube.
7C) I go to the right side of the frame and start at the seat cluster and repeat 7B to get a nice even coat.
I use an HVLP deatil gun with the fan pattern set on round. It takes about 7-10 minutes to spray ONE coat.
If I don't have any runs*, I wait about an hour before spraying Sikkens color(s) in the same pattern as above. I have turned the frame upside down again.
*IF I have any runs, I let the frame hang out overnight to cure. The next day I sand the runs smooth, using a small block of hardwood and being carefull to ONLY sand the run itself. I try not to sand through the primer down to the frame!
The window for DPLF is about 24 hours so I don't have to sand the whole frame again, just the runs.
8) I spray 2-3 coats of Sikkens with about 15 minutes "flash"time between coats. More time if the coats are thick, which ideally, they shouldn't be.
9) I wait 1-2 hours and then spray 3 coats of PPG 2042 clear in the manner described above. About 20-30 minutes flash time between coats. I try to get the last coat on quickly & evenly so that there are no dry or dusty spots and not so thick as to get runs. Then there won't be any time wasted trying to sand/polish the final finish.
10) Let the frame hang on the painting peg or on a peg elsewhere for about a week. If you can make an imprssion in the paint with your fingernail, let it hang some more. I usually check somewhere on the drop-out where the axle will be. Autobody shops have the luxury of "baking" the finished paint by heating the paint booth to about 140 degrees for about an hour.
Notes;
1) If you get runs in metallic/pearl colors, you will have to sand and respray those spots. Sanding metallic/pearl colors will scratch the flakes and clearing over that will NOT make it go away.
If at all possible, DO NOT SAND ANY METALLIC/PEARL COLORS!
2) If you want to add decals, pin striping etc; spray the color and only spray 1 (ONE) coat of clear. Let the frame sit overnight. Add decals/stripes etc and then go ahead and spray 2-3 more coats of clear over all that. If you are doing other art with say artists acrylics (in tubes) let the frame hang overnight (or 2) THEN SCUFF WITH FINE SCOTCHBRITE PADS. Clean with Wax & Grease remover.
THEN add your art/decals/stripes etc. Gold extra fine point paint pens work great as long as your careful. Slip? CAREFULLY remove the offending glitch with a paper towel dipped in 860/870.
Now you can clear with the final 2-3 coats of clear and the clear will stick properly. If you do the final work within 24 hours, you shouldn't have to scuff the whole frame.
Catalysed paints have a "window" of time where the next coat will stick without having to scuff or sand. Go outside that window and you WILL have to scuff/sand before applying the next coat. Got that?
3) DO NOT spray the final clear coats at the end of the day if it is going to be cold that evening. You run the risk of a NASTY problem called SOLVENT POPPING!
That happens when the paint skins over before the solvents have had a chance to escape. The result is little tiny "champagne" bubbles in the clear. They can NOT be sanded out as they are deep in the clear coats.
YOU WILL HAVE TO START ALL OVER AGAIN!!!
Dirtdrop, hope that answers some of your questions! If NOT, let me know and I'll do my best to help you out! Or ANY ONE for that matter. You can PM me, email me at mb@mbent.net or call me 831-521-3801 California time.
Cheers & good luck to all,
Dr. Deltron
05-27-07 | 08:03 PM
#21

Dr. Deltron posted all of that in response to my dumb questions and he has given me more help by PM and by telephone. He's never made a dime on me. What a guy!
I'm in the process of painting my Carlton for the second time. I wasn't happy with the way it came out the first time, so I stripped it and started over. I like to do things myself, but I don't ever want to paint a bike again. It's tedious and time consuming, I'm working with dangerous materials without the proper safety gear and the results will never be anywhere near as nice as what Dr. D can produce with all of his experience.
I'm in the process of painting my Carlton for the second time. I wasn't happy with the way it came out the first time, so I stripped it and started over. I like to do things myself, but I don't ever want to paint a bike again. It's tedious and time consuming, I'm working with dangerous materials without the proper safety gear and the results will never be anywhere near as nice as what Dr. D can produce with all of his experience.
05-29-07 | 02:09 PM
#22
59'er
Joined: Oct 2005
Posts: 3,307
Likes: 12
From: Alexandria, IN
Bikes: LeMond Maillot Jaune, Vintage Trek 520 (1985), 1976 Schwinn Voyageur 2, Miyata 1000 (1985)
I keep checking to see if there is a frame painter in the Indianapolis area. I know a guy who paints cars so that might work.
__________________
05-29-07 | 02:28 PM
#23

Senior Member
Joined: Dec 2001
Posts: 17,687
Likes: 12
From: n.w. superdrome
Bikes: 1 trek, serotta, rih, de Reus, Pogliaghi and finally a Zieleman! and got a DeRosa
David Cheakas (again)
before and after 1983/4 Pogliaghi pista.
Before

After

Marty
before and after 1983/4 Pogliaghi pista.
Before
After
Marty
__________________
Sono pi� lento di quel che sembra.
Odio la gente, tutti.
Want to upgrade your membership? Click Here.
Sono pi� lento di quel che sembra.
Odio la gente, tutti.
Want to upgrade your membership? Click Here.
05-31-07 | 08:39 AM
#24
Senior Member
Joined: Nov 2006
Posts: 160
Likes: 2
From: In Baton Rouge, Louisiana for work, but home is Texas!
Bikes: 2010 Trek 3500
Originally Posted by cuda2k
David Cheakas (SouthwestFrameworks.com)
Before:
After:
I've sticked this for the time being. Will probably eventually unsticky it and move the link into the C&V Link Sticky after we get a good list developed. Since we have so many stickies already I've at least temporarly dropped the "Where'd you Ride Today" sticky and added that link to the C&V Link thread's first post.
Before:
After:
I've sticked this for the time being. Will probably eventually unsticky it and move the link into the C&V Link Sticky after we get a good list developed. Since we have so many stickies already I've at least temporarly dropped the "Where'd you Ride Today" sticky and added that link to the C&V Link thread's first post.
I actually have a frame over at David's now. Here is the before. I will post the after here and on my photo site. https://www.pbase.com/cparker75/volkscycle
__________________
Carvey Parker
Texan Till I Die!
2010 Trek 3500
Miss my 2006 Specialized Tricross Comp
Carvey Parker
Texan Till I Die!
2010 Trek 3500
Miss my 2006 Specialized Tricross Comp
05-31-07 | 10:08 PM
#25
Junk Collector
Joined: Jun 2005
Posts: 973
Likes: 2
From: Chicago IL
Bikes: 1987 Schwinn Circuit, 2012 Colnago M10, 1990 Schwinn CrissCross