


Galled seatpost? Cleaning up a seattube 501:
 04-06-09, 06:39 AM
#1


Senior Member
Thread Starter

Join Date: Aug 2003
Location: Tampa, Florida
Posts: 13,954
Mentioned: 40 Post(s)
Tagged: 0 Thread(s)
Quoted: 413 Post(s)
Likes: 0
Liked 109 Times
in
78 Posts
Galled seatpost? Cleaning up a seattube 501:
No 101's for this project. Graduate level wrenching on this one!!!
So, if your like me you've had your share of bike with seatposts that have been tore up from rough seat tubes. In this brief tutorial we'll go over cleaning up a seat tube.
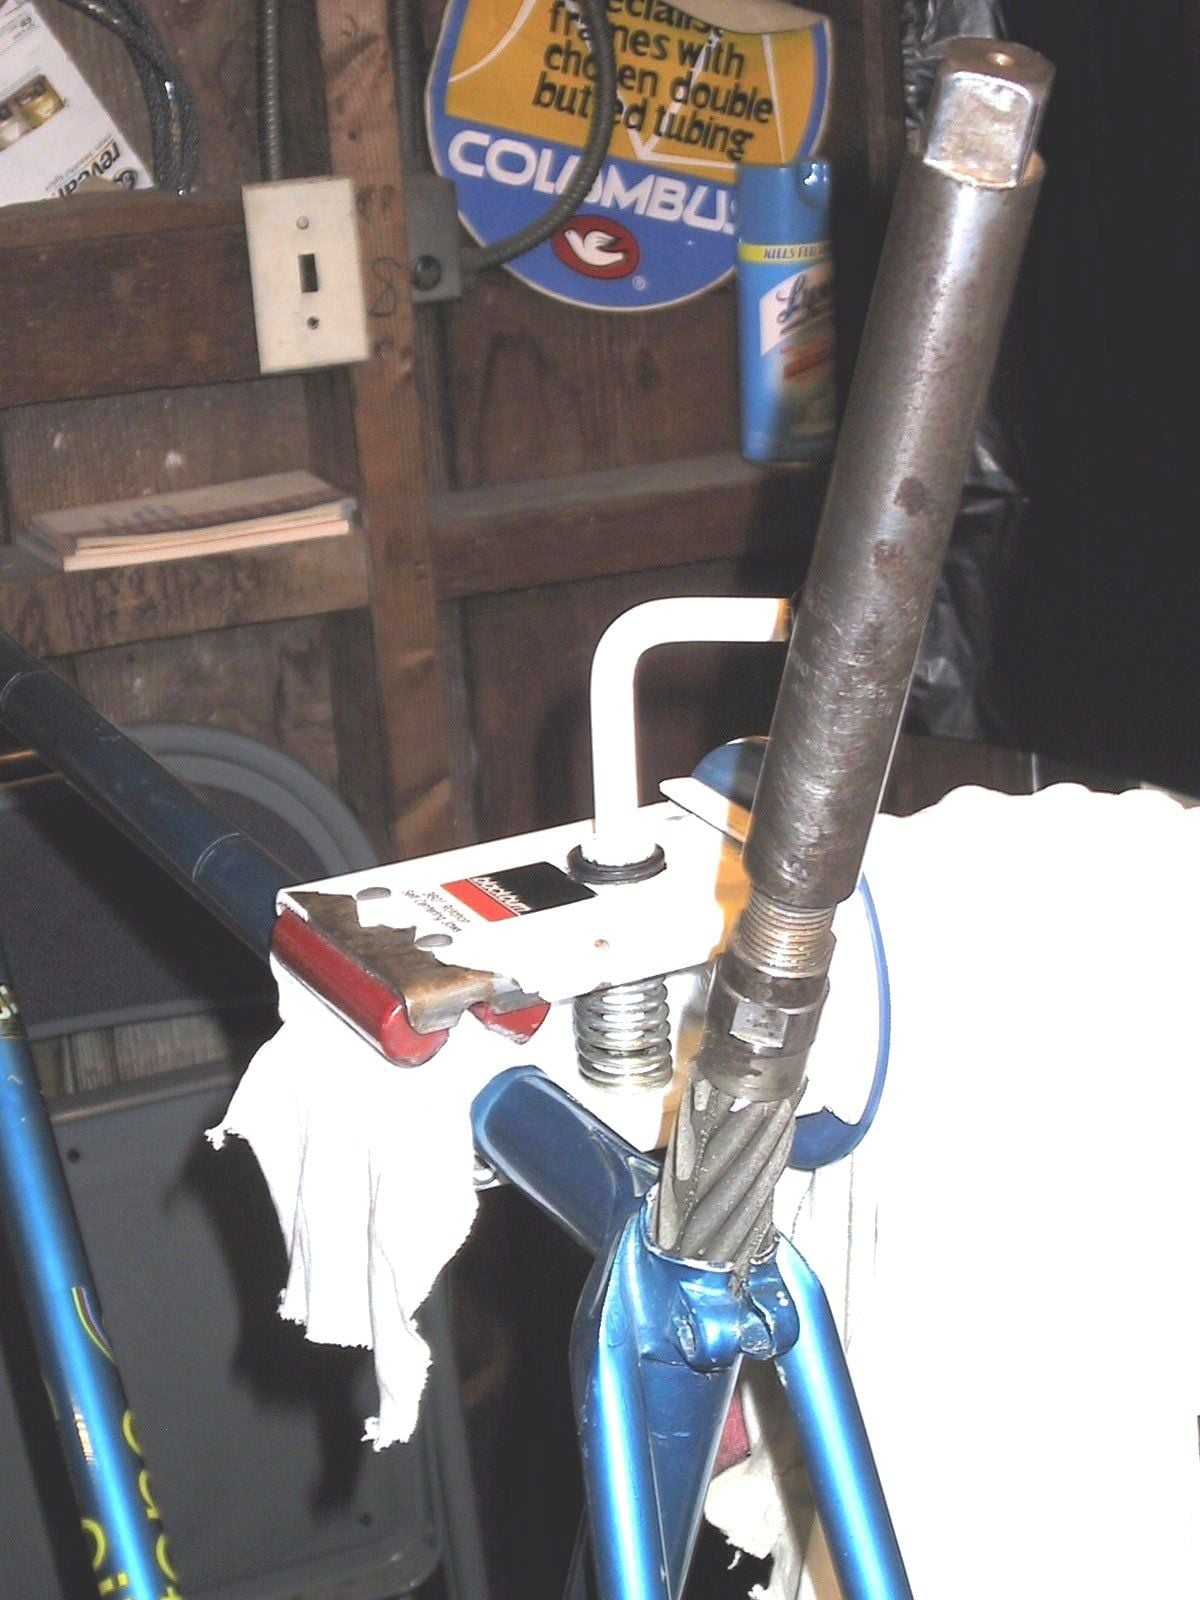
1. Remove binder bold. Slot in seat tube MUST be parralell form top to bottom. If its not parralell spread it open. I use a big screw driver. A seatpost can be inserted a half inch or and rocked back and forth. Spread until space is even.


Degrease the inside of the tube. It needs to be very clean!! If it isnt your tools will get gummed up very quickly!!
Now we need to find the rough spots. I marker up a seatpost with sharpie or other suitable fine smelling marker. Insert seatpost and remove. Compare marks on seatpost with the inside of the tube to locate trouble areas.
VERY IMPORTANT: DO NOT twist the post as its inserted and removed. Straight in, straight out.
Markered up.


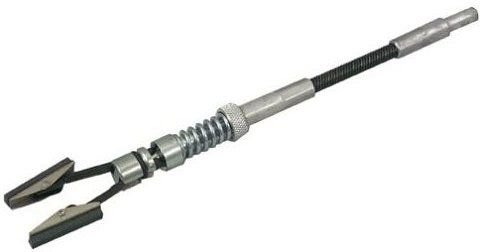
Now we know where the high spots are. I primarily use 2 tools for cleaning up seat tubes, a 'b@stard file' and an automotive brake hone. The b@stard file I have is ~8" long, flat on one side and curved on the other. Its proper name may be a 5/8" b@stard file. Automtive brake hones attach to drill and spin to smooth the inside of calipers re-sealing. There are 2 types, the one like my picture and another with a bunch of small balls. When mine wears out I'll try the ball style.
File:

Brake hone:

So, if your like me you've had your share of bike with seatposts that have been tore up from rough seat tubes. In this brief tutorial we'll go over cleaning up a seat tube.
1. Remove binder bold. Slot in seat tube MUST be parralell form top to bottom. If its not parralell spread it open. I use a big screw driver. A seatpost can be inserted a half inch or and rocked back and forth. Spread until space is even.
Degrease the inside of the tube. It needs to be very clean!! If it isnt your tools will get gummed up very quickly!!
Now we need to find the rough spots. I marker up a seatpost with sharpie or other suitable fine smelling marker. Insert seatpost and remove. Compare marks on seatpost with the inside of the tube to locate trouble areas.
VERY IMPORTANT: DO NOT twist the post as its inserted and removed. Straight in, straight out.
Markered up.
Now we know where the high spots are. I primarily use 2 tools for cleaning up seat tubes, a 'b@stard file' and an automotive brake hone. The b@stard file I have is ~8" long, flat on one side and curved on the other. Its proper name may be a 5/8" b@stard file. Automtive brake hones attach to drill and spin to smooth the inside of calipers re-sealing. There are 2 types, the one like my picture and another with a bunch of small balls. When mine wears out I'll try the ball style.
File:
Brake hone:
Last edited by miamijim; 04-09-18 at 03:27 PM.
 04-06-09, 06:49 AM
#2
Senior Member
Thread Starter
Join Date: Aug 2003
Location: Tampa, Florida
Posts: 13,954
Mentioned: 40 Post(s)
Tagged: 0 Thread(s)
Quoted: 413 Post(s)
Likes: 0
Liked 109 Times
in
78 Posts
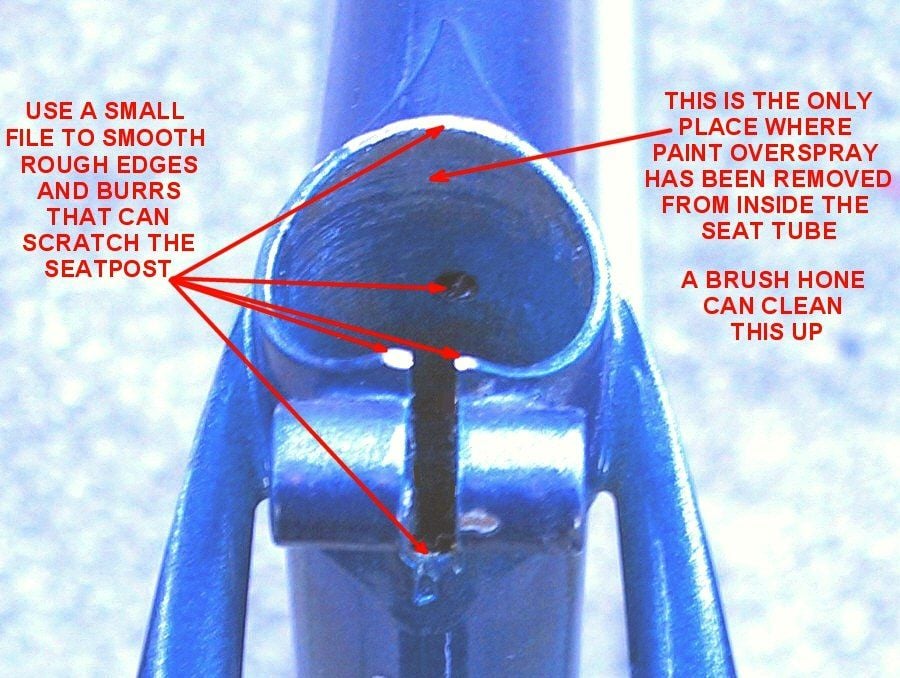
There are variety of areas that need attention. From left to right:
1. Top tube vent hole.
2. Seam where seat tube meets seat lug. Notice the smooth transition with no discernable line. This is good!!
3. Brazing point for seat stays. Yes, an external brazing point can cause issues!!
4. Seam where seat tube meets lug. Notice the line. This is NOT a smooth transition!!

Another reference photo. Again, notice the high spots:

Its very important to clean out the seat tube after every use of the file or hone. Your done when the post slides in and out easily. A marked up post will have have wide even marks once the tube is properly cleaned up. Keep in mind that this post has no grease so any issues will be very apparent!!

Greased up and ready to go. ESP insertion:
https://i.imgur.com/37f9M1Zs.mp4
.
.
.
1. Top tube vent hole.
2. Seam where seat tube meets seat lug. Notice the smooth transition with no discernable line. This is good!!
3. Brazing point for seat stays. Yes, an external brazing point can cause issues!!
4. Seam where seat tube meets lug. Notice the line. This is NOT a smooth transition!!
Another reference photo. Again, notice the high spots:
Its very important to clean out the seat tube after every use of the file or hone. Your done when the post slides in and out easily. A marked up post will have have wide even marks once the tube is properly cleaned up. Keep in mind that this post has no grease so any issues will be very apparent!!
Greased up and ready to go. ESP insertion:
https://i.imgur.com/37f9M1Zs.mp4
.
.
.
Last edited by miamijim; 04-09-18 at 03:49 PM.
 04-06-09, 10:34 AM
#5
Large Member
and another tip:
if you work with the bike clamped upside down, you can avoid those nasty filings getting into the BB without having to remove it. or you can plug the tube with a rag with a string attached above it, and hope to pull it up without dropping metals scraps down the tube. (maybe turn the bike upside down as you pull the tube rag out).
and grease both the tube and the post when you reassemble... I know Sheldon doesn't / didn't bother, saying it was like putting peanut butter on both pieces of the sandwich, but the top edge of the seat tube scrapes much of the grease away as you slide it in, leaving the very bottom of the seat post fairly unprotected if you only grease the post.
04-06-09, 10:44 AM
#6
Senior Member
Thread Starter
Join Date: Aug 2003
Location: Tampa, Florida
Posts: 13,954
Mentioned: 40 Post(s)
Tagged: 0 Thread(s)
Quoted: 413 Post(s)
Likes: 0
Liked 109 Times
in
78 Posts
and another tip:
if you work with the bike clamped upside down, you can avoid those nasty filings getting into the BB without having to remove it. or you can plug the tube with a rag with a string attached above it, and hope to pull it up without dropping metals scraps down the tube. (maybe turn the bike upside down as you pull the tube rag out).
and grease both the tube and the post when you reassemble... I know Sheldon doesn't / didn't bother, saying it was like putting peanut butter on both pieces of the sandwich, but the top edge of the seat tube scrapes much of the grease away as you slide it in, leaving the very bottom of the seat post fairly unprotected if you only grease the post.
if you work with the bike clamped upside down, you can avoid those nasty filings getting into the BB without having to remove it. or you can plug the tube with a rag with a string attached above it, and hope to pull it up without dropping metals scraps down the tube. (maybe turn the bike upside down as you pull the tube rag out).
and grease both the tube and the post when you reassemble... I know Sheldon doesn't / didn't bother, saying it was like putting peanut butter on both pieces of the sandwich, but the top edge of the seat tube scrapes much of the grease away as you slide it in, leaving the very bottom of the seat post fairly unprotected if you only grease the post.
04-06-09, 12:32 PM
#7
Senior Member

Join Date: Mar 2005
Location: Pinole, CA, USA
Posts: 17,392
Mentioned: 24 Post(s)
Tagged: 0 Thread(s)
Quoted: 443 Post(s)
Likes: 0
Liked 27 Times
in
25 Posts
I do exactly the same thing. Great minds think alike. Your brake hone needs new stones.
EDIT: My fill is a mill b@stard.
EDIT: My fill is a mill b@stard.
Last edited by Grand Bois; 04-06-09 at 12:37 PM.
04-06-09, 01:00 PM
#8
Senior Member
Thread Starter
Join Date: Aug 2003
Location: Tampa, Florida
Posts: 13,954
Mentioned: 40 Post(s)
Tagged: 0 Thread(s)
Quoted: 413 Post(s)
Likes: 0
Liked 109 Times
in
78 Posts
IIRC I only used the home on 3 or 4 seat tubes before the stones were dead.
04-06-09, 01:31 PM
#11
Highway Litter
Join Date: Feb 2009
Posts: 73
Mentioned: 0 Post(s)
Tagged: 0 Thread(s)
Quoted: 0 Post(s)
Likes: 0
Liked 0 Times
in
0 Posts
Officially called a "wheel cylinder hone". I would think most any auto parts place like autozone or napa would stock a stone kit. I think folks still rebuild wheel cylinders. So much is just "toss and replace" anymore.
Great video, BTW!
Great video, BTW!
04-06-09, 06:14 PM
#14

Old fart

Join Date: Nov 2004
Location: Appleton WI
Posts: 24,786
Bikes: Several, mostly not name brands.
Mentioned: 153 Post(s)
Tagged: 0 Thread(s)
Quoted: 3588 Post(s)
Liked 3,400 Times
in
1,934 Posts
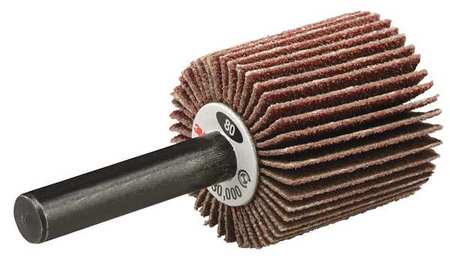
This is what I use:

It's adjustable from 27.0mm to 30.25mm and the blades ensure a circular cut so you're only taking off metal where it needs to be removed.
It's adjustable from 27.0mm to 30.25mm and the blades ensure a circular cut so you're only taking off metal where it needs to be removed.
04-06-09, 06:51 PM
#15
Bottecchia fan
Join Date: Aug 2003
Location: Colorado Springs, CO
Posts: 3,520
Bikes: 1959 Bottecchia Milano-Sanremo (frame), 1966 Bottecchia Professional (frame), 1971 Bottecchia Professional (frame), 1973 Bottecchia Gran Turismo, 1974 Bottecchia Special, 1977 Bottecchia Special (frame), 1974 Peugeot UO-8
Mentioned: 2 Post(s)
Tagged: 0 Thread(s)
Quoted: 33 Post(s)
Likes: 0
Liked 12 Times
in
9 Posts
I'm thinking that ain't cheap. How much does one of those go for?
__________________
1959 Bottecchia Milano-Sanremo(frame), 1966 Bottecchia Professional (frame), 1971 Bottecchia Professional (frame),
1973 Bottecchia Gran Turismo, 1974 Bottecchia Special, 1977 Bottecchia Special (frame),
1974 Peugeot UO-8, 1988 Panasonic PT-3500, 2002 Bianchi Veloce, 2004 Bianchi Pista
1959 Bottecchia Milano-Sanremo(frame), 1966 Bottecchia Professional (frame), 1971 Bottecchia Professional (frame),
1973 Bottecchia Gran Turismo, 1974 Bottecchia Special, 1977 Bottecchia Special (frame),
1974 Peugeot UO-8, 1988 Panasonic PT-3500, 2002 Bianchi Veloce, 2004 Bianchi Pista
04-06-09, 07:09 PM
#16
Old fart
Join Date: Nov 2004
Location: Appleton WI
Posts: 24,786
Bikes: Several, mostly not name brands.
Mentioned: 153 Post(s)
Tagged: 0 Thread(s)
Quoted: 3588 Post(s)
Liked 3,400 Times
in
1,934 Posts
New, they can run anywhere from about US$30 to over US$100. I bought that one from United Bicycle Tools many years ago for about US$40 I think. I picked up several more used ones (to cover sizes from 21mm to 27mm (and a ginormous 38mm - 42mm one) as a lot on eBay for about US$50 a couple years ago.
04-06-09, 08:05 PM
#18
Bottecchia fan
Join Date: Aug 2003
Location: Colorado Springs, CO
Posts: 3,520
Bikes: 1959 Bottecchia Milano-Sanremo (frame), 1966 Bottecchia Professional (frame), 1971 Bottecchia Professional (frame), 1973 Bottecchia Gran Turismo, 1974 Bottecchia Special, 1977 Bottecchia Special (frame), 1974 Peugeot UO-8
Mentioned: 2 Post(s)
Tagged: 0 Thread(s)
Quoted: 33 Post(s)
Likes: 0
Liked 12 Times
in
9 Posts
New, they can run anywhere from about US$30 to over US$100. I bought that one from United Bicycle Tools many years ago for about US$40 I think. I picked up several more used ones (to cover sizes from 21mm to 27mm (and a ginormous 38mm - 42mm one) as a lot on eBay for about US$50 a couple years ago.
__________________
1959 Bottecchia Milano-Sanremo(frame), 1966 Bottecchia Professional (frame), 1971 Bottecchia Professional (frame),
1973 Bottecchia Gran Turismo, 1974 Bottecchia Special, 1977 Bottecchia Special (frame),
1974 Peugeot UO-8, 1988 Panasonic PT-3500, 2002 Bianchi Veloce, 2004 Bianchi Pista
1959 Bottecchia Milano-Sanremo(frame), 1966 Bottecchia Professional (frame), 1971 Bottecchia Professional (frame),
1973 Bottecchia Gran Turismo, 1974 Bottecchia Special, 1977 Bottecchia Special (frame),
1974 Peugeot UO-8, 1988 Panasonic PT-3500, 2002 Bianchi Veloce, 2004 Bianchi Pista
04-09-18, 03:51 PM
#19
Senior Member
Thread Starter
Join Date: Aug 2003
Location: Tampa, Florida
Posts: 13,954
Mentioned: 40 Post(s)
Tagged: 0 Thread(s)
Quoted: 413 Post(s)
Likes: 0
Liked 109 Times
in
78 Posts
I received a PM from Bob aka 'Sir Name' to update the pics... I think I got them all in proper order. Couldn't figure out how to embed the video at the end of post 2 so you'll have to click the link.
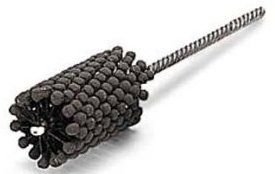
Also, I ditched the 'stone' style hone and have gone to the 'ball' style. The ball style doesn't clog up with debris like the flat stone style. And the flat stone style edges chip very easily.
Also, I ditched the 'stone' style hone and have gone to the 'ball' style. The ball style doesn't clog up with debris like the flat stone style. And the flat stone style edges chip very easily.
04-09-18, 04:00 PM
#20
working on my sandal tan

Join Date: Aug 2011
Location: CID
Posts: 22,629
Bikes: 1991 Bianchi Eros, 1964 Armstrong, 1988 Diamondback Ascent, 1988 Bianchi Premio, 1987 Bianchi Sport SX, 1980s Raleigh mixte (hers), All-City Space Horse (hers)
Mentioned: 98 Post(s)
Tagged: 0 Thread(s)
Quoted: 3871 Post(s)
Liked 2,568 Times
in
1,579 Posts
Great stuff, @miamijim. 
One thing I've done to open up a slightly collapsed seat tube is to insert a quill stem with a shim to take up most of the gap, and then tighten the bolt to "jack" it open.
One thing I've done to open up a slightly collapsed seat tube is to insert a quill stem with a shim to take up most of the gap, and then tighten the bolt to "jack" it open.

 04-29-18, 11:44 PM
#22
Senior Member
Join Date: Oct 2015
Location: PDX
Posts: 13,043
Bikes: Merz x 5 + Specialized Merz Allez x 2, Strawberry/Newlands/DiNucci/Ti x3, Gordon, Fuso/Moulton x2, Bornstein, Paisley,1958-74 Paramounts x3, 3rensho, 74 Moto TC, 73-78 Raleigh Pro's x5, Marinoni x2, 1960 Cinelli SC, 1980 Bianchi SC, PX-10 X 2
Mentioned: 267 Post(s)
Tagged: 0 Thread(s)
Quoted: 4512 Post(s)
Liked 6,384 Times
in
3,669 Posts
Half round Bastard is the coarse one, half round Mill Bastard is the fine version.
The coarse one is the one I use as it is hard to exert force to the side of the tube, so the coarse one works better. Then I chase with Scotchbrite on a gun barrel cleaner to smooth out and keep from scratching nice seatposts.
The coarse one is the one I use as it is hard to exert force to the side of the tube, so the coarse one works better. Then I chase with Scotchbrite on a gun barrel cleaner to smooth out and keep from scratching nice seatposts.
04-30-18, 01:21 AM
#23
verktyg

Join Date: Jul 2006
Location: SF Bay Area
Posts: 4,030
Bikes: Current favorites: 1988 Peugeot Birraritz, 1984 Gitane Super Corsa, 1980s DeRosa, 1981 Bianchi Campione Del Mondo, 1992 Paramount OS, 1988 Colnago Technos, 1985 RalieghUSA SBDU Team Pro
Mentioned: 207 Post(s)
Tagged: 0 Thread(s)
Quoted: 1036 Post(s)
Liked 1,238 Times
in
654 Posts
No 101's for this project. Graduate level wrenching on this one!!!
So, if your like me you've had your share of bike with seatposts that have been tore up from rough seat tubes. In this brief tutorial we'll go over cleaning up a seat tube.
Degrease the inside of the tube. It needs to be very clean!! If it isnt your tools will get gummed up very quickly!!
Now we need to find the rough spots. I marker up a seatpost with sharpie or other suitable fine smelling marker. Insert seatpost and remove. Compare marks on seatpost with the inside of the tube to locate trouble areas.
VERY IMPORTANT: DO NOT twist the post as its inserted and removed. Straight in, straight out.
Now we know where the high spots are. I primarily use 2 tools for cleaning up seat tubes, a 'b@stard file' and an automotive brake hone. The b@stard file I have is ~8" long, flat on one side and curved on the other. Its proper name may be a 5/8" b@stard file. Automtive brake hones attach to drill and spin to smooth the inside of calipers re-sealing. There are 2 types, the one like my picture and another with a bunch of small balls. When mine wears out I'll try the ball style.
Here's some additional info that I've posted over the years in regards to these issues.
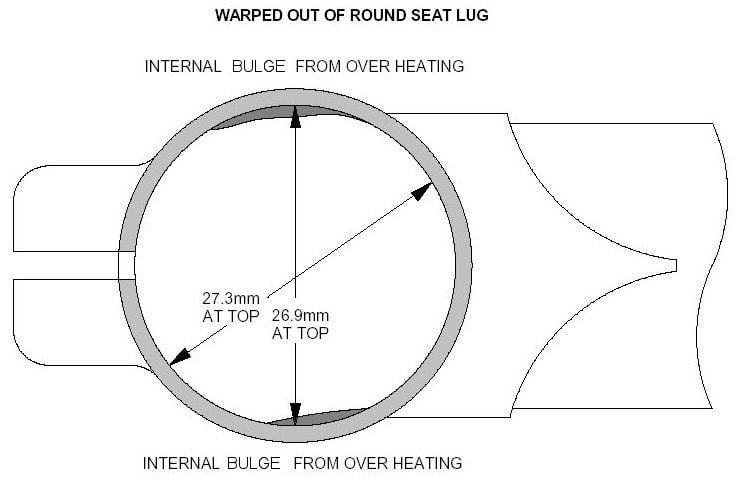
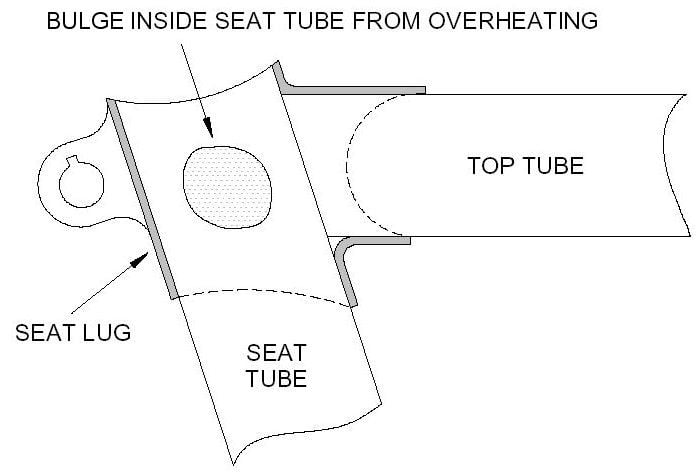
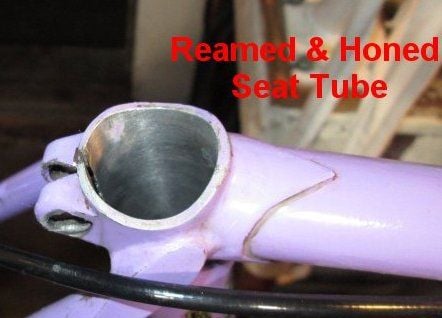
We machined a set of steel mandrels in the common seat post diameters, 26mm to 27.4m, to round out the top of the seat tubes. A great number of bikes and frames came with badly sized seat tubes, including a lot of the most sacred holy Italian marques. (yes, it's sacrilege but true)

After doing your step 1 recomendation - spreading the "ears" in the lugs, we would check the seat tubes with a mandrel. We found that many seat tubes were not only out of round but had bulges inside from over heating when the seat stays were brazed on. The mandrels removed much of the bulge.
Next we reamed the seat tubes then honed them with an automotive brake cylinder hone. Finally we made sure there were no burrs at the top or inside the seat tubes. I've used a fine tooth Swiss pattern 1/2 round or round files to do this. Fine tooth because the tops of the seat tubes tend to be hard from cooling down too fast and fine tooth files work better on the harder steel..

This was an NOS frame. Looks like they may have run an undersized reamer down the seat tube to remove excess paint but not cleaned things up.
I found my 26mm-32mm spiral flute adjustable reamer at a surplus tool shop back in 1975 for $5.

verktyg

__________________
Don't believe everything you think! History is written by those who weren't there....
Chas. ;-)
Don't believe everything you think! History is written by those who weren't there....
Chas. ;-)
Last edited by verktyg; 04-30-18 at 01:28 AM.
04-30-18, 01:35 AM
#24
verktyg
Join Date: Jul 2006
Location: SF Bay Area
Posts: 4,030
Bikes: Current favorites: 1988 Peugeot Birraritz, 1984 Gitane Super Corsa, 1980s DeRosa, 1981 Bianchi Campione Del Mondo, 1992 Paramount OS, 1988 Colnago Technos, 1985 RalieghUSA SBDU Team Pro
Mentioned: 207 Post(s)
Tagged: 0 Thread(s)
Quoted: 1036 Post(s)
Liked 1,238 Times
in
654 Posts
Seat Tube Nightmare
Continued from my previous post:
A few months ago I picked up a lilac 1971 Raleigh Competition on eBay. I'd planned on using it as beater for the dirt roads in the Eroica CA ride.
The seat tube and seatpost were in the worst condition that I've ever encountered in my 45 years of bike wrenching. Quickly remedied the problem... see last picture.


Shees! Hammer mechanic!

verktyg
A few months ago I picked up a lilac 1971 Raleigh Competition on eBay. I'd planned on using it as beater for the dirt roads in the Eroica CA ride.
The seat tube and seatpost were in the worst condition that I've ever encountered in my 45 years of bike wrenching. Quickly remedied the problem... see last picture.
Shees! Hammer mechanic!
verktyg
__________________
Don't believe everything you think! History is written by those who weren't there....
Chas. ;-)
Don't believe everything you think! History is written by those who weren't there....
Chas. ;-)
Last edited by verktyg; 04-30-18 at 01:38 AM.
04-30-18, 04:47 AM
#25
Senior Member

Join Date: May 2015
Location: Richmond VA area
Posts: 2,618
Bikes: '00 Koga Miyata Full Pro Oval Road bike.
Mentioned: 17 Post(s)
Tagged: 0 Thread(s)
Quoted: 475 Post(s)
Likes: 0
Liked 8 Times
in
7 Posts
Great info in this thread. Just out of curiousity, dont many oldschool shops have some type of reamer for this purpose? i dont remember actually ever doing it, but I could've sworn there were tools for the purpose. My current ride could use the treatment, btw.