


I need some guidance/advice from some home-made bike mechanics
 10-07-09, 09:17 AM
#26
Senior Member
Thread Starter

Join Date: Aug 2009
Location: Mississippi Coast
Posts: 812
Bikes: 198? Raleigh Technium 480, 1970 Raleigh Sports, Motobecane Nomade Sprint
Mentioned: 0 Post(s)
Tagged: 0 Thread(s)
Quoted: 0 Post(s)
Likes: 0
Liked 1 Time
in
1 Post
My local plastic surgeon?
But seriously, a bike shop should have them?
But seriously, a bike shop should have them?
 10-07-09, 09:43 AM
#27
cowboy, steel horse, etc

Join Date: Sep 2008
Location: The hot spot.
Posts: 44,870
Bikes: everywhere
Mentioned: 72 Post(s)
Tagged: 1 Thread(s)
Quoted: 12791 Post(s)
Liked 7,699 Times
in
4,087 Posts
Channel locks, or pipe wrench, etc on the knurled bottom nut of headset ONLY.
10-07-09, 09:47 AM
#28
Senior Member
Thread Starter
Join Date: Aug 2009
Location: Mississippi Coast
Posts: 812
Bikes: 198? Raleigh Technium 480, 1970 Raleigh Sports, Motobecane Nomade Sprint
Mentioned: 0 Post(s)
Tagged: 0 Thread(s)
Quoted: 0 Post(s)
Likes: 0
Liked 1 Time
in
1 Post
Ah, ok. I will try the screwdriver and hammer technique when I get home. I'll definitely be taking lots of pictures because once I get in there I'm sure I won't know what the hell I'm doing. 
10-07-09, 10:26 AM
#29
cowboy, steel horse, etc
Join Date: Sep 2008
Location: The hot spot.
Posts: 44,870
Bikes: everywhere
Mentioned: 72 Post(s)
Tagged: 1 Thread(s)
Quoted: 12791 Post(s)
Liked 7,699 Times
in
4,087 Posts
I guess there's a chance it's an English thread BB, so you might have to loosen the left crank clockwise.
10-07-09, 12:51 PM
#30


.
Join Date: Aug 2005
Location: Rocket City, No'ala
Posts: 12,764
Bikes: 2014 Trek Domane 5.2, 1985 Pinarello Treviso, 1990 Gardin Shred, 2006 Bianchi San Jose
Mentioned: 3 Post(s)
Tagged: 0 Thread(s)
Quoted: 62 Post(s)
Likes: 0
Liked 29 Times
in
14 Posts
Update:
I got the cotters out and the cranks off with a c-clamp, a hammer and a large bolt.
How would I go about using channel locks to open the bottom bracket up? I'll get some good pictures of the bottom bracket tonight with cranks off.
PS. From what I know about this bike, it's a fairly low-end model. I also got it very cheap, so I'm not real concerned with keeping everything in excellent shape. As long as it won't cause damage that keeps it from working I don't care about using a makeshift tool. I'm not trying to restore this bike or make money on it. This is a learning experience for me and I want to do this stuff myself for the first time on a bike that I don't care if I mess up.
Keep the channel locks away from the bike.
 10-07-09, 12:57 PM
#31
Senior Member
Thread Starter
Join Date: Aug 2009
Location: Mississippi Coast
Posts: 812
Bikes: 198? Raleigh Technium 480, 1970 Raleigh Sports, Motobecane Nomade Sprint
Mentioned: 0 Post(s)
Tagged: 0 Thread(s)
Quoted: 0 Post(s)
Likes: 0
Liked 1 Time
in
1 Post
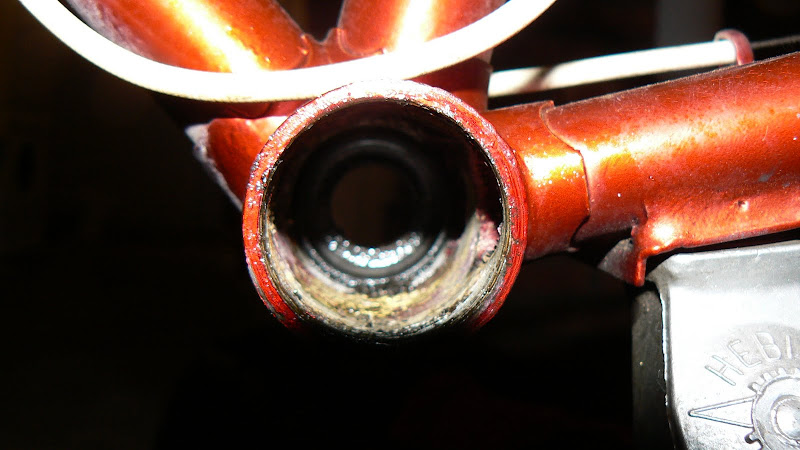
ooooo, that looks ugly.
I thought of another question, and feel free to tell me I'm stupid for even mentioning it. Is there any reason I couldn't just replace my bottom bracket with something like this? Is there something I'm missing that would make that not work? Or be not so cheap?
I thought of another question, and feel free to tell me I'm stupid for even mentioning it. Is there any reason I couldn't just replace my bottom bracket with something like this? Is there something I'm missing that would make that not work? Or be not so cheap?
10-07-09, 01:01 PM
#32
cowboy, steel horse, etc
Join Date: Sep 2008
Location: The hot spot.
Posts: 44,870
Bikes: everywhere
Mentioned: 72 Post(s)
Tagged: 1 Thread(s)
Quoted: 12791 Post(s)
Liked 7,699 Times
in
4,087 Posts
Well, you'd have to get cranks too, of course, and also determine if you need an English or Italian BB.
10-07-09, 02:48 PM
#33
Senior Member
Working on those darn bikes can become addicting. It is fun and challenging, especially when you run into unforseen problems. Get some good bike books with exploded parts diagrams. Unfortunatley, tools can get expensive. You could easily spend a lot more than $50 just for bottom bracket tools. Like anything, not having the right tools makes the job a lot harder. Good luck .
10-07-09, 03:41 PM
#34

www.theheadbadge.com

Join Date: Sep 2005
Location: Southern Florida
Posts: 28,514
Bikes: https://www.theheadbadge.com
Mentioned: 124 Post(s)
Tagged: 0 Thread(s)
Quoted: 2422 Post(s)
Liked 4,396 Times
in
2,093 Posts


 10-07-09, 04:06 PM
#35
aka Tom Reingold

Join Date: Jan 2009
Location: New York, NY, and High Falls, NY, USA
Posts: 40,509
Bikes: 1962 Rudge Sports, 1971 Raleigh Super Course, 1971 Raleigh Pro Track, 1974 Raleigh International, 1975 Viscount Fixie, 1982 McLean, 1996 Lemond (Ti), 2002 Burley Zydeco tandem
Mentioned: 511 Post(s)
Tagged: 0 Thread(s)
Quoted: 7353 Post(s)
Liked 2,481 Times
in
1,440 Posts
Why bother with aluminum cups in the first place?
__________________
Tom Reingold, tom@noglider.com
New York City and High Falls, NY
Blogs: The Experienced Cyclist; noglider's ride blog
�When man invented the bicycle he reached the peak of his attainments.� � Elizabeth West, US author
Please email me rather than PM'ing me. Thanks.
Tom Reingold, tom@noglider.com
New York City and High Falls, NY
Blogs: The Experienced Cyclist; noglider's ride blog
�When man invented the bicycle he reached the peak of his attainments.� � Elizabeth West, US author
Please email me rather than PM'ing me. Thanks.
10-07-09, 04:22 PM
#36
Great State of Varmint

Join Date: Sep 2008
Location: Dante's Third Ring
Posts: 7,476
Mentioned: 0 Post(s)
Tagged: 0 Thread(s)
Quoted: 2 Post(s)
Likes: 0
Liked 15 Times
in
15 Posts
Old and rusty one-piece cranks & bottom-bracket (Ashtabula cranks) can be a real PITA to remove the lock-ring and all. Requiring a slow and annoying blow-by-blow with a hammer and whatever fits. But not channel-locks.
10-07-09, 05:02 PM
#37
Senior Member
Thread Starter
Join Date: Aug 2009
Location: Mississippi Coast
Posts: 812
Bikes: 198? Raleigh Technium 480, 1970 Raleigh Sports, Motobecane Nomade Sprint
Mentioned: 0 Post(s)
Tagged: 0 Thread(s)
Quoted: 0 Post(s)
Likes: 0
Liked 1 Time
in
1 Post
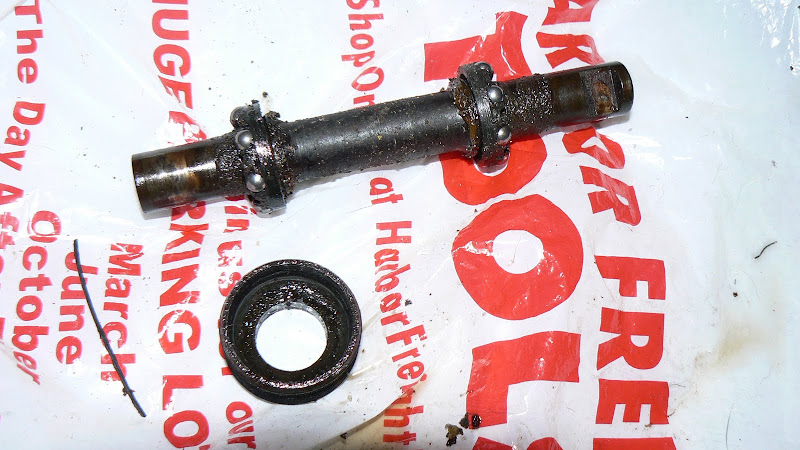
OK, it came off pretty easily actually. I got it all apart without mangling or damaging anything and all I used was a screwdriver, hammer and a pair of pliers. It looks pretty nasty in there huh?

10-07-09, 05:05 PM
#38
cowboy, steel horse, etc
Join Date: Sep 2008
Location: The hot spot.
Posts: 44,870
Bikes: everywhere
Mentioned: 72 Post(s)
Tagged: 1 Thread(s)
Quoted: 12791 Post(s)
Liked 7,699 Times
in
4,087 Posts
Looks great for 30+ years old!
10-07-09, 05:10 PM
#39
Senior Member
Thread Starter
Join Date: Aug 2009
Location: Mississippi Coast
Posts: 812
Bikes: 198? Raleigh Technium 480, 1970 Raleigh Sports, Motobecane Nomade Sprint
Mentioned: 0 Post(s)
Tagged: 0 Thread(s)
Quoted: 0 Post(s)
Likes: 0
Liked 1 Time
in
1 Post
So what's my next move as far as the bb is concerned? Degrease everything, get new bearing balls and grease and put it back together? I'm not sure what all goes into re-doing a bb or how to put it back together correctly.
10-07-09, 05:20 PM
#40
PanGalacticGargleBlaster

Join Date: Apr 2009
Location: Smugglers Notch, Vermont
Posts: 7,531
Bikes: Upright and Recumbent....too many to list, mostly Vintage.
Mentioned: 0 Post(s)
Tagged: 0 Thread(s)
Quoted: 19 Post(s)
Likes: 0
Liked 6 Times
in
5 Posts
https://sheldonbrown.com/tooltips/bbadj.html
its everything you need to know.
You might want to get new bearings, they are cheap. If you do, you should use all loose bearings and ditch those retaining rings
you got the right idea though, degrease it all and follow the instructions in that article.
You don't need to remove the other (fixed) Cup.
10-07-09, 05:25 PM
#41
Senior Member

 and try again. Repeat until you simultaneously get the lockring tight and the bearings snug but spinning smoothly. Use plenty of grease. This will help hold the bearings in place during assembly and help prevent water from getting into the assembly later.
Make sure the threads are clean and of course, make sure you grease the threads before re-assembly!
That's about all there is to it unless something is damaged but it looks to be in OK condition from the photos. You can check the bearing tracks for wear but unless it's severe I wouldn't worry about it. If the BB spindle is non-symmetrical and you can't remember which way it came out, usually the long side is on the drive side. You can check this by test fitting the crank to the spindle and checking the crank arm clearance against the chainstays.
10-07-09, 05:55 PM
#42
Senior Member

Join Date: Jun 2008
Location: Big Rapids, MI
Posts: 444
Bikes: 81 or 82 Mayata 912, Mystery Peugeot
Mentioned: 0 Post(s)
Tagged: 0 Thread(s)
Quoted: 0 Post(s)
Likes: 0
Liked 0 Times
in
0 Posts
ooooo, that looks ugly.
I thought of another question, and feel free to tell me I'm stupid for even mentioning it. Is there any reason I couldn't just replace my bottom bracket with something like this? Is there something I'm missing that would make that not work? Or be not so cheap?
I thought of another question, and feel free to tell me I'm stupid for even mentioning it. Is there any reason I couldn't just replace my bottom bracket with something like this? Is there something I'm missing that would make that not work? Or be not so cheap?
https://www.velo-orange.com/grcrufrthbob.html
or a $100+ dollar BB from Phil Wood. This is because of the threading. These are square tapered bottom brackets which mean you wouldn't be able to use the cottered crankset that came on your bike. The $12 BB in your link is modern style. I don't know the official term but I would call it splined. You would need a modern crankset which would be pricey and look out of place. Your best bet is probably to stick with the ball and cups style.
10-07-09, 06:03 PM
#43
cowboy, steel horse, etc
Join Date: Sep 2008
Location: The hot spot.
Posts: 44,870
Bikes: everywhere
Mentioned: 72 Post(s)
Tagged: 1 Thread(s)
Quoted: 12791 Post(s)
Liked 7,699 Times
in
4,087 Posts
Oh, yeah, I forgot this is a 70's Gitane, which may have French BB.
10-07-09, 08:41 PM
#44
Great State of Varmint
Join Date: Sep 2008
Location: Dante's Third Ring
Posts: 7,476
Mentioned: 0 Post(s)
Tagged: 0 Thread(s)
Quoted: 2 Post(s)
Likes: 0
Liked 15 Times
in
15 Posts
I'd give it a long soak in a solvent such as charcoal-lighter fluid. Really clean them as good as you can. In that these are French - you might never get a chance to replace them.
10-07-09, 09:16 PM
#45
Senior Member
Thread Starter
Join Date: Aug 2009
Location: Mississippi Coast
Posts: 812
Bikes: 198? Raleigh Technium 480, 1970 Raleigh Sports, Motobecane Nomade Sprint
Mentioned: 0 Post(s)
Tagged: 0 Thread(s)
Quoted: 0 Post(s)
Likes: 0
Liked 1 Time
in
1 Post
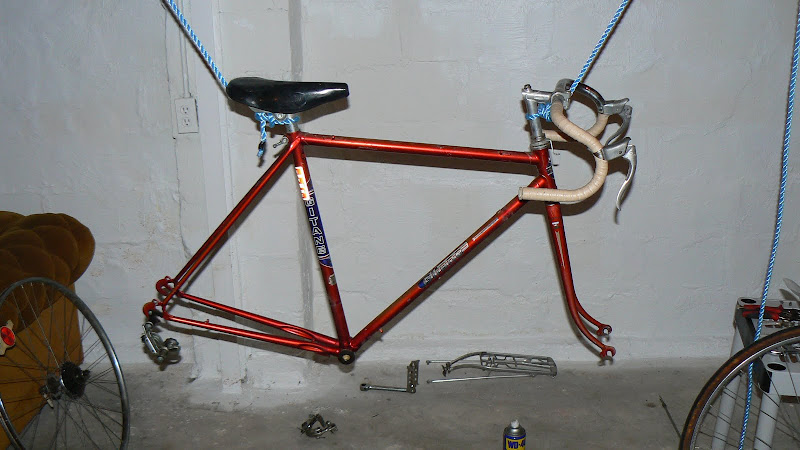
So, you say I should use loose bearings? Does that mean just bearings alone, and not ones that are in a plastic clip/holder thing like in this picture? If they aren't in a clip, how would I get them in there when I put everything back together without them going all over the place?
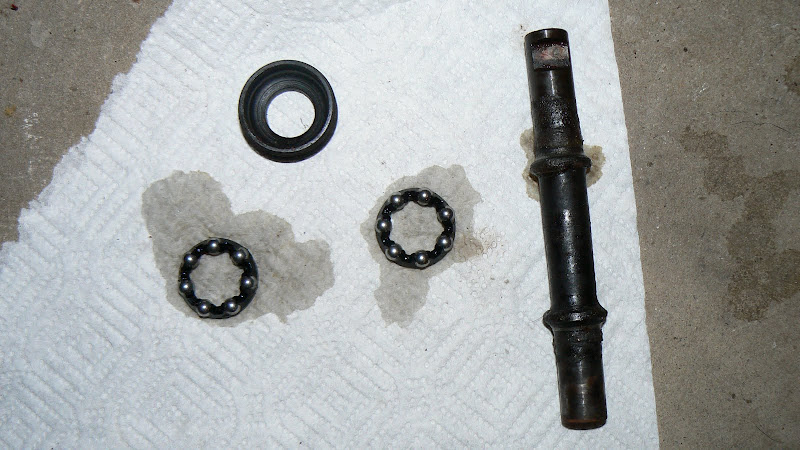
When I do put the bearings back in, is this grease ok to use? Or is there a specific kind you are supposed to use?

And here's a pic of the bike now with almost everything taken off.
When I do put the bearings back in, is this grease ok to use? Or is there a specific kind you are supposed to use?
And here's a pic of the bike now with almost everything taken off.
10-08-09, 08:56 AM
#46
Senior Member

Join Date: Apr 2005
Location: Ann Arbor, MI
Posts: 16,880
Bikes: 1980 Masi, 1984 Mondonico, 1984 Trek 610, 1980 Woodrup Giro, 2005 Mondonico Futura Leggera ELOS, 1967 PX10E, 1971 Peugeot UO-8
Mentioned: 49 Post(s)
Tagged: 0 Thread(s)
Quoted: 1858 Post(s)
Liked 664 Times
in
506 Posts
I dunno, maybe I'm ham-fisted with a screwdriver and artistic with a channellock, but I find equal risk of manglement using a hammer and drift versus a channel lock. Really, I have a problem with all the lock-ring spanners as well, though I'd like to try a Var or Hozan next time.
10-08-09, 08:57 AM
#47
Senior Member
Agreed, but don't sell at market price for the same bike prior to rebuild. Advertise the work that has been done to the bike in detail, and increase the price because the work increases the value. Buy bikes for significiantly less than their going market value as is, and sell them for a fair share more, fully rebuilt.
Avoid Nottingham Raleighs with cottered cranks (if you find a Super Course or anything with a serial number beginning with W, send it to me), and French threaded bikes with cottered cranks, at least until you have more experience in general. That Gitane would be ok as your 10th or 15th rebuild, not your first.
Last edited by krems81; 10-08-09 at 09:25 AM.
10-08-09, 09:05 AM
#48
Senior Member
Join Date: Apr 2005
Location: Ann Arbor, MI
Posts: 16,880
Bikes: 1980 Masi, 1984 Mondonico, 1984 Trek 610, 1980 Woodrup Giro, 2005 Mondonico Futura Leggera ELOS, 1967 PX10E, 1971 Peugeot UO-8
Mentioned: 49 Post(s)
Tagged: 0 Thread(s)
Quoted: 1858 Post(s)
Liked 664 Times
in
506 Posts
So, you say I should use loose bearings? Does that mean just bearings alone, and not ones that are in a plastic clip/holder thing like in this picture? If they aren't in a clip, how would I get them in there when I put everything back together without them going all over the place?
Next you can either cover the balls with a thin layer of grease, or pack a 1/8" bead of grease on the BB axle bearing surface, and carefully insert the BB axle through the hole in the fixed cup, working from the inside of the BB shell. Once this is all the way in, you should be able to turn the shaft and feel nice smooth ball bearing action.
10-08-09, 09:10 AM
#49
Senior Member
1. You are restoring this bike
2. If you look to make at least tool money on it, you'll be able to buy tools and make your life easier. Your work is something of value, at least have the buyer cover your tool costs.
Start with a lockring tool, a fixed cup tool, a pin spanner and crank puller.
2. If you look to make at least tool money on it, you'll be able to buy tools and make your life easier. Your work is something of value, at least have the buyer cover your tool costs.
Start with a lockring tool, a fixed cup tool, a pin spanner and crank puller.
Last edited by krems81; 10-08-09 at 09:27 AM.
10-08-09, 09:21 AM
#50
Senior Member
Did the right (drive) side bb cup thread in towards the front of the bike (right handed), or towards the rear (left handed)?
If left, its probably english or swiss. If right, its french.
You need eleven ball bearings in each cup. Take the clean cups in hand and put a thick bed of grease in there, toothpaste style, and bury the bearings in the grease one by one, until you have 11 in each cup. If you use enough grease they won't fall out or even budge when you go to install the cups.
Install drive side first, tight, put spindle in, longer side on the drive side if it is asymetric, and follow Sheldon Brown's instructions for installing, adjusting, and locking down the adjustable cup.