


Got Burned!!


 04-27-11 | 11:26 AM
#127

Thread Starter
Motorcycle RoadRacer
Joined: May 2010
Posts: 3,826
Likes: 4
OMG...
I am on the lookout for on in good condition that is for sure. I already have the 85 Raleigh Competition and Prestige, and would LOVE to ad a sweet Grand Prix to the stable.
That is indeed the exact same bike but with somebody that cares!! the person who had my bike left it outside.. A shame..
I am on the lookout for on in good condition that is for sure. I already have the 85 Raleigh Competition and Prestige, and would LOVE to ad a sweet Grand Prix to the stable.
That is indeed the exact same bike but with somebody that cares!!
the person who had my bike left it outside.. A shame..
04-27-11 | 11:34 AM
#129

www.theheadbadge.com


Joined: Sep 2005
Posts: 29,005
Likes: 5,494
From: Southern Florida
Bikes: https://www.theheadbadge.com
I had a premonition that you were going to fall in love with the ride. It might be a mid-range, Taiwanese frame, but the '86 GPs are as much fun to ride as any top-end SLX frame - perhaps even more so.
I ran one with Campagnolo Triomphe until I replaced it with my '61 Paramount:

-Kurt
I ran one with Campagnolo Triomphe until I replaced it with my '61 Paramount:
-Kurt
__________________


04-27-11 | 11:34 AM
#130
Thread Starter
Motorcycle RoadRacer
Joined: May 2010
Posts: 3,826
Likes: 4
 04-27-11 | 11:38 AM
#131
Thread Starter
Motorcycle RoadRacer
Joined: May 2010
Posts: 3,826
Likes: 4
I had a premonition that you were going to fall in love with the ride. It might be a mid-range, Taiwanese frame, but the '86 GPs are as much fun to ride as any top-end SLX frame - perhaps even more so.
I ran one with Campagnolo Triomphe until I replaced it with my '61 Paramount:
-Kurt
I ran one with Campagnolo Triomphe until I replaced it with my '61 Paramount:
-Kurt

You know I got to find me a good one.
 Trying to GET all of them like YOU!!
  ..
04-27-11 | 11:38 AM
..
04-27-11 | 11:38 AM
#132

Spin Forest! Spin!
Joined: Sep 2007
Posts: 5,956
Likes: 18
From: Arrid Zone-a
Bikes: I used to have many. And I Will again.
Hit that stem with PB Blaster and let it soak over night. Then rap it with a plastic mallet or dead blow hammer.
The Shimano 105 components are great parts. Those brakes performed better than the Dura Ace model of the same year. Hubs were buttery smooth with polished races. The RD will handle up to 8 speed cassettes. And a little elbow grease and metal polish it will look like this:

As for the frame rust, if it was my bike, I'd bead blast it down to clean steel, braze on replacement cable guides or change to two brake cable stops if the area of the original ones are too far gone.
Then paint it and ride it. (BTW, disc brake caliper paint is very tough and cures better than standard rattle can paint)
If you want to preserve as much of the original finish and decals, treat the rust rot with Permatex rust converter. Neutralizes the rust and stops it. The rust turns into a purple color too! It can be sanded once it dries. Then clearcoat it as you considered and it'll be a Howard Raleigh USA beater original!
The Shimano 105 components are great parts. Those brakes performed better than the Dura Ace model of the same year. Hubs were buttery smooth with polished races. The RD will handle up to 8 speed cassettes. And a little elbow grease and metal polish it will look like this:
As for the frame rust, if it was my bike, I'd bead blast it down to clean steel, braze on replacement cable guides or change to two brake cable stops if the area of the original ones are too far gone.
Then paint it and ride it. (BTW, disc brake caliper paint is very tough and cures better than standard rattle can paint)
If you want to preserve as much of the original finish and decals, treat the rust rot with Permatex rust converter. Neutralizes the rust and stops it. The rust turns into a purple color too! It can be sanded once it dries. Then clearcoat it as you considered and it'll be a Howard Raleigh USA beater original!
04-27-11 | 11:41 AM
#133
www.theheadbadge.com
Joined: Sep 2005
Posts: 29,005
Likes: 5,494
From: Southern Florida
Bikes: https://www.theheadbadge.com
-Kurt
__________________
Last edited by cudak888; 04-27-11 at 02:44 PM.
04-27-11 | 11:44 AM
#134

Champion of the Low End
Joined: Oct 2007
Posts: 851
Likes: 37
From: Culver, IN
Bikes: I have some bikes
No problem. I work on bikes in a rural area, and people bring in rusty and deteriorated bikes all the time. Bikes that were left in the barn, next the barn, behind the barn, etc. One of my customers is an Amish gentleman with a Nishiki International that he's been sweating all over for 25 years. If you think that Raleigh is rusty, you ain't seen nothin.
04-27-11 | 12:53 PM
#135
Thread Starter
Motorcycle RoadRacer
Joined: May 2010
Posts: 3,826
Likes: 4
Hit that stem with PB Blaster and let it soak over night. Then rap it with a plastic mallet or dead blow hammer.
The Shimano 105 components are great parts. Those brakes performed better than the Dura Ace model of the same year. Hubs were buttery smooth with polished races. The RD will handle up to 8 speed cassettes. And a little elbow grease and metal polish it will look like this:
As for the frame rust, if it was my bike, I'd bead blast it down to clean steel, braze on replacement cable guides or change to two brake cable stops if the area of the original ones are too far gone.
Then paint it and ride it. (BTW, disc brake caliper paint is very tough and cures better than standard rattle can paint)
If you want to preserve as much of the original finish and decals, treat the rust rot with Permatex rust converter. Neutralizes the rust and stops it. The rust turns into a purple color too! It can be sanded once it dries. Then clearcoat it as you considered and it'll be a Howard Raleigh USA beater original!
I like that!!
The derrailer is really not that bad, it is those freakin brakes I got to work on.. They stop, but they don't looked centered, and I know they need adjusting. The brake in front has Shimano 105 on it, the rear brake is plain!! ??
The ride is good, so good, I could take detour going home, and just ride...
04-27-11 | 01:02 PM
#136
Thread Starter
Motorcycle RoadRacer
Joined: May 2010
Posts: 3,826
Likes: 4
I gave up trying to put together the series. That would have been 4 bikes - not including the Team Pro or 555 replica - spanning four years. I'm satisfied with the '84 Competition and '84 Super Course. In fact, I'm happy with the '84 Competition alone; the Super Course is simply a coat hanger for my Campagnolo Victory group.
-Kurt
-Kurt
It fits her perfectly, and she was breaking the 15 mph speed limit in Atlantic City on it. She was on the 85 Comp, and I was on the 85 Prestige.. You know I almost got into a fight in Atlantic City over those bikes.

 04-27-11 | 01:33 PM
#138
Thread Starter
Motorcycle RoadRacer
Joined: May 2010
Posts: 3,826
Likes: 4
The feedback and encouragement I got just in this thread, IMO, worth 100 times the $70..
Plus, I got some killer deals, in the past too.
No way in the world would I have spent 4 hours tinkering with a bike if not for this thread. When it comes to mechanics, I am all thumbs, trying to change that..
 04-28-11 | 02:09 PM
#140
master of bottom licks
Joined: Apr 2008
Posts: 2,210
Likes: 2
From: Lou-evil, Canned-Yucky USA
04-28-11 | 04:22 PM
#141

Senior Member
Joined: Nov 2007
Posts: 4,599
Likes: 158
From: Santa Fe, NM
Bikes: Vassago Moosknuckle Ti 29+ XTR, 90's Merckx Corsa-01 9sp Record, PROJECT: 1954 Frejus SuperCorsa
You know I was thinking something like that on same order. I was thinking about tap it would a wooded board. I was thinking that if anything was stuck it would be the seatpost. The nut on the stem wasn't too hard. It came all the way out, and it had plenty grease on it too. Will try this when I get home. Thanks for that tip...
Take a look at the pic to see what I mean - the long bolt basically pulls the wedge upwards to the opposing slope/ramp of the stem (or the stem is slotted with a conical wedge, same idea) - the tension on the bolt pulls these together, creating an expansion that locks the stem in place.
05-06-11 | 08:47 AM
#142
Thread Starter
Motorcycle RoadRacer
Joined: May 2010
Posts: 3,826
Likes: 4
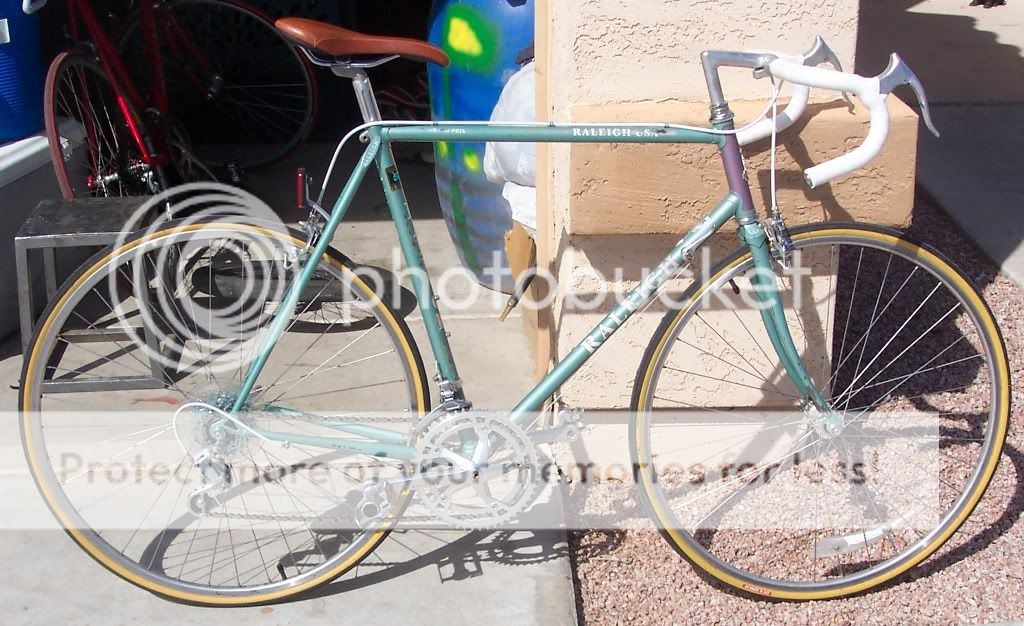
I am still on to this. In fact, the size and everything about this bike I like except for the rust! As I said in my last post, changed wheels and tires, and a cassette that was on the other wheel. All that worked out nice. I rode the bike on my regular commute..Now, to start working on the bike. I adjusted the seat, tried at the stem too. A little tight, but as a poster suggester I will hit it with a rubber mallet and go from there. The front brakes were lopsided and rubbing a little. Okay, I tinkered with the front brake per videos on the internet, stopped them from rubbing. Now, I went to fix the lopsideness. Not working out too well, and a little rubber piece fell off. I had taken off the front brake pads, cleaned them off, and put them back on.. Right now, I am stuck with the little rubber piece that fell off, and I don't know whether to chit or go blind!!
Going to let it stay just like that until I can get somebody to show me what to do. I don't want to mess this up. If I can fixed the brakes, put something on rust spots, maybe some touch up on other spots, I am going to ride this bike, plus use it for a teaching platform. As some one has already mentioned, here I am with about 8 bikes, and can bareley change a flat. Can't do any wrenching.
No matter, I am sticking with it.. Here is the bike on the stand now, and where it will stay until I get those brakes fixed.
05-06-11 | 09:03 AM
#143
Senior Member
Joined: Nov 2007
Posts: 4,599
Likes: 158
From: Santa Fe, NM
Bikes: Vassago Moosknuckle Ti 29+ XTR, 90's Merckx Corsa-01 9sp Record, PROJECT: 1954 Frejus SuperCorsa
Fine tuning sidepulls becomes an acquired skill, with alot of "feel" involved. Basically, loosen the fixing bolt on the back side of the fork (front brake) or brake bridge (rear brake). I'd guess that this will take a 5mm hex wrench if the bolts are the recessed style, or a 10mm wrench if not.
once the brakes are loose (just loose enough to rotate back and forth without binding), lightly tighten the nut with one hand while holding the brakes with the other hand - the trick here is to hold the brakes with a slight overcompensation for the torque of the bolt tightening. start by holding the opposing brake pad all the way to the rim. Now start to torque the bolt a little more, observing how the brake calipers are rotating (if at all), using the free hand to prevent the calipers from rotating too close the "centered" position. The spring will have a tendency to "load up" as the bolt is tightened with the calipers restrained, so it is not uncommon for the calipers to turn farther than the angle they were being held at, hence the "over compensation". There are more sophisticated ways to do this, but this is a quick and easy way that gets you 95% there.
Looking at your photo, it is clear that the front brake is turned as a result of the tighening torque, so it is skewed (hence the brake rub). Loosen it, hold those calipers,re-tighten. Rinse and repeat until the caliper stays centered.

 05-06-11 | 01:38 PM
#145
www.theheadbadge.com
Joined: Sep 2005
Posts: 29,005
Likes: 5,494
From: Southern Florida
Bikes: https://www.theheadbadge.com
Fine tuning sidepulls becomes an acquired skill, with alot of "feel" involved. Basically, loosen the fixing bolt on the back side of the fork (front brake) or brake bridge (rear brake). I'd guess that this will take a 5mm hex wrench if the bolts are the recessed style, or a 10mm wrench if not.
once the brakes are loose (just loose enough to rotate back and forth without binding), lightly tighten the nut with one hand while holding the brakes with the other hand - the trick here is to hold the brakes with a slight overcompensation for the torque of the bolt tightening. start by holding the opposing brake pad all the way to the rim. Now start to torque the bolt a little more, observing how the brake calipers are rotating (if at all), using the free hand to prevent the calipers from rotating too close the "centered" position. The spring will have a tendency to "load up" as the bolt is tightened with the calipers restrained, so it is not uncommon for the calipers to turn farther than the angle they were being held at, hence the "over compensation". There are more sophisticated ways to do this, but this is a quick and easy way that gets you 95% there.
Looking at your photo, it is clear that the front brake is turned as a result of the tighening torque, so it is skewed (hence the brake rub). Loosen it, hold those calipers,re-tighten. Rinse and repeat until the caliper stays centered.
once the brakes are loose (just loose enough to rotate back and forth without binding), lightly tighten the nut with one hand while holding the brakes with the other hand - the trick here is to hold the brakes with a slight overcompensation for the torque of the bolt tightening. start by holding the opposing brake pad all the way to the rim. Now start to torque the bolt a little more, observing how the brake calipers are rotating (if at all), using the free hand to prevent the calipers from rotating too close the "centered" position. The spring will have a tendency to "load up" as the bolt is tightened with the calipers restrained, so it is not uncommon for the calipers to turn farther than the angle they were being held at, hence the "over compensation". There are more sophisticated ways to do this, but this is a quick and easy way that gets you 95% there.
Looking at your photo, it is clear that the front brake is turned as a result of the tighening torque, so it is skewed (hence the brake rub). Loosen it, hold those calipers,re-tighten. Rinse and repeat until the caliper stays centered.
-Kurt
__________________
05-06-11 | 02:17 PM
#146
Spin Forest! Spin!
Joined: Sep 2007
Posts: 5,956
Likes: 18
From: Arrid Zone-a
Bikes: I used to have many. And I Will again.
If you don't have a thin enough wrench to fit the flats of the brake bolt, try what I do when I initially install calipers....loosen the mounting nut until the caliper rotates freely, I usually don't have a brake cable installed yet, but it shouldn't matter here...grab the brake arms and squeeze them tightly against the rim as if the brake is applied. The return spring is now loaded equally and the arms can't rotate. Start tightening the mounting nut as you hold the arms against the rim. Once tight, release the arms and the caliper is pretty centered against the rim.
BTW, those black plastic things are bushings to reduce friction where the spring touches the caliper. See pic above, just slip them back on there. You don't want to toss these!!
BTW, those black plastic things are bushings to reduce friction where the spring touches the caliper. See pic above, just slip them back on there. You don't want to toss these!!

 05-06-11 | 02:41 PM
#148
Senior Member
Joined: Nov 2007
Posts: 4,599
Likes: 158
From: Santa Fe, NM
Bikes: Vassago Moosknuckle Ti 29+ XTR, 90's Merckx Corsa-01 9sp Record, PROJECT: 1954 Frejus SuperCorsa
05-06-11 | 06:40 PM
#149
Senior Member
Joined: Oct 2008
Posts: 2,929
Likes: 2
I'll go out on a limb here with this comment/question.
I don't think the rust is from perspiration. I think it is from immersion in water. I bet this bike originally came from New Orleans (hurricane Katrina) or some other coastal area and it got seriously wet and stayed wet/salty for a long time.
cehowardGS, you need to learn to use Naval Jelly to remove that rust.
05-06-11 | 07:06 PM
#150
Thread Starter
Motorcycle RoadRacer
Joined: May 2010
Posts: 3,826
Likes: 4