


Show Your Blocked Saddles
 03-12-12, 08:15 PM
#26

multimodal commuter

Join Date: Nov 2006
Location: NJ, NYC, LI
Posts: 19,808
Bikes: 1940s Fothergill, 1959 Allegro Special, 1963? Claud Butler Olympic Sprint, Lambert 'Clubman', 1974 Fuji "the Ace", 1976 Holdsworth 650b conversion rando bike, 1983 Trek 720 tourer, 1984 Counterpoint Opus II, 1993 Basso Gap, 2010 Downtube 8h, and...
Mentioned: 584 Post(s)
Tagged: 0 Thread(s)
Quoted: 1908 Post(s)
Liked 574 Times
in
339 Posts
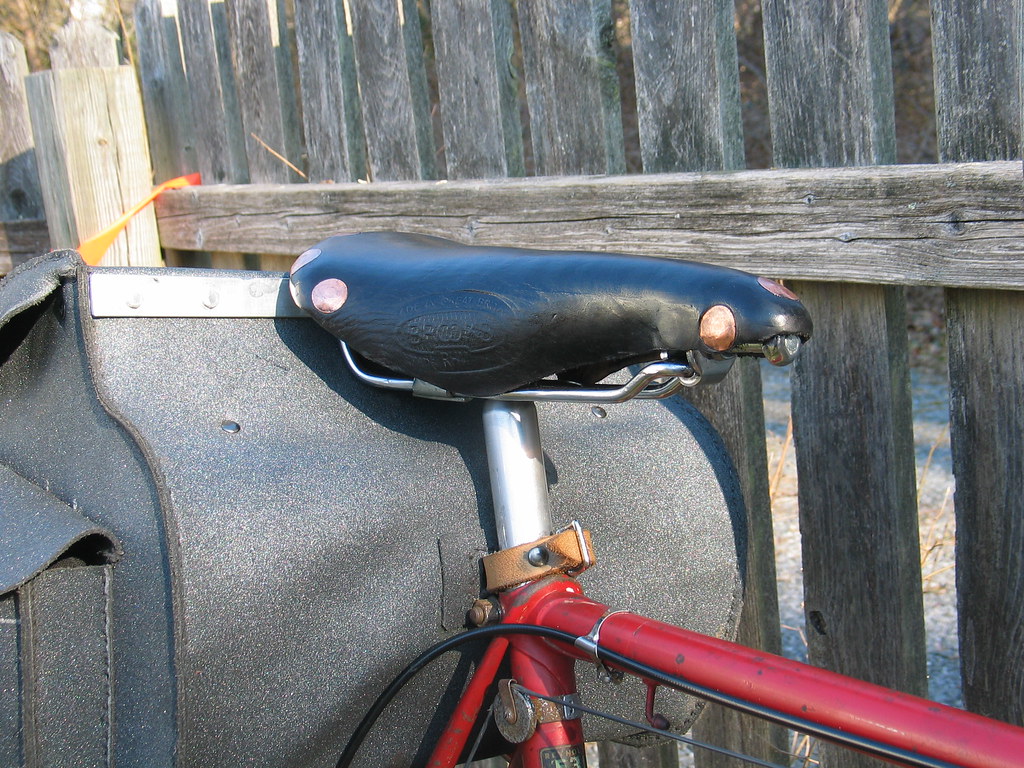
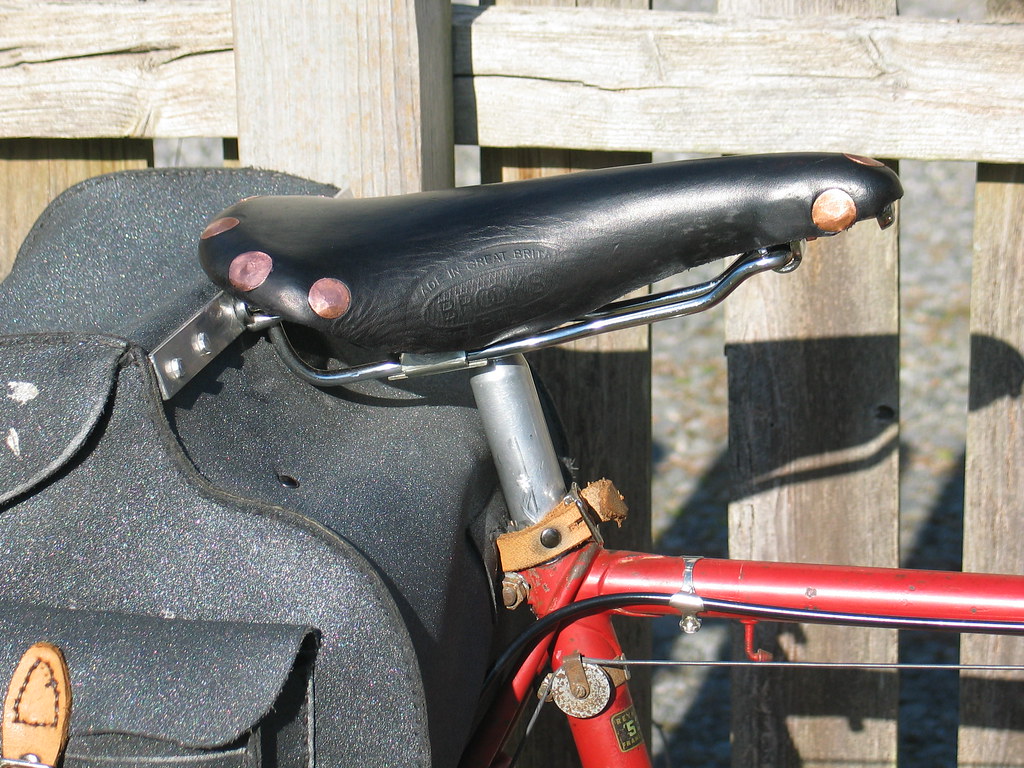
No, you misunderstand me. When I got the old Brooks Pro frame there was no leather on it; what you see in my photos is the new top I made. The cut of the leather isn't that drastic; the rivets are bigger than usual, which throws the look off. I do the thinning of the leather before soaking it and forming it into a saddle shape. I don't like the look of the thick leather cut so close to the cantle, so I tapered its thickness down to almost nothing, leaving only a few mm of thin leather that curls under the edge of the cantle plate. The skirts are similar; rather than being beveled on the outside, like a Brooks Professional, the skirt is beveled on the inside, allowing it to curl under. Unfortunately this also makes it hard to get at the saddle clamp hardware; attaching it to the seat post I had to bend the skirt out, which resulted in the rumpled look of the leather. Oops.
 03-12-12, 08:29 PM
#27
十人十色
Thread Starter

No longer  That's great work, rhm!
I think the answer to attaching the saddle to the post might be to use an old-fashioned clip and post, which would actually suit the saddle, IMHO.
The only change I would make is to have a little more leather between the front rivet and the edge, but maybe what I'm seeing is the curl effect...
Are you taking commissions?
That's great work, rhm!I think the answer to attaching the saddle to the post might be to use an old-fashioned clip and post, which would actually suit the saddle, IMHO.
The only change I would make is to have a little more leather between the front rivet and the edge, but maybe what I'm seeing is the curl effect...
Are you taking commissions?
03-13-12, 01:36 AM
#28
Senior Member
Join Date: Feb 2009
Location: Adelaide, Australia
Posts: 72
Mentioned: 0 Post(s)
Tagged: 0 Thread(s)
Quoted: 0 Post(s)
Likes: 0
Liked 0 Times
in
0 Posts
I have posted the first saddle before, one I recovered from a 1948 Dunlop saddle

It has 7mm thick leather (much thicker than a Brooks Pro) and has been 'tied' underneath with a chain link.


The next is an experiment on a 1959 Brooks, which had the nose piece torn from the rest of the saddle leather.
I arched and flattened the rear section of the cantleplate before recovering with 6mm thick leather


It is a work in progress and I used the photo on the Speedplay site and this one on Speedbicycles site for inspiration.

I may do another reshaped one taking more time and care, and possibly copper rivets (but not Brooks rivets as they are too short for the extra leather thickness). This one can then go on the indoor trainer.
It has 7mm thick leather (much thicker than a Brooks Pro) and has been 'tied' underneath with a chain link.
The next is an experiment on a 1959 Brooks, which had the nose piece torn from the rest of the saddle leather.
I arched and flattened the rear section of the cantleplate before recovering with 6mm thick leather
It is a work in progress and I used the photo on the Speedplay site and this one on Speedbicycles site for inspiration.
I may do another reshaped one taking more time and care, and possibly copper rivets (but not Brooks rivets as they are too short for the extra leather thickness). This one can then go on the indoor trainer.
03-13-12, 01:55 AM
#29
十人十色
Thread Starter
I have posted the first saddle before, one I recovered from a 1948 Dunlop saddle
It has 7mm thick leather (much thicker than a Brooks Pro) and has been 'tied' underneath with a chain link.
The next is an experiment on a 1959 Brooks, which had the nose piece torn from the rest of the saddle leather.
I arched and flattened the rear section of the cantleplate before recovering with 6mm thick leather.
It is a work in progress and I used the photo on the Speedplay site and this one on the Speedbicycles site for inspiration.
I may do another reshaped one taking more time and care, and possibly copper rivets (but not Brooks rivets as they are too short for the extra leather thickness). This one can then go on the indoor trainer.
And very nice saddles
 03-13-12, 02:35 AM
#30
Senior Member
Join Date: Feb 2009
Location: Adelaide, Australia
Posts: 72
Mentioned: 0 Post(s)
Tagged: 0 Thread(s)
Quoted: 0 Post(s)
Likes: 0
Liked 0 Times
in
0 Posts

I used countersunk stainless steel bolts, like the one on the right. These were then modified for the keeper saddle by a mate carefully machining the countersinking away, leaving a thin flat head (as in the left bolt). This was thought to place less stress on the leather over time.
03-13-12, 08:14 AM
#31
multimodal commuter
Join Date: Nov 2006
Location: NJ, NYC, LI
Posts: 19,808
Bikes: 1940s Fothergill, 1959 Allegro Special, 1963? Claud Butler Olympic Sprint, Lambert 'Clubman', 1974 Fuji "the Ace", 1976 Holdsworth 650b conversion rando bike, 1983 Trek 720 tourer, 1984 Counterpoint Opus II, 1993 Basso Gap, 2010 Downtube 8h, and...
Mentioned: 584 Post(s)
Tagged: 0 Thread(s)
Quoted: 1908 Post(s)
Liked 574 Times
in
339 Posts
No longer That's great work, rhm!*
I think the answer to attaching the saddle to the post might be to use an old-fashioned clip and post, which would actually suit the saddle, IMHO.**
The only change I would make is to have a little more leather between the front rivet and the edge, but maybe what I'm seeing is the curl effect...***
Are you taking commissions?****
That's great work, rhm!*I think the answer to attaching the saddle to the post might be to use an old-fashioned clip and post, which would actually suit the saddle, IMHO.**
The only change I would make is to have a little more leather between the front rivet and the edge, but maybe what I'm seeing is the curl effect...***
Are you taking commissions?****
**But that is an old-fashioned clip and post! But it is not a very pretty clip (not chromed), so I inverted it so it is hidden inside the skirts of the saddle.
*** There are various issues at play here. I hammered the heads of the rivets out very wide, some more than others. In this case I think the rivet head is not very symmetrical, and the shaft of the rivet itself may be slightly oblique, bringing the head down lower than ideal. Peening the rivets on the side of the nose piece is one of the most difficult parts of the process. At any rate there is more leather there than you would think.
****I have done a few, but haven't got comfortable with it. Even if I charge an insanely high price, I end working at a comparatively low hourly rate and there are inevitably quality control issues of various kinds.

You just can't get good help these days
 .
03-13-12, 08:50 AM
.
03-13-12, 08:50 AM
#32

Senior Member

Join Date: Dec 2001
Location: n.w. superdrome
Posts: 17,687
Bikes: 1 trek, serotta, rih, de Reus, Pogliaghi and finally a Zieleman! and got a DeRosa
Mentioned: 6 Post(s)
Tagged: 0 Thread(s)
Quoted: 15 Post(s)
Likes: 0
Liked 9 Times
in
9 Posts
Given the look, quality etc. of the saddle you did for me I'd be inclined to
disagree with that assessment.
I'm at work and can't see any of the posted photo's but I'll post
photos of the saddle when I get home (and take some pics).
Marty
disagree with that assessment.
I'm at work and can't see any of the posted photo's but I'll post
photos of the saddle when I get home (and take some pics).
Marty
__________________
Sono pi� lento di quel che sembra.
Odio la gente, tutti.
Want to upgrade your membership? Click Here.
Sono pi� lento di quel che sembra.
Odio la gente, tutti.
Want to upgrade your membership? Click Here.
03-13-12, 08:58 AM
#33
十人十色
Thread Starter
I rather like that! Lovely colour...I see about the clip. I'd imagined it would be easier to slide a spanner up the sides with a clip than to deal with a twin-bolt Campagnolo, which I'd assumed you'd used.
Did I say that was a lovely colour?
03-13-12, 09:20 AM
#34
Senior Member

Join Date: Apr 2007
Location: Thunder Bay, Ontario, Canada - burrrrr!
Posts: 11,674
Bikes: 1958 Rabeneick 120D, 1968 Legnano Gran Premio, 196? Torpado Professional, 2000 Marinoni Piuma
Mentioned: 210 Post(s)
Tagged: 0 Thread(s)
Quoted: 1372 Post(s)
Likes: 0
Liked 1,752 Times
in
939 Posts
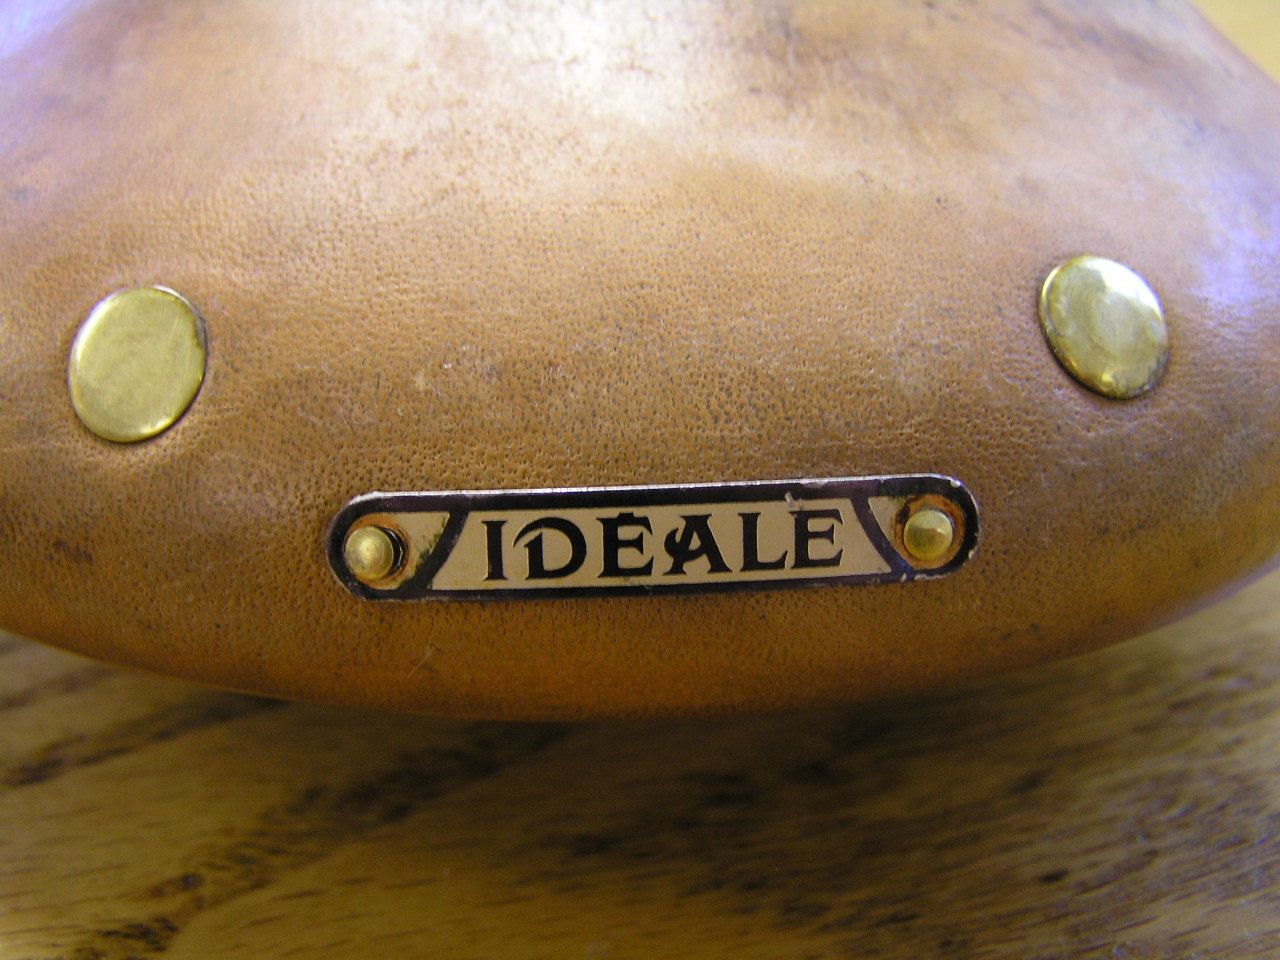
Is the logo upo sido? Or is it just me...
__________________
"98% of the bikes I buy are projects".
"98% of the bikes I buy are projects".
 03-13-12, 10:21 AM
#36
The Drive Side is Within

Ah, yes, a Skoorb saddle. Very nice.
__________________
The bicycle, the bicycle surely, should always be the vehicle of novelists and poets. Christopher Morley
The bicycle, the bicycle surely, should always be the vehicle of novelists and poets. Christopher Morley
03-13-12, 10:43 AM
#37
Senior Member
Join Date: Nov 2005
Posts: 5,768
Bikes: Cinelli, Paramount, Raleigh, Carlton, Zeus, Gemniani, Frejus, Legnano, Pinarello, Falcon
Mentioned: 0 Post(s)
Tagged: 0 Thread(s)
Quoted: 12 Post(s)
Likes: 0
Liked 8 Times
in
8 Posts
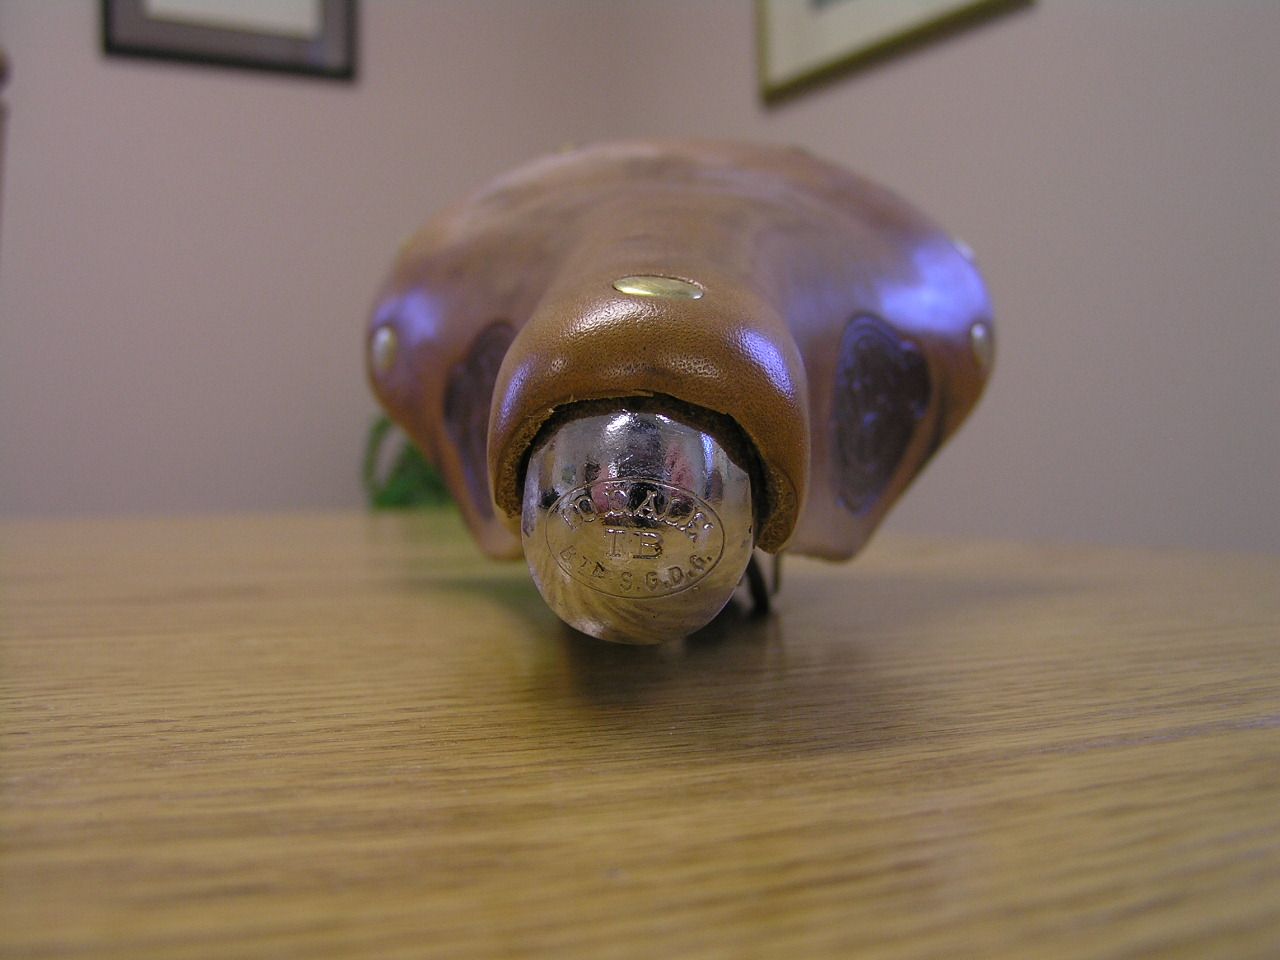
Years ago I cut a few B17s I got for cheap. Pattern was copied from an Ideale I have. This was an original honey dyed black.
03-13-12, 12:04 PM
#38
Stop reading my posts!

Join Date: Sep 2004
Posts: 12,584
Mentioned: 90 Post(s)
Tagged: 0 Thread(s)
Quoted: 1444 Post(s)
Liked 1,064 Times
in
788 Posts
this is a very entertaining (and maybe inspirational) thread, thanks to all the contributors. I'm very impressed with the dedication some folks have to sweating the details: things like making your own (upside-down, no less) brand-stamp, to machining each Allen bolt individually to make it a broad flat head with virtually no countersink...that's some serious shop work, unless you happen to have a robot to do this.
Which got me to thinking about other fastener options (a favorite topic) and I've always had Elevator Bolts in the back or my head, waiting for a good application. (Really, I do have bolts in the back of my head, that explains a lot)
These are/were used to hold together the huge belts in grain elevators and have an enormous nearly flat head with no Allen hole or other slot. There are some (very limited selection) in stainless steel and the only size that might work would be the 1/4" x 3/4" and might require the shafts to be cut down shorter. I am guessing that SS heads that big and flat could also be peened.
https://www.boltdepot.com/Elevator_bo...-8_1_4-20.aspx
03-13-12, 12:19 PM
#39
multimodal commuter
Join Date: Nov 2006
Location: NJ, NYC, LI
Posts: 19,808
Bikes: 1940s Fothergill, 1959 Allegro Special, 1963? Claud Butler Olympic Sprint, Lambert 'Clubman', 1974 Fuji "the Ace", 1976 Holdsworth 650b conversion rando bike, 1983 Trek 720 tourer, 1984 Counterpoint Opus II, 1993 Basso Gap, 2010 Downtube 8h, and...
Mentioned: 584 Post(s)
Tagged: 0 Thread(s)
Quoted: 1908 Post(s)
Liked 574 Times
in
339 Posts
Okay, I'm going to let you wags laugh at my expense for a couple more days, then that photo is getting mysteriously deleted off my Flickr page. So a word to the wise, if you want to use it for extortion purposes in the future, better save it to your hard drive.
On my first saddle, instead of rivets I used 1/4" brass carriage bolts, and then filed the heads down so only a vestigal phillips head slot was visible. This was a lot more work than pounding rivets with a hammer, and the results were far less satisfying. Elevator bolts would seem to have some potential, definitely if the heads are thin enough that you can pound them to fit the curvature of the saddle. This would also prevent the heads from turning when you tighten the nuts. But don't let me discourage anyone from pounding rivets with a hammer; it's not nearly as difficult as you might imagine, and very satisfying. I particularly like the part where I swing the hammer and smash it down on a metal punch I'm holding in my left hand. I also like the fact that it gave me an excuse to buy an anvil. I always wanted one!
On my first saddle, instead of rivets I used 1/4" brass carriage bolts, and then filed the heads down so only a vestigal phillips head slot was visible. This was a lot more work than pounding rivets with a hammer, and the results were far less satisfying. Elevator bolts would seem to have some potential, definitely if the heads are thin enough that you can pound them to fit the curvature of the saddle. This would also prevent the heads from turning when you tighten the nuts. But don't let me discourage anyone from pounding rivets with a hammer; it's not nearly as difficult as you might imagine, and very satisfying. I particularly like the part where I swing the hammer and smash it down on a metal punch I'm holding in my left hand. I also like the fact that it gave me an excuse to buy an anvil. I always wanted one!
03-14-12, 08:39 AM
#40
Senior Member
Join Date: Dec 2009
Location: Germany
Posts: 221
Mentioned: 1 Post(s)
Tagged: 0 Thread(s)
Quoted: 11 Post(s)
Likes: 0
Liked 11 Times
in
8 Posts
Shown below is a Brooks Professional (early 60s) that was narrowed at least by 1 cm compared to my other Pro saddles of the same era.
Apparently the cantle plate was bent using heat as one can see from the tarnishing of the metal around the rail's joints (or were the rails (re-)welded to the cantle plate from the upper side, following it's curving?).


Cover was reattached using big hammered rivets, one extra rivet in the middle. Leather was trimmed slightly by cutting off the rearmost part of it, including "Brooks" badge, right back to the cantle's edge.
I do not know much about this craft but remember seeing butchered saddles on '60ish german racing bikes, big hammered rivets being stamped "L�ders BERLIN" (L�ders being a legendary german frame builder. Unfortunately website - not his! - with details no longer accessible).
Apparently L�ders carried out these modifications, too.
Apparently the cantle plate was bent using heat as one can see from the tarnishing of the metal around the rail's joints (or were the rails (re-)welded to the cantle plate from the upper side, following it's curving?).
Cover was reattached using big hammered rivets, one extra rivet in the middle. Leather was trimmed slightly by cutting off the rearmost part of it, including "Brooks" badge, right back to the cantle's edge.
I do not know much about this craft but remember seeing butchered saddles on '60ish german racing bikes, big hammered rivets being stamped "L�ders BERLIN" (L�ders being a legendary german frame builder. Unfortunately website - not his! - with details no longer accessible).
Apparently L�ders carried out these modifications, too.
Last edited by qd-s; 03-15-12 at 05:07 AM.
03-14-12, 09:04 AM
#41
十人十色
Thread Starter
Shown below is a Brooks Professional (early 60s) that was narrowed at least by 1 cm compared to my other Pro saddles of the same era.
Apparently the cantle plate was bent using heat as one can see from the tarnishing of the metal around the rail's joints (or were the rails (re-)welded to the cantle plate from the upper side, following it's curving?).
Cover was reattached using big hammered rivets, one extra rivet in the middle. Leather was trimmed slightly by cutting off the rearmost part of it, including "Brooks" badge, right back to the cantle's edge.
I do not know much about this craft but remember seeing butchered saddles on '60ish german racing bikes, big hammered rivets being stamped "L�ders" (L�ders being a legendary german frame builder from Berlin. Unfortunately website - not his! - with details no longer accessible).
Apparently L�ders carried out these modifications, too.
Your rails might have been removed, shortened and re-welded. They mention that being done on classicrendezvous link that Clydesdale Scot posted earlier.
Do you have a side view of your saddle? It looks like the sides have been cut away and I'm interested to know what that looks like before I do the same to my Pro.
03-14-12, 10:43 AM
#42
Senior Member
Join Date: Jul 2009
Posts: 11,128
Bikes: 1986 Alan Record Carbonio, 1985 Vitus Plus Carbone 7, 1984 Peugeot PSV, 1972 Line Seeker, 1986(est.) Medici Aerodynamic (Project), 1985(est.) Peugeot PY10FC
Mentioned: 22 Post(s)
Tagged: 0 Thread(s)
Quoted: 150 Post(s)
Likes: 0
Liked 34 Times
in
27 Posts
")
 03-15-12, 04:43 AM
#43
Senior Member

Join Date: Apr 2005
Location: Ann Arbor, MI
Posts: 16,880
Bikes: 1980 Masi, 1984 Mondonico, 1984 Trek 610, 1980 Woodrup Giro, 2005 Mondonico Futura Leggera ELOS, 1967 PX10E, 1971 Peugeot UO-8
Mentioned: 49 Post(s)
Tagged: 0 Thread(s)
Quoted: 1858 Post(s)
Liked 664 Times
in
506 Posts
03-15-12, 05:33 AM
#44
Senior Member
Join Date: Dec 2009
Location: Germany
Posts: 221
Mentioned: 1 Post(s)
Tagged: 0 Thread(s)
Quoted: 11 Post(s)
Likes: 0
Liked 11 Times
in
8 Posts
...
Your rails might have been removed, shortened and re-welded. They mention that being done on classicrendezvous link that Clydesdale Scot posted earlier.
Do you have a side view of your saddle? It looks like the sides have been cut away and I'm interested to know what that looks like before I do the same to my Pro.
Apart from big rivets in front as well, the butchered saddle seems to be standard. Chamfered side-edges untouched, still there.
03-15-12, 06:36 AM
#45
Freewheel Medic

Join Date: Oct 2005
Location: An Island on the Coast of GA!
Posts: 12,886
Bikes: Snazzy* Schwinns, Classy Cannondales & a Super Pro Aero Lotus (* Ed.)
Mentioned: 140 Post(s)
Tagged: 0 Thread(s)
Quoted: 1453 Post(s)
Liked 2,197 Times
in
963 Posts
rhm recovered an Ideale Model 90 frame for me. It is worth posting pictures because the style of the leather was changed slightly.
I wanted it left natural and have finally found a bike to try it on, the '75 Schwinn Sports Tourer I recently bought.

I hope to complete the Sports Tourer project in the next two weeks so I can finally offer a test ride report on Rudy's handi work. In the mean time I'm enjoying some south Florida sunshine and visits with cudak888 and Michael Angelo!
I wanted it left natural and have finally found a bike to try it on, the '75 Schwinn Sports Tourer I recently bought.
I hope to complete the Sports Tourer project in the next two weeks so I can finally offer a test ride report on Rudy's handi work. In the mean time I'm enjoying some south Florida sunshine and visits with cudak888 and Michael Angelo!
__________________
Bob
Enjoying the GA coast all year long!
Thanks for visiting my website: www.freewheelspa.com
Bob
Enjoying the GA coast all year long!
Thanks for visiting my website: www.freewheelspa.com
03-20-12, 02:12 PM
#46
Senior Member
Join Date: Dec 2009
Location: Germany
Posts: 221
Mentioned: 1 Post(s)
Tagged: 0 Thread(s)
Quoted: 11 Post(s)
Likes: 0
Liked 11 Times
in
8 Posts
Short digression and some questions:
Did standard Brooks Professional saddles of the 60s generally come with small rivets? Or were they available from stock also with the bigger hammered rvets? When started production run of big rivet-Professionals?
I've got another quite heavily worn Pro with beautiful supple leather cover from 1962 (see below, cantle stamped "PAT No 662070" and "B 62") with big copper rivets. Rivets' faces smooth, probably filed and sanded.


According to VeloBase Brooks Pro was introduced in 1963.
"Brooks Professional" brand-stamping on both sides of this saddle is faint but clearly readable.
I have no idea if big rivets of my saddle are standard Brooks or if saddle was modified at some point (I think at least hammering marks were sanded down later in its life).
Did standard Brooks Professional saddles of the 60s generally come with small rivets? Or were they available from stock also with the bigger hammered rvets? When started production run of big rivet-Professionals?
I've got another quite heavily worn Pro with beautiful supple leather cover from 1962 (see below, cantle stamped "PAT No 662070" and "B 62") with big copper rivets. Rivets' faces smooth, probably filed and sanded.
According to VeloBase Brooks Pro was introduced in 1963.
"Brooks Professional" brand-stamping on both sides of this saddle is faint but clearly readable.
I have no idea if big rivets of my saddle are standard Brooks or if saddle was modified at some point (I think at least hammering marks were sanded down later in its life).
Last edited by qd-s; 03-20-12 at 02:15 PM.
03-28-12, 09:12 AM
#48
十人十色
Thread Starter
Short digression and some questions:
Did standard Brooks Professional saddles of the 60s generally come with small rivets? Or were they available from stock also with the bigger hammered rvets? When started production run of big rivet-Professionals?
I've got another quite heavily worn Pro with beautiful supple leather cover from 1962 (see below, cantle stamped "PAT No 662070" and "B 62") with big copper rivets. Rivets' faces smooth, probably filed and sanded.
According to VeloBase Brooks Pro was introduced in 1963.
"Brooks Professional" brand-stamping on both sides of this saddle is faint but clearly readable.
I have no idea if big rivets of my saddle are standard Brooks or if saddle was modified at some point (I think at least hammering marks were sanded down later in its life).
03-28-12, 09:20 AM
#49
Senior Member

Join Date: Apr 2005
Location: Wherever
Posts: 16,748
Mentioned: 92 Post(s)
Tagged: 0 Thread(s)
Quoted: 556 Post(s)
Likes: 0
Liked 132 Times
in
78 Posts
I surely am no expert, but I don't think the large, hammered rivets showed up until the mid to late 70's or so. I didn't see any of them when riding in the early 70's, and it wasn't until later, I believe, that they started doing the large rivets with the introduction of the model they called the Brooks TEAM pro. I could be wrong.
03-28-12, 09:27 AM
#50
Senior Member
Join Date: Apr 2005
Location: Wherever
Posts: 16,748
Mentioned: 92 Post(s)
Tagged: 0 Thread(s)
Quoted: 556 Post(s)
Likes: 0
Liked 132 Times
in
78 Posts
Okay, I'm going to let you wags laugh at my expense for a couple more days, then that photo is getting mysteriously deleted off my Flickr page. So a word to the wise, if you want to use it for extortion purposes in the future, better save it to your hard drive.
On my first saddle, instead of rivets I used 1/4" brass carriage bolts, and then filed the heads down so only a vestigal phillips head slot was visible. This was a lot more work than pounding rivets with a hammer, and the results were far less satisfying. Elevator bolts would seem to have some potential, definitely if the heads are thin enough that you can pound them to fit the curvature of the saddle. This would also prevent the heads from turning when you tighten the nuts. But don't let me discourage anyone from pounding rivets with a hammer; it's not nearly as difficult as you might imagine, and very satisfying. I particularly like the part where I swing the hammer and smash it down on a metal punch I'm holding in my left hand. I also like the fact that it gave me an excuse to buy an anvil. I always wanted one!
On my first saddle, instead of rivets I used 1/4" brass carriage bolts, and then filed the heads down so only a vestigal phillips head slot was visible. This was a lot more work than pounding rivets with a hammer, and the results were far less satisfying. Elevator bolts would seem to have some potential, definitely if the heads are thin enough that you can pound them to fit the curvature of the saddle. This would also prevent the heads from turning when you tighten the nuts. But don't let me discourage anyone from pounding rivets with a hammer; it's not nearly as difficult as you might imagine, and very satisfying. I particularly like the part where I swing the hammer and smash it down on a metal punch I'm holding in my left hand. I also like the fact that it gave me an excuse to buy an anvil. I always wanted one!
Impressive. Right side up or not.
 Also, what anvil did you buy and how are you supporting the back side of the rivet on an anvil? Maybe you did a thread answering all of these questions.. Anyway, I'm impressed. Nice work.