


Need Advice/Help - Rebuilding Suntour Bottom Bracket
 04-03-12, 01:42 PM
#1
Senior Member
Thread Starter
Join Date: Feb 2012
Location: Manhattan
Posts: 73
Mentioned: 0 Post(s)
Tagged: 0 Thread(s)
Quoted: 1 Post(s)
Likes: 0
Liked 14 Times
in
3 Posts
Need Advice/Help - Rebuilding Suntour Bottom Bracket
Hi Good people,
Today in the park, riding my 1980 Trek steel, I decided to challenge a passing Carbon comrade. As I bore down to accelerate, I heard a squeal and some random clacking noises from my bike. My friend rode on with a shrug.
I got home and decided to do a long overdue BB overhaul. I had the tools - the crank puller, the lock-ring wrench. I got the entire BB mechanism removed but can't go any further.
I had expected ball bearings to fall to the floor as I removed the BB. Clearly, I've got some kind of sealed system. I'm not sure how to proceed at this point.
I've posted a YouTube showing the removed BB mechanism. Hopefully someone will recognize the unit and will be able to advise me about doing work on it.
In the video, I mention some decayed plastic material that I scraped out of the shell. I've since figured out that the plastic was the wrap with the Suntour specs on it. Aside from loosing the specs, I don't think it was functional. I don't think this BB needed a plastic sleeve like one I saw in a YouTube about rebuilding bottom brackets.
Please make any comments that will educate me on what's up with this style of mechanism. Can I replace the bearings? How do I get them out?
I've also noticed, since shooting the video, that while the drive side bearings spin ok (just ok), the left side bearings seem locked. I think I may have located the source of the squealing!
Thanks so much all BF people. This is the best place on the internet for ANYTHING.
YouTube at : https://www.youtube.com/watch?v=5Ta_P...ature=youtu.be
Lance, rides in NYC
 04-03-12, 02:06 PM
#2

Bianchi Goddess

Join Date: Apr 2009
Location: Shady Pines Retirement Fort Wayne, In
Posts: 27,858
Bikes: Too many to list here check my signature.
Mentioned: 192 Post(s)
Tagged: 2 Thread(s)
Quoted: 2930 Post(s)
Liked 2,926 Times
in
1,491 Posts
I believe you have one of these
https://velobase.com/ViewComponent.as...m=119&AbsPos=1
I was never just how or if they came apart. I think you can screw the cup back in and use a something like the spindle to tap it out of the cup. That circlip should be OK to push the bearing out. same for the other side. then head to your local bearing shop and get some new ones.
No there was not a plastic sleeve on that,
__________________
�One morning you wake up, the girl is gone, the bikes are gone, all that's left behind is a pair of old tires and a tube of tubular glue, all squeezed out"
Sugar "Kane" Kowalczyk
�One morning you wake up, the girl is gone, the bikes are gone, all that's left behind is a pair of old tires and a tube of tubular glue, all squeezed out"
Sugar "Kane" Kowalczyk
Last edited by Bianchigirll; 04-03-12 at 02:09 PM.
04-03-12, 04:28 PM
#3
Senior Member
Thread Starter
Join Date: Feb 2012
Location: Manhattan
Posts: 73
Mentioned: 0 Post(s)
Tagged: 0 Thread(s)
Quoted: 1 Post(s)
Likes: 0
Liked 14 Times
in
3 Posts
Hi BianchiGirll,
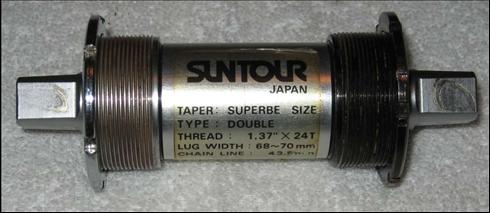
Thanks. Yes, mine is very similar. Can't believe you have one handy. A few minor diff: mine is called a "Mountain Triple" where yours says "Type: Double"
I've taken a closer look at the idea of tapping it out, but it's not going to work. Looking end-on from the outside with a magnifier, you're not actually looking at the bearing ring - there's a plate on top and the plate is welded to the turning-ridges, so there's nothing to tap against. Take a look:

It's like, you'd have to reach in from the back and grab the bearing donut to pull it out. Can't imagine how I'd do that!
Thanks for helping brain this out together!
Lance
Thanks. Yes, mine is very similar. Can't believe you have one handy. A few minor diff: mine is called a "Mountain Triple" where yours says "Type: Double"
I've taken a closer look at the idea of tapping it out, but it's not going to work. Looking end-on from the outside with a magnifier, you're not actually looking at the bearing ring - there's a plate on top and the plate is welded to the turning-ridges, so there's nothing to tap against. Take a look:
It's like, you'd have to reach in from the back and grab the bearing donut to pull it out. Can't imagine how I'd do that!
Thanks for helping brain this out together!
Lance
04-03-12, 05:01 PM
#4
Senior Member
Thread Starter
Join Date: Feb 2012
Location: Manhattan
Posts: 73
Mentioned: 0 Post(s)
Tagged: 0 Thread(s)
Quoted: 1 Post(s)
Likes: 0
Liked 14 Times
in
3 Posts
Hey eschlwc,
Great. That's what I needed to know - I'm replacing, not rebuilding.
Yes - I see the un55 on Amazon. A couple of questions:
I don't know if I'm JIS or ISO - and I don't see that info on the crank descriptions on Amazon. How can I make that determination and be sure I'm ordering the right standard?
Also -my shell width is 68mm - great.
The lock ring is inscribed: "Suntour 1.37 x 24T (L and R)"
My shell opening (inside diameter) is 33.25 mm (if that matters)
But my axel width is 131 mm; larger than the 127.5mm they show for the largest on Amazon. I'm running a triple, the old SunTour was labeled "Type: Mountain Triple". Do you think I can find a 131 or get by on a 127.5?
Thanks so much. I don't know what I'd do without all this help.
Best,
Lance
Last edited by LanceRides; 04-03-12 at 05:18 PM. Reason: more details
04-03-12, 07:26 PM
#5
missing in action

Join Date: Nov 2007
Posts: 4,483
Mentioned: 0 Post(s)
Tagged: 0 Thread(s)
Quoted: 42 Post(s)
Liked 49 Times
in
29 Posts
Assuming this is the Suntour unit with lock rings on both ends, you haven't removed the cup from the end pictured. It's probably just stuck on the body, try threading it halfway back into the BB, with the body sticking out (reversed,) then you should be able to get a good enough grip on the body to get it out of the cup. It shouldn't take much force.
04-03-12, 08:07 PM
#6
Senior Member
Thread Starter
Join Date: Feb 2012
Location: Manhattan
Posts: 73
Mentioned: 0 Post(s)
Tagged: 0 Thread(s)
Quoted: 1 Post(s)
Likes: 0
Liked 14 Times
in
3 Posts
Hey Chris,
My thinking at this point is that if I can get a new BB for around $25 it's the easy and best way to go. Even if I can access the bearing cartridge, I'll still be back on-line searching around for a new cartridge that'll fit. So replacement sure sounds good to me.
However, I'd like to understand what you're suggesting. Can you explain it more clearly for me; I don't know which part your trying to get off of which. And as for threading it back into the shell with the BB on the outside, well, I hate to use my frame as a vice! Do you think this is safe?
appreciate your suggestions,
Lance
04-03-12, 10:01 PM
#7
Banned.
Join Date: May 2011
Location: on the beach
Posts: 4,816
Bikes: '73 falcon sr, '76 grand record, '84 davidson
Mentioned: 0 Post(s)
Tagged: 0 Thread(s)
Quoted: 59 Post(s)
Likes: 0
Liked 22 Times
in
17 Posts
what cranks do you have, and is the spindle square tapered? take a pic!
04-03-12, 10:49 PM
#8
Senior Member
Thread Starter
Join Date: Feb 2012
Location: Manhattan
Posts: 73
Mentioned: 0 Post(s)
Tagged: 0 Thread(s)
Quoted: 1 Post(s)
Likes: 0
Liked 14 Times
in
3 Posts
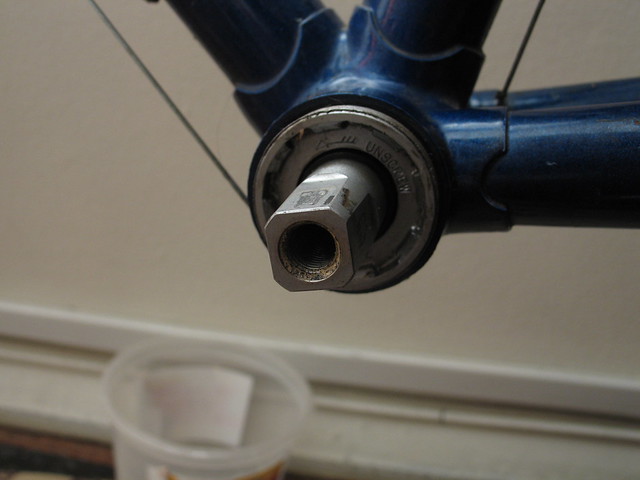
eschlwc - Sure, great. Here's some pics.
It's a Sugino AT, it's a triple.
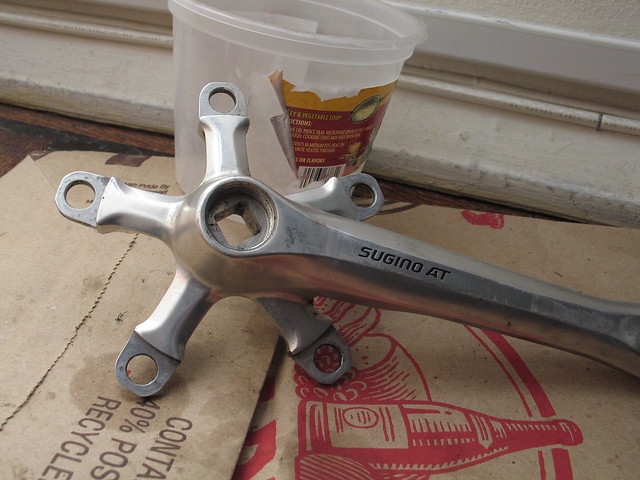
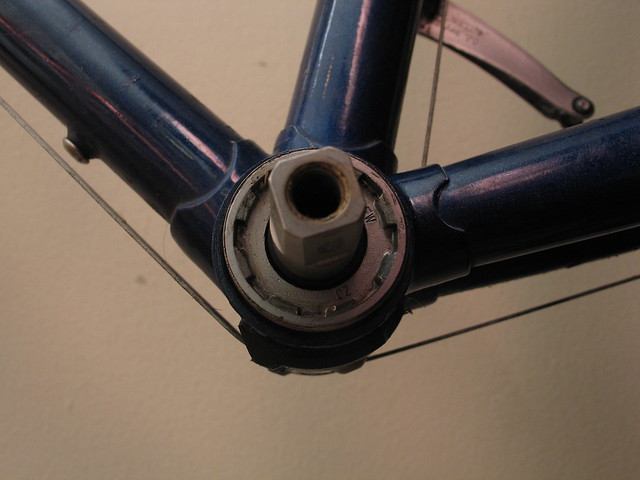
I'm showing the BB loosely installed in the shell. I was sort of putting it back together, but it's no good, it won't spin. Square, yes. Taper - I don't know how to tell by looking, but my calipers show it smaller at the outside by just a bit.
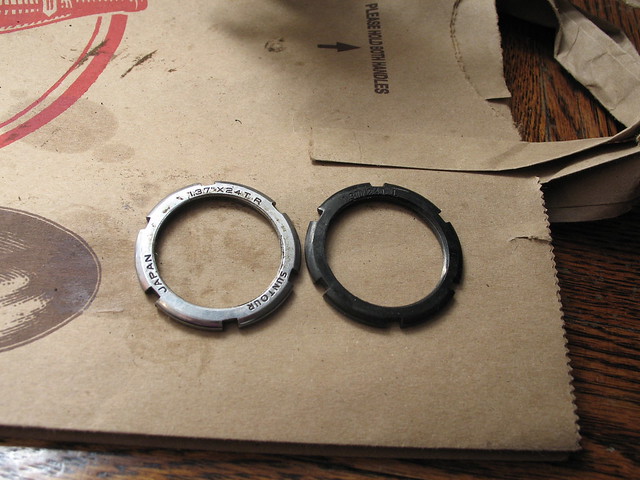
And yes, it's got lock rings on both ends; one silver, one black. (btw, I think the L & R on the inscription indicates threading - not which side of the bike it mounts on!)
Thanks for looking. Here's one more view
Lance
It's a Sugino AT, it's a triple.
I'm showing the BB loosely installed in the shell. I was sort of putting it back together, but it's no good, it won't spin. Square, yes. Taper - I don't know how to tell by looking, but my calipers show it smaller at the outside by just a bit.
And yes, it's got lock rings on both ends; one silver, one black. (btw, I think the L & R on the inscription indicates threading - not which side of the bike it mounts on!)
Thanks for looking. Here's one more view
Lance
04-04-12, 06:42 AM
#9
Senior Member
Thread Starter
Join Date: Feb 2012
Location: Manhattan
Posts: 73
Mentioned: 0 Post(s)
Tagged: 0 Thread(s)
Quoted: 1 Post(s)
Likes: 0
Liked 14 Times
in
3 Posts
Thanks for the ideas eschlwc. Yeah, a new powerlink chain would be a good reward. I'm off to my LBS today to see what they have on the shelf. Beautiful weather here this week and I don't want to waste it waiting for my super saver shipping. Thanks for your help!
04-04-12, 09:51 AM
#10
missing in action
Join Date: Nov 2007
Posts: 4,483
Mentioned: 0 Post(s)
Tagged: 0 Thread(s)
Quoted: 42 Post(s)
Liked 49 Times
in
29 Posts
Hey Chris,
My thinking at this point is that if I can get a new BB for around $25 it's the easy and best way to go. Even if I can access the bearing cartridge, I'll still be back on-line searching around for a new cartridge that'll fit. So replacement sure sounds good to me.
However, I'd like to understand what you're suggesting. Can you explain it more clearly for me; I don't know which part your trying to get off of which. And as for threading it back into the shell with the BB on the outside, well, I hate to use my frame as a vice! Do you think this is safe?
appreciate your suggestions,
Lance
My thinking at this point is that if I can get a new BB for around $25 it's the easy and best way to go. Even if I can access the bearing cartridge, I'll still be back on-line searching around for a new cartridge that'll fit. So replacement sure sounds good to me.
However, I'd like to understand what you're suggesting. Can you explain it more clearly for me; I don't know which part your trying to get off of which. And as for threading it back into the shell with the BB on the outside, well, I hate to use my frame as a vice! Do you think this is safe?
appreciate your suggestions,
Lance

What I was suggesting was to remove the remaining silver threaded cup from the end of the body so you can get to the bearing. It shouldn't be a tight fit at all, which is why I say it won't take much force to pull the body out. I don't think you'd be putting the frame at risk using only your hands and pulling the cartridge straight out.
04-04-12, 10:49 AM
#11
aka: Dr. Cannondale
Join Date: Jul 2009
Posts: 7,734
Mentioned: 234 Post(s)
Tagged: 0 Thread(s)
Quoted: 2155 Post(s)
Liked 3,404 Times
in
1,205 Posts
Been through this with one of these (at least the first generation, where it was easy to get to the bearings), and the cost of the new bearings was more than the cost of a UN54/55.
The offset on that 127.5 is probably close to what you have with the 131 and since it's only a couple MM, unless your inner ring is riding too close to the chainstay, it will work fine.
The offset on that 127.5 is probably close to what you have with the 131 and since it's only a couple MM, unless your inner ring is riding too close to the chainstay, it will work fine.
__________________
Hard at work in the Secret Underground Laboratory...
Hard at work in the Secret Underground Laboratory...
04-04-12, 06:38 PM
#12
Senior Member
Thread Starter
Join Date: Feb 2012
Location: Manhattan
Posts: 73
Mentioned: 0 Post(s)
Tagged: 0 Thread(s)
Quoted: 1 Post(s)
Likes: 0
Liked 14 Times
in
3 Posts
Update
Yes. You were all correct. It came apart. Here's an update.
I stopped by my LBS and my tech immediately noticed what a long axel it was. "that's a long axel" he said. "There's no Shimano that long!" he added. And he was right. My axel is a 131mm. Trying to use a smaller axel would be iffy. So we proceeded to try to disassemble what I had.
He and I examined the unit, trying to figure out how to get it apart. I mentioned eschlwc's idea of threading the body into a frame reversed. He was intrigued, got out an old frame and gave it a try. The silver sleeve was simply friction fit into the bearing assembly and came apart with a firm tug. Way to go Eschlwc!
On the other end, where the bearing assembly seemed to be married to the axel, it just took a sharp tap with a mallet to drop the axel out of the ring. Way to go BianciGirll!
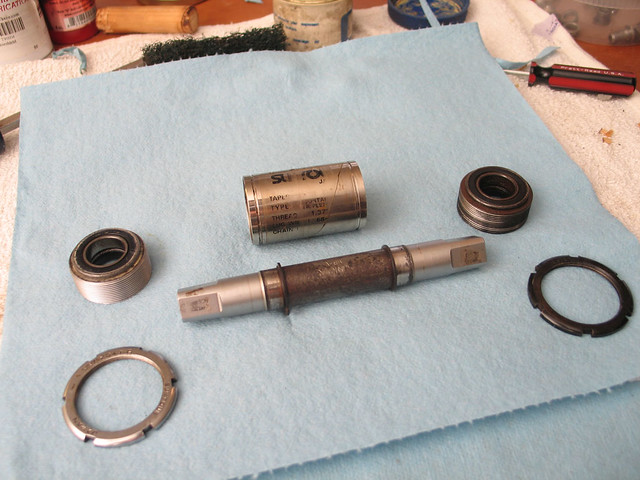
So here's what I was left with - (Note that I still have not accessed the bearing cartridge rings)
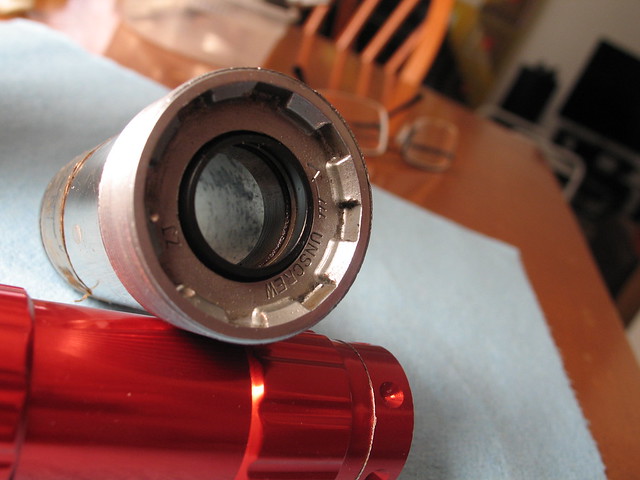
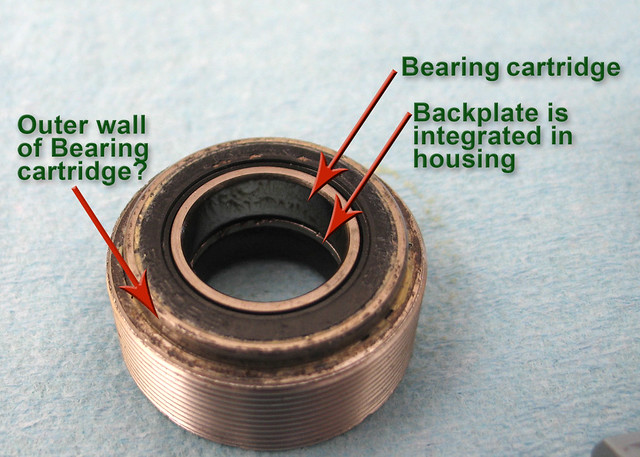
Back at home, my next challenge was to try to extract the bearing cart. Couldn't figure it out. Have a look. The bearing cart sits on top of a metal plate that's integrated into the assembly. There's no way to knock it out from the other side. I tried sticking a screw driver in there, in the space between the plate and the ring but that went nowhere.
Still open to suggestions on this question - how to get the darn thing out!
As I looked, and prodded, and lubed the thing, I noticed that there was a very thin washer that had degraded and was torn and twisted. The thing was nearly lost in the muck and rust. I pulled it off with tweezers and tossed it.
After all the cleaning, it seemed like it was spinning a little better. I decided to reassemble onto the bike and see where I stood. Long story long, it's fixed. It's lovely. With no chain on, the crank will spin for a good while without slowing down.
I think I'm out of the woods. Have to take a test drive tomorrow. Wanted to thank you all for your help and suggestions - all were good and helpful. Would still like to solve the removal the bearings mystery. But it's academic, I think I'll be able to ride tomorrow.
Lance, rides in NY
I stopped by my LBS and my tech immediately noticed what a long axel it was. "that's a long axel" he said. "There's no Shimano that long!" he added. And he was right. My axel is a 131mm. Trying to use a smaller axel would be iffy. So we proceeded to try to disassemble what I had.
He and I examined the unit, trying to figure out how to get it apart. I mentioned eschlwc's idea of threading the body into a frame reversed. He was intrigued, got out an old frame and gave it a try. The silver sleeve was simply friction fit into the bearing assembly and came apart with a firm tug. Way to go Eschlwc!
On the other end, where the bearing assembly seemed to be married to the axel, it just took a sharp tap with a mallet to drop the axel out of the ring. Way to go BianciGirll!
So here's what I was left with - (Note that I still have not accessed the bearing cartridge rings)
Back at home, my next challenge was to try to extract the bearing cart. Couldn't figure it out. Have a look. The bearing cart sits on top of a metal plate that's integrated into the assembly. There's no way to knock it out from the other side. I tried sticking a screw driver in there, in the space between the plate and the ring but that went nowhere.
Still open to suggestions on this question - how to get the darn thing out!
As I looked, and prodded, and lubed the thing, I noticed that there was a very thin washer that had degraded and was torn and twisted. The thing was nearly lost in the muck and rust. I pulled it off with tweezers and tossed it.
After all the cleaning, it seemed like it was spinning a little better. I decided to reassemble onto the bike and see where I stood. Long story long, it's fixed. It's lovely. With no chain on, the crank will spin for a good while without slowing down.
I think I'm out of the woods. Have to take a test drive tomorrow. Wanted to thank you all for your help and suggestions - all were good and helpful. Would still like to solve the removal the bearings mystery. But it's academic, I think I'll be able to ride tomorrow.
Lance, rides in NY
04-04-12, 07:31 PM
#13
Senior Member

Join Date: Aug 2006
Location: Knoxville, TN
Posts: 1,977
Bikes: Schwinn Paramount P15, Fisher Montare, Proteus, Rivendell Quickbeam
Mentioned: 1 Post(s)
Tagged: 0 Thread(s)
Quoted: 12 Post(s)
Likes: 0
Liked 4 Times
in
4 Posts
Now that the crank is installed, measure to see if you have 2mm space to run a 127 bb in the future.
04-04-12, 08:37 PM
#14
Senior Member
Thread Starter
Join Date: Feb 2012
Location: Manhattan
Posts: 73
Mentioned: 0 Post(s)
Tagged: 0 Thread(s)
Quoted: 1 Post(s)
Likes: 0
Liked 14 Times
in
3 Posts
Understood.
I've got like 3.5mm clearance. So, 131 - 127.5 = 3.5, about 1.75 less on each side. If my test ride fails, then it's easy to order up a Shimano 127.5.
I've got like 3.5mm clearance. So, 131 - 127.5 = 3.5, about 1.75 less on each side. If my test ride fails, then it's easy to order up a Shimano 127.5.
04-04-12, 09:07 PM
#15
missing in action
Join Date: Nov 2007
Posts: 4,483
Mentioned: 0 Post(s)
Tagged: 0 Thread(s)
Quoted: 42 Post(s)
Liked 49 Times
in
29 Posts
On the unit that I had in my possession, the bearings remained with the center section when the end cups were removed. It looks like there's some hardened grease around the circumference of the bearing in your annotated photo, I wonder if that's what's holding the bearing and cup together? If you have another opportunity to tear into it, I'd try soaking some penetrant such as Kroil or Pb'laster into that junction, then clean it up and see if it will come apart.
04-04-12, 09:16 PM
#16
Senior Member
Thread Starter
Join Date: Feb 2012
Location: Manhattan
Posts: 73
Mentioned: 0 Post(s)
Tagged: 0 Thread(s)
Quoted: 1 Post(s)
Likes: 0
Liked 14 Times
in
3 Posts
I see. Your bearings remained stuck in the sleeve, where mine is stuck in the cup. Yes, that seems plausible; the sleeve does tightly mate over that surface that I labeled "Outer Wall". So you think that that is the outer wall of the bearing cartridge.
Ok, if it comes out of the bike again, I'll give it a try.
Thanks.
Ok, if it comes out of the bike again, I'll give it a try.
Thanks.
04-05-12, 07:53 AM
#18
Senior Member
Join Date: Nov 2008
Location: South Jersey
Posts: 1,959
Bikes: Too many Bicycles to list
Mentioned: 10 Post(s)
Tagged: 0 Thread(s)
Quoted: 90 Post(s)
Liked 137 Times
in
45 Posts
A little bit of heat on the outer cup may also help dislodge the bearing, the one I have apart also has the bearings stuck on the center section and I have not tried to remove them yet. I want to try and rebuild the one I have because I like the fact that you can really dial in the chainline, mine is out of a C Dale ST500 that had a triple.
Glenn
Glenn
04-05-12, 10:29 AM
#19
Senior Member
Thread Starter
Join Date: Feb 2012
Location: Manhattan
Posts: 73
Mentioned: 0 Post(s)
Tagged: 0 Thread(s)
Quoted: 1 Post(s)
Likes: 0
Liked 14 Times
in
3 Posts
Just back from a lap in the park - everything seems great. Smoother than ever actually. Mission accomplished. Thanks for all the help.
(I'll be holding my breath that that paper-thin washer that sat on the axel between the bearings and a lockring washer isn't missed. It was mashed and I peeled it up out of the muck and tossed it. Do I need that thing?)
(I'll be holding my breath that that paper-thin washer that sat on the axel between the bearings and a lockring washer isn't missed. It was mashed and I peeled it up out of the muck and tossed it. Do I need that thing?)
04-05-12, 10:56 AM
#20
aka: Dr. Cannondale
Join Date: Jul 2009
Posts: 7,734
Mentioned: 234 Post(s)
Tagged: 0 Thread(s)
Quoted: 2155 Post(s)
Liked 3,404 Times
in
1,205 Posts
The paper thin washer is in all likelihood the bearing's inner race shield. Hence the rust, muck, etc. It will run fine until the bearings get contaminated and then will slowly grind itself into oblivion.
As I said before, I been there.
Best way to remove the bearing from the blind cup is to destroy it from the inner race outward, once the inner race ir removed the rest of it will pretty much fall out. Replacement bearings are easy to find online, I used a commercial bearing replacement firm and got really nice sealed ones that will probably outlast the bike they went on.
__________________
Hard at work in the Secret Underground Laboratory...
Hard at work in the Secret Underground Laboratory...
06-19-16, 02:50 PM
#21
Newbie
Join Date: Dec 2015
Location: Madison, WI, USA
Posts: 1
Bikes: Trek 1500, Sekai 4000, Takara fixed gear coversion
Mentioned: 0 Post(s)
Tagged: 0 Thread(s)
Quoted: 0 Post(s)
Likes: 0
Liked 0 Times
in
0 Posts
Hi,
First, thanks for this thread and the helpful information shared. It gave me confidence to try rebuilding. I am really happy with the result I achieved. It was economical and I think I should have a really nice, reliable, and low (no?) maintenance BB to depend on. I figure it may help someone out in the future if I share some information and photos.
1) new bearings
Here's a shot of the bearing removed, a standard 6903 bearing. I found good pricing online and bought 2 Phil Wood bearings for ~$20. The Phil part no. for the 6903 is PWX93.

2) Disassembly
When I removed the BB from the bike the "cups" and lock rings were easy to separate from the bearing, spindle, sleeve assembly. Here is everything off the bike, together.

I easily pulled the bearings off the spindle using a dead blow hammer. The outside diameter of the bearing is 30 mm, so a headset wrench supported by some scrap 2x4 to support the outer sleeve of the BB assembly was used when striking the spindle to separate the first bearing from the spindle.
Pics below demonstrate what this looks like, after I had already done the complete separation of the bearings. Once you have done the first separation the second is easy since you are left with just one bearing on the spindle with no sleeve, so you can easily rig up something to support the remaining bearing when you strike the spindle with the hammer to push out the spindle. It didn't take a lot of force from the hammer to separate the bearings. In the first separation you are separating the bearing on top from the spindle and you are separating the bearing on the bottom from the outer sleeve. It was easy for me to remove the bearing left in the sleeve. I forget what I did exactly. I think I was simply able to push or pop it out with say, the handle of a hammer or something.


My BB had the steel washer intact against the circlip on the drive side. No washer was present on the other side. There was a small buildup of dirty, hardened grease around the circumference of the spindle where the bearings are pressed against the steel washer and circlip. I carefully scraped and cleaned this off of both sides to promote the new bearings seating on the spindle squarely.

3) Assembly
I live in a town with 2 auto parts stores that loan tools for free. I rented a ball joint press for the day. It's a common generic set not specific to any particular makes or models. I'm thinking you could be okay with careful hammering instead of pressing, but I wanted to be gentle and safe. Maybe this is way too cautious and overkill. In performing a clutch replacement on a car I've hammered the pilot bearing into the flywheel and had no problems.

I used the press along with:
• 16 mm washers
I found this size allowed space for the spindle to pass through and for the bearing to be well supported.
• a piece of threaded pipe. I don't have the sizing. Just take your BB parts with you when you visit the hardware store.
• in two of the pics I used a third, bigger washer to bridge between the screw of the press and the threaded pipe. This must have been one I happened to have around and am not sure of the size.
Here's what I did.
1) Use one of the cup adapters and a 16 mm washer to support the bearing, and press it onto one end of the spindle. Looks like I did the drive side first. It takes very little effort to press.

2) Next, I pressed the spindle with the one bearing attached into the outer sleeve. The long length of the spindle is facing down into the sleeve , and the short end with the crank arm taper is facing up. The force is being applied through the pipe section onto the bearing (with a 16 mm washer on top). The random large washer I had around is between the screw and the pipe section.

3) Finally, as shown in the last 2 pics, press the remaining bearing onto the spindle and into the sleeve together with one press. Use the two 16 mm washers in supporting the 2 bearings and the large washer against the press screw.


The end result is a good-as-new, adjustable chain line BB with nice smooth bearings that should last a long time. I built a crude tool out of a hunk of wood to install the BB. I cut out a notch to fit around the spindle and then drove 2 screws in opposite sides of the spindle notch to engage with the notches in the BB "cups". The screw heads were ground and filed down into rectangles to fit the notches.
Mark
First, thanks for this thread and the helpful information shared. It gave me confidence to try rebuilding. I am really happy with the result I achieved. It was economical and I think I should have a really nice, reliable, and low (no?) maintenance BB to depend on. I figure it may help someone out in the future if I share some information and photos.
1) new bearings
Here's a shot of the bearing removed, a standard 6903 bearing. I found good pricing online and bought 2 Phil Wood bearings for ~$20. The Phil part no. for the 6903 is PWX93.
2) Disassembly
When I removed the BB from the bike the "cups" and lock rings were easy to separate from the bearing, spindle, sleeve assembly. Here is everything off the bike, together.
I easily pulled the bearings off the spindle using a dead blow hammer. The outside diameter of the bearing is 30 mm, so a headset wrench supported by some scrap 2x4 to support the outer sleeve of the BB assembly was used when striking the spindle to separate the first bearing from the spindle.
Pics below demonstrate what this looks like, after I had already done the complete separation of the bearings. Once you have done the first separation the second is easy since you are left with just one bearing on the spindle with no sleeve, so you can easily rig up something to support the remaining bearing when you strike the spindle with the hammer to push out the spindle. It didn't take a lot of force from the hammer to separate the bearings. In the first separation you are separating the bearing on top from the spindle and you are separating the bearing on the bottom from the outer sleeve. It was easy for me to remove the bearing left in the sleeve. I forget what I did exactly. I think I was simply able to push or pop it out with say, the handle of a hammer or something.
My BB had the steel washer intact against the circlip on the drive side. No washer was present on the other side. There was a small buildup of dirty, hardened grease around the circumference of the spindle where the bearings are pressed against the steel washer and circlip. I carefully scraped and cleaned this off of both sides to promote the new bearings seating on the spindle squarely.
3) Assembly
I live in a town with 2 auto parts stores that loan tools for free. I rented a ball joint press for the day. It's a common generic set not specific to any particular makes or models. I'm thinking you could be okay with careful hammering instead of pressing, but I wanted to be gentle and safe. Maybe this is way too cautious and overkill. In performing a clutch replacement on a car I've hammered the pilot bearing into the flywheel and had no problems.
I used the press along with:
• 16 mm washers
I found this size allowed space for the spindle to pass through and for the bearing to be well supported.
• a piece of threaded pipe. I don't have the sizing. Just take your BB parts with you when you visit the hardware store.
• in two of the pics I used a third, bigger washer to bridge between the screw of the press and the threaded pipe. This must have been one I happened to have around and am not sure of the size.
Here's what I did.
1) Use one of the cup adapters and a 16 mm washer to support the bearing, and press it onto one end of the spindle. Looks like I did the drive side first. It takes very little effort to press.
2) Next, I pressed the spindle with the one bearing attached into the outer sleeve. The long length of the spindle is facing down into the sleeve , and the short end with the crank arm taper is facing up. The force is being applied through the pipe section onto the bearing (with a 16 mm washer on top). The random large washer I had around is between the screw and the pipe section.
3) Finally, as shown in the last 2 pics, press the remaining bearing onto the spindle and into the sleeve together with one press. Use the two 16 mm washers in supporting the 2 bearings and the large washer against the press screw.
The end result is a good-as-new, adjustable chain line BB with nice smooth bearings that should last a long time. I built a crude tool out of a hunk of wood to install the BB. I cut out a notch to fit around the spindle and then drove 2 screws in opposite sides of the spindle notch to engage with the notches in the BB "cups". The screw heads were ground and filed down into rectangles to fit the notches.
Mark
Last edited by rideitifyoulike; 06-23-16 at 06:20 PM.
06-20-16, 12:35 AM
#22
Senior Member
Join Date: Oct 2015
Location: PDX
Posts: 13,043
Bikes: Merz x 5 + Specialized Merz Allez x 2, Strawberry/Newlands/DiNucci/Ti x3, Gordon, Fuso/Moulton x2, Bornstein, Paisley,1958-74 Paramounts x3, 3rensho, 74 Moto TC, 73-78 Raleigh Pro's x5, Marinoni x2, 1960 Cinelli SC, 1980 Bianchi SC, PX-10 X 2
Mentioned: 267 Post(s)
Tagged: 0 Thread(s)
Quoted: 4512 Post(s)
Liked 6,383 Times
in
3,669 Posts
Very well done. Overkill, maybe more like thorough problem solving that led to an excellent result. When not sure how to proceed caution usually prevails, most often when things like this go south it is from lack of experience, planning, time or all of these. Your process avoided any pitfalls and was completely successful.
06-20-16, 06:02 AM
#23
Semper Fi
Join Date: Jan 2008
Posts: 12,942
Mentioned: 89 Post(s)
Tagged: 0 Thread(s)
Quoted: 1172 Post(s)
Liked 358 Times
in
241 Posts
Nice report, Mark, and welcome aboard. You should fit in nicely here.
Bill
Bill
__________________
Semper Fi, USMC, 1975-1977
I Can Do All Things Through Him, Who Gives Me Strength. Philippians 4:13
Semper Fi, USMC, 1975-1977
I Can Do All Things Through Him, Who Gives Me Strength. Philippians 4:13
06-20-16, 06:49 AM
#24
Senior Member
Join Date: Apr 2006
Location: Washington County, Vermont, USA
Posts: 3,778
Bikes: 1966 Dawes Double Blue, 1976 Raleigh Gran Sport, 1975 Raleigh Sprite 27, 1980 Univega Viva Sport, 1971 Gitane Tour de France, 1984 Lotus Classique, 1976 Motobecane Grand Record
Mentioned: 77 Post(s)
Tagged: 0 Thread(s)
Quoted: 765 Post(s)
Liked 660 Times
in
351 Posts
What a heroic project! It would have been easier to install a 127 mm Shimano BB with a 2 mm spacer under the drive-side cup. But your way was more righteous, for sure.

