


decal application
 02-02-13 | 05:20 PM
#1
Thread Starter
Senior Member
Joined: May 2011
Posts: 1,288
Likes: 0
From: N Central Illinois
Bikes: 12 Bianchi Oltre VDCM,11 Bianchi Cavaria, 13 Bianchi Cavaria,12 Bianchi infinito, couple vintage Bianchi's and a 1980 alan super record
decal application
I bought some decals for my AlAn project and am a bit nervous to try and apply the down tube decals, only one shot. Can anyone give me ideas, tips as to how I get them on straight and w/o bubbles and basically without messing it up or things to avoid when doing this? I have never done decals on a bicycle before, thanks.
 02-02-13 | 05:22 PM
#2

Senior Member
Joined: Apr 2005
Posts: 16,748
Likes: 138
From: Wherever
What kind? Vinyl type from Cyclomondo, etc?
If so, yes, you get one shot at it, but if you use the "wet method" you get a bit of time to slide the decals into position.
Dampen the frame after cleaning it well and place the decals onto the wet frame and "squeegee" the water out from under the decal with a paper towel.
As for alignment, cut some very thin strips of blue masking tape, 1/8 inch or so, and place them on the frame tube to act as alignment guides. Same place both sides. If they don't look right, remove and re-place them. Place them just outside where the decal will sit. A long, thin line of tape will help the eye see if the decal is straight.
Last edited by rootboy; 02-02-13 at 05:31 PM.
02-02-13 | 05:48 PM
#4
Thread Starter
Senior Member
Joined: May 2011
Posts: 1,288
Likes: 0
From: N Central Illinois
Bikes: 12 Bianchi Oltre VDCM,11 Bianchi Cavaria, 13 Bianchi Cavaria,12 Bianchi infinito, couple vintage Bianchi's and a 1980 alan super record
Yes cyclomondo and excellent tips rootboy, many thanks. 
02-02-13 | 05:52 PM
#5
Senior Member
Joined: Apr 2005
Posts: 16,748
Likes: 138
From: Wherever
It's a bit of a white knuckle experience. I know it was for me. But if you've got everything laid out, ready to go, and sort of do a dry run or two before you start, it helps. Once you lay the decals onto the wet frame, you've only got about 3 or 5 seconds to get them into position, and having little strips of tape really helps. Work quickly and with confidence. It's not too bad. Good luck.
02-02-13 | 06:28 PM
#6
self propelled lifer
Joined: Aug 2007
Posts: 557
Likes: 12
From: Manitoba
Bikes: 1962 Dawes Galaxy; 72 Gitane Interclub;73 Peugeot PR10;78 Torpado Luxe;73 Grandis; 81 Raleigh/Carlton Comp; 85 Bianchi Stelvio; 87 Bianchi Brava; 73 Bottechia Special; 1969 or70 Bob Jackson
I use a drop or two of liquid soap in the application water and i've never had a problem repositioning the decals, even to the point of completely removing and repositioning them. Don't be afraid to use lots of water on the frame any excess will press out. I generally use my thumbs for the initial "squeegee" then a soft cloth to soak up the excess water. Greg Softley recommends at least a week before applying clearcoat to let any trapped moisture evaporate. Good luck!
02-02-13 | 11:51 PM
#7

Senior Member

Joined: Dec 2010
Posts: 655
Likes: 16
From: NC High Country
JR at Velocals recommended the soap technique, too. I think it helped a little. With a tall seat tube wrap, it's just a stressful deal because there's so much surface area, I think. On the Trek frame below, I added to the degree of difficulty by adding a second set of water bosses to the frame, so I had to punch a hole in the decal, get that in the right place, and still center the decal itself. Came out well enough, but wouldn't want to do it again, thank you very much! I agree with rootboy, lay it out with tape.

Last edited by simmonsgc; 02-03-13 at 12:02 AM.
02-03-13 | 06:45 AM
#8
Senior Member

Joined: May 2010
Posts: 3,904
Likes: 36
From: Hurricane Alley , Florida
Bikes: Treks (USA), Schwinn Paramount, Schwinn letour,Raleigh Team Professional, Gazelle GoldLine Racing, 2 Super Mondias, Carlton Professional.
Water with a bit of soap method, tape also. Measure, measure, and measure again. Once you're satified with the placement, squeeze out the water, I used a regular business card, instead of a plastic style "squeegee". The plastic would tend to "grab" the decal too much.
Decals by Velocals.
Decals by Velocals.
02-03-13 | 07:22 AM
#9
�part-timer�
Joined: Oct 2008
Posts: 659
Likes: 232
From: Tidewater VA
Bikes: 1975 Raleigh Gran Sport, 1978 Bertin C35, 1982 Trek 614, 1983 Trek 620, 1984 Nishiki Seral, 1995 Mercian Ko�M, 1998 Fisher HKEK, 2000 Rivendell RS, 2001 Heron Touring, 2016 Nobilette Custom
+1 on the drop of soap technique. That'll give you as much time as you need get the decal straight before you squeegee the water out and dab it dry.
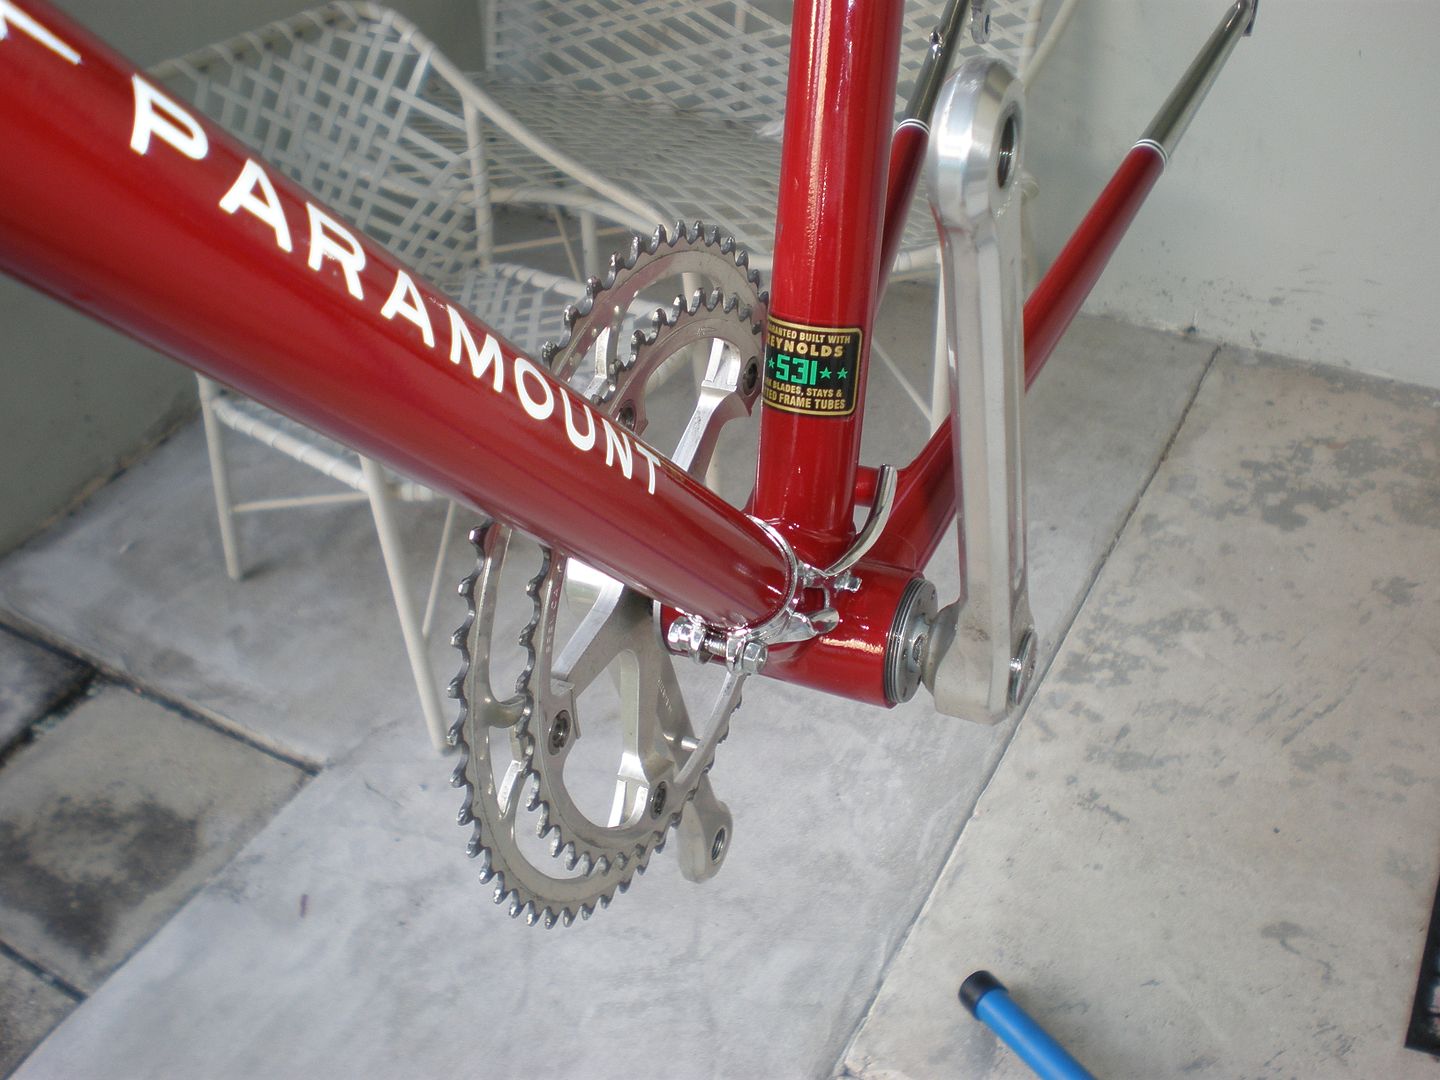
Another good tip is to make sure the downtube decal is positioned slightly higher than the middle of the tube, so it will appear centered when viewed from above. I didn't explain that very well, but look at the first photo of Michael Angelo's beautiful Paramount above, and you'll see what I mean.
Another good tip is to make sure the downtube decal is positioned slightly higher than the middle of the tube, so it will appear centered when viewed from above. I didn't explain that very well, but look at the first photo of Michael Angelo's beautiful Paramount above, and you'll see what I mean.
02-03-13 | 09:01 AM
#10
Senior Member
Joined: Dec 2010
Posts: 655
Likes: 16
From: NC High Country
Yes, and I'll add this even if it might seem overly anal. I was a little worried about that sharp edge on the the credit card, so I took some 200-grit and "rounded it over" a bit. The velocals decals are pretty thick, but discretion being the better part and all...
02-03-13 | 11:24 AM
#12
Thread Starter
Senior Member
Joined: May 2011
Posts: 1,288
Likes: 0
From: N Central Illinois
Bikes: 12 Bianchi Oltre VDCM,11 Bianchi Cavaria, 13 Bianchi Cavaria,12 Bianchi infinito, couple vintage Bianchi's and a 1980 alan super record
Rootboy, I hadn't considered clear coating the frame. As it is now, I have the original seat tube decals in battered shape, but I like keeping some of the original decals in tact to help show the way the bike was 32 years ago and also how well they held up. I am planning on just applying new down tube decals because someone suggested the frame looks unbalanced without the down tube decals and I do agree after looking at it. I had never heard of an edge sealing pen. I like that, thanks. I am off work today so I may lay out the decals this afternoon. I will also try some soap when I actually apply the decals. Great tips from everyone, thanks.
02-03-13 | 11:25 AM
#13
Thread Starter
Senior Member
Joined: May 2011
Posts: 1,288
Likes: 0
From: N Central Illinois
Bikes: 12 Bianchi Oltre VDCM,11 Bianchi Cavaria, 13 Bianchi Cavaria,12 Bianchi infinito, couple vintage Bianchi's and a 1980 alan super record
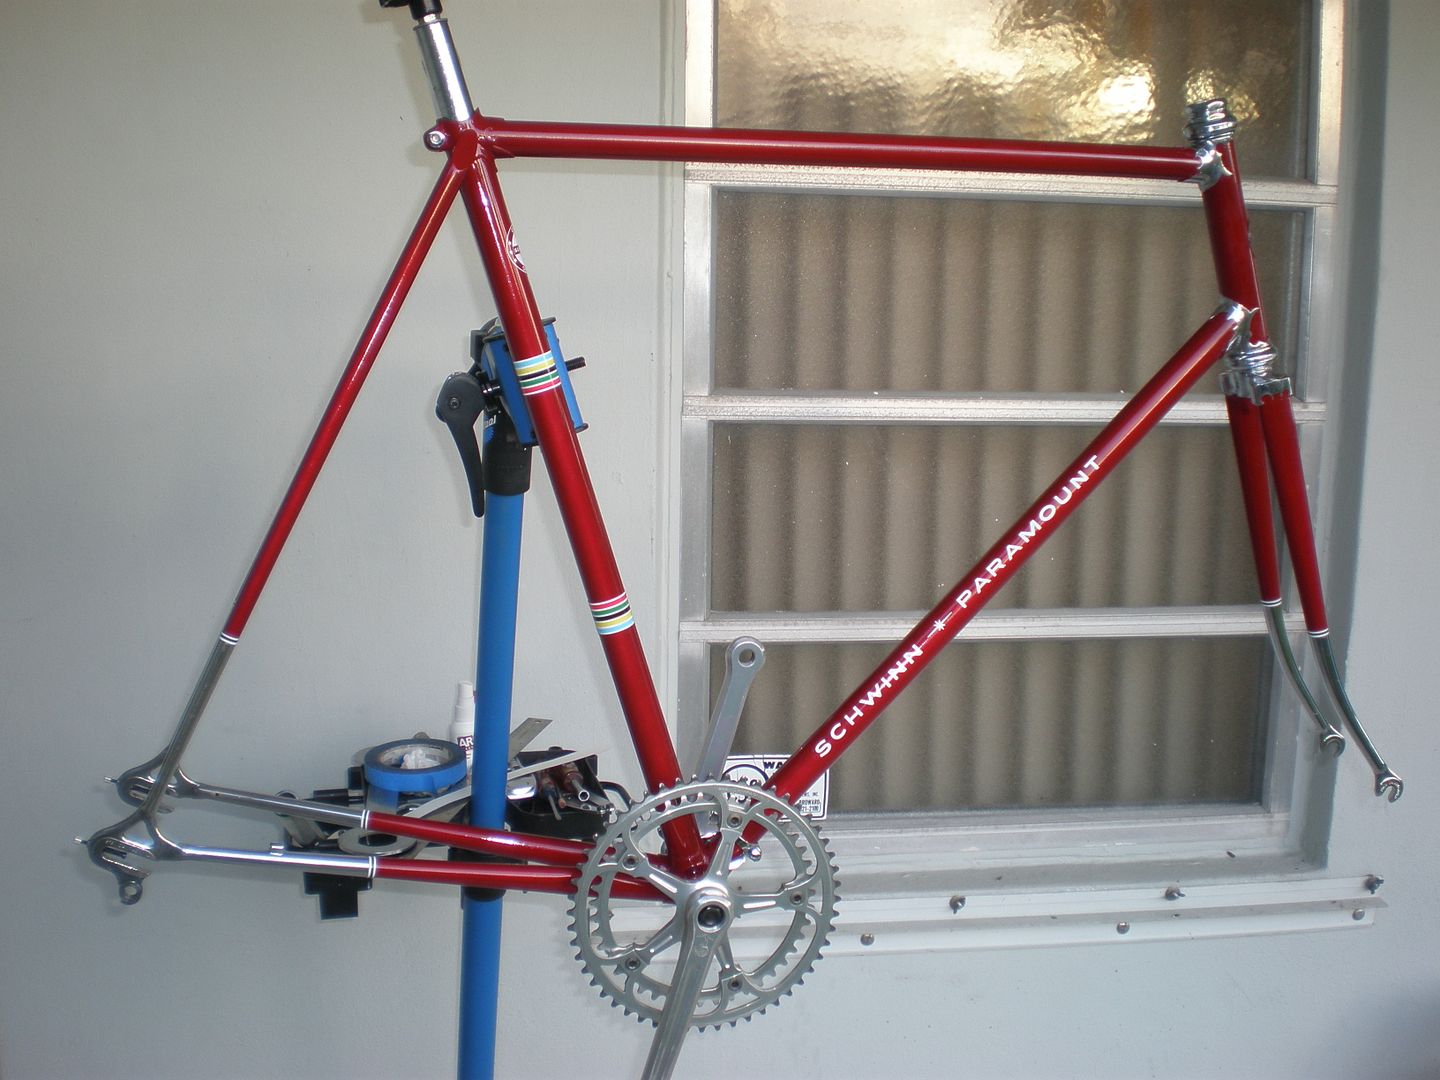
The trek and paramount look fantastic by the way. 
02-03-13 | 11:30 AM
#14
Senior Member
Joined: Apr 2005
Posts: 16,748
Likes: 138
From: Wherever
This is the one I used:
https://www.rvinyl.com/application/to...m#.UQ6elqVj65Q
https://www.rvinyl.com/application/to...m#.UQ6elqVj65Q
02-03-13 | 12:19 PM
#15
Thread Starter
Senior Member
Joined: May 2011
Posts: 1,288
Likes: 0
From: N Central Illinois
Bikes: 12 Bianchi Oltre VDCM,11 Bianchi Cavaria, 13 Bianchi Cavaria,12 Bianchi infinito, couple vintage Bianchi's and a 1980 alan super record
I just ordered one, thanks for the link.
02-03-13 | 01:07 PM
#16
Thread Starter
Senior Member
Joined: May 2011
Posts: 1,288
Likes: 0
From: N Central Illinois
Bikes: 12 Bianchi Oltre VDCM,11 Bianchi Cavaria, 13 Bianchi Cavaria,12 Bianchi infinito, couple vintage Bianchi's and a 1980 alan super record
There is a considerable difference in size from the original.

02-03-13 | 02:38 PM
#17
Thread Starter
Senior Member
Joined: May 2011
Posts: 1,288
Likes: 0
From: N Central Illinois
Bikes: 12 Bianchi Oltre VDCM,11 Bianchi Cavaria, 13 Bianchi Cavaria,12 Bianchi infinito, couple vintage Bianchi's and a 1980 alan super record
02-03-13 | 03:16 PM
#18
Senior Member
Joined: May 2010
Posts: 3,904
Likes: 36
From: Hurricane Alley , Florida
Bikes: Treks (USA), Schwinn Paramount, Schwinn letour,Raleigh Team Professional, Gazelle GoldLine Racing, 2 Super Mondias, Carlton Professional.
02-03-13 | 04:14 PM
#19
Thread Starter
Senior Member
Joined: May 2011
Posts: 1,288
Likes: 0
From: N Central Illinois
Bikes: 12 Bianchi Oltre VDCM,11 Bianchi Cavaria, 13 Bianchi Cavaria,12 Bianchi infinito, couple vintage Bianchi's and a 1980 alan super record
 02-06-13 | 01:55 PM
#20
Thread Starter
Senior Member
Joined: May 2011
Posts: 1,288
Likes: 0
From: N Central Illinois
Bikes: 12 Bianchi Oltre VDCM,11 Bianchi Cavaria, 13 Bianchi Cavaria,12 Bianchi infinito, couple vintage Bianchi's and a 1980 alan super record
Well I applied the AlAn decals on the down tube last night. It wasn't an easy start because with water and a bit of soap I couldn't get the decals to even stay in place. Once I wiped of the water the decals did stick and I was able to get them in place. I did have to pull them to re stick and ended up with one of the A's having a very slight crease (blah!). Over all it was pretty smooth and I will know what to expect next time I do this. I would like to that the few that responded with tips to help with the learning process. Now if I can ever get the replacement cup to show up I can finish the assembly.

Thread
Thread Starter
Forum
Replies
Last Post
EveryManALion
Singlespeed & Fixed Gear
3
03-24-10 05:49 AM
