


Suggestions requested for a front rack kludge
 11-09-14 | 11:17 PM
#1

Thread Starter
Senior Member
Joined: Jan 2011
Posts: 781
Likes: 8
From: Utah
Suggestions requested for a front rack kludge
Hello-
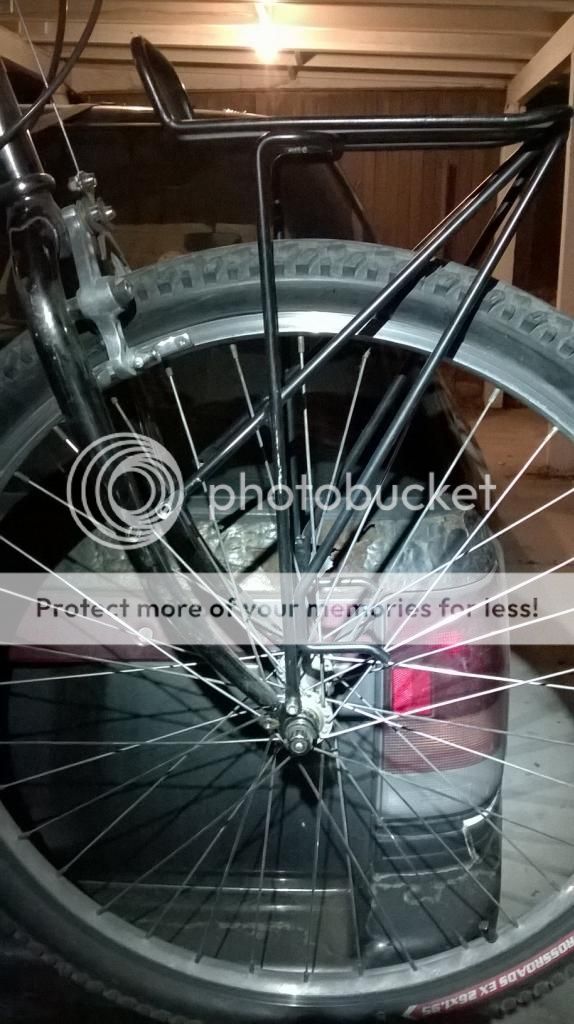
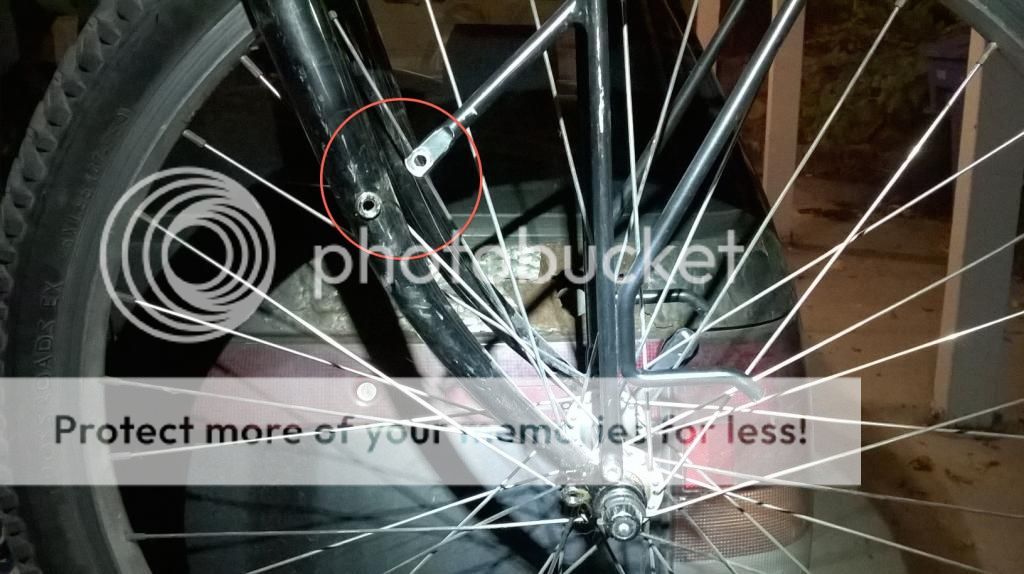
I got this Blackburn front rack in a great trade with a BF member. It's not designed with any adjustability so I am having trouble mounting it on my High Sierra, partly due to the very slack HT angle. For a number of reasons I can't use the lower/rear of the two eyelets. So in using the upper/forward eyelets, if I want the rack to be even remotely level, I have a sizable gap between rack strut and mid-fork boss (see photos). I am thinking that I can use something to bridge this gap, especially because I don't plan to carry a lot of weight and that strut does not seem to bear nearly as much of the weight as the other.
Does this seem like a reasonable idea? If so, what material would you suggest I use? I was thinking of aluminum flat bar stock, but am not sure which thickness would be best. I have basic tools but no access to a machine shop or anything like that. Thanks!


 11-10-14 | 12:17 AM
#2
Senior Member
Joined: Jan 2014
Posts: 272
Likes: 2
If you aren't too concerned about the looks you can probably get either flat bar or pre-drilled flat bar from any hardware store. Should get something at least 1/8-1/4" thick, probably aluminum so it doesn't rust and is easy to drill. Another option are "p" clamps which come in different lengths and diameters from most auto stores.
11-10-14 | 01:22 AM
#3

Senior Member


Joined: Nov 2011
Posts: 7,951
Likes: 688
From: Port Angeles, WA
Bikes: A green one, "Ragleigh," or something.
IMHO, 1/8" aluminum flat bar stock would be stiff enough for a secondary mounting point like that. 1/4" would be overkill. The lighter guage is super easy to work with; being easily cut with tin snips and easy to drill. I used hand tools to fashion some of that into fender mounting hardware on my latest Super Course build.
Plus it's so cheap, if you botch the first attempt at making the hardware you need, you've still got plenty of material left for the next four.
Plus it's so cheap, if you botch the first attempt at making the hardware you need, you've still got plenty of material left for the next four.
__________________
● 1971 Grandis SL ● 1972 Lambert Grand Prix frankenbike ● 1972 Raleigh Super Course fixie ● 1973 Nishiki Semi-Pro ● 1979 Motobecane Grand Jubile ●1980 Apollo "Legnano" ● 1984 Peugeot Vagabond ● 1985 Shogun Prairie Breaker ● 1986 Merckx Super Corsa ● 1987 Schwinn Tempo ● 1988 Schwinn Voyageur ● 1989 Bottechia Team ADR replica ● 1990 Cannondale ST600 ● 1993 Technium RT600 ● 1996 Kona Lava Dome ●
● 1971 Grandis SL ● 1972 Lambert Grand Prix frankenbike ● 1972 Raleigh Super Course fixie ● 1973 Nishiki Semi-Pro ● 1979 Motobecane Grand Jubile ●1980 Apollo "Legnano" ● 1984 Peugeot Vagabond ● 1985 Shogun Prairie Breaker ● 1986 Merckx Super Corsa ● 1987 Schwinn Tempo ● 1988 Schwinn Voyageur ● 1989 Bottechia Team ADR replica ● 1990 Cannondale ST600 ● 1993 Technium RT600 ● 1996 Kona Lava Dome ●
11-10-14 | 08:04 AM
#4

Extraordinary Magnitude

Joined: Aug 2009
Posts: 14,081
Likes: 2,135
From: Waukesha WI
Bikes: 1978 Trek TX700; 1978/79 Trek 736; 1984 Specialized Stumpjumper Sport; 1984 Schwinn Voyageur SP; 1985 Trek 620; 1985 Trek 720; 1986 Trek 400 Elance; 1987 Schwinn High Sierra; 1990 Miyata 1000LT
What reasons can you not use the lower eyelets?
In my experience with the racks that mount to the fork end eyelets- they're made to mount to the lower eyelets. The length of that strut is designed to go to the lower eyelet and the upper strut(s) mount to the fork crown and the rack is leve.
I would just use a spacer between the eyelet and the rack strut, it holds the rack strut out of the way for the fork. Moving it down and back and rotating the rack should be enough to make the holes match up and level out the rack.
__________________
*Recipient of the 2006 Time Magazine "Person Of The Year" Award*
Commence to jigglin� huh?!?!
"But hey, always love to hear from opinionated amateurs." -says some guy to Mr. Marshall.
Commence to jigglin� huh?!?!
"But hey, always love to hear from opinionated amateurs." -says some guy to Mr. Marshall.
Last edited by The Golden Boy; 11-10-14 at 08:18 AM. Reason: Apparently I didn't finish typing...
11-10-14 | 10:33 AM
#5
Thread Starter
Senior Member
Joined: Jan 2011
Posts: 781
Likes: 8
From: Utah
Thanks for the information. Very helpful. Lascauxcaveman, that SC looks great! I am impressed by your artisanal aluminum-working skills.  But truly impressed by the woodies!
Golden Boy, I considered the spacers but due to both the rack and one of the mid-fork bosses being a bit out of alignment, it simply will not mount. Additionally (and strangely) the boss takes a larger bolt than the usual, so I would have to drill out the rack strut.
But truly impressed by the woodies!Golden Boy, I considered the spacers but due to both the rack and one of the mid-fork bosses being a bit out of alignment, it simply will not mount. Additionally (and strangely) the boss takes a larger bolt than the usual, so I would have to drill out the rack strut.
11-10-14 | 11:40 AM
#6

Senior Member
Joined: Oct 2014
Posts: 195
Likes: 4
I agree with the previous post. Why can't you use the lower/rear eyelets? Is it because you need them for a fender? If so, I'd use them for both!
It looks like you're making this too complicated by extending the upper arms. Plus, you may also be underestimating the force that will be applied to the upper arms. When you hit bumps or brake hard, those upper arms may receive just as much force as the lower arms.
My advice is to use the lower/rear eyelets and see how close the upper arms are. It looks like they will still be a little too far away from the upper fork mounting holes---but not much. Then I would bend the lower arms just below the front struts so that the upper arms reach the upper fork holes. Here's an illustration (click on it to see it at full size):
My drawing shows your original idea on the left. The center drawing shows that the upper arm will still be a little distance away from the upper fork mounting point. The last drawing on the right shows that all you'll need to do is add a gentle bend to the lower arm and elongate the mounting hole in the lower arm to make the upper arm fit. An alternative to elongating the hole would be to bend the upper arm upward a little.
I tried to preserve the angle of rack bed as was shown in your original photo. But it doesn't appear to be perfectly level---it appears to tip back toward the bike a little. This seams okay to me. But if you wanted it perfectly level, you may need to bend the lower arm a little more than is shown in my drawing.
Kind regards, RoadLight
11-10-14 | 11:49 AM
#7
Banned
Joined: Jun 2010
Posts: 43,586
Likes: 1,380
From: NW,Oregon Coast
Bikes: 8
++ 1 use the Proper Holes , rear of the dropout with some spacer washers* between the Lower fork tip and the Rack strut.
Then bolt to the mid fork braze on Directly.. * presta valve stem ring nuts work great , an LBS will give them away.
You reasons are probably your self imposed limit, and not meaningful. . Ive mounted those racks Many times in the past 20 years..
So many forks only have the lower Eyelet .. and the top of the rack does Not have to be Dead Level to work fine.
Then bolt to the mid fork braze on Directly.. * presta valve stem ring nuts work great , an LBS will give them away.
For a number of reasons I can't use the lower/rear of the two eyelets
So many forks only have the lower Eyelet .. and the top of the rack does Not have to be Dead Level to work fine.
Last edited by fietsbob; 11-10-14 at 11:57 AM.
11-10-14 | 11:49 AM
#8
Senior Member
Joined: Nov 2011
Posts: 7,951
Likes: 688
From: Port Angeles, WA
Bikes: A green one, "Ragleigh," or something.
^ Very nice work there. And definitely more elegant than making add-ons out of flat stock scrap. It bears mentioning that the little bend on the end of the rack's legs should be got right on the first attempt, as aluminum does not want to be bent more than once.
__________________
● 1971 Grandis SL ● 1972 Lambert Grand Prix frankenbike ● 1972 Raleigh Super Course fixie ● 1973 Nishiki Semi-Pro ● 1979 Motobecane Grand Jubile ●1980 Apollo "Legnano" ● 1984 Peugeot Vagabond ● 1985 Shogun Prairie Breaker ● 1986 Merckx Super Corsa ● 1987 Schwinn Tempo ● 1988 Schwinn Voyageur ● 1989 Bottechia Team ADR replica ● 1990 Cannondale ST600 ● 1993 Technium RT600 ● 1996 Kona Lava Dome ●
● 1971 Grandis SL ● 1972 Lambert Grand Prix frankenbike ● 1972 Raleigh Super Course fixie ● 1973 Nishiki Semi-Pro ● 1979 Motobecane Grand Jubile ●1980 Apollo "Legnano" ● 1984 Peugeot Vagabond ● 1985 Shogun Prairie Breaker ● 1986 Merckx Super Corsa ● 1987 Schwinn Tempo ● 1988 Schwinn Voyageur ● 1989 Bottechia Team ADR replica ● 1990 Cannondale ST600 ● 1993 Technium RT600 ● 1996 Kona Lava Dome ●
11-10-14 | 03:15 PM
#9
Thread Starter
Senior Member
Joined: Jan 2011
Posts: 781
Likes: 8
From: Utah
RoadLight - wow - thank you for the thoughtful and detailed reply. That makes a lot of sense. It would be somewhat tricky (also having to enlarge the mounting hole on the diagonal strut and get that right "the first time") but workable.
11-10-14 | 08:36 PM
#10
Senior Member
Joined: Oct 2014
Posts: 195
Likes: 4
As for the mounting hole on the bottom rack arm, a small round file should make quick work of it---especially if the rack is aluminum. You should wait to do the filing until after the bend has been made, then mark where the hole needs to be with a pen poked through the eyelet.
Finally, one more idea: If you want to avoid bending the lower rack arm, you could fabricate a small piece of metal to bridge the gap between where the bottom/rear eyelet is and where the bottom rack hole needs to be. If I understand you, you need a spacer and this piece could serve that purpose, too. I think this would be a better place to do this than at the upper arm as envisioned in your original post. A small piece of rectangular aluminum with two holes should suffice. One end would mount to the existing bottom/rear eyelet, the other would mount to the rack. I'd use the strongest aluminum you can find or maybe use steel.
Kind regards, RoadLight

