


Any advice I can get on wiring a light for the first time?
 07-13-16 | 02:53 PM
#1

Thread Starter
Senior Member

Joined: Sep 2008
Posts: 488
Likes: 16
From: Ashfield, Mass.
Any advice I can get on wiring a light for the first time?
I'm installing a B&M Cyo T which doesn't come with a lot of installation instructions. It's my first foray into the world of dyno hub powered lights. I am also installing a fender mounted B&M tail light.
My hub is a Shutter which has the Shimano-type connection. What is the best angle for the connection to be set at? Up parallel to the fork blade? Down with a bit of slack? What aspect makes for the easiest roadside wheel removal? Are there any pitfalls to warn me about?
I'd like to run the wire for the tail light up inside the fender. I'm thinking small pieces of heavy duty drinking straw that are hot glued onto the inner fender surface to provide the channel for holding the wire in place. There is pretty minimal clearance so whatever I use needs to be low profile.
I'd also like to have a spade connection to separate the wire where it enters the fender in order to make removing the fender less complicated. Are there any tricks to keeping spade connections corrosion-free over the long term?
Thanks for any tips and tricks people may be able to share.
 07-13-16 | 04:50 PM
#2

Senior Member
Joined: Feb 2008
Posts: 5,321
Likes: 4,834
From: Peoria, IL
There are periodic discussions of this sort of thing on the I-bob google group:
https://groups.google.com/forum/?hl=...m/internet-bob
I've been using hub dynamos for a long time, but it has always been Schmidt dynamos. The only thing I can suggest is to have the connector aimed down a bit, if only so that any water that runs down the wire (from the fork) will drip off of the bend at the bottom instead of running into the connector.
For attaching wire to the inside of a fender, you might check into using aluminum tape. I recall hearing good things about this.
The key to keeping spade connectors free of corrosion is to not use spade connectors.
Or more specifically, use connectors that are designed for use in wet, lousy conditions.
Personally, I just use high quality connector pins and sockets and use heatshrink tubing to shield the joint from moisture as much as possible. I sometimes use dielectric grease to keep moisture out of the joint where the pin goes into the socket, but the pins and sockets are nickle plated and are quite resistant to corrosion. You can pick up dielectric grease at most Radio Shacks.
I've got a lot of electronics experience with aircraft and earthmoving equipment, so my habits and preferences don't match well with the rest of the folks using dynamos. Honestly, the bike industry knows just enough about electronics and and good connectors to get by, and the customers are probably too price sensitive to use connectors built to survive frequent exposure to moisture. For the layperson, I'm not sure what the best solution is. Maybe check with an auto parts store to see what sort of moisture-resistant connectors they sell?
Steve in Peoria
07-13-16 | 06:02 PM
#3
Senior Member

Joined: Sep 2015
Posts: 1,695
Likes: 113
From: New Jersey
The connector that comes with the hub is the connector you must use, so there isn't much sense in worrying about it. As the above poster mentioned, it would be wise to use dielectric grease in the connector. You neither need to, nor should, pack it full. Just in the circular protrusions through which the wires pass (these may already be filled, as they are on Shimano hubs). Dielectric grease can be bought in small sachets from auto parts stores, or begged from a friendly [car] mechanic. You would require unusually high-quality shrink wrap to seal the connector/wire junction, due to its size. Stuff that shrinks a lot is not cheap, but you can 'build up' the strands with shrink wrap if you are patient/don't mind the slightly chunky look. Unless you're planning on submerging the bike (why?), the dielectric grease is sufficient in practice.
If you were electronically (mechanically?) inclined, you could theoretically chop the spades off of the Cyo, and replace them with better connectors, but I find well applied shrink wrap works fine to keep moisture out. If you are unconcerned about removing the light easily, you can even place the shrink completely over the spade junction, locking it in place. Mind you, this only applies to the taillight, as you are going to remove, if present, the spades that are attached for 'traditional' hub mounting, in lieu of the SP/Shimano/Sanyo system.
I leave quite a bit of slack/extra wiring in my system, as it allows for re-cutting the ends in the future, or for the unexpected, ie: the light mount breaking away. It is always prudent to leave slack in the system, as with cabling on a bike. I spiral wrap the excess, as with a wired cyclo-computer, but usually only on the fork. The taillight wiring is easily replaced, so I do not use much more than I need, perhaps 1-2" of slack. You can neatly pierce a small hole behind the seatstay brace for the fender, and feed the taillight wire through there. A rubber grommet may be used, if desired. Bike shops may have spare Di2 grommets about, which fit dynamo wiring nicely. Again, as above, you may lay the wiring inside the fender, and tape over it with alumininum tape, if your fenders have no provisions for mounting the wiring. If putting the wiring near the tire makes you nervous, you may run it along the edge of the fender, taped over.
That said, if you have a rack, consider using a rack-mount light, as it greatly simplifies [clean] installation...
07-13-16 | 09:26 PM
#4
Thread Starter
Senior Member
Joined: Sep 2008
Posts: 488
Likes: 16
From: Ashfield, Mass.
Thanks for all the advice. I'm unlikely to go with a rack-mount for the tail light at this point since I have the fender mount already and am planning to run the bike with fenders most of the time. I'm not a long time fender user though, so like the ability to have them on and off as easily as possible.
Any reason to distrust any of the advice here?: https://janheine.wordpress.com/2012/...generator-hub/
The one qualification to the above is that I have a Shutter, not a Son, hub so will be making a different connection at the hub end: Shutter install
Any reason to distrust any of the advice here?: https://janheine.wordpress.com/2012/...generator-hub/
The one qualification to the above is that I have a Shutter, not a Son, hub so will be making a different connection at the hub end: Shutter install
07-14-16 | 08:55 AM
#5

Senior Member
Joined: Apr 2010
Posts: 6,341
Likes: 326
From: Mountain View, CA USA and Golden, CO USA
Bikes: 97 Litespeed, 50-39-30x13-26 10 cogs, Campagnolo Ultrashift, retroreflective rims on SON28/PowerTap hubs
I'm installing a B&M Cyo T which doesn't come with a lot of installation instructions. It's my first foray into the world of dyno hub powered lights. I am also installing a fender mounted B&M tail light.
My hub is a Shutter which has the Shimano-type connection. What is the best angle for the connection to be set at? Up parallel to the fork blade? Down with a bit of slack? What aspect makes for the easiest roadside wheel removal?
My hub is a Shutter which has the Shimano-type connection. What is the best angle for the connection to be set at? Up parallel to the fork blade? Down with a bit of slack? What aspect makes for the easiest roadside wheel removal?
https://www.sinewavecycles.com/collec...ase-connectors
Split the cable ~6" up with the two connectors staggered so they can't short. Install the short piece on the hub. Set it up so the wire from the hub runs parallel to the blades and the connection is on the outside rear of the fork leg.
Compared to a direct connection there's much less slack to catch on something, it's easier to connect, there's no stress on the hub connection when you unplug it, and it looks better.
I left a bunch of slack for more flexibility relocating things which I stowed in loops beneath zip-ties. I'd get rid of it for a cleaner install (I also have a USB-Werk with micro-banana connections) and just use a longer stub in the unlikely event I make changes although the cosmetics don't justify redoing the connectors.

I'd also like to have a spade connection to separate the wire where it enters the fender in order to make removing the fender less complicated.
Are there any tricks to keeping spade connections corrosion-free over the long term?
Last edited by Drew Eckhardt; 07-14-16 at 09:23 AM.
07-14-16 | 11:56 AM
#6
Senior Member
Joined: Feb 2008
Posts: 5,321
Likes: 4,834
From: Peoria, IL
<..snip..>
Any reason to distrust any of the advice here?: https://janheine.wordpress.com/2012/...generator-hub/
<..snip.>
Any reason to distrust any of the advice here?: https://janheine.wordpress.com/2012/...generator-hub/
<..snip.>
For a soldered connection like this, the biggest risk of failure comes from wire fatigue at the point where the solder has wicked up the wire. Strain relief reduces the flexing of the wire strands at the point where the wire changes from "very stiff" (i.e. at the end of the section with solder) to "very flexible" (no solder in the wire strands). If you look at the common connectors that you use, such as headphones, AC power cords for appliances, etc., you'll see a section of mechanical support for the wires.
Steve in Peoria
07-14-16 | 03:02 PM
#7
Thread Starter
Senior Member
Joined: Sep 2008
Posts: 488
Likes: 16
From: Ashfield, Mass.
Buy a set (two male, two female) of gold plated micro banana plugs from sinewave cycles for $4 including the six pieces of shrink-wrap you'll want for a clean installation
Split the cable ~6" up with the two connectors staggered so they can't short. Install the short piece on the hub. Set it up so the wire from the hub runs parallel to the blades and the connection is on the outside rear of the fork leg.
Compared to a direct connection there's much less slack to catch on something, it's easier to connect, there's no stress on the hub connection when you unplug it, and it looks better.
Thanks
07-14-16 | 04:04 PM
#8
Senior Member
Joined: Apr 2010
Posts: 6,341
Likes: 326
From: Mountain View, CA USA and Golden, CO USA
Bikes: 97 Litespeed, 50-39-30x13-26 10 cogs, Campagnolo Ultrashift, retroreflective rims on SON28/PowerTap hubs
Right, it makes it easier. You don't need to reach as far when straddling the bike to disconnect the cables, the connections separate straight up and down, the connection is more accessible than when it's sandwiched between the hub and dropout, and it takes less force to separate than the spades on Schmidt hubs which isn't an issue for you.
07-14-16 | 04:35 PM
#9
Senior Member
Joined: Feb 2008
Posts: 5,321
Likes: 4,834
From: Peoria, IL
I'm not sure how easy the SP /Shimano connector is to connect and disconnect, but the spades used on the SON are not particularly convenient. It didn't take me long to figure out to add a set of pins & sockets in-line with the dynamo, just a few inches from it.
Here's a shot of what I did with my first generation SON....
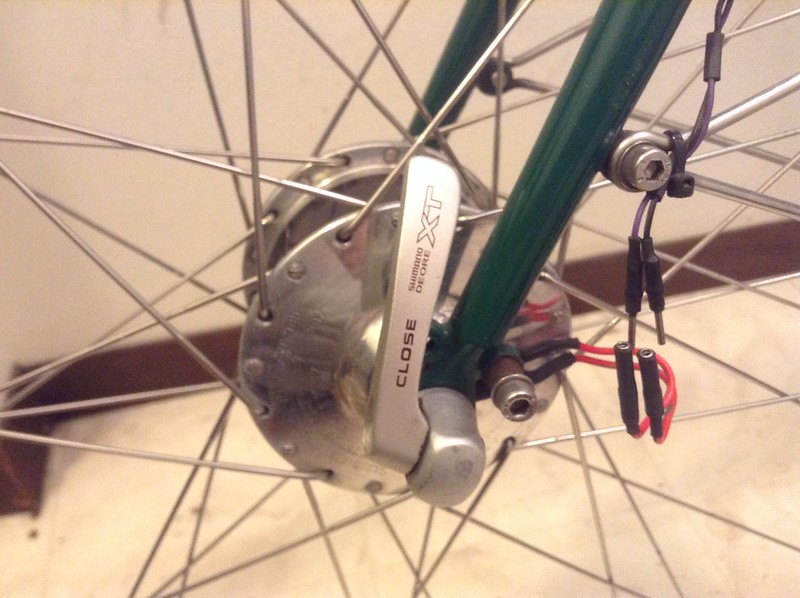
the pins and sockets are from Amphenol... specifically, their AT series. They can be purchased from Digi-key.
Steve in Peoria
Here's a shot of what I did with my first generation SON....
the pins and sockets are from Amphenol... specifically, their AT series. They can be purchased from Digi-key.
Steve in Peoria
07-14-16 | 05:26 PM
#10
Thread Starter
Senior Member
Joined: Sep 2008
Posts: 488
Likes: 16
From: Ashfield, Mass.
Haven't used it yet, but just pulling on the female (outer part) it seems to disconnect quite easily. Perhaps surprisingly too easy to overcome the slight detent (if that is the correct term in this case) that holds the two pieces together.

Thread
Thread Starter
Forum
Replies
Last Post
mastakebob
Electronics, Lighting, & Gadgets
14
09-08-14 08:24 PM
