


Poor workmanship in B&M Toplight Line Plus
 02-09-17 | 12:43 AM
#1
Thread Starter
Senior Member


Joined: Sep 2005
Posts: 3,838
Likes: 398
From: Michigan
Bikes: Trek 730 (quad), 720 & 830, Bike Friday NWT, Brompton M36R & M6R, Dahon HAT060 & HT060, ...
Poor workmanship in B&M Toplight Line Plus
After a few years of use, I realized that the standlight in my B&M Toplight Line Plus dynamo rear light quit working. I normally rely on my own backup system but, due to the change in configuration, I had to fall back onto the backup in the light. I was dismayed reading many online reports, mostly in German, on the standlight in that lamp quitting to work and, encouraged by this earlier thread, decided to open the lamp and to investigate.
The lamp is sealed, but its opening turned out to be relatively easy. I slipped a rounded knife between the plastic parts of the housing and moved it along the circumference with the glue relieving the two parts without any breakage. The interior looked grim. One of the standlight capacitor tabs was detached from the capacitor and from the PCB board. Prior to breaking off the board, that tab seems to have corroded through. One connection between the two sides of the PCB was also corroded through and not connecting. Signs of corrosion were evident in different places. The basic issue was that, while a soldermask was applied, there was no coating of any sort applied thereafter - all solder joints and component terminals were left exposed.
After I fixed everything, I could see that the circuitry operated fine when immersed under water. Still coating is needed to ensure durability. I thought that the sealed housing was there to protect the interior, but apparently water has no problem getting in. In addition the capacitor tabs seem to be too feeble to hold the capacitor in long term under typical bike conditions. I expected better from B&M. I will be applying coating before putting the lamp together.
 02-09-17 | 08:44 AM
#3

Senior Member

Joined: Feb 2008
Posts: 5,309
Likes: 4,811
From: Peoria, IL
......
The lamp is sealed, but its opening turned out to be relatively easy. I slipped a rounded knife between the plastic parts of the housing and moved it along the circumference with the glue relieving the two parts without any breakage. The interior looked grim. One of the standlight capacitor tabs was detached from the capacitor and from the PCB board. Prior to breaking off the board, that tab seems to have corroded through. One connection between the two sides of the PCB was also corroded through and not connecting. Signs of corrosion were evident in different places. The basic issue was that, while a soldermask was applied, there was no coating of any sort applied thereafter - all solder joints and component terminals were left exposed.
After I fixed everything, I could see that the circuitry operated fine when immersed under water. Still coating is needed to ensure durability. I thought that the sealed housing was there to protect the interior, but apparently water has no problem getting in. In addition the capacitor tabs seem to be too feeble to hold the capacitor in long term under typical bike conditions. I expected better from B&M. I will be applying coating before putting the lamp together.
Any chance that you've got pictures of the board or the failure?? I'm always curious about this stuff.

A bit of conformal coating on the board and solder joints can only help. Maybe a bit of RTV to seal up the housing will help too?
Steve in Peoria
02-09-17 | 10:02 AM
#4
Senior Member
Joined: Dec 2010
Posts: 9,685
Likes: 2,603
From: northern Deep South
Bikes: Fuji Touring, Novara Randonee
I'm surprised to read this. I noticed a few weeks ago that the standlight wasn't working on my 5 year old unit. Did a bit of surfing, and would you believe Peter White nailed it again? I had the connectors reversed, probably did it when I put a new cable on last fall. A few minutes to correct the connectors, and the standlight is working again!
On top of that, both my blinking backups failed in a heavy rain a couple days later. One blinkie shorted out, it's working again after drying and recharging. The other one had drained the batteries, drying and replacing them got that one working. The B&M provided light all the way home.
On top of that, both my blinking backups failed in a heavy rain a couple days later. One blinkie shorted out, it's working again after drying and recharging. The other one had drained the batteries, drying and replacing them got that one working. The B&M provided light all the way home.
02-09-17 | 12:35 PM
#5
Thread Starter
Senior Member
Joined: Sep 2005
Posts: 3,838
Likes: 398
From: Michigan
Bikes: Trek 730 (quad), 720 & 830, Bike Friday NWT, Brompton M36R & M6R, Dahon HAT060 & HT060, ...
I'm surprised to read this. I noticed a few weeks ago that the standlight wasn't working on my 5 year old unit. Did a bit of surfing, and would you believe Peter White nailed it again? I had the connectors reversed, probably did it when I put a new cable on last fall. A few minutes to correct the connectors, and the standlight is working again!
On top of that, both my blinking backups failed in a heavy rain a couple days later. One blinkie shorted out, it's working again after drying and recharging. The other one had drained the batteries, drying and replacing them got that one working. The B&M provided light all the way home.
On top of that, both my blinking backups failed in a heavy rain a couple days later. One blinkie shorted out, it's working again after drying and recharging. The other one had drained the batteries, drying and replacing them got that one working. The B&M provided light all the way home.
02-09-17 | 09:15 PM
#6
Thread Starter
Senior Member
Joined: Sep 2005
Posts: 3,838
Likes: 398
From: Michigan
Bikes: Trek 730 (quad), 720 & 830, Bike Friday NWT, Brompton M36R & M6R, Dahon HAT060 & HT060, ...
Here are the photos of the lamp under reconstruction, all pieces, top, bottom and side views.
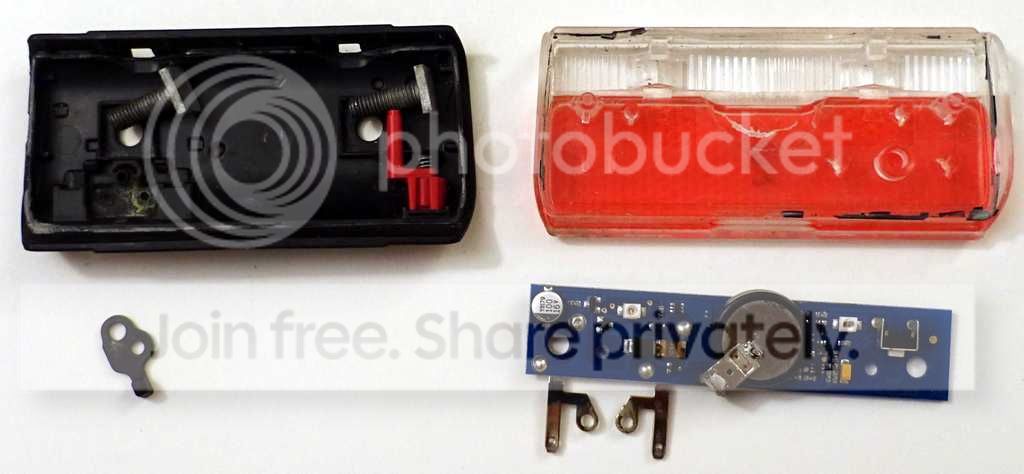
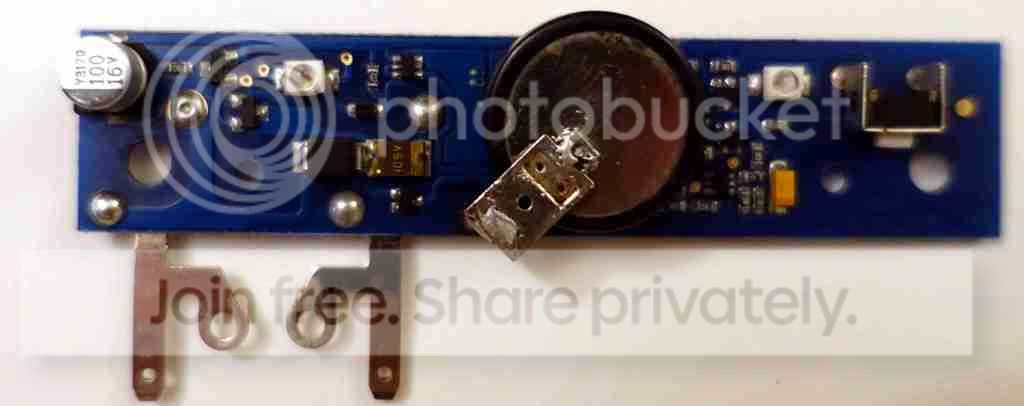
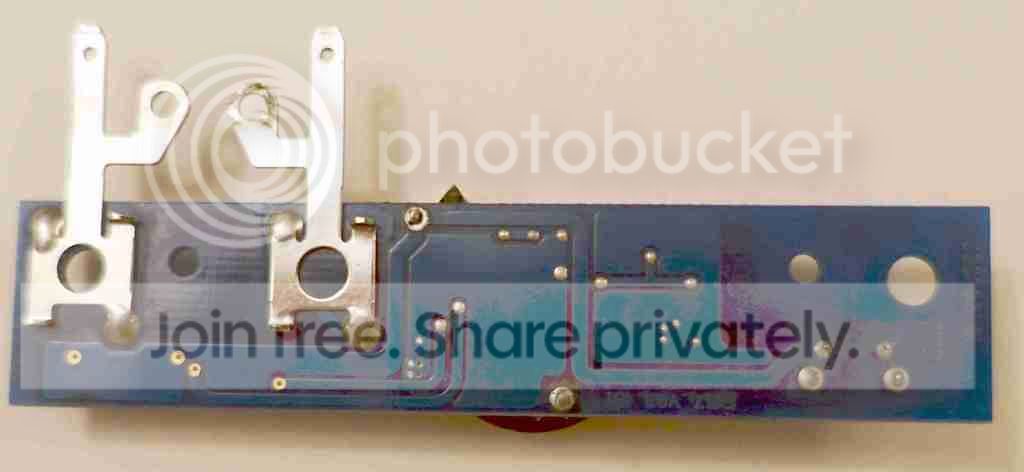


On the rear part of the housing you can still see water sediments. The corrosion was primarily in the form of patches extending from exposed solder joints. You can still see some corrosion sneaking out of the insulation on the standlight capacitor. The top tab of the capacitor was corroded along its bottom edge. That contributed presumably to the breaking off of the tab from its continuation as a pin going into the board. Solder around that pin was cracked indicating high tensions acting there. The whole tab was also detached from the top of the capacitor, with the tiny spot welding giving way. Similar welding of the bottom tab gave way right as I started inspecting the lamp. It is all solidly soldered now. In the side view under the capacitor you can see a piece of wire I had to solder to restore a connection between a pad and trace, that corroded away. When the housing is closed, the capacitor body presses against the front of the housing. During vibrations thai presumably contributes to the capacitor freeing itself from the tabs.
On the rear part of the housing you can still see water sediments. The corrosion was primarily in the form of patches extending from exposed solder joints. You can still see some corrosion sneaking out of the insulation on the standlight capacitor. The top tab of the capacitor was corroded along its bottom edge. That contributed presumably to the breaking off of the tab from its continuation as a pin going into the board. Solder around that pin was cracked indicating high tensions acting there. The whole tab was also detached from the top of the capacitor, with the tiny spot welding giving way. Similar welding of the bottom tab gave way right as I started inspecting the lamp. It is all solidly soldered now. In the side view under the capacitor you can see a piece of wire I had to solder to restore a connection between a pad and trace, that corroded away. When the housing is closed, the capacitor body presses against the front of the housing. During vibrations thai presumably contributes to the capacitor freeing itself from the tabs.

Thread
Thread Starter
Forum
Replies
Last Post
coolkat
Classic & Vintage
2
08-18-23 01:32 PM
