


The Dreaded Seat Tube Crack
 09-10-25 | 08:19 PM
#1
Thread Starter
Highly Enriched Driftium


Joined: Apr 2017
Posts: 6,879
Likes: 2,240
The Dreaded Seat Tube Crack; mitigation
As posted on many other threads, bifold frames have a notorious tendency to form a circumferential crack on the front of the seat tube, just above the weld to the main tube, or originating at the bottom of the T-slot if that is in the front, not the back of the tube. This is due to any or all of:
- hugely long seatpost, so exerts a higher bending moment aft than standard frames
- stress there due to clamping force (much increased on bikes with a plastic (instead of aluminum) bushing/shim there between the seatpost and seat tube)
- front T-slot causing a stress concentration on the tension stress side of the tube under rider weight, and fatigue stress happens in tension; T-slot on back of seat tube is better, because that is the compression stress side under rider weight
- stress concentration at transition of weld to tube, less if that is well blended
- lower material strength due to effect of weld heat zone; minimized if frame is heat treated after welding, or of a material that retains full strength after welding without post heat-treating.
I had to toss a frame where I did not discover the crack early enough (it had the earlier plastic bushing), and it had progressed all the way around to the seatstays on both sides and had started to go down the seat tube.
On my replacement frame, I've monitored things closely there because of this.
It has the newer aluminum bushing for less clamping distortion.
I added a soda-can material shim between the aluminum bushing and frame, to further minimize tube distortion under clamping. This makes the seatpost tight even without clamping, so is much more difficult to raise and lower the seatpost, however I do that very seldom, so not a big issue.
Recently, I discovered a small crack, about 1/8"/3mm long, emanating laterally from the bottom of the T-slot. Removing the seatpost and bushing and examining the inside of the seat tube confirmed this, and that it was not simply a crack in the paint. This is early enough to mitigate, hopefully. Longer, and I would have drilled a small hole at the end of the crack, as stress relief, to hopefully stop it. But in this case, I removed the crack area of metal. I don't have a round file, but a neighbor had a power drill and the right size bit. The key is to remove the crack as the tiny end of the crack is a continual stress concentration, and replace that with a smooth, gentle radius, at least as large a radius as that originally on the T-slot, that reduces stress concentration. If the crack is short, remove it completely. If the crack is long, just drill a small hole at the end of it to impede crack propagation.
I removed the seatpost and bushing. Drilling into the crack would have removed more material than necessary, because the crack was shorter that the drill diameter, so I could not drill partly over an edge. So instead of drilling, I put the drill on low speed and used the side of the drill bit (turning forward, right hand), to slowly cut into the crack area, like a milling cutter. I first poked the drill in to the far side of the seat tube, then backed off some to make sure I was not drilling into the far side of the tube. Then slowly, with lateral pressure, began to cut away the crack area. Slow and patient, this took about 20 minutes I think, including stopping multiple times to remove chips with a magnet. Then deburring inside. Then burnishing the new edge smooth; I wanted to do this with the small end of a knife honing steel, but hard to get in there. Instead, I reversed the drill direction to run it backwards, and used more lateral pressure with the drill, to burnish the edge without metal removal. This introduces residual compressive stress on the surface, like shot-peening, to improve fatigue life.
Then reassembled. Hopefully the repair holds up.
The soda can shim may not have helped, but didn't hurt.
What I *really* want is a stainless steel bushing in place of the aluminum one, I've only seen aluminum ones for sale; Steel has 3X the elastic stiffness of aluminum, so it should help reduce the stress on the seat tube. I wish I still had access to a metal lathe, I'd make one. If taking more stress on the bushing causes it to crack, I'd still much rather that part, easily replaced at low cost, be replaced, than a crack in the seat tube turning the frame to junk.
This was a 4130 chrome-moly steel frame. Procedure is same for aluminum frames.
Note: This failure mode has also shown up on aluminum adjustable height handleposts at the clamping slot; Mitigation procedue is the same.
So far I've only seen these failures on brand D folders, both mine, and posts by others. I'm curious as to whether it shows up on other brands and the details, such as T-slot location, or if crack was instead at weld zone, etc.
Cheers.
- hugely long seatpost, so exerts a higher bending moment aft than standard frames
- stress there due to clamping force (much increased on bikes with a plastic (instead of aluminum) bushing/shim there between the seatpost and seat tube)
- front T-slot causing a stress concentration on the tension stress side of the tube under rider weight, and fatigue stress happens in tension; T-slot on back of seat tube is better, because that is the compression stress side under rider weight
- stress concentration at transition of weld to tube, less if that is well blended
- lower material strength due to effect of weld heat zone; minimized if frame is heat treated after welding, or of a material that retains full strength after welding without post heat-treating.
I had to toss a frame where I did not discover the crack early enough (it had the earlier plastic bushing), and it had progressed all the way around to the seatstays on both sides and had started to go down the seat tube.
On my replacement frame, I've monitored things closely there because of this.
It has the newer aluminum bushing for less clamping distortion.
I added a soda-can material shim between the aluminum bushing and frame, to further minimize tube distortion under clamping. This makes the seatpost tight even without clamping, so is much more difficult to raise and lower the seatpost, however I do that very seldom, so not a big issue.
Recently, I discovered a small crack, about 1/8"/3mm long, emanating laterally from the bottom of the T-slot. Removing the seatpost and bushing and examining the inside of the seat tube confirmed this, and that it was not simply a crack in the paint. This is early enough to mitigate, hopefully. Longer, and I would have drilled a small hole at the end of the crack, as stress relief, to hopefully stop it. But in this case, I removed the crack area of metal. I don't have a round file, but a neighbor had a power drill and the right size bit. The key is to remove the crack as the tiny end of the crack is a continual stress concentration, and replace that with a smooth, gentle radius, at least as large a radius as that originally on the T-slot, that reduces stress concentration. If the crack is short, remove it completely. If the crack is long, just drill a small hole at the end of it to impede crack propagation.
I removed the seatpost and bushing. Drilling into the crack would have removed more material than necessary, because the crack was shorter that the drill diameter, so I could not drill partly over an edge. So instead of drilling, I put the drill on low speed and used the side of the drill bit (turning forward, right hand), to slowly cut into the crack area, like a milling cutter. I first poked the drill in to the far side of the seat tube, then backed off some to make sure I was not drilling into the far side of the tube. Then slowly, with lateral pressure, began to cut away the crack area. Slow and patient, this took about 20 minutes I think, including stopping multiple times to remove chips with a magnet. Then deburring inside. Then burnishing the new edge smooth; I wanted to do this with the small end of a knife honing steel, but hard to get in there. Instead, I reversed the drill direction to run it backwards, and used more lateral pressure with the drill, to burnish the edge without metal removal. This introduces residual compressive stress on the surface, like shot-peening, to improve fatigue life.
Then reassembled. Hopefully the repair holds up.
The soda can shim may not have helped, but didn't hurt.
What I *really* want is a stainless steel bushing in place of the aluminum one, I've only seen aluminum ones for sale; Steel has 3X the elastic stiffness of aluminum, so it should help reduce the stress on the seat tube. I wish I still had access to a metal lathe, I'd make one. If taking more stress on the bushing causes it to crack, I'd still much rather that part, easily replaced at low cost, be replaced, than a crack in the seat tube turning the frame to junk.
This was a 4130 chrome-moly steel frame. Procedure is same for aluminum frames.
Note: This failure mode has also shown up on aluminum adjustable height handleposts at the clamping slot; Mitigation procedue is the same.
So far I've only seen these failures on brand D folders, both mine, and posts by others. I'm curious as to whether it shows up on other brands and the details, such as T-slot location, or if crack was instead at weld zone, etc.
Cheers.
Last edited by Duragrouch; 09-10-25 at 08:59 PM.

 09-10-25 | 11:58 PM
#3
Thread Starter
Highly Enriched Driftium
Joined: Apr 2017
Posts: 6,879
Likes: 2,240
HAH! Y'know, I have considered it. The problem is, I would not want to overpower the bottom ("deltech") cable, as that one is mitigating bending moment on the hinge. Ideally, the top cable would be shorter, going from just behind the hinge to a stout locking collar (like the seatpost clamp but with no inner rim) on the seatpost a few inches above the seat tube.
On the later steel Speeds, they relocated the T-slot to the back, that should help. But they don't put a U-gusset in front like on the aluminum frames.
A high-strength steel bushing/shim, preferrably stainless, but most especially having a high fatigue strength, would help reinforce that area. Even better with a longer seatpost (mine is not at limit but even with the bushing bottom) and a longer bushing, spreading the load over a longer span so should reduce the reaction force at the top of the seat tube, would also help. XL seatposts are common, it's a longer, and steel bushing, that does not exist yet.
On the later steel Speeds, they relocated the T-slot to the back, that should help. But they don't put a U-gusset in front like on the aluminum frames.
A high-strength steel bushing/shim, preferrably stainless, but most especially having a high fatigue strength, would help reinforce that area. Even better with a longer seatpost (mine is not at limit but even with the bushing bottom) and a longer bushing, spreading the load over a longer span so should reduce the reaction force at the top of the seat tube, would also help. XL seatposts are common, it's a longer, and steel bushing, that does not exist yet.
09-11-25 | 03:33 AM
#4
Senior Member

Joined: Aug 2014
Posts: 1,157
Likes: 441
From: UK
Bikes: customized Dahon Helios 1x10, customized Dahon Smooth Hound 1x11, customized Dahon Hammerhead 8.0 d7, Kinesis GX Race 50(mullet setup 1x11), Forme Calver 37 (1x11), Planet X Giovanissimi 20 (1x9), Orange Zest 20 (1x9)
How long have you had this aluminum frame, and what is your estimate of the mileage or hours spent in the saddle?
 09-11-25 | 04:32 PM
#5

Senior Member
Joined: Jun 2022
Posts: 2,356
Likes: 1,315
From: The Ring of Fire, the Global South, Asia-Pacific, the Tropics...
Bikes: Several, all affordably priced, none exalted cult artifacts or hype jobs
Rivers upon rivers of text and not a single image. Try it the other way around.
 09-11-25 | 06:21 PM
#6
Senior Member
Joined: Jun 2022
Posts: 2,356
Likes: 1,315
From: The Ring of Fire, the Global South, Asia-Pacific, the Tropics...
Bikes: Several, all affordably priced, none exalted cult artifacts or hype jobs
...
How long have you had this aluminum frame, and what is your estimate of the mileage or hours spent in the saddle?
How long have you had this aluminum frame, and what is your estimate of the mileage or hours spent in the saddle?
09-11-25 | 10:42 PM
#7
Thread Starter
Highly Enriched Driftium
Joined: Apr 2017
Posts: 6,879
Likes: 2,240
That first frame, used for about 6 years with frequent 14-16 mile rides in dry months, but I only recall using 2 or 3 sets of road tires (I use up tires from other folders with little use that I've bought, before buying new), so I think perhaps 10k miles, I rotate the tires and get good life from them. The second frame doesn't have the miles of the old one yet, I'm nearing the end of life on the second set of tires , I haven't been riding as much as I should, swapped the frame in spring 2022, so guessing perhaps 4-5k miles. I added an improvised deltech cable to the new frame which has been fantastic in reducing stress on the frame hinge, eliminating need for adjustment. If the seat tube holds up, I expect longer life out of the frame.
To compare, my '89 Cannondale road race bike, 35 miles daily when dry for about 15 years, I estimate I put 75k miles on it when it went into storage for a townie. It was on its 3rd wheel set due to fatigue cracks at the spoke holes, on smooth roads. Frame was still going strong.
I didn't take pics of this recent repair, as I suddenly had access to a drill for a brief period, so did the repair quick, as I didn't want to ride the bike until that was done. Here are pics of my previous (first) frame after that crack was first discovered:

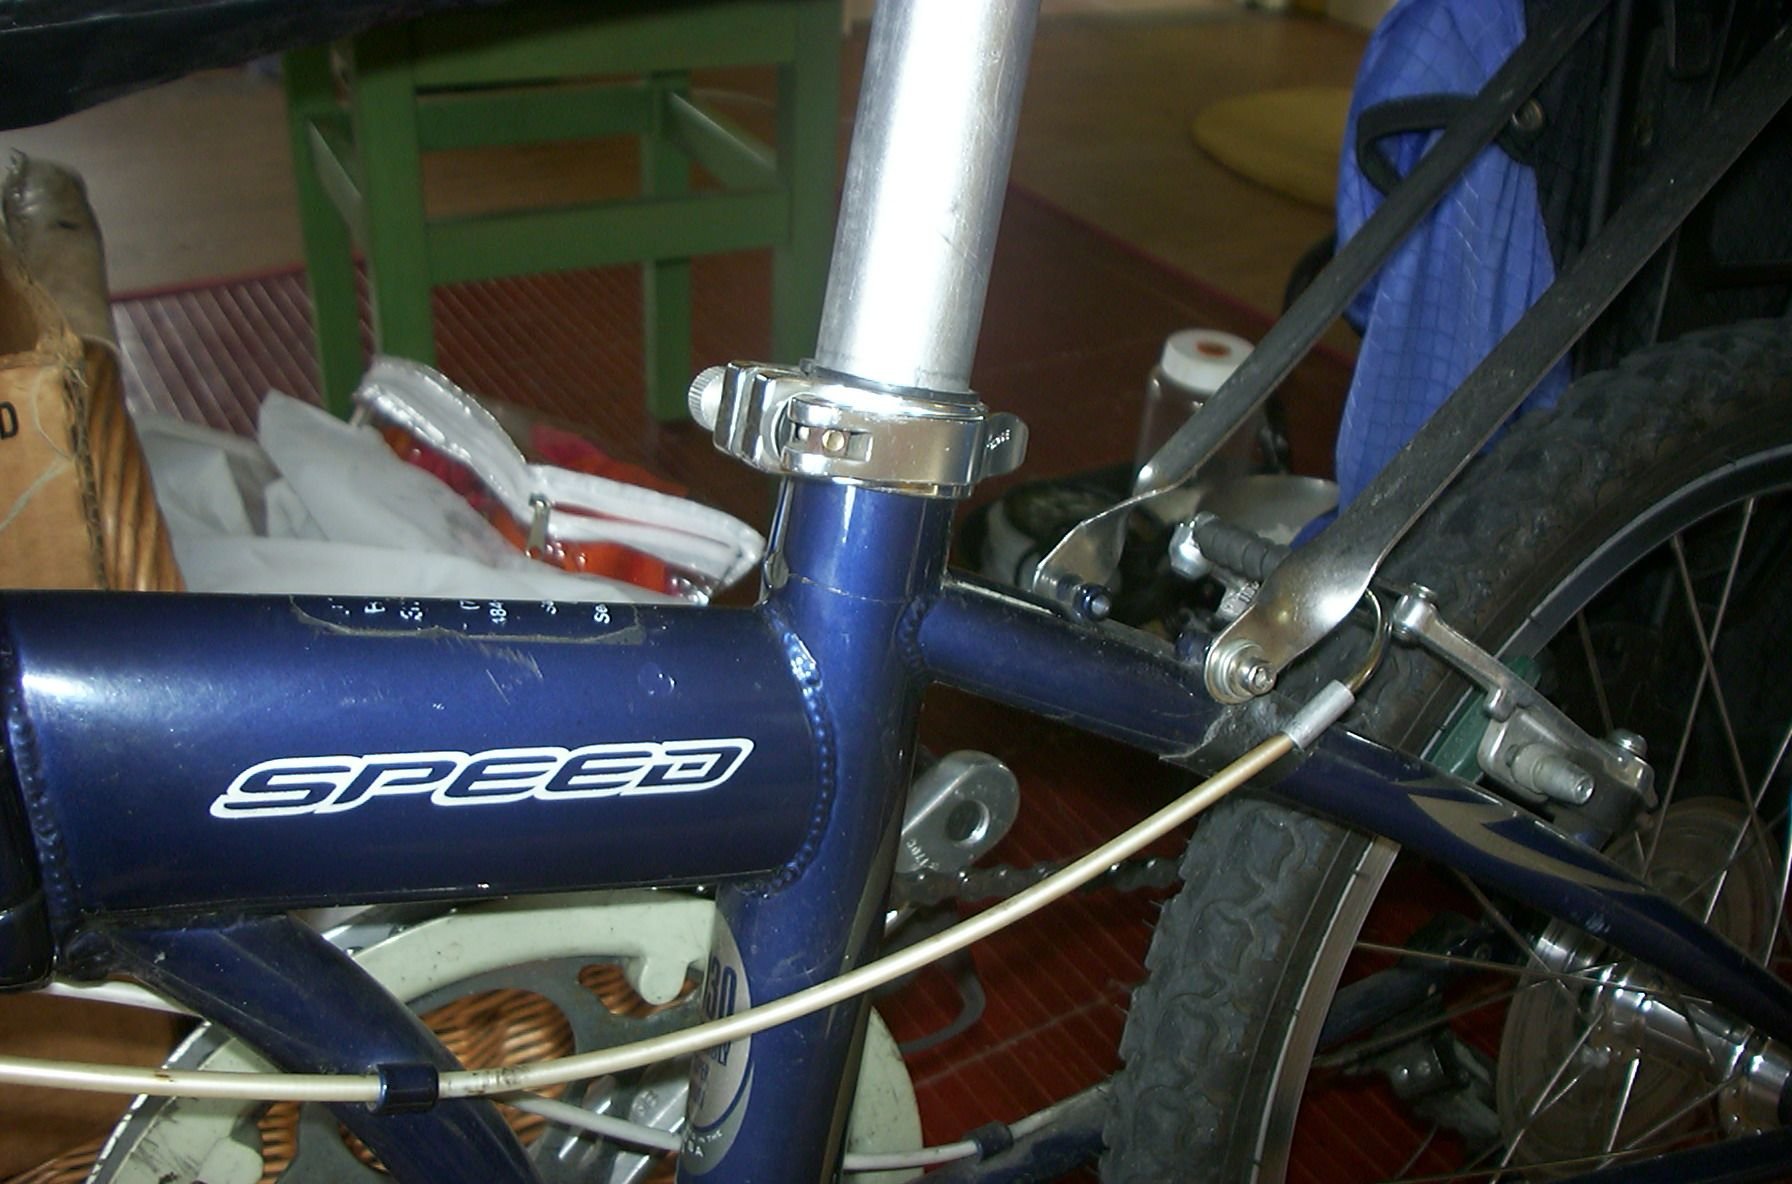
Note the earlier Dahon plastic bushing, and the resulting taper in the slot, due to plastic elastic compression under the tightness needed to keep the seatpost from slipping. At that time I was a more svelte 170 lbs. I continued to ride the bike I think for another five years before the cracks on both sides spread aft to along the seatstay welds. Had I drilled holes, and replaced the bushing with aluminum, it might have held off further cracking, don't know. I finally drilled a hole on the left side, turned the bike around to do the right, and saw the cracking was worse and going in two directions, back past the seatstay welds, and vertically down the seat tube, the frame was toast at that point. But in the pic above, that's only about 2 years of 14 mile rides in dry weather, that's only about 5k miles max, perhaps less because most of it was on that one set of tires at that point. That's not much frame life.
A later Speed frame that I left rackless and rode at my ex-GF's, that one has the seat tube slot in back, plus aluminum bushing, should be better life. But I sure would like a steel bushing there, I don't have lathe access but I may be able to fabricate one from steel sheet, but at high strength, it'll be a bear to get it to roll into a cylinder without it springing back. Most stainless steels will easily air-harden after heating red, so I could anneal, bend, heat, if I had an oxy-acetylene torch...
Last edited by Duragrouch; 09-11-25 at 11:04 PM.
09-12-25 | 06:36 AM
#8

Schwinnasaur

Joined: Dec 2006
Posts: 1,947
Likes: 355
From: New Orleans, LA
My approach to seatpost slippage is to add a band clamp on the seatpost and that transfers load to the top of the seatpost tube. This works well and avoids over tightening. I would in the future keep away from shims. They lead to cracks from over tightening.
Last edited by Schwinnsta; 09-12-25 at 06:42 AM.
09-12-25 | 07:33 AM
#9
Senior Member
Joined: Aug 2014
Posts: 1,157
Likes: 441
From: UK
Bikes: customized Dahon Helios 1x10, customized Dahon Smooth Hound 1x11, customized Dahon Hammerhead 8.0 d7, Kinesis GX Race 50(mullet setup 1x11), Forme Calver 37 (1x11), Planet X Giovanissimi 20 (1x9), Orange Zest 20 (1x9)
I don't think over tightening is at fault here.
I believe there is a design flaw in the frame's seat tube. Dahon placed the clamping relief notch at the front of the tube and added an oval hole at the bottom of the notch to prevent vertical cracking. However, as the rider uses the bike, the weight/load on the saddle creates a significant moment toward the rear of the bike. This moment is significant due to the length of the seatpost.
Since the clamp holds the top of the seatpost tightly within the seat tube, this moment is transferred to the seat tube, leading to repeated fatigue cycles at the oval hole of the notch—primarily in tension. Over time, this results in horizontal cracking of the seat tube.
I believe there is a design flaw in the frame's seat tube. Dahon placed the clamping relief notch at the front of the tube and added an oval hole at the bottom of the notch to prevent vertical cracking. However, as the rider uses the bike, the weight/load on the saddle creates a significant moment toward the rear of the bike. This moment is significant due to the length of the seatpost.
Since the clamp holds the top of the seatpost tightly within the seat tube, this moment is transferred to the seat tube, leading to repeated fatigue cycles at the oval hole of the notch—primarily in tension. Over time, this results in horizontal cracking of the seat tube.
09-12-25 | 08:50 AM
#10
Thread Starter
Highly Enriched Driftium
Joined: Apr 2017
Posts: 6,879
Likes: 2,240
I don't think over tightening is at fault here.
I believe there is a design flaw in the frame's seat tube. Dahon placed the clamping relief notch at the front of the tube and added an oval hole at the bottom of the notch to prevent vertical cracking. However, as the rider uses the bike, the weight/load on the saddle creates a significant moment toward the rear of the bike. This moment is significant due to the length of the seatpost.
Since the clamp holds the top of the seatpost tightly within the seat tube, this moment is transferred to the seat tube, leading to repeated fatigue cycles at the oval hole of the notch—primarily in tension. Over time, this results in horizontal cracking of the seat tube.
I believe there is a design flaw in the frame's seat tube. Dahon placed the clamping relief notch at the front of the tube and added an oval hole at the bottom of the notch to prevent vertical cracking. However, as the rider uses the bike, the weight/load on the saddle creates a significant moment toward the rear of the bike. This moment is significant due to the length of the seatpost.
Since the clamp holds the top of the seatpost tightly within the seat tube, this moment is transferred to the seat tube, leading to repeated fatigue cycles at the oval hole of the notch—primarily in tension. Over time, this results in horizontal cracking of the seat tube.
Schwinnsta: A locking collar above, would have allowed reduced clamping loads with the plastic bushing. However, with the aluminum bushing, and most especially with my added shim so the slot doesn't get compressed, high clamping loads should have no effect on the seat tube.
Fentuz: Your analysis is right on the money. I wrote up similar and sent to Dahon when the first frame cracked and they blew me off, said I was too heavy and too tall, neither of which was true. The front side of the tube is loaded in tension, so susceptible to fatigue, whereas the back is loaded in compression, much less of an issue, which is why 99% of bikes put the clamp slot in back, for eons. Notably, Dahon moved the slot location to back, and changed the bushing to aluminum. I recommended they preemptively send out metal bushings to Dahon owners with plastic bushings, to perhaps prevent or delay cracking, and they had no interest in doing that.
Last edited by Duragrouch; 09-12-25 at 08:53 AM.
09-12-25 | 09:20 AM
#11
Senior Member
Joined: Aug 2014
Posts: 1,157
Likes: 441
From: UK
Bikes: customized Dahon Helios 1x10, customized Dahon Smooth Hound 1x11, customized Dahon Hammerhead 8.0 d7, Kinesis GX Race 50(mullet setup 1x11), Forme Calver 37 (1x11), Planet X Giovanissimi 20 (1x9), Orange Zest 20 (1x9)
Your analysis is right on the money. I wrote up similar and sent to Dahon when the first frame cracked and they blew me off, said I was too heavy and too tall, neither of which was true. The front side of the tube is loaded in tension, so susceptible to fatigue, whereas the back is loaded in compression, much less of an issue, which is why 99% of bikes put the clamp slot in back, for eons. Notably, Dahon moved the slot location to back, and changed the bushing to aluminum. I recommended they preemptively send out metal bushings to Dahon owners with plastic bushings, to perhaps prevent or delay cracking, and they had no interest in doing that.
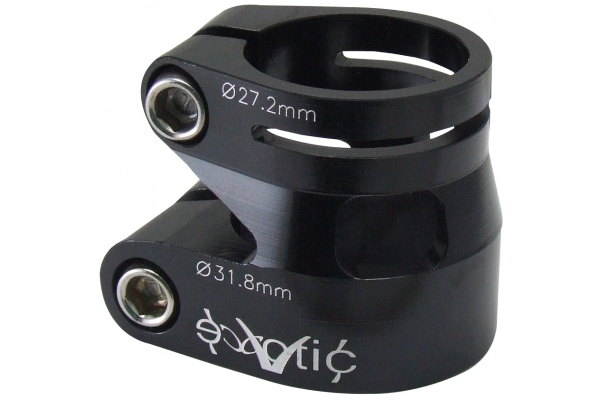
I think they could have put a shallower slot at the back and they should fit "twin clamp", basically a split tube with 2 clamping levers (on the front) so that it covers the overall slot and behaves like a cerclage stopping the loading of the slot stress release feature.
 09-12-25 | 11:07 AM
#12
Schwinnasaur
Joined: Dec 2006
Posts: 1,947
Likes: 355
From: New Orleans, LA
You're both right.
Schwinnsta: A locking collar above, would have allowed reduced clamping loads with the plastic bushing. However, with the aluminum bushing, and most especially with my added shim so the slot doesn't get compressed, high clamping loads should have no effect on the seat tube.
Fentuz: Your analysis is right on the money. I wrote up similar and sent to Dahon when the first frame cracked and they blew me off, said I was too heavy and too tall, neither of which was true. The front side of the tube is loaded in tension, so susceptible to fatigue, whereas the back is loaded in compression, much less of an issue, which is why 99% of bikes put the clamp slot in back, for eons. Notably, Dahon moved the slot location to back, and changed the bushing to aluminum. I recommended they preemptively send out metal bushings to Dahon owners with plastic bushings, to perhaps prevent or delay cracking, and they had no interest in doing that.
Schwinnsta: A locking collar above, would have allowed reduced clamping loads with the plastic bushing. However, with the aluminum bushing, and most especially with my added shim so the slot doesn't get compressed, high clamping loads should have no effect on the seat tube.
Fentuz: Your analysis is right on the money. I wrote up similar and sent to Dahon when the first frame cracked and they blew me off, said I was too heavy and too tall, neither of which was true. The front side of the tube is loaded in tension, so susceptible to fatigue, whereas the back is loaded in compression, much less of an issue, which is why 99% of bikes put the clamp slot in back, for eons. Notably, Dahon moved the slot location to back, and changed the bushing to aluminum. I recommended they preemptively send out metal bushings to Dahon owners with plastic bushings, to perhaps prevent or delay cracking, and they had no interest in doing that.
I don't see or understand Fentuz analysis. I agree that aluminum bushing, actually seat tube clamps are better than plastic. Dahon could have gone to stainless steel clamps and that it would have been better still. Either way using an additional clamp on the seatpost, pre-cracking, solves the problem
09-12-25 | 11:31 AM
#13
Senior Member
Joined: Aug 2014
Posts: 1,157
Likes: 441
From: UK
Bikes: customized Dahon Helios 1x10, customized Dahon Smooth Hound 1x11, customized Dahon Hammerhead 8.0 d7, Kinesis GX Race 50(mullet setup 1x11), Forme Calver 37 (1x11), Planet X Giovanissimi 20 (1x9), Orange Zest 20 (1x9)
09-12-25 | 11:54 AM
#14
Schwinnasaur
Joined: Dec 2006
Posts: 1,947
Likes: 355
From: New Orleans, LA
Just the tension part. I see that there are cyclic forces on the parts and the compression part is higher on the rear, but I am unsure if there is ever tension on the front. I would see it as being in compression but less. Anyway, my main point is the additional clamp works.
 09-13-25 | 12:42 AM
#16
Thread Starter
Highly Enriched Driftium
Joined: Apr 2017
Posts: 6,879
Likes: 2,240
Just the tension part. I see that there are cyclic forces on the parts and the compression part is higher on the rear, but I am unsure if there is ever tension on the front. I would see it as being in compression but less. Anyway, my main point is the additional clamp works.
Also note: In order for the seatpost to pass behind the bottom bracket when folding, the seatpost and tube angle are actually less inclined than on typical bikes. However, when deployed to normal saddle height, the saddle position relative to the bottom bracket position, results in geometry that is quite conventional; I refer to this as "effective/virtual seat tube angle", in the same manner as effective/virtual top tube length on conventional frames with a very sloping top tube.
09-13-25 | 12:45 AM
#17
Thread Starter
Highly Enriched Driftium
Joined: Apr 2017
Posts: 6,879
Likes: 2,240
looking at your bike pictures, it seems they slot is @ the front because its bottom is levelled with the seat stay tubes and would interfere with the weld.
I think they could have put a shallower slot at the back and they should fit "twin clamp", basically a split tube with 2 clamping levers (on the front) so that it covers the overall slot and behaves like a cerclage stopping the loading of the slot stress release feature.
I think they could have put a shallower slot at the back and they should fit "twin clamp", basically a split tube with 2 clamping levers (on the front) so that it covers the overall slot and behaves like a cerclage stopping the loading of the slot stress release feature.
It would be great if folders came with double clamps, but hopefully QR levers instead of bolts, it is a folder after all.
09-13-25 | 06:34 AM
#18
Schwinnasaur
Joined: Dec 2006
Posts: 1,947
Likes: 355
From: New Orleans, LA
If the seatpost were vertical and the saddle just sat on, there would be no tension. Because it is angled aft (like most seatposts, so increases effective top tube length as it is raised), weight on the saddle causes it to try to bend aft, so tension on the front of the seatpost and tube, and compression on the aft of both (cylindrical beam loaded in bending). Because the exposed section is nearly an order of magnitude longer than seatposts on large-wheel bikes (at least those with a level top tube), the bending moment from even a little aft force, can really matter in long term fatigue life. Dahon takes the approach of going large on seatpost diameter. Bike Friday goes more conventional diameter, but the long seatpost out of chrome-moly steel rather than aluminum.
Also note: In order for the seatpost to pass behind the bottom bracket when folding, the seatpost and tube angle are actually less inclined than on typical bikes. However, when deployed to normal saddle height, the saddle position relative to the bottom bracket position, results in geometry that is quite conventional; I refer to this as "effective/virtual seat tube angle", in the same manner as effective/virtual top tube length on conventional frames with a very sloping top tube.
Also note: In order for the seatpost to pass behind the bottom bracket when folding, the seatpost and tube angle are actually less inclined than on typical bikes. However, when deployed to normal saddle height, the saddle position relative to the bottom bracket position, results in geometry that is quite conventional; I refer to this as "effective/virtual seat tube angle", in the same manner as effective/virtual top tube length on conventional frames with a very sloping top tube.
09-13-25 | 11:02 AM
#19


So is the issue the insert? As in,the insert wears,the seatpost rocks back-and-forth,and then the frame cracks? Do the inserts not get replaced at intervals?
__________________

C'dale BBU('05 and '09)/Super Six/Hooligan8and 3,Kona Dew Deluxe,Novara Buzz/Safari,Surly Big Dummy,Marin Pt Reyes,Giant Defy 1,Schwinn DBX SuperSport,Brompton S6L/S2E-X/M6L-X/S12 T Line

C'dale BBU('05 and '09)/Super Six/Hooligan8and 3,Kona Dew Deluxe,Novara Buzz/Safari,Surly Big Dummy,Marin Pt Reyes,Giant Defy 1,Schwinn DBX SuperSport,Brompton S6L/S2E-X/M6L-X/S12 T Line
09-13-25 | 01:26 PM
#20
Senior Member
Joined: Aug 2014
Posts: 1,157
Likes: 441
From: UK
Bikes: customized Dahon Helios 1x10, customized Dahon Smooth Hound 1x11, customized Dahon Hammerhead 8.0 d7, Kinesis GX Race 50(mullet setup 1x11), Forme Calver 37 (1x11), Planet X Giovanissimi 20 (1x9), Orange Zest 20 (1x9)
It is doubtful that it puts the seatpost in tension. The tensile forces caused by bending do not get large enough to cause the tube to go into tension. You still get changes in loading so you still get fatigue. You are also adding to the stresses by the clamping forces.
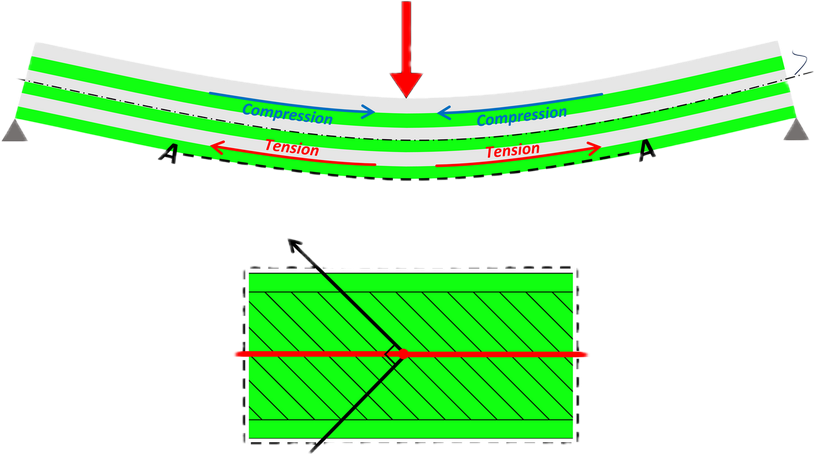
if you cut a small notch on a piece of branch perpendicularly the branch axis, if you apply a bending load setting the notch side in tension, it will eventually break.
do the same but putting the notch side in compression, it may break but if/when it does, it will be later
09-13-25 | 01:36 PM
#21
Senior Member
Joined: Aug 2014
Posts: 1,157
Likes: 441
From: UK
Bikes: customized Dahon Helios 1x10, customized Dahon Smooth Hound 1x11, customized Dahon Hammerhead 8.0 d7, Kinesis GX Race 50(mullet setup 1x11), Forme Calver 37 (1x11), Planet X Giovanissimi 20 (1x9), Orange Zest 20 (1x9)
they are about 4” long and won t do much to prevent frame cracking.
other than a longer collar covering the frame exposed tube, i cannot see much solution other than obviously put the notch at the back with a smaller round hole (rather than large oval) an possibly thicken the tube or add reinforcement bracket as they did on the old jetstream
09-13-25 | 01:45 PM
#22
Senior Member
Joined: Aug 2014
Posts: 1,157
Likes: 441
From: UK
Bikes: customized Dahon Helios 1x10, customized Dahon Smooth Hound 1x11, customized Dahon Hammerhead 8.0 d7, Kinesis GX Race 50(mullet setup 1x11), Forme Calver 37 (1x11), Planet X Giovanissimi 20 (1x9), Orange Zest 20 (1x9)
https://www.mad4one.com/gb/seatpost-...lease-286.html
https://www.unicycle.com/nimbus-doub...t-clamp-black/
09-13-25 | 02:46 PM
#23
Senior Member
Joined: Feb 2017
Posts: 2,538
Likes: 570
09-13-25 | 05:13 PM
#24
Schwinnasaur
Joined: Dec 2006
Posts: 1,947
Likes: 355
From: New Orleans, LA
as the seatpost is on a ~73deg angle, it is load towards the back consequently, the load distribution of the tube will be compressive on the back and tensile on the front. The oval hole believe as a stress raiser.
if you cut a small notch on a piece of branch perpendicularly the branch axis, if you apply a bending load setting the notch side in tension, it will eventually break.
do the same but putting the notch side in compression, it may break but if/when it does, it will be later
if you cut a small notch on a piece of branch perpendicularly the branch axis, if you apply a bending load setting the notch side in tension, it will eventually break.
do the same but putting the notch side in compression, it may break but if/when it does, it will be later
The part about the notch is wrong too, When you create a notch, you change the properties of the piece. The beam has less depth, so the stresses go up there.
09-13-25 | 05:44 PM
#25
Schwinnasaur
Joined: Dec 2006
Posts: 1,947
Likes: 355
From: New Orleans, LA
Originally Dahon likely used a plastic shim. Do cracking problems, from overtightening, they now recommend steel ones. They sell them but DG made his own. I checked their website in the states, and they are out of stock. I do think DG's problem is from over tightening along with the wallowing out and back and all that, but I don't know the exact mechanism.