


Downtube Mini suspension upgrades
 02-21-08, 02:44 PM
#26
Senior Member
Thread Starter
Join Date: May 2005
Location: Albany, WA
Posts: 7,393
Mentioned: 16 Post(s)
Tagged: 0 Thread(s)
Quoted: 321 Post(s)
Likes: 0
Liked 7 Times
in
6 Posts
Hmmmm, I am a little lost here. But then again, this is a little out of my realm of comfort.
So your saying that given the material of the seatpost that what is important is the distance between your butt and the clamp at the bottom -- not how much material is below that clamp -- since that is what determines the resonant frequency ... sort of like a guitar string. No matter how long the string is, if I clamp the string at the 5th fret, the same note is created.
So your saying that given the material of the seatpost that what is important is the distance between your butt and the clamp at the bottom -- not how much material is below that clamp -- since that is what determines the resonant frequency ... sort of like a guitar string. No matter how long the string is, if I clamp the string at the 5th fret, the same note is created.
 02-21-08, 05:02 PM
#27
Senior Member
Thread Starter
Join Date: May 2005
Location: Albany, WA
Posts: 7,393
Mentioned: 16 Post(s)
Tagged: 0 Thread(s)
Quoted: 321 Post(s)
Likes: 0
Liked 7 Times
in
6 Posts
What i mean, is that by installing the nylon bush, any bobbing from the suspension is eliminated, so if there is still any bobbing left over, then that must be due to the seat post. I followed a process of elimination.
02-21-08, 09:55 PM
#28
Wheelsuck

Join Date: Jun 2007
Posts: 6,158
Mentioned: 0 Post(s)
Tagged: 0 Thread(s)
Quoted: 0 Post(s)
Likes: 0
Liked 0 Times
in
0 Posts
Sorry, I am notorious for thinking other can read my thoughts. Oops.
What i mean, is that by installing the nylon bush, any bobbing from the suspension is eliminated, so if there is still any bobbing left over, then that must be due to the seat post. I followed a process of elimination.
What i mean, is that by installing the nylon bush, any bobbing from the suspension is eliminated, so if there is still any bobbing left over, then that must be due to the seat post. I followed a process of elimination.
02-21-08, 10:19 PM
#29
Senior Member
Thread Starter
Join Date: May 2005
Location: Albany, WA
Posts: 7,393
Mentioned: 16 Post(s)
Tagged: 0 Thread(s)
Quoted: 321 Post(s)
Likes: 0
Liked 7 Times
in
6 Posts
I aven't checked, but that particular violent bobbing I got with the nylon spacer in place felt much the same as with the elastomer. The elastomer is supposedly damped, I don't know how well, but that leaves the resonant system of the seatpost untouched, whatever you use down in the suspension. The way I see it, there are several resonant systems, you already called them, tyres, seatpost and rear suspension. Each has its own resonant frequency independent of the other 2. You have to treat each one independently for a given rider mass.
For the rear suspension, I think the blue medium Cane Creek elastomer I used for a while is close to being right.
The tyres I pump rather hard, so their resonant frequency will be high, out of the way.
Working on the seat post to lift the resonance...
For the rear suspension, I think the blue medium Cane Creek elastomer I used for a while is close to being right.
The tyres I pump rather hard, so their resonant frequency will be high, out of the way.
Working on the seat post to lift the resonance...
02-21-08, 10:37 PM
#30
Senior Member
Thread Starter
Join Date: May 2005
Location: Albany, WA
Posts: 7,393
Mentioned: 16 Post(s)
Tagged: 0 Thread(s)
Quoted: 321 Post(s)
Likes: 0
Liked 7 Times
in
6 Posts
I think the 3 resonant systems, being independent of each other have to be treated in isolation with each other. Each one needs to be either close to being critically damped or far out of the way. You can't change the rear suspension's properties and expect the seatpost to improve.
02-21-08, 11:19 PM
#31
Wheelsuck
Join Date: Jun 2007
Posts: 6,158
Mentioned: 0 Post(s)
Tagged: 0 Thread(s)
Quoted: 0 Post(s)
Likes: 0
Liked 0 Times
in
0 Posts
If the suspension was setting off the seatpost, then changing it would help out, but that's not the beast we're dealing with. It looks like that your pedaling alone is the culprit. So the trick now is just going to be trying to figure out the best way to stiffen the post.
02-25-08, 08:20 PM
#32
Senior Member
Thread Starter
Join Date: May 2005
Location: Albany, WA
Posts: 7,393
Mentioned: 16 Post(s)
Tagged: 0 Thread(s)
Quoted: 321 Post(s)
Likes: 0
Liked 7 Times
in
6 Posts
After feeling the nice damped response of a Brommie while test-riding some bikes last weekend, I thought perhaps I could get some real rubber to try out on the Mini.
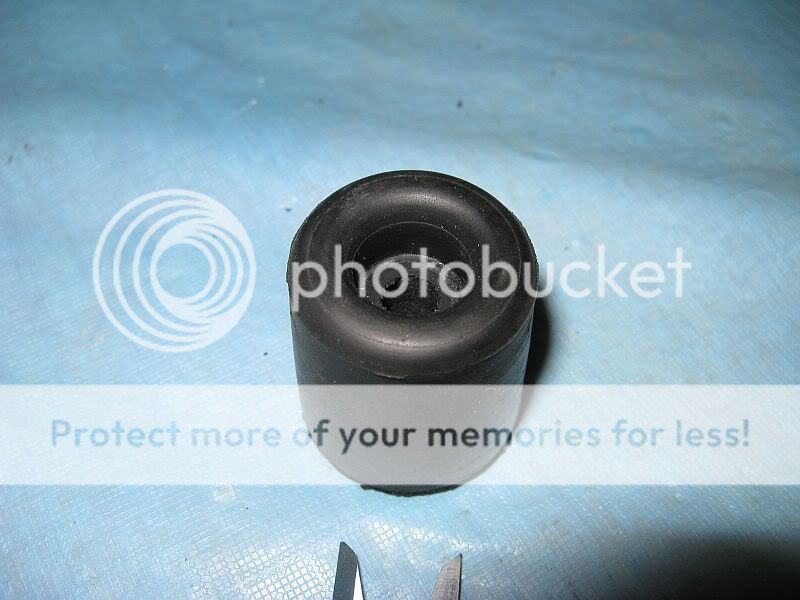
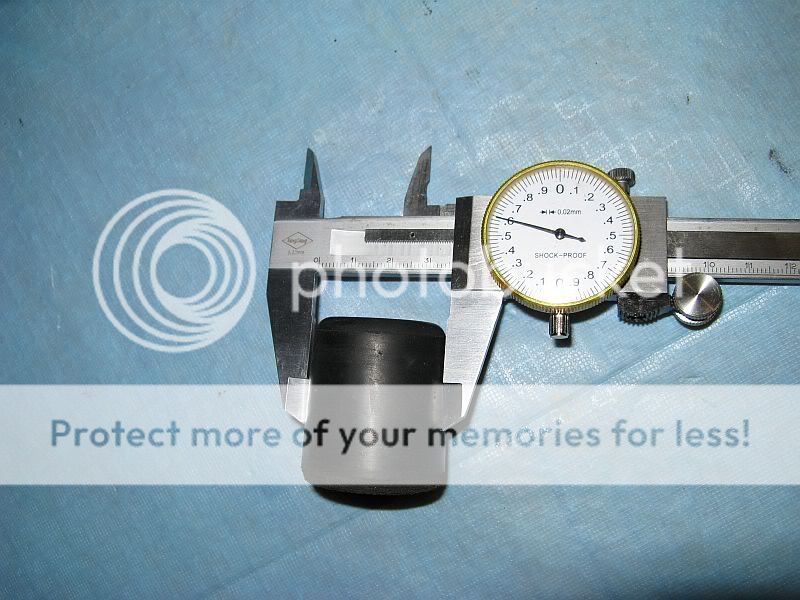
At a local rubber shop I found a rubber doorstop which has almost the perfect shape. It has a 10mm recess at one end meant for the screw, and it has just the right diameter to completely fill the space. All I needed to do was to increase the screw hole size to 9mm. It fits almost perfectly. The recess slides just about perfectly around the boss for the original spring, and fills the space around the boss almost like it was purposely designed for it.
Anyway, I installed it last night and rode the Mini to work and it is perfect, better than the blue Cane Creek elastomer.
It could be a bit longer though, so perhaps I will get another one and combine the 2 back to back. Riding it it compresses into a bulging shape like there is a squash ball in there. The rubber concertina is not installed, not necessary.
02-25-08, 10:18 PM
#33

Senior Member
Join Date: Aug 2005
Location: San Rafael, California
Posts: 2,097
Mentioned: 8 Post(s)
Tagged: 0 Thread(s)
Quoted: 113 Post(s)
Likes: 0
Liked 8 Times
in
6 Posts
After feeling the nice damped response of a Brommie while test-riding some bikes last weekend, I thought perhaps I could get some real rubber to try out on the Mini.
At a local rubber shop I found a rubber doorstop which has almost the perfect shape. It has a 10mm recess at one end meant for the screw, and it has just the right diameter to completely fill the space. All I needed to do was to increase the screw hole size to 9mm. It fits almost perfectly. The recess slides just about perfectly around the boss for the original spring, and fills the space around the boss almost like it was purposely designed for it.
Anyway, I installed it last night and rode the Mini to work and it is perfect, better than the blue Cane Creek elastomer.
It could be a bit longer though, so perhaps I will get another one and combine the 2 back to back. Riding it it compresses into a bulging shape like there is a squash ball in there. The rubber concertina is not installed, not necessary.
02-26-08, 07:01 AM
#34
multimodal commuter

Join Date: Nov 2006
Location: NJ, NYC, LI
Posts: 19,808
Bikes: 1940s Fothergill, 1959 Allegro Special, 1963? Claud Butler Olympic Sprint, Lambert 'Clubman', 1974 Fuji "the Ace", 1976 Holdsworth 650b conversion rando bike, 1983 Trek 720 tourer, 1984 Counterpoint Opus II, 1993 Basso Gap, 2010 Downtube 8h, and...
Mentioned: 584 Post(s)
Tagged: 0 Thread(s)
Quoted: 1908 Post(s)
Liked 574 Times
in
339 Posts
Later I found that the bolt holding the pivot together is completely bottomed out; it is all the way tight and cannot be made tighter. So that's where the slop is coming from. What I need to do, I think, is take it all apart and find a washer of the right size so the bolt doesn't bottom out.
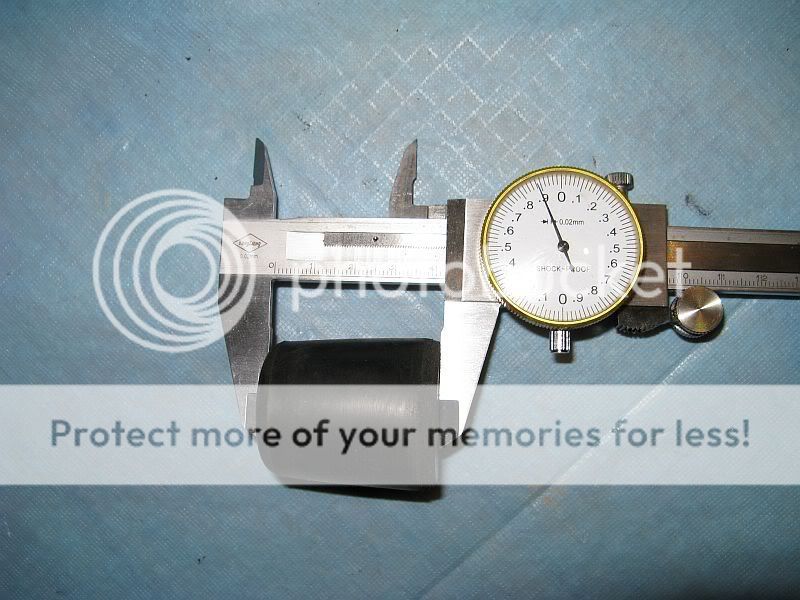
First, the lateral play/slop does not come from this bolt; it must come from the suspension hinge. In my case, the 2 spindles were of different size, 19.92mm and 19.97mm, and the bushes being molded were both 20.00mm. So one of the spindles rattled around in its bush, and this cause the lateral play in the hinge.
02-26-08, 01:55 PM
#35
Senior Member
Thread Starter
Join Date: May 2005
Location: Albany, WA
Posts: 7,393
Mentioned: 16 Post(s)
Tagged: 0 Thread(s)
Quoted: 321 Post(s)
Likes: 0
Liked 7 Times
in
6 Posts
Check out some previous posts in this thread - I made new bushes and used grease. One could also use shim material.
02-27-08, 08:03 PM
#36
Senior Member
Thread Starter
Join Date: May 2005
Location: Albany, WA
Posts: 7,393
Mentioned: 16 Post(s)
Tagged: 0 Thread(s)
Quoted: 321 Post(s)
Likes: 0
Liked 7 Times
in
6 Posts
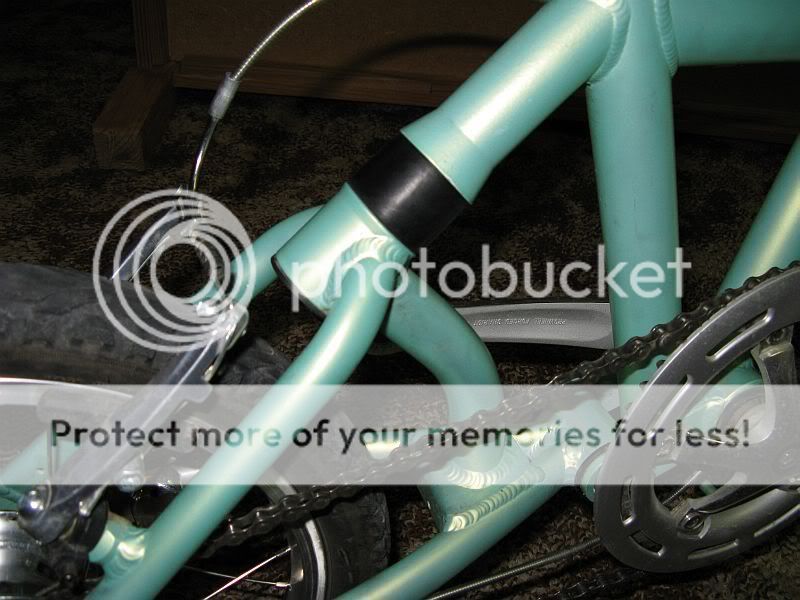
Well I have ridden with the rubber doorstop a few days and it ROCKS! 
Seatpost boinging aside, the suspension ceases to be an issue. There is sufficient spring to soften the edge off bumps, and enough damping so you don't bounce in the saddle. It feels exactly like the tyres are pumped soft.
I very strongly recommend this upgrade. I have written a simple procedure for doing the replacement, but pictures are still to be taken. I will place the procedure and edit it once I have the pictures.
02-27-08, 08:04 PM
#37
Senior Member
Thread Starter
Join Date: May 2005
Location: Albany, WA
Posts: 7,393
Mentioned: 16 Post(s)
Tagged: 0 Thread(s)
Quoted: 321 Post(s)
Likes: 0
Liked 7 Times
in
6 Posts
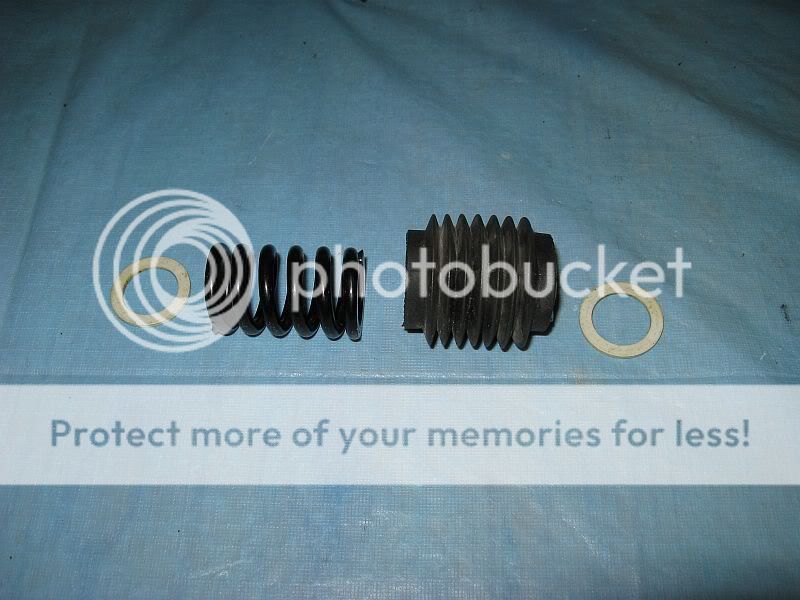
How to upgrade your Downtube Mini suspension spring:
It's a very simple procedure: remove the spring, install the doorstop, ride. No special parts need to be manufactured. I have broken it down in a step-by-step procedure for clarity.
Materials needed:
1. Rubber doorstop. The one pictured is almost perfect in all respects - shape, size and damping properties. Note the dimensions and especially the recess at the one end.
2. 2x mudguard washers (this is what they were called at the hardware store, basically large washers. Hole: 10mm. Total thickness: 2-3mm
Procedure:
1. Enlarge the screw hole in the doorstop to 9mm: Pop the doorstop in a deep-freeze for a couple of hours to harden it, then simply drill the hole out with a 9mm drill bit. (A 6mm or 1/4" bit will probably work but you'll have some effort to push the suspension bolt through at assembly time.)
2. Place the bike upside down. (Optional): Unhook the rear brake noodle.
3. (Optional): Loosen the rear axle nuts and take the chain off the front cog to create slack. Pull the gear and brake cables a bit to the back to create some slack. Then pull the rear wheel to the extreme of the track end and hand-tighten the axle nuts to keep it there. This step creates some room to access the suspension bolt but may not be essential.
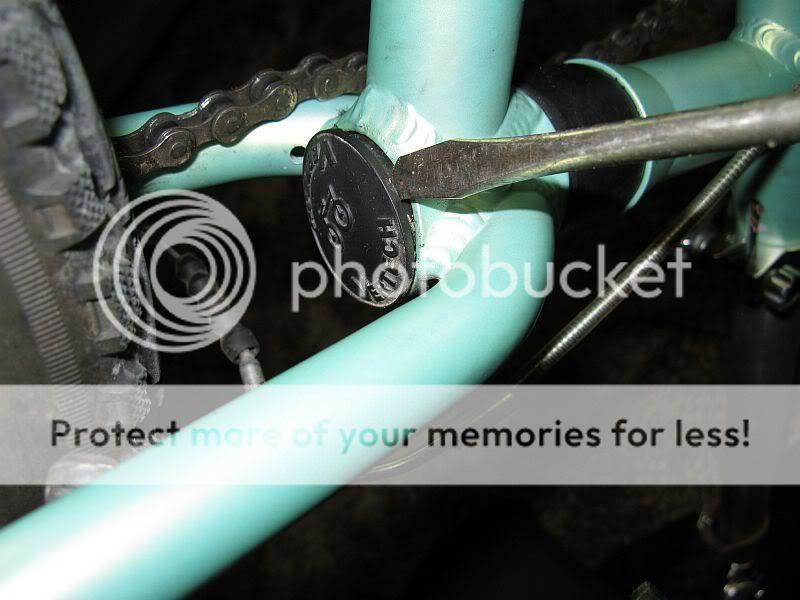
4. Remove the rubber end cap pictured. Unscrew the bolt in the recess. Leave it in place - no need to remove it.
5. Swivel the rear triangle to open the suspension gap and remove the rubber concertina sleeve, spring and the plastic washers under the spring ends.
6. Insert both plastic washers around the spring boss at the main frame side of the suspension joint. This fills in that recess a bit so that the spring boss height matches the doorstop recess depth.
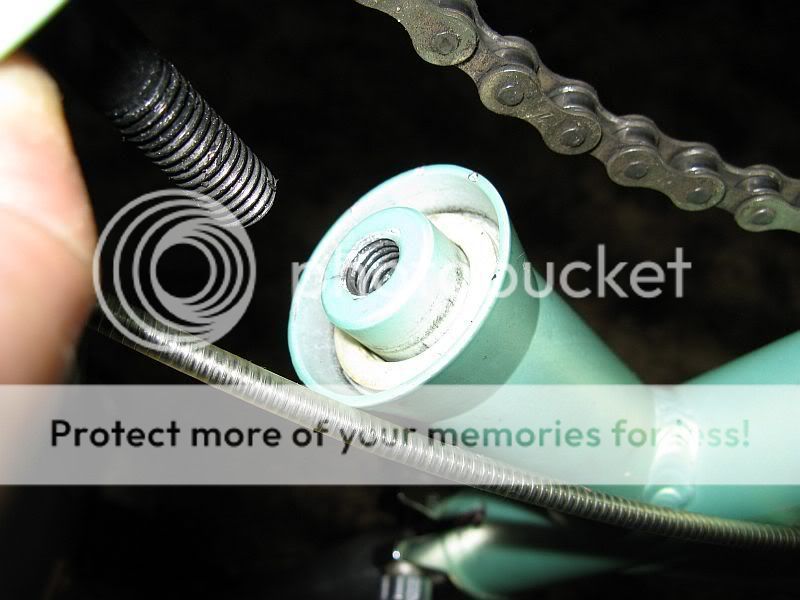
7. Apply a small amount of grease on the recess end of the rubber doorstop. Push it over the frame side spring boss. It is a neat fit and some force is needed.
8. Slide the mudguard washers over the suspension bolt up against the spring boss on the rear trangle side. When pushed against the spring boss, the washers must be slightly recessed to ensure the doorstop is captured by the edge. Grease the bolt lightly.
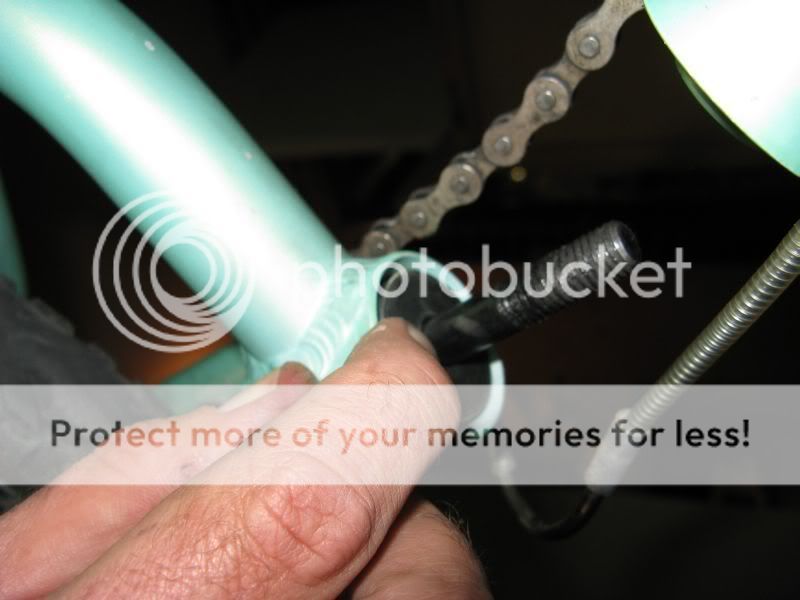
9. Push the bolt through the doorstop hole and tighten it. Mine requires some fiddling, especially pushing the suspension gap closed to ensure the bolt threads engage. Put the rubber end cap back in.
10. (Optional): Put the rear wheel back in its place and settle the cables. Hook up the rear brake.
Go for a ride!
It's a very simple procedure: remove the spring, install the doorstop, ride. No special parts need to be manufactured. I have broken it down in a step-by-step procedure for clarity.
Materials needed:
1. Rubber doorstop. The one pictured is almost perfect in all respects - shape, size and damping properties. Note the dimensions and especially the recess at the one end.
2. 2x mudguard washers (this is what they were called at the hardware store, basically large washers. Hole: 10mm. Total thickness: 2-3mm
Procedure:
1. Enlarge the screw hole in the doorstop to 9mm: Pop the doorstop in a deep-freeze for a couple of hours to harden it, then simply drill the hole out with a 9mm drill bit. (A 6mm or 1/4" bit will probably work but you'll have some effort to push the suspension bolt through at assembly time.)
2. Place the bike upside down. (Optional): Unhook the rear brake noodle.
3. (Optional): Loosen the rear axle nuts and take the chain off the front cog to create slack. Pull the gear and brake cables a bit to the back to create some slack. Then pull the rear wheel to the extreme of the track end and hand-tighten the axle nuts to keep it there. This step creates some room to access the suspension bolt but may not be essential.
4. Remove the rubber end cap pictured. Unscrew the bolt in the recess. Leave it in place - no need to remove it.
5. Swivel the rear triangle to open the suspension gap and remove the rubber concertina sleeve, spring and the plastic washers under the spring ends.
6. Insert both plastic washers around the spring boss at the main frame side of the suspension joint. This fills in that recess a bit so that the spring boss height matches the doorstop recess depth.
7. Apply a small amount of grease on the recess end of the rubber doorstop. Push it over the frame side spring boss. It is a neat fit and some force is needed.
8. Slide the mudguard washers over the suspension bolt up against the spring boss on the rear trangle side. When pushed against the spring boss, the washers must be slightly recessed to ensure the doorstop is captured by the edge. Grease the bolt lightly.
9. Push the bolt through the doorstop hole and tighten it. Mine requires some fiddling, especially pushing the suspension gap closed to ensure the bolt threads engage. Put the rubber end cap back in.
10. (Optional): Put the rear wheel back in its place and settle the cables. Hook up the rear brake.
Go for a ride!
Last edited by jur; 02-28-08 at 05:41 AM.
02-28-08, 09:26 AM
#38
Part-time epistemologist

Nice job Jur. Thanks.
-G
-G
__________________
A narrative on bicycle driving.
A narrative on bicycle driving.
02-28-08, 10:15 AM
#39
Wheelsuck
Join Date: Jun 2007
Posts: 6,158
Mentioned: 0 Post(s)
Tagged: 0 Thread(s)
Quoted: 0 Post(s)
Likes: 0
Liked 0 Times
in
0 Posts
In the US, these would be called 'Fender Washers', just in case anyone is looking for them.
02-28-08, 10:44 AM
#40
Eschew Obfuscation

Join Date: Aug 2005
Location: San Francisco Bay Area
Posts: 3,845
Bikes: 2005 Fuji Professional, 2002 Lemond Zurich, Folders - Strida, Merc, Dahon, Downtube, Recumbent folder
Mentioned: 0 Post(s)
Tagged: 0 Thread(s)
Quoted: 1 Post(s)
Likes: 0
Liked 0 Times
in
0 Posts
Thanks for posting the pics, Jur. Makes thing clear enough that even an idiot like me can make the mod.
I'll be running off to the hardware store now...
I'll be running off to the hardware store now...
02-28-08, 03:43 PM
#41
Full Member
Thanks for a great thread. Not sure where I might find such a doorstop around here. Was this a car/truck part or a house part? I'm pretty familiar with what my local hardware store stocks and don't recall seeing anything quite like it.
Lucky for us you posted pictures so I am going to print them out and bring them with me so I can show the store clerks what I am searching for. This could be the suspension cure I have been looking for
Lucky for us you posted pictures so I am going to print them out and bring them with me so I can show the store clerks what I am searching for. This could be the suspension cure I have been looking for
02-28-08, 04:27 PM
#42
The Legitimiser

Join Date: Jul 2005
Location: Southampton, UK
Posts: 4,849
Bikes: Gazelle Trim Trophy, EG Bates Track Bike, HR Bates Cantiflex bike, Nigel Dean fixed gear conversion, Raleigh Royal, Falcon Westminster.
Mentioned: 0 Post(s)
Tagged: 0 Thread(s)
Quoted: 2 Post(s)
Likes: 0
Liked 5 Times
in
4 Posts
That'd be a house part - screws to the wall or floor behind a door, so the door bounces of it, rather than smacking into aforementioned wall.
02-28-08, 05:50 PM
#43
Full Member
https://www.absolutehome.com/web/cata...36E7E46B5C716D
So far I can find ones like Jur shows on UK websites, but nothing local. That's why I was thinking I might be able to find a substitute at a car parts store... Maybe SesameCrunch will have better luck.
02-28-08, 05:55 PM
#44
Senior Member
Thread Starter
Join Date: May 2005
Location: Albany, WA
Posts: 7,393
Mentioned: 16 Post(s)
Tagged: 0 Thread(s)
Quoted: 321 Post(s)
Likes: 0
Liked 7 Times
in
6 Posts
I could buy a bunch of those stops and mail them to someone in the US from where they could be sent onwards to individuals.
I actually found them in a rubber shop, not a hardware shop. I went to the rubber shop with a vague idea of finding some round rubber rods which I could then whip into shape on the lathe, but found the (home) doorstop instead. They also had a range of red rubber bungs the sort which is used to plug up lab flasks, which might have worked.
I have another idea up my sleeve which I still have to try out. Basically it is to use a 20mm diameter round rubber rod inside the original spring. As the spring compresses, so does the rubber, expanding in diameter and pressing against the spring coils. I am wondering if this might have a good enough damping effect.
Last edited by jur; 02-28-08 at 06:01 PM.
02-28-08, 06:31 PM
#45
Full Member
[
Thanks for the offer. I haven't given up on finding one here yet, and with the picture I have great hopes that someone can find a similar item. I'm pretty sure I can find tapered black rubber stoppers/bungs but they would need to be drilled out and wouldn't have the nice recess like the doorstop.
I could buy a bunch of those stops and mail them to someone in the US from where they could be sent onwards to individuals.
...They also had a range of red rubber bungs the sort which is used to plug up lab flasks, which might have worked.
I have another idea up my sleeve which I still have to try out. Basically it is to use a 20mm diameter round rubber rod inside the original spring. As the spring compresses, so does the rubber, expanding in diameter and pressing against the spring coils. I am wondering if this might have a good enough damping effect.
03-03-08, 05:28 PM
#46
Full Member
I don't want to get into the bike parts biz, but I do want some of these doorstops to try out.Any Downtube Mini owners who are interested should send me a private message here on this board.
Don't know about prices yet, but Jur thinks that he paid about AUS$4 each. I assume that US postage would be more than a buck and at worst $8.95, the cost of postage from OZ to here will probably add at least another couple of bucks, so probably somewhere in the $7-15$ range per doorstop with discounts for multiples to the same address.
Let me know if you are interested.
03-03-08, 07:05 PM
#47
Senior Member
Thread Starter
Join Date: May 2005
Location: Albany, WA
Posts: 7,393
Mentioned: 16 Post(s)
Tagged: 0 Thread(s)
Quoted: 321 Post(s)
Likes: 0
Liked 7 Times
in
6 Posts
Looks like postage to the US will be about $20 for a parcel of between 0.5 and 0.75kg. Since a doorstop is a pretty robust thing, packing can be limited to a tough postage satchel with some bubble wrap to hold the stuff together. Dunno how much one of these things weigh, probably a lot less than 50g, so we can accomodate at least 10 in there, perhaps up to 20, so that makes perhaps $2 or less amortized international postage. Not bad.
03-19-08, 06:30 PM
#48
Senior Member
Thread Starter
Join Date: May 2005
Location: Albany, WA
Posts: 7,393
Mentioned: 16 Post(s)
Tagged: 0 Thread(s)
Quoted: 321 Post(s)
Likes: 0
Liked 7 Times
in
6 Posts
This morning I rode to work and have to say I have reached suspension Nirvana. The suspension is so plush with large travel while being nicely damped. It just glides over bumps. I doubt it could be any better.
How did I do it? Very simple.
Short version:
I cemented a 10mm disc of rubber (hacksawed off from another doorstop) to the end of the one I had in there, to increase travel and to not have it compress so far when riding it. The result was that the longer but otherwise same doorstop became easier to compress due to more complience for the bulge to form. So I got increased travel plus effectively softer elastomer plus the space is increased. If you don't glue them together, the pieces act more independently, being effectively stiffer, especially if you put a mudguard washer in between pieces.
Long version:
I did some more experiments. The main thing that I thought about was suspension travel. The original spring is 51mm so that is total amount of stuff that is compressing.
The doorstop OTOH is about 30mm of stuff that is compressing (ignoring the recessed bit that goes around the original spring boss), a substantial smaller amount than the spring. I felt this in my rides, it felt like a tyre's effect, perhaps like a Big Apple pumped hard. I could feel the edges being removed from bumps but I thought if the travel was longer, then it would end up feeling plusher. I also thought that the single doorstop was being compressed a bit much and wouldn't be so good for heavier people. (I am a scrawny 75kg.)
So I next took 2 doorstops and cut off about 10mm from the fatter end of each, and installed them end-to-end. (For one of them I made the recess shallower by sanding the rim off using my belt sander, that worked very well.) The reasoning for using 2 was that there would be more stuff to compress, in fact the total length was about 60mm and I had some effort to get the bolt to engage when installing. This installation didn't need the mudguard washer, only the 2 plastic spacer washers mentioned in my assembly procedure.
I rode with the shortened end-end doorstops for a week, including a 3-day tour over some very rough stuff that I still have to post pics of. It worked better than just the one doorstop, not compressing nearly as much, and I thought that was that. A good solution. But I still thought it was rather firm for my weight, and didn't feel all that different from just a single doorstop.
I like to fiddle, so I took the original unchanged doorstop and with rubber cement glued one of the pieces that I sawed off the other doorstops, to the flat end, leaving the cement to cure overnight with the assembly clamped lightly in my bench vise. This was to make it longer so that there is more room for further compression especially for heavier people. I installed this last night with a fender washer and immediately noticed during installation that strangely, it was much softer than before I glued on the extra piece! This was a totally unexpected result.
This morning I rode to work and have to say I have reached suspension Nirvana. The suspension is so plush with large travel while being nicely damped. It just glides over bumps. I doubt it could be any better.
Soooooooo, how is it that the glued version became softer?? I first thought maybe the rubber cement softened it but that doesn't hold water. Then I realised, it is the 2 separate pieces now acting as a homogenous piece. The longer dimension has made the bulging out of the tube-like structure easier, so it requires less force to achieve the same amount of compression due to it bulging out easier.
This explains why the fatter, glued assembly acts much softer than the 2 end-to-end pieces. The latter were each acting individually more or less, so that made bulging out of each piece much harder. You can see why this is so by imagining having a stacked series of fat rubber washers, but each isolated from the next by a rigid washer. Such an assembly would require MUCH larger force for a certain amount of travel compared to a homogenous rubber piece using the exact same material.
So this ends my experiments, and I can now make a recommendation for heavier people: Instead of using harder rubber, you could also cut the elastomer in half and put in a thin, stiff washer made from plastic or whatever in between. This should double the effective stiffness. Alternatively, I could put a pipe clamp around the rubber to prevent the middle part from bulging out and achieve more stiffness.
Last edited by jur; 03-19-08 at 06:36 PM.
03-20-08, 03:23 PM
#50
Eschew Obfuscation
Join Date: Aug 2005
Location: San Francisco Bay Area
Posts: 3,845
Bikes: 2005 Fuji Professional, 2002 Lemond Zurich, Folders - Strida, Merc, Dahon, Downtube, Recumbent folder
Mentioned: 0 Post(s)
Tagged: 0 Thread(s)
Quoted: 1 Post(s)
Likes: 0
Liked 0 Times
in
0 Posts
Jur:
I hereby award you an honorary PhD in Mini-Suspensionology. Good work!
I hereby award you an honorary PhD in Mini-Suspensionology. Good work!
__________________
