


Early frame dimensions
 04-29-15 | 08:27 PM
#1
Thread Starter
Junior Member
Joined: Apr 2015
Posts: 7
Likes: 0
Early frame dimensions
does anyone know if there was a industry standard frame rake measurement around 1900 era ?
or are there degree increments , Im pretty much interested in Hendee , I just thought maybe there was a rake that everyone was aiming for , wheelbase , trail , height etc
or are there degree increments , Im pretty much interested in Hendee , I just thought maybe there was a rake that everyone was aiming for , wheelbase , trail , height etc
 04-29-15 | 08:58 PM
#2
Senior Member


Joined: Feb 2012
Posts: 19,344
Likes: 5,461
From: Rochester, NY
Bikes: Stewart S&S coupled sport tourer, Stewart Sunday light, Stewart Commuting, Stewart Touring, Co Motion Tandem, Stewart 3-Spd, Stewart Track, Fuji Finest, Mongoose Tomac ATB, GT Bravado ATB, JCP Folder, Stewart 650B ATB
Having not done the specific research I'll say this- There was a range of tire diameters and design "families" back then (as today ). Rake is in my experience a resultant of the other steering geometry aspects. So to place some handling quality on a rake is not well placed energy. Andy
). Rake is in my experience a resultant of the other steering geometry aspects. So to place some handling quality on a rake is not well placed energy. Andy
04-30-15 | 04:08 PM
#4
Thread Starter
Junior Member
Joined: Apr 2015
Posts: 7
Likes: 0
Looking at Hendees bicycle geometry from the axle plates and the angle of the stays etc , theres measurements and angles that are repeated thru the years and some not .
Its easy enough to measure diamond frames from pics but measuring the neck angle might be a bit dodgie , I thought maybe there was a standardised angle like eg 80 degrees or 85 degrees as opposed to 81 , 82 ,83 , 84 etc increments or minutes ! .....surely not
basically all I have to go by is pics of Hendee bikes
04-30-15 | 06:14 PM
#5


Decrepit Member
Joined: Aug 2005
Posts: 10,488
Likes: 92
From: Santa Rosa, California
Bikes: Waterford 953 RS-22, several Paramounts
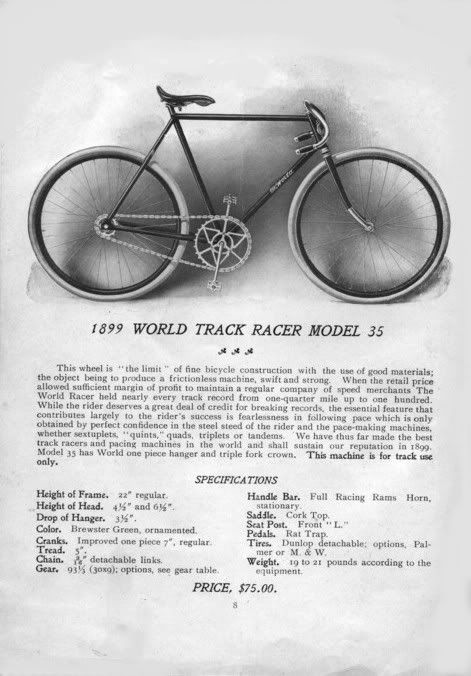
Generally, looking at turn of the century (c. 1900) bicycle ads, the head tube angle and seat tube angle were very slack compared to today's frame geometry. I took some measurements from this 1899 Schwinn World track bike and plugged in linear dimensions to suit me. It was just an exercise to see if it might make sense to build a bike using TIG-welded modern air-hardening steel tubing one of these days.
These bikes had a lot of trail and the stems had no forward extension. The 3-1/2" BB drop (88.9mm) seemed too low with modern 622cm BSD rims and skinnier tires, so I raised the BB so the drop is 70mm.
I don't know if this helps at all, but I'm posting it FWIW. The chainring and rear cog are "skip-tooth", so 30t x 9t is really 60t x 18t.
 05-01-15 | 03:20 PM
#6
Thread Starter
Junior Member
Joined: Apr 2015
Posts: 7
Likes: 0
Thats excellent! those old pics are what Ive been looking at , Thing is theres also camera lens distortion to consider when measuring angles .
I blew the page up to 200% then measured the visible , inside wheel rims , Front vertical = 75mm , horizontal 77mm
Rear vertical = 74mm , horizontal 76mm
so the wheels in the pic arent round , so frame angles could be and likely arent actual
I measure
top tube to down tube 45*
top tube to seat post 68*
seat post to down tube 67*
total 180*
seat post to top stay 55*
seat post to bottom stay 60*
top - bottom stay 65*
total 180*
the angle of the head to top tube 20*
but because of lens distortion all those measurements can mean NOTHING!!
Now.... your frame , because its got angles 67.5* and 0.0* on the top tube as a bench mark its easier
top tube to down tube 47*
top tube to seat post 66*
seat post to down tube 67*
seat post to top stay 49*
seat post bottom stay 59*
top - bottom stay 72*
the head is 23.5* to the top tube to match the 67.5*
tricky bit = Ive got flat screen to measure off but when I blow the pic up to 200% to measure the wheels
front wheel vertical 99mm , horizontal 100mm
rear wheel vertical 99mm , horizontal 100mm
so even though theres a person attached to this diagram who can double check my measurements and tell me Im wrong , I have to be skeptical of my OWN measurements because I can see distorion in the screen or in the case of 100 year old photos , camera lens distortion . Even scanned pics show distortion so they are also not reliable
Ive been looking a old Hendee and Indian bicycle frame geometry and it caves in when I can see the distorion that most people wouldnt even notice.
heres 2 pics
one is 20 degrees from head bearing flat to the top tube of 1922 - 31 indian chief motor cycle
one is 25 degrees from head bearing flat to the top tube of 1920 - 31 indian scout motor cycle
how this is relavant is from Hendee bicycles evolving into mc , there must have been angles and geometry that Hendee saw as suitable being a racer from diamond frame then to hoop then cradle frame mc in the art deco era
05-01-15 | 07:53 PM
#7
Decrepit Member
Joined: Aug 2005
Posts: 10,488
Likes: 92
From: Santa Rosa, California
Bikes: Waterford 953 RS-22, several Paramounts
You'll never get precise dimensions from a photo, but you can get quite close. Generally, a photographer can minimize distortion by photographing a bike straight-on from the side (film plane of the camera exactly parallel to the longitudinal plane of the bike) using a long telephoto lens. In the case of the Schwinn World track bike photo above, you can tell that's what the photographer did since the non-driveside seat stay and chain stay as well as the non-driveside fork blade are all pretty well hidden by the driveside stays and fork blade.
I use a Gerber variable scale which I set to a known length on the 1899 Schwinn World Model 33 photo, in this case the 24" c-t seat tube length. I then did a sanity check with scale my looking at the BB drop (3") and head tube length (6 1/2") to ensure they all jived. Looking at the dimensions of the front and rear wheel rim vertical and horizontal inside diameters, you can see the front wheel was closer to the camera than the rear wheel as the front rim is slightly larger. Also, the camera was positioned slightly above the vertical center of the frame as the pedals and the handlebar appear to be photographed from above, and this is why the vertical rim diameters are slightly less than the horizontal rim diameters of both wheels. This requires some judicious averaging to get more accurate measurements.
Here's the catalog page.

Here's the 24" seat tube scaled.

Bottom Bracket Drop.

Head Tube Length.

Fork Rake.

Top Tube Length.

Crank Arm Length.

I use a Gerber variable scale which I set to a known length on the 1899 Schwinn World Model 33 photo, in this case the 24" c-t seat tube length. I then did a sanity check with scale my looking at the BB drop (3") and head tube length (6 1/2") to ensure they all jived. Looking at the dimensions of the front and rear wheel rim vertical and horizontal inside diameters, you can see the front wheel was closer to the camera than the rear wheel as the front rim is slightly larger. Also, the camera was positioned slightly above the vertical center of the frame as the pedals and the handlebar appear to be photographed from above, and this is why the vertical rim diameters are slightly less than the horizontal rim diameters of both wheels. This requires some judicious averaging to get more accurate measurements.
Here's the catalog page.
Here's the 24" seat tube scaled.
Bottom Bracket Drop.
Head Tube Length.
Fork Rake.
Top Tube Length.
Crank Arm Length.
05-01-15 | 07:58 PM
#8
Decrepit Member
Joined: Aug 2005
Posts: 10,488
Likes: 92
From: Santa Rosa, California
Bikes: Waterford 953 RS-22, several Paramounts
Front Rim Inside Diameter (vertical).

Front Rim I.D. (horizontal).

Rear Rim I.D. (vertical).

Rear Rim I.D. (horizontal).

Wheelbase:

Front Rim I.D. (horizontal).
Rear Rim I.D. (vertical).
Rear Rim I.D. (horizontal).
Wheelbase:
05-02-15 | 03:10 PM
#9
Thread Starter
Junior Member
Joined: Apr 2015
Posts: 7
Likes: 0
crikey ... thats a measuring stick ! I always notice the camera angles looking at chain stay , fork blade on far side , drives me nuts .
another thing is that the old advertising agency used air brush , photoshop of the day .
I got a library book out yesterday , cant exactly draw lines all over it , but its the same situation of vintage photography .
Im considering a Gerber variable scale
another thing is that the old advertising agency used air brush , photoshop of the day .
I got a library book out yesterday , cant exactly draw lines all over it , but its the same situation of vintage photography .
Im considering a Gerber variable scale
06-13-15 | 09:17 PM
#10
Senior Member
Joined: Sep 2012
Posts: 1,751
Likes: 7
- I have often needed to quickly go from a photo to get dimensions (for all sorts of things besides bike frames).
- It has often been simplest to save the photo out as a JPEG file and then insert it into PowerPoint and get busy with it
-- Assuming you have some idea how big the item is in the real world, set the page size to be a bit larger
-- Use a scale of 1 PowerPoint inch or cm on screen (your choice) = 1 foot or 1 inch or 1 cm, real world, as needed
-- Then insert the JPEG file into the blank PowerPoint drawing.
- If you know any dimension of any part of the item in the picture, then make a line that size to compare the JPEG to.
-- Move this line over on top of the picture and position it about where the known part is.
-- If you know the angle of the known part, you can enter that angle into the rotation of the new line
-- Then click once on the picture, and resize it so the known item in the photo is the same size as the new line. Keeping proportions the same when resizing.
-- Zoom in a lot to make sure the starting and end points of the line you made and the known part in the photo are spot on. Resize the photo as needed to get it right.
- After you have the photo the correct size, you can lay other PowerPoint lines, rectangles, circles, etc., over top of it, resize them to match that in the JPEG, and then take your dimensions from them. While not a high precision CADD program, pray tell, PowerPoint can get you close enough for most uses and most folks have it installed on a computer near them. Really handy for sorting out a bicycle ad on ebay where the seller knows only that it has 700C wheels but has one picture of it and no clue as to the seat-tube or top-tube or the chain-stays.
Hope that helps a bit
/K
 06-16-15 | 10:40 PM
#12

Senior Member
Joined: Dec 2009
Posts: 9,563
Likes: 735
From: Melbourne, Oz
Bikes: https://weightweenies.starbike.com/forum/viewtopic.php?f=10&t=152015&p=1404231
Here's a few computer tips:
First, hold down Alt and hit 248 on the numpad: �_�
And when it comes to measuring stuff from pictures, I like to use Paint Shop Pro (pretty sure Photoshop is similar enough). The geometric distortion tools can be pretty handy...
Say all you have is a photo of a photo, and it's not even straight-on, you can use perspective correction to fix it, and/or if the shot itself is off-centre, you can correct a little bit for that too. There are also tools to correct for lens distortion as well.
But the main utility for this sort of stuff comes into play when you resize the pic so one pixel is 1mm (imperial be damned). First, jump on Google's image search to make sure you're you're starting with the largest copy you can find (hit the little camera icon to paste an image's address or upload one). In this case, no dice. So I had to resize the pic 435.5% to get there, and it's a bit fuzzy, but just good enough to be sure you're making reasonably accurate measurements. (Neatly enough, at this scale a bike nearly fills HD resolution, and my telly is my monitor.)

Now I can just use the straighten tool to find angles and/or rotate the pic to use the selection box to measure anything.

First, hold down Alt and hit 248 on the numpad: �_�
And when it comes to measuring stuff from pictures, I like to use Paint Shop Pro (pretty sure Photoshop is similar enough). The geometric distortion tools can be pretty handy...
Say all you have is a photo of a photo, and it's not even straight-on, you can use perspective correction to fix it, and/or if the shot itself is off-centre, you can correct a little bit for that too. There are also tools to correct for lens distortion as well.
But the main utility for this sort of stuff comes into play when you resize the pic so one pixel is 1mm (imperial be damned). First, jump on Google's image search to make sure you're you're starting with the largest copy you can find (hit the little camera icon to paste an image's address or upload one). In this case, no dice. So I had to resize the pic 435.5% to get there, and it's a bit fuzzy, but just good enough to be sure you're making reasonably accurate measurements. (Neatly enough, at this scale a bike nearly fills HD resolution, and my telly is my monitor.)
Now I can just use the straighten tool to find angles and/or rotate the pic to use the selection box to measure anything.

