


Latest Project

 01-21-18 | 04:53 PM
#27
Thread Starter
Senior Member


Joined: Aug 2012
Posts: 680
Likes: 283
From: Seattle
Yesterday's progress:
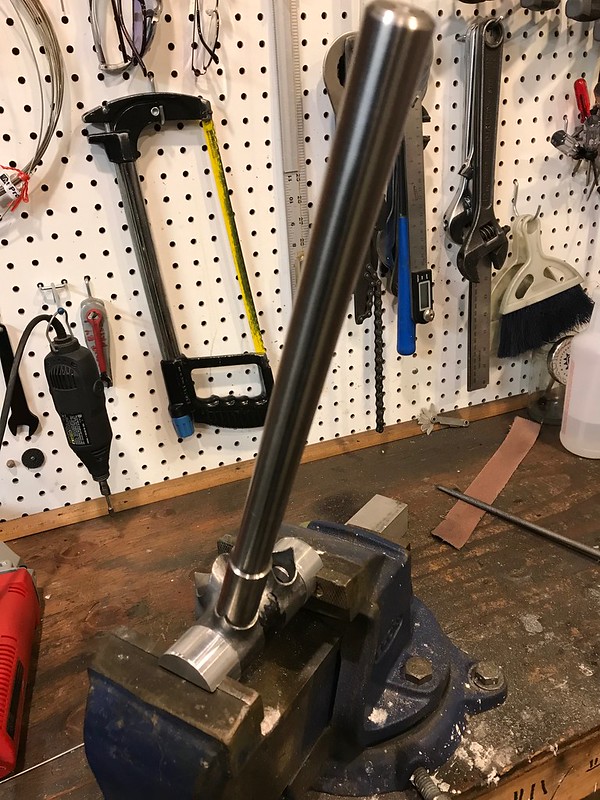
First off was adjusting the angles and sockets of the BB. Normally, I build with oval stays but with these round stays using a scrap piece of bar, I was able to have a nice anvil inside the socket to hammer against and the bar provided leverage to move the socket around too. Track bikes have somewhat higher BB's and these frames are very small so the angles are a bit off of standard road bike. I was lucky and found a BB with angles that were pretty close from Ceeway but they still needed a few degrees adjustment on the stays. I also needed to tightened the sockets up a bit as there was just a bit more slop than needed for the filler (Silver). I think I cycled through the 4 shells 2 or 3 times before I was happy with all of them!:
After getting through the BB's, I mitered the top tubes. Normally, I use tubing blocks on each end to keep miters in phase. I don't have 8 1" blocks though so, I had to do one end and then move the blocks to the other end keeping everthing in phase. Once i'd moved the blocks, I tried a few different ways to get them back in phase on the other end. I found that the headtube snug slip fit on my BB post on the surface plate so, I forced the mitered HT end of the TT against that while adjusting the block on the other end of the tube against the surface plate. Most important tool in the garage is problem solving skills.
I mitered the HT end:

Then held it tight against the HT mounted on the BB post:

Once the block was on, I could measure with my 600mm calipers (which are super handy!) to scribe a mark at the right TT length for the ST end miter.

After those were completed, I moved on to braze on the seat tube sleeves for the seat cluster. I generally like that step because adding it makes me think that I'm building something strong that will last. I didn't thin these on the lathe and I didn't carve them at the bottom like I normally do due to these having a separate aluminum clamp that requires the full 31.8mm diameter ST and time constraints. Sorry about the photo quality. I apparently didn't turn the lights back up after I finished brazing. I recently switched from tube CFL's to LED lights in the shop and now I am having a hard time seeing the color and flux changes.
 Untitled by Duane Draper, on Flickr
 Untitled by Duane Draper, on Flickr
 Untitled by Duane Draper, on Flickr
I use silver on these sleeves all the way through which then requires I use Fillet Pro on the TT/seatstays. This increases costs a bit (a lot) but I like that I get full penetration under the sleeve, I'm putting less heat into a critical joint which decreases distortion and retains more strength, clean up is faster and shaping the fillets in this area is a bit easier. There's a lot of good reasons to use FP here.
Finally, I got started on wishbone stays. These are Andy Newlands at Torch and File (.com) and are really nicely cast.

Later today, I'm hoping to get the DT's mitered and maybe braze the BB shells onto the ST's. At that point, I'll miter the chainstays and mount it all up in the jig to make final adjustments to the miters and fit up before tacking.
Stay tuned!
First off was adjusting the angles and sockets of the BB. Normally, I build with oval stays but with these round stays using a scrap piece of bar, I was able to have a nice anvil inside the socket to hammer against and the bar provided leverage to move the socket around too. Track bikes have somewhat higher BB's and these frames are very small so the angles are a bit off of standard road bike. I was lucky and found a BB with angles that were pretty close from Ceeway but they still needed a few degrees adjustment on the stays. I also needed to tightened the sockets up a bit as there was just a bit more slop than needed for the filler (Silver). I think I cycled through the 4 shells 2 or 3 times before I was happy with all of them!:
After getting through the BB's, I mitered the top tubes. Normally, I use tubing blocks on each end to keep miters in phase. I don't have 8 1" blocks though so, I had to do one end and then move the blocks to the other end keeping everthing in phase. Once i'd moved the blocks, I tried a few different ways to get them back in phase on the other end. I found that the headtube snug slip fit on my BB post on the surface plate so, I forced the mitered HT end of the TT against that while adjusting the block on the other end of the tube against the surface plate. Most important tool in the garage is problem solving skills.
I mitered the HT end:
Then held it tight against the HT mounted on the BB post:
Once the block was on, I could measure with my 600mm calipers (which are super handy!) to scribe a mark at the right TT length for the ST end miter.
After those were completed, I moved on to braze on the seat tube sleeves for the seat cluster. I generally like that step because adding it makes me think that I'm building something strong that will last. I didn't thin these on the lathe and I didn't carve them at the bottom like I normally do due to these having a separate aluminum clamp that requires the full 31.8mm diameter ST and time constraints. Sorry about the photo quality. I apparently didn't turn the lights back up after I finished brazing. I recently switched from tube CFL's to LED lights in the shop and now I am having a hard time seeing the color and flux changes.
Untitled by Duane Draper, on FlickrUntitled by Duane Draper, on FlickrUntitled by Duane Draper, on FlickrI use silver on these sleeves all the way through which then requires I use Fillet Pro on the TT/seatstays. This increases costs a bit (a lot) but I like that I get full penetration under the sleeve, I'm putting less heat into a critical joint which decreases distortion and retains more strength, clean up is faster and shaping the fillets in this area is a bit easier. There's a lot of good reasons to use FP here.
Finally, I got started on wishbone stays. These are Andy Newlands at Torch and File (.com) and are really nicely cast.
Later today, I'm hoping to get the DT's mitered and maybe braze the BB shells onto the ST's. At that point, I'll miter the chainstays and mount it all up in the jig to make final adjustments to the miters and fit up before tacking.
Stay tuned!
__________________
https://www.flickr.com/photos/54319503@N05/
https://www.draper-cycles.com
https://www.flickr.com/photos/54319503@N05/
https://www.draper-cycles.com
Last edited by duanedr; 01-21-18 at 04:58 PM.
01-22-18 | 08:20 PM
#29
Thread Starter
Senior Member
Joined: Aug 2012
Posts: 680
Likes: 283
From: Seattle
Yes, the BB has following dimensions: (Ceeway #W100) 57.4x64.8x7�. I needed 57.75*x 66.8* x7*. I only needed 2* increase between ST/CS. There was almost that much slop in the chainstay sockets. The bar was nice because it provided a bit of an anvil inside the socket and it stretched the sockets but kept the rounded shape very nicely. The harder part is tightening up the base of the socket. I have some 3/8" bars of brass and aluminum I use to blacksmith it all into place.
Speaking of, I was driving through the neighborhood a week or so back and a guy near us had his garage door open. He had what appeared to be a blacksmith shop in the garage with a fire pit and anvil. I've wanted to stop in ever since. We're in a pretty urban setting so, it's a bit odd to see a big fire burning in someone's garage! I'm sure my neighbors think the same.
Speaking of, I was driving through the neighborhood a week or so back and a guy near us had his garage door open. He had what appeared to be a blacksmith shop in the garage with a fire pit and anvil. I've wanted to stop in ever since. We're in a pretty urban setting so, it's a bit odd to see a big fire burning in someone's garage! I'm sure my neighbors think the same.
__________________
https://www.flickr.com/photos/54319503@N05/
https://www.draper-cycles.com
https://www.flickr.com/photos/54319503@N05/
https://www.draper-cycles.com
01-24-18 | 08:12 AM
#30
Randomhead
Joined: Aug 2008
Posts: 25,930
Likes: 4,825
From: Happy Valley, Pennsylvania
that's interesting, I tried opening up that same angle on a bike that has a complete front triangle, and it wouldn't go as far as I wanted. I was recently looking at that bb shell because I'm using the same one on a new frame, those sockets are pretty robust. Not sure if we are using the same bb shell though.
there is a blacksmith shop near here in someone's yard, but it has been here since 1835. I think blacksmithing is pretty popular, probably more than building bike frames anyway.
there is a blacksmith shop near here in someone's yard, but it has been here since 1835. I think blacksmithing is pretty popular, probably more than building bike frames anyway.
02-01-18 | 08:06 PM
#31
Thread Starter
Senior Member
Joined: Aug 2012
Posts: 680
Likes: 283
From: Seattle
First off, to the folks who do this every day, all day, respect. I spent last Sunday in the shop putting flame to steel and filler and after about 7 hours, I was exhausted. Mentally and physically.
I started by getting mitered tubes into the jig to make sure tubes fit together as expected. Once that was done, I went at it with focus and fury.

I was too focused to take many pictures in between. I can say there was some mitering that happened:

Some brazing :


The fourth didn't make in the picture as I didn't think I would get it finished but then my 4pm appointment was cancelled so, I dove back in and finished it as well.

About 7 hours later, I ended up with:

After cleaning up, I went to dinner and had a beer.
I started by getting mitered tubes into the jig to make sure tubes fit together as expected. Once that was done, I went at it with focus and fury.
I was too focused to take many pictures in between. I can say there was some mitering that happened:
Some brazing :
The fourth didn't make in the picture as I didn't think I would get it finished but then my 4pm appointment was cancelled so, I dove back in and finished it as well.
About 7 hours later, I ended up with:
After cleaning up, I went to dinner and had a beer.
__________________
https://www.flickr.com/photos/54319503@N05/
https://www.draper-cycles.com
https://www.flickr.com/photos/54319503@N05/
https://www.draper-cycles.com
02-02-18 | 06:53 AM
#32
Senior Member
Joined: Dec 2012
Posts: 148
Likes: 10
From: Puyallup, WA
Bikes: Many... Up to 9 in the stable now
Nice work. I love having a long day (or two) to put completely into building. My initial immersion was a 3-day intensive workshop with Dave Levy of TiCycles Fabrication, what ended up to be almost 12 hour days. They kicked me out at the end of day 3. In the off hours I went back to my hotel and built wheels...
02-17-18 | 02:46 AM
#33
Thread Starter
Senior Member
Joined: Aug 2012
Posts: 680
Likes: 283
From: Seattle
Checking back in. Over the past 2 weeks, I spent a week in California for work so, today was my first day where I was able to spend much time in the shop.
Not really related to this project, I experimented with Phosphoric Acid to clean off surface rust after soaking the flux off. I had a conversation with another builder who gave me some tips on how to use phosphoric acid to get rid of rust during the building process so that was a good jump forward in making it nicer to work with a partially built frame or fork.
Also not really related, I have been following threads on propane/oxygen concentrators and have been patiently waiting for a concentrator to show up on Craigslist. An estate auction house listed something and I won the bid at $52! I brought it home and plumbed it into my OA set up to test it and it works wonderfully. I ordered up an elbow and TEN-5 tip to go on my Victor 100 torch. I also ordered arresters and propane regulator. I estimate that I'm into the set up for around $200 not including the torch handle and hoses. I will be using propane/Oxygen with the big torch/tip for crowns, lugs, and plug dropouts. Fillets, I think, will be better with A/O and smaller tip. I'm amazed at how well the propane set up works. I don't know if it's the bigger tip (previously, my biggest tip with O/A was a Victor #3) or propane heating properties but, the following CS joints were a breeze! I also did some testing flowing brass into a sleeve an immediately had my best results yet. I was able to flow brass about 40mm down a .058" walled sleeve without any burning or external flowing of brass. Again, it could just be that a bigger tip makes the difference. My Acetylene tank is too small to drive anything bigger than a #3.
On to recent progress!
I have decided to do the fillet finish work to fill in short time spots in the shop. I'm realizing there is a lot of finish work to do!
Top tube is done, downtube needs work:

Seat cluster/top tube:

Aligning the rear end with a known good wheel.

I got them all tacked and aligned, brazed and chased:


Then I put a dummy headset in and some wheels to see where I was.

Then I started working on the seatstays:

The cut stays, with pre-forms for brazing. Need to clean them up and they are ready to go.

Three day weekend. Might have them done by Tuesday!
Not really related to this project, I experimented with Phosphoric Acid to clean off surface rust after soaking the flux off. I had a conversation with another builder who gave me some tips on how to use phosphoric acid to get rid of rust during the building process so that was a good jump forward in making it nicer to work with a partially built frame or fork.
Also not really related, I have been following threads on propane/oxygen concentrators and have been patiently waiting for a concentrator to show up on Craigslist. An estate auction house listed something and I won the bid at $52! I brought it home and plumbed it into my OA set up to test it and it works wonderfully. I ordered up an elbow and TEN-5 tip to go on my Victor 100 torch. I also ordered arresters and propane regulator. I estimate that I'm into the set up for around $200 not including the torch handle and hoses. I will be using propane/Oxygen with the big torch/tip for crowns, lugs, and plug dropouts. Fillets, I think, will be better with A/O and smaller tip. I'm amazed at how well the propane set up works. I don't know if it's the bigger tip (previously, my biggest tip with O/A was a Victor #3) or propane heating properties but, the following CS joints were a breeze! I also did some testing flowing brass into a sleeve an immediately had my best results yet. I was able to flow brass about 40mm down a .058" walled sleeve without any burning or external flowing of brass. Again, it could just be that a bigger tip makes the difference. My Acetylene tank is too small to drive anything bigger than a #3.
On to recent progress!
I have decided to do the fillet finish work to fill in short time spots in the shop. I'm realizing there is a lot of finish work to do!
Top tube is done, downtube needs work:
Seat cluster/top tube:
Aligning the rear end with a known good wheel.
I got them all tacked and aligned, brazed and chased:
Then I put a dummy headset in and some wheels to see where I was.
Then I started working on the seatstays:
The cut stays, with pre-forms for brazing. Need to clean them up and they are ready to go.
Three day weekend. Might have them done by Tuesday!
__________________
https://www.flickr.com/photos/54319503@N05/
https://www.draper-cycles.com
https://www.flickr.com/photos/54319503@N05/
https://www.draper-cycles.com
Last edited by duanedr; 02-20-18 at 01:32 AM.
02-17-18 | 10:39 AM
#35

Senior Member
Joined: Mar 2012
Posts: 1,104
Likes: 48
From: santa barbara CA
Where and how do you position the preformed rings? Do you heat with the fork pointing up or down? Was the # 3 tip you used for OA a Victor tip(.059 orifice)?
thanks, Brian
thanks, Brian
Last edited by calstar; 02-17-18 at 10:46 AM.
02-17-18 | 03:02 PM
#36
Thread Starter
Senior Member
Joined: Aug 2012
Posts: 680
Likes: 283
From: Seattle
I clean all of the parts first. Then i make sure the preforms fit snuggly into the tube (this is important). I put flux into the tube past where the plug/preform will be and then put the preform into the end of the tube. Finally, I push the preform into the tube using the plug that will ultimately end up brazd in place and then flux the outside of the joint. This way the preform sits right against the plug and the tube. On some early test joints, the preform wasn't touching the tube or the plug and it doesn't melt completely.
Gravity is your friend! I aim to have the filler melt down into the joint. For these, I will do the top single socket side, then rotate to do the chainstay joints. I'll take photos of this as I go.
Yes. I used it on a victor 100 torch handle. I used that for sleeves, crowns, bb's and plug dropouts and stuff where there was significant mass to heat. For fillets and braze-ons I use a J-28 with #0. I will try doing some fillets with the propane but, will need to get smaller tips. Fillet brazing with a #5 on thin walled tubing is beyond my skillset!
__________________
https://www.flickr.com/photos/54319503@N05/
https://www.draper-cycles.com
https://www.flickr.com/photos/54319503@N05/
https://www.draper-cycles.com
02-17-18 | 03:10 PM
#37
Thread Starter
Senior Member
Joined: Aug 2012
Posts: 680
Likes: 283
From: Seattle
I was worried the tire would hit the seattube when fully forward. As you can see, full forward, there is about 3mm of clearance.
__________________
https://www.flickr.com/photos/54319503@N05/
https://www.draper-cycles.com
https://www.flickr.com/photos/54319503@N05/
https://www.draper-cycles.com
02-20-18 | 10:35 AM
#38
Thread Starter
Senior Member
Joined: Aug 2012
Posts: 680
Likes: 283
From: Seattle
I was able to find some time in garage yesterday afternoon.
I reamed and faced headtubes:

After I ream the headtube, I hone it with one of those flex hone things so all the rough edges are smoothed.
Here I am doing some mock up work on the chainstays: This is with about 3mm of clearance between the tire and arch when the wheel is fully forward in the slots. Not a lot of room for the stub to go on that yoke!

I brazed on the first stub using the preform that Andy sent with the yokes (foreground) but felt there wasn't quite enough filler so, I fed in a bit more manually. Then I made new preforms with a few wraps (background). I'm sure Andy has seen enough of these to know there is enough filler in there with one wrap but, I just feel a bit better having some seep out of the joint.

Also, as promised, Here's how I do the preforms:
First, I bevel the top edge of the plug:

Then after wire brushing the surface to be brazed, I wipe with alcohol and apply flux:

Clean the inside of the tube, wipe with alcohol and insert the preform

Add flux:

Use the plug to push the preform into the tube:

Add more flux:

Apply heat:

At this point, there is only completing seatstays and putting them on and slotting the seattube. Then I will build each one up and take it for a quick spin before tearing down, doing a final inspection and then sending off to paint. Hoping to have them all done by end of February.
I reamed and faced headtubes:
After I ream the headtube, I hone it with one of those flex hone things so all the rough edges are smoothed.
Here I am doing some mock up work on the chainstays: This is with about 3mm of clearance between the tire and arch when the wheel is fully forward in the slots. Not a lot of room for the stub to go on that yoke!
I brazed on the first stub using the preform that Andy sent with the yokes (foreground) but felt there wasn't quite enough filler so, I fed in a bit more manually. Then I made new preforms with a few wraps (background). I'm sure Andy has seen enough of these to know there is enough filler in there with one wrap but, I just feel a bit better having some seep out of the joint.
Also, as promised, Here's how I do the preforms:
First, I bevel the top edge of the plug:
Then after wire brushing the surface to be brazed, I wipe with alcohol and apply flux:
Clean the inside of the tube, wipe with alcohol and insert the preform
Add flux:
Use the plug to push the preform into the tube:
Add more flux:
Apply heat:
At this point, there is only completing seatstays and putting them on and slotting the seattube. Then I will build each one up and take it for a quick spin before tearing down, doing a final inspection and then sending off to paint. Hoping to have them all done by end of February.
__________________
https://www.flickr.com/photos/54319503@N05/
https://www.draper-cycles.com
https://www.flickr.com/photos/54319503@N05/
https://www.draper-cycles.com
02-20-18 | 10:37 AM
#39
Thread Starter
Senior Member
Joined: Aug 2012
Posts: 680
Likes: 283
From: Seattle
After all of the above, I brazed on the number badges. I don't have great photo of that but, while they were out soaking in the tank, it got very cold (low 20s)! I put the frames in the tank around 6pm and by 10pm ice was forming around them - you can see it stuck to the tubes in this pic.

__________________
https://www.flickr.com/photos/54319503@N05/
https://www.draper-cycles.com
https://www.flickr.com/photos/54319503@N05/
https://www.draper-cycles.com
02-22-18 | 10:27 PM
#41
Thread Starter
Senior Member
Joined: Aug 2012
Posts: 680
Likes: 283
From: Seattle
 02-23-18 | 10:55 AM
#42

Very Slow Rider
Joined: Jul 2017
Posts: 1,274
Likes: 133
From: E Wa
Bikes: Jones Plus LWB, 1983 Centurion Japanese CrMo bike
I am 5'8" but I have teens/preteens! I just bought a langster and set it up for commuting but would LOVE to take off my emergency kit, throw on a fixed cog and pump up the tires and take it to the velodrome in Redmond!!!!
02-23-18 | 10:12 PM
#43
Thread Starter
Senior Member
Joined: Aug 2012
Posts: 680
Likes: 283
From: Seattle
02-24-18 | 08:57 AM
#44
Very Slow Rider
Joined: Jul 2017
Posts: 1,274
Likes: 133
From: E Wa
Bikes: Jones Plus LWB, 1983 Centurion Japanese CrMo bike
02-25-18 | 01:50 PM
#45
Thread Starter
Senior Member
Joined: Aug 2012
Posts: 680
Likes: 283
From: Seattle
They have different nights of racing for new riders and intermediate racers. Then the fast folks come out on Friday nights where you'll usually see a few national and world champ jerseys flying around. There's a beer garden, the track is surrounded by grass so, lots of folks bring picnic style dinners and it is really a lot of fun. Especially on a nice summer Friday night here.
They usually have a 'Kiddie Kilo' where kids get to do a couple laps on their own bikes. Ever see a 4 year old kid, riding his bike with training wheels on a banked velodrome?
__________________
https://www.flickr.com/photos/54319503@N05/
https://www.draper-cycles.com
https://www.flickr.com/photos/54319503@N05/
https://www.draper-cycles.com
02-25-18 | 04:35 PM
#46
Very Slow Rider
Joined: Jul 2017
Posts: 1,274
Likes: 133
From: E Wa
Bikes: Jones Plus LWB, 1983 Centurion Japanese CrMo bike
It is a lot of fun. It's like a 3 hour road race all crammed into 5 minutes. Very intense. The Jerry Baker velodrome does a great job getting new racers up and going. From Spokane it would be a bit of a trek to get to the training classes they put on for new racers (3 or 4 Tuesday nights in a row) and then the new racers have to do like 4 Thursday night 'practice races' before they can move up to Monday night real racing for Cat 4/5's. It's a bit of a time investment to race.
They have different nights of racing for new riders and intermediate racers. Then the fast folks come out on Friday nights where you'll usually see a few national and world champ jerseys flying around. There's a beer garden, the track is surrounded by grass so, lots of folks bring picnic style dinners and it is really a lot of fun. Especially on a nice summer Friday night here.
They usually have a 'Kiddie Kilo' where kids get to do a couple laps on their own bikes. Ever see a 4 year old kid, riding his bike with training wheels on a banked velodrome?
You're right, I think Redmond is a TAD too far to trapes just to get my racing fix in. I am thinking about starting single speed CX this fall, I just emailed the organizers today. They had 6 races in Walla Walla, Pullman, Moscow, Spokane and Mead.
Dang... to think I used to work JUST off 520 in Bellevue; but I wasn't in to cycling then.
 03-20-18 | 12:01 AM
#48
Thread Starter
Senior Member
Joined: Aug 2012
Posts: 680
Likes: 283
From: Seattle
Wow, it's been almost a month! Time flies when you have kids!
Over the past 3 weeks, I have added seatstays, slotted seattubes, reamed and faced various parts as well as polished the skin off my thumb several times!
When we last were together, I had just brazed the stub to the top of the wishbone and paired the legs up.

After that, I brazed the legs onto the wishbone to create a single seatstay unit:

Once this was done, I did several measurements to ensure the legs were in the same plane and symmetrical. This was highly focused work and there are no pictures.
The next step was mitering the wishbone/seattube junction. I started down the path of using a fixure I created for exactly this purpose but, because the stub is so short, I decided that I would simply miter by hand. I cut the angle, and went at it with a file. Because I was very careful about cutting the seatstays equal length, I was able to simply drop them onto the dropout stubs and worry about the top miter. I thought. It turns out to not be that simple. The first one took more than 2 hours to get where I wanted. The next one took 20 minutes and each following one took a couple minutes less. Eventually, I was happy with their fitment and fired up the torch. I used Fillet Pro for the wishbone to ST joint as I had used silver for the sleeve. I used brass preforms for each of the other joints in the seatstays.


Then there was a week and a half of finish work like sanding, polishing, slotting and such. Every time I looked at one, I saw something I wasn't satisfied with. I swear, I could spend another 3 months doing the finish work and still would find little imperfections!

The full squad, out on the patio!

Test build - The cranks are some old road cranks and the bar/stem are from my track bike. The stem the bike was designed around is 70mm long so the bars are quite a ways out there on this test build.

Finally, I sent my test pilot out for a spin. His first time riding fixed gear, 700c wheels and drop bars. He said it was fine but he didn't like the bars. :

Next steps:
Components came in from FSA/Vision ( Vision ) today. I will pick them up tomorrow to do a dry install just to make sure everything fits together.
Then it's off to Seattle Powder Coating https://www.facebook.com/pages/Seattle-Powder-Coat/103037239763205 for a really nice deep 2 part metallic blue.
I have to still order decals as well (with new design!).
I'll post more photo's when they come back from coating.
Aside:
Now that the building part is done, I'm feeling a bit of withdrawal and find myself dreaming of my next project. The kids always need new bikes so, I think it's going to be a really light road bike for my test pilot so he can join me as I start riding again.
I do have a commission from a former racing team mate who would like something special. She's about 5'0" tall (with cleats on) and about 98lbs so, that could be fun.
I also want to make myself a 24" or 26" BMX cruiser sort of thing. Maybe even have it chrome plated - for old times sake. I have a super sweet old school ESP BMX stem that is just itching for a bike and that would take me back to my roots...
https://www.facebook.com/photo.php?f...20667074582243
Thanks for following along!
Over the past 3 weeks, I have added seatstays, slotted seattubes, reamed and faced various parts as well as polished the skin off my thumb several times!
When we last were together, I had just brazed the stub to the top of the wishbone and paired the legs up.
After that, I brazed the legs onto the wishbone to create a single seatstay unit:
Once this was done, I did several measurements to ensure the legs were in the same plane and symmetrical. This was highly focused work and there are no pictures.
The next step was mitering the wishbone/seattube junction. I started down the path of using a fixure I created for exactly this purpose but, because the stub is so short, I decided that I would simply miter by hand. I cut the angle, and went at it with a file. Because I was very careful about cutting the seatstays equal length, I was able to simply drop them onto the dropout stubs and worry about the top miter. I thought. It turns out to not be that simple. The first one took more than 2 hours to get where I wanted. The next one took 20 minutes and each following one took a couple minutes less. Eventually, I was happy with their fitment and fired up the torch. I used Fillet Pro for the wishbone to ST joint as I had used silver for the sleeve. I used brass preforms for each of the other joints in the seatstays.
Then there was a week and a half of finish work like sanding, polishing, slotting and such. Every time I looked at one, I saw something I wasn't satisfied with. I swear, I could spend another 3 months doing the finish work and still would find little imperfections!
The full squad, out on the patio!
Test build - The cranks are some old road cranks and the bar/stem are from my track bike. The stem the bike was designed around is 70mm long so the bars are quite a ways out there on this test build.
Finally, I sent my test pilot out for a spin. His first time riding fixed gear, 700c wheels and drop bars. He said it was fine but he didn't like the bars. :
Next steps:
Components came in from FSA/Vision ( Vision ) today. I will pick them up tomorrow to do a dry install just to make sure everything fits together.
Then it's off to Seattle Powder Coating https://www.facebook.com/pages/Seattle-Powder-Coat/103037239763205 for a really nice deep 2 part metallic blue.
I have to still order decals as well (with new design!).
I'll post more photo's when they come back from coating.
Aside:
Now that the building part is done, I'm feeling a bit of withdrawal and find myself dreaming of my next project. The kids always need new bikes so, I think it's going to be a really light road bike for my test pilot so he can join me as I start riding again.
I do have a commission from a former racing team mate who would like something special. She's about 5'0" tall (with cleats on) and about 98lbs so, that could be fun.
I also want to make myself a 24" or 26" BMX cruiser sort of thing. Maybe even have it chrome plated - for old times sake. I have a super sweet old school ESP BMX stem that is just itching for a bike and that would take me back to my roots...
https://www.facebook.com/photo.php?f...20667074582243
Thanks for following along!
__________________
https://www.flickr.com/photos/54319503@N05/
https://www.draper-cycles.com
https://www.flickr.com/photos/54319503@N05/
https://www.draper-cycles.com
Last edited by duanedr; 03-20-18 at 12:07 AM.
03-22-18 | 08:19 PM
#50
Thread Starter
Senior Member
Joined: Aug 2012
Posts: 680
Likes: 283
From: Seattle
I received in most of the components from FSA/Vision. Super folks to work with and nice gear! However, after test installing a crankset, I determined the clearances were too tight. There is about 1mm at the chainring and 2 at the crankarm. I'm now in scramble mode to make a dimpler to dimple at both the chainring and crank arm locations on the outer side of the chainstays. I'm glad I was able to test before sending to the coater!

My workback schedule to have them ready by 4/15/2018 is to have them to the powder coater by 3/28/2018.
Stay tuned!
My workback schedule to have them ready by 4/15/2018 is to have them to the powder coater by 3/28/2018.
Stay tuned!
__________________
https://www.flickr.com/photos/54319503@N05/
https://www.draper-cycles.com
https://www.flickr.com/photos/54319503@N05/
https://www.draper-cycles.com