


Bottom Bracket Rebuild Question
 05-19-10 | 02:49 PM
#1
Thread Starter
Senior Member
Joined: Oct 2008
Posts: 430
Likes: 0
From: Akron, OH
Bikes: 2008 Seven Axiom Steel, 1984 Colnago Nuovo Mexico, 2008 Cervelo P2C, 2000 Trek Multitrack 7200
Bottom Bracket Rebuild Question
I'm rebuilding the bottom bracket on my 1971 Hercules (a Raleigh clone). This is only the second time I have attempted this and besides trashing one of the cotters, it has gone smoothly. A couple of questions.
1. I was very careful about removing the old bearings, or so I thought. Is it possible that there are 10 bearings on the left side and 12 on the right side?
2. I read once in one of the forum posts that someone out there never bothers to remove the fixed cup on the right side when doing a bottom bracket rebuild. I can't get it off and yes I know that the threads are reverse threads, but is this a good idea and how to you do it? With needle nose pliers and lots of grease I assume?
TSapp
 05-19-10 | 03:08 PM
#2
Collector of Useless Info
Joined: Aug 2009
Posts: 1,404
Likes: 5
You're kidding, right? The only way to get the fixed cup out, in general, is by using massive amounts of force, like a 3-foot breaker bar or a bench vice with the frame used as the lever. That's why most people don't remove the fixed cup if they can avoid it. Do you really *need* to remove it? If so, then Saint Sheldon's method is pretty effective: https://www.sheldonbrown.com/tooltips/bbcups.html
I think there are 11 quarter-inch balls on each side, if loose balls are used.
I think there are 11 quarter-inch balls on each side, if loose balls are used.
05-19-10 | 03:20 PM
#3
Senior Member


Joined: Mar 2010
Posts: 1,795
Likes: 146
If you want to remove the fixed cup, get the tool from:https://bikesmithdesign.com/
It works. But, you probably don't nee to remove it.
There you can also find a cotter press and the correct cotters for your bike. I bought the press recently even though I had already drilled the old cotters out. It makes installation a breeze.
It works. But, you probably don't nee to remove it.
There you can also find a cotter press and the correct cotters for your bike. I bought the press recently even though I had already drilled the old cotters out. It makes installation a breeze.
05-19-10 | 04:56 PM
#4

PanGalacticGargleBlaster
Joined: Apr 2009
Posts: 7,531
Likes: 9
From: Smugglers Notch, Vermont
Bikes: Upright and Recumbent....too many to list, mostly Vintage.
11 bearings per side should be correct.
The reason nobody takes the fixed cup out is because its a F*****'in B******** and a C*^$& **#^@$!!
seriosuly though unless you are replacing the cup or painting the frame there's really no need to take it out, just clean it in place.
If you really are a glutton for punishment though and dont want the special Tool, you can use a bench vise. Clamp the vise on the raised section in the middle of the fixed cup. Tightly. Very Tightly. Then rotate the entire frame. The increased moment arm (your frame) will give you the leverage you'll need to get that sucker loose. Just be sure you're turining the correct direction
__________________
--Don't Panic.
--Don't Panic.
05-19-10 | 05:31 PM
#5

Senior Member
Joined: Jul 2006
Posts: 6,930
Likes: 5
From: Toronto (again) Ontario, Canada
Bikes: Old Bike: 1975 Raleigh Delta, New Bike: 2004 Norco Bushpilot
11 bearings per side should be correct.
The reason nobody takes the fixed cup out is because its a F*****'in B******** and a C*^$& **#^@$!!
seriosuly though unless you are replacing the cup or painting the frame there's really no need to take it out, just clean it in place.
If you really are a glutton for punishment though and dont want the special Tool, you can use a bench vise. Clamp the vise on the raised section in the middle of the fixed cup. Tightly. Very Tightly. Then rotate the entire frame. The increased moment arm (your frame) will give you the leverage you'll need to get that sucker loose. Just be sure you're turining the correct direction
The reason nobody takes the fixed cup out is because its a F*****'in B******** and a C*^$& **#^@$!!
seriosuly though unless you are replacing the cup or painting the frame there's really no need to take it out, just clean it in place.
If you really are a glutton for punishment though and dont want the special Tool, you can use a bench vise. Clamp the vise on the raised section in the middle of the fixed cup. Tightly. Very Tightly. Then rotate the entire frame. The increased moment arm (your frame) will give you the leverage you'll need to get that sucker loose. Just be sure you're turining the correct direction
05-19-10 | 05:45 PM
#6
Senior Member
Joined: Jul 2009
Posts: 11,128
Likes: 39
Bikes: 1986 Alan Record Carbonio, 1985 Vitus Plus Carbone 7, 1984 Peugeot PSV, 1972 Line Seeker, 1986(est.) Medici Aerodynamic (Project), 1985(est.) Peugeot PY10FC
11 bearings per side should be correct.
The reason nobody takes the fixed cup out is because its a F*****'in B******** and a C*^$& **#^@$!!
seriosuly though unless you are replacing the cup or painting the frame there's really no need to take it out, just clean it in place.
If you really are a glutton for punishment though and dont want the special Tool, you can use a bench vise. Clamp the vise on the raised section in the middle of the fixed cup. Tightly. Very Tightly. Then rotate the entire frame. The increased moment arm (your frame) will give you the leverage you'll need to get that sucker loose. Just be sure you're turining the correct direction
The reason nobody takes the fixed cup out is because its a F*****'in B******** and a C*^$& **#^@$!!
seriosuly though unless you are replacing the cup or painting the frame there's really no need to take it out, just clean it in place.
If you really are a glutton for punishment though and dont want the special Tool, you can use a bench vise. Clamp the vise on the raised section in the middle of the fixed cup. Tightly. Very Tightly. Then rotate the entire frame. The increased moment arm (your frame) will give you the leverage you'll need to get that sucker loose. Just be sure you're turining the correct direction
Always did it that way and I have never been defeated by any fixed cup all these years....just make sure you know what way to turn the frame, or it could turn into a big disaster!
You can also use a big adjustable wrench (as big a wrench you can find!) but you have to make sure it's as tight and stable on the fixed cup before you start putting any force into it. I did this a couple of times when I did not have access to a good bench vise and I had my brother step on the wrench with the bike frame on a cement floor and it did not have anywhere to go when I started turning.
Chombi
05-19-10 | 06:21 PM
#7
elcraft
Joined: Sep 2008
Posts: 840
Likes: 120
From: Greater Boston
[QUOTE= Unless of course it was French or Italian threaded, and then it might be tough to get the fixed cup anyway.[/QUOTE]
The OP said it was from a Raleigh-clone Hercules! that means it's Raleigh proprietary threading, i.e. non standard. I can't wait for someone (maybe Velo Orange in a fit of Anglophilia) to make a cartidge style Bottom bracket for Raleigh Proprietary threading. then I could upgrade this Carlton-built Grand Prix Mixte that I just acquired...
The OP said it was from a Raleigh-clone Hercules! that means it's Raleigh proprietary threading, i.e. non standard. I can't wait for someone (maybe Velo Orange in a fit of Anglophilia) to make a cartidge style Bottom bracket for Raleigh Proprietary threading. then I could upgrade this Carlton-built Grand Prix Mixte that I just acquired...
05-19-10 | 07:46 PM
#8
Senior Member
Joined: May 2010
Posts: 3,904
Likes: 36
From: Hurricane Alley , Florida
Bikes: Treks (USA), Schwinn Paramount, Schwinn letour,Raleigh Team Professional, Gazelle GoldLine Racing, 2 Super Mondias, Carlton Professional.
Did somone say cartridge style Bottom Brackets for Raleigh threading? Phil Wood has them in lots of lengths and square taper styles, with mounting rings in 26TPI.
Mike
https://sheldonbrown.com/harris/bottombrackets.html
Mike
https://sheldonbrown.com/harris/bottombrackets.html
05-19-10 | 08:17 PM
#9
elcraft
Joined: Sep 2008
Posts: 840
Likes: 120
From: Greater Boston
Did somone say cartridge style Bottom Brackets for Raleigh threading? Phil Wood has them in lots of lengths and square taper styles, with mounting rings in 26TPI.
Mike
https://sheldonbrown.com/harris/bottombrackets.html
Mike
https://sheldonbrown.com/harris/bottombrackets.html
05-19-10 | 08:25 PM
#10
Senior Member
Joined: Dec 2005
Posts: 740
Likes: 4
From: Pacific Northwest
You can get just the Phil cups for Raleigh at $40-ish. Then install the cartridge from a Shimano Deore XT UN71, UN72, or UN73 bottom bracket (after 1st removing the stock Shimano cups) into the Phil cups. You can often get those XT BBs cheap enough sometimes. Who knows, you might even have one in one of your bikes???
05-19-10 | 08:44 PM
#11

missing in action
Joined: Nov 2007
Posts: 4,483
Likes: 53
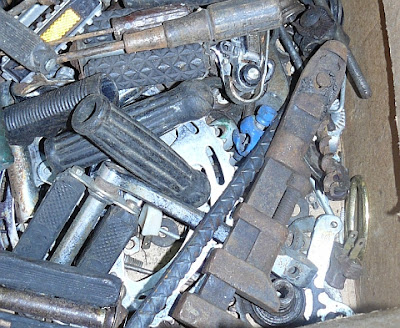
I used to use the bench vise approach, but then I scored this box of parts at the flea market and a light bulb went on in my head just before I tossed the monkey wrench into my "tools I'll never use drawer"
It also gave me an excuse to use the media blaster and try the boiled linseed oil treatment on the bare steel:
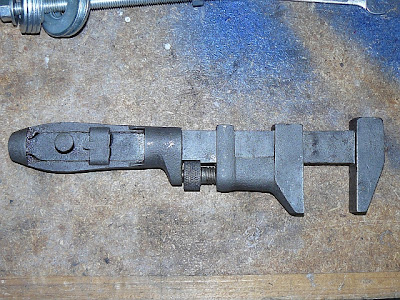
It works great (also on headsets) and I've never needed any more leverage than the handle provides to break a fixed cup loose. In the cases where the fixed cup has low profile flats (such as on the style of cups that are used on Raleigh Sports and similar,) I use my makeshift headset press to keep the wrench from slipping:

And while we're on the topic of improvised tools, I found a nice set of channel-lock pliers while riding and ground down the teeth to make a set of lockring pliers:
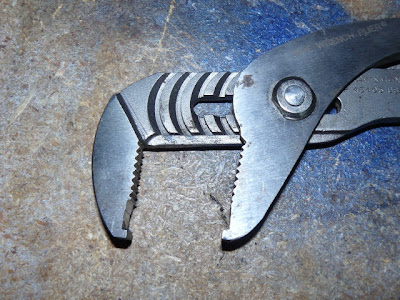

More importantly, they make opening a Sturmey Archer AW a piece of cake:

It also gave me an excuse to use the media blaster and try the boiled linseed oil treatment on the bare steel:
It works great (also on headsets) and I've never needed any more leverage than the handle provides to break a fixed cup loose. In the cases where the fixed cup has low profile flats (such as on the style of cups that are used on Raleigh Sports and similar,) I use my makeshift headset press to keep the wrench from slipping:
And while we're on the topic of improvised tools, I found a nice set of channel-lock pliers while riding and ground down the teeth to make a set of lockring pliers:
More importantly, they make opening a Sturmey Archer AW a piece of cake:
 05-19-10 | 08:55 PM
#13
Senior Member


Joined: Mar 2007
Posts: 9,179
Likes: 5,361
From: SF Bay Area, East bay
Bikes: Miyata 618 GT, Marinoni, Kestral 200, Soma double cross 2002 Trek 5200, KHS Flite, Koga Miyata, Schwinn Spitfire 5, Mondia Special, Univega Alpina, Miyata team Ti, Santa Cruz Highball, Waterford rs11
Good idea Chris, you should post it in the tips. https://www.bikeforums.net/showthread...ead-(hopefully)
 05-19-10 | 09:21 PM
#14
missing in action
Joined: Nov 2007
Posts: 4,483
Likes: 53
Good idea Chris, you should post it in the tips. https://www.bikeforums.net/showthread...ead-(hopefully)
05-19-10 | 10:03 PM
#15
Senior Member
Joined: Jul 2009
Posts: 11,128
Likes: 39
Bikes: 1986 Alan Record Carbonio, 1985 Vitus Plus Carbone 7, 1984 Peugeot PSV, 1972 Line Seeker, 1986(est.) Medici Aerodynamic (Project), 1985(est.) Peugeot PY10FC
05-19-10 | 11:39 PM
#16
Senior Member
Joined: Mar 2008
Posts: 1,683
Likes: 13
From: Kansai
I'm not going to recommend this, but just as a matter of principle on my rider bikes with reverse threaded fixed cups, I remove the fixed cup everytime I do bottom bracket maintenance, which is at least annually. My theory is that if you do this periodically, it never gets tightened to the point that it becomes an issue. The bikes on which I follow this regimen, the fixed cups always come off w/out any drama at all, only takes a few moments. The consolation prize for this (tiny, tiny) bit of extra effort is it is easier to clean the cup and I get to take a better look/see, clean/regrease threads, etc.
Just off the top of my head, it is probably about 2-3k miles between this type of maintenance.
I've used the Sheldon tool for years. Again, on my bikes following a periodic maintenance schedule, it isn't difficult at all. But on other bikes, while it has yet to fail me, it has been a close run of things a few times.
Another thing to consider is that your riding style is also going to influence how tight the fixed cup becomes. Remember all that stuff about for every action there is equal/opposite reaction? That means that if you are a pedal masher, get out of the saddle on hills, etc, your fixed cup is going to end up tighter than if you are more of a spinner. I'm much more of the latter, which helps keeps the maintenance above a bit of an easier task.
YMMV
05-20-10 | 05:32 AM
#17
Thread Starter
Senior Member
Joined: Oct 2008
Posts: 430
Likes: 0
From: Akron, OH
Bikes: 2008 Seven Axiom Steel, 1984 Colnago Nuovo Mexico, 2008 Cervelo P2C, 2000 Trek Multitrack 7200
Lots of good replies. I'm still wondering about a "tried and true" technique for getting the bearings into the fixed cup if I'm not going to remove the fixed cup? Ideas????
TSapp
TSapp
05-20-10 | 06:36 AM
#18
missing in action
Joined: Nov 2007
Posts: 4,483
Likes: 53
Getting the bearings in place is not a problem after you spread a generous amount of grease on the fixed cup's race. You can insert the spindle from the outside of the cup to act as a guide and then use a pair of long tweezers or needle nose pliers to press each bearing into the grease, they'll stay put while you remove the spindle and install it from the correct side.
You can also drop the bearings into the grease from the open side if you lack the correct tools, but if your aim isn't good you stand a chance of bouncing one into a frame tube, and then you'll have to start over after you fish it out.
The whole operation is easier with both cups out of course, you can bed the bearings into the grease and they'll stand quite a bit of handling without falling out.
05-20-10 | 06:53 AM
#19
Senior Member
Joined: Jul 2006
Posts: 6,930
Likes: 5
From: Toronto (again) Ontario, Canada
Bikes: Old Bike: 1975 Raleigh Delta, New Bike: 2004 Norco Bushpilot
I don't know the Phil Woods are pricey, but it's relative, it doesn't take a big job for a car repair to pay for even the top of the line PW hub. Really though, they don't make cup and cone bottom brackets anymore, so what is your chances of finding a new fixed cup for anything except maybe English Threaded.

