


Truly Epic BB removal
 01-04-09 | 12:53 PM
#1
Thread Starter
.


Joined: Aug 2005
Posts: 12,769
Likes: 38
From: Rocket City, No'ala
Bikes: 2014 Trek Domane 5.2, 1985 Pinarello Treviso, 1990 Gardin Shred, 2006 Bianchi San Jose
Truly Epic BB removal
Still working on the bottom bracket in that '87 Fuso. LBS had no luck so I took it home and declared all-out war.


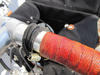
You can see I got the axle out. I then was able to get that "locknut" off but now I'm looking at these threads sticking out of the bb. The inside of the bb has an aluminum sleeve. I am now banging and chiseling on what's left and I'm able to get spray lube down into the bb threads. Hopefully, the rest of the cartridge will come out.
On the drive side, I'm slowly dremeling out notches so my Park FR-6 freewheel removal tool can get a good grip; maybe I can then wrench the thing out of there.
 01-04-09 | 01:11 PM
#3

Arsehole
Joined: Jul 2008
Posts: 2,280
Likes: 1
I've had so many BBs like that.... they SUCK. I had a tool at one time, it was an expanding thingie....the more you cranked on it, the tighter it got inside of whatever you were trying to take out. It worked great. But it "disappeared" several years ago, and I haven't been able to find one since. The REALLY bad BBs I cut the cups in half with a one-hand hacksaw blade & holder. If the shell threads get buggered up a little, I just retap it. Like you, apparently, I try all other options first, though.
01-04-09 | 01:21 PM
#4

Too bad, the looked like a high end lightweight BB.
__________________
1 Super Record bike, 1 Nuovo Record bike, 1 Pista, 1 Road, 1 Cyclocross/Allrounder, 1 MTB, 1 Touring, 1 Fixed gear
1 Super Record bike, 1 Nuovo Record bike, 1 Pista, 1 Road, 1 Cyclocross/Allrounder, 1 MTB, 1 Touring, 1 Fixed gear
01-04-09 | 01:31 PM
#5

Back In The Saddle

Joined: Mar 2005
Posts: 2,364
Likes: 205
From: NorCal
Bikes: N+1
That removal almost makes this worth the price to replace the BB shell completely:
https://www.bilenky.com/Restorations.html
https://www.bilenky.com/Restorations.html
__________________
In life there are no mistakes, only lessons. -Shin
In life there are no mistakes, only lessons. -Shin
01-04-09 | 01:40 PM
#6

www.theheadbadge.com

Joined: Sep 2005
Posts: 29,000
Likes: 5,486
From: Southern Florida
Bikes: https://www.theheadbadge.com
Listen - I went through the same thing with a Campagnolo Veloce BB. Do the following:
Take a Sawzall and cut the BB cups through (BEFORE you hit the BB shell steel, of course) parallel to the chainstays (where the least amount of threading would be damaged if you happen to nick them). Take a hammer and knock the BB cups to the center (see BB cup to the left) - they'll lose their strength and fall out.

-Kurt
Take a Sawzall and cut the BB cups through (BEFORE you hit the BB shell steel, of course) parallel to the chainstays (where the least amount of threading would be damaged if you happen to nick them). Take a hammer and knock the BB cups to the center (see BB cup to the left) - they'll lose their strength and fall out.
-Kurt
__________________


Last edited by cudak888; 01-04-09 at 01:53 PM.
01-04-09 | 01:53 PM
#8
Thread Starter
.
Joined: Aug 2005
Posts: 12,769
Likes: 38
From: Rocket City, No'ala
Bikes: 2014 Trek Domane 5.2, 1985 Pinarello Treviso, 1990 Gardin Shred, 2006 Bianchi San Jose
I've got heat guns and dry ice and liquid nitrogen I can use at work but at this point, the hacksaw is looking pretty good. I believe I'll give pack some dry ice into the bb to see if it'll shrink the aluminum enough to free it. If not, hacksaw it will be.
Then the frame goes off to Bilenky for repair and repaint. When I get it back, LBS can reface the bb if necessary.
Then the frame goes off to Bilenky for repair and repaint. When I get it back, LBS can reface the bb if necessary.
01-04-09 | 01:56 PM
#9
www.theheadbadge.com
Joined: Sep 2005
Posts: 29,000
Likes: 5,486
From: Southern Florida
Bikes: https://www.theheadbadge.com
Don't waste time doing either - use the hacksaw. Takes 10 minutes for both sides, easy as pie, the risk of nicking the BB threads is minimal (you'll know when you're through the BB), and they'll peel out in 20 seconds.
Repaint? Looks pretty good to me...
-Kurt
Repaint? Looks pretty good to me...
-Kurt
__________________
01-04-09 | 03:01 PM
#11
Senior Member
Joined: Dec 2007
Posts: 622
Likes: 1
From: Boone NC USA
Bikes: Bianchi hybrid. Dunelt 3-sp. Raleigh basket case. Wanting a Roadster.
You lightweight guys have all the fun, I just opened up the BB on a 44 year old 3-speed. No problems and I was holding the cup with a cresent wrench. The old grease was almost harder than the bearings. Funny thing though I put back 11 balls per side and had one left over. Oh well if you do not have parts left over you are doing something wrong.
01-04-09 | 03:58 PM
#12
Thread Starter
.
Joined: Aug 2005
Posts: 12,769
Likes: 38
From: Rocket City, No'ala
Bikes: 2014 Trek Domane 5.2, 1985 Pinarello Treviso, 1990 Gardin Shred, 2006 Bianchi San Jose
Lots of nicks, scratches and rust spots. Some bubbling under the rear brake bridge and around the seatpost cluster. Two of the top tube cable guides have rusted through and the third one doesn't look too happy, either.
I looked at a lot of Fusos and found a red and black version I liked. Dave Moulton is supposed to be close to a deal on new decals so the bike should look like new when I get it back.
I looked at a lot of Fusos and found a red and black version I liked. Dave Moulton is supposed to be close to a deal on new decals so the bike should look like new when I get it back.
01-04-09 | 06:22 PM
#13
www.theheadbadge.com
Joined: Sep 2005
Posts: 29,000
Likes: 5,486
From: Southern Florida
Bikes: https://www.theheadbadge.com
01-04-09 | 06:24 PM
#14
Senior Member
Joined: Jan 2006
Posts: 6,564
Likes: 1,050
From: Berwyn PA
Bikes: I hate bikes!
MAN what a job! I just picked up my frame from Bilenky today and can tell you they do GREAT work. Best of luck w/ that bottom bracket and be sure and post some follow up pics when you get your frame back.
 sorry, i had to
01-04-09 | 11:14 PM
sorry, i had to
01-04-09 | 11:14 PM
#17
 01-04-09 | 11:54 PM
#18
*** bottom bracket, they spin crazy good and are light. But they never come out without a fight. Usually installed with Loctite, and the aluminum rings are too soft to reef on.
The last one I took out was not as bad a hatchet job as yours, but I had to use enough heat to pretty much destroy the sealed bearings.
The last one I took out was not as bad a hatchet job as yours, but I had to use enough heat to pretty much destroy the sealed bearings.
01-05-09 | 01:41 AM
#19

AFAIK the BB is made by Nadax (model "Favorit"), and the cartridge bearings are by *** (and despite the acronym they make very high-quality bearings, originally a German company now world-wide). I recall Nadax as being Swiss and nearly the quality of Edco, but I could be wrong. I sure don't understand what purpose the double-threaded ring adjustable cup serves...but given how thin it is you might be able to just collapse it with some vise grips and avoid the hacksaw altogether. Hmmm, I now see that it has a complete alloy sleeve, maybe the construction isn't as goofy as I first thought. Keep battlin' and good luck!
Last edited by unworthy1; 01-05-09 at 01:53 AM.
01-05-09 | 09:35 AM
#20
Senior Member
Joined: Dec 2007
Posts: 622
Likes: 1
From: Boone NC USA
Bikes: Bianchi hybrid. Dunelt 3-sp. Raleigh basket case. Wanting a Roadster.
In the electrical department at your home building supply store is something called No-Ox or another brand of the same thing. It is intended to use on aluminum to copper electrical connections. It is a good anti-seize compound for installing aluminum parts on steel frames. It is also good for alumimum to aluminum.
01-05-09 | 10:54 AM
#21
www.theheadbadge.com
Joined: Sep 2005
Posts: 29,000
Likes: 5,486
From: Southern Florida
Bikes: https://www.theheadbadge.com
In the electrical department at your home building supply store is something called No-Ox or another brand of the same thing. It is intended to use on aluminum to copper electrical connections. It is a good anti-seize compound for installing aluminum parts on steel frames. It is also good for alumimum to aluminum.
Not to mention hope and pray that the BB weep hole does its job.
-Kurt
__________________
01-05-09 | 05:16 PM
#23

Old fart
Joined: Nov 2004
Posts: 26,314
Likes: 5,225
From: Appleton WI
Bikes: Several, mostly not name brands.
Ouch, that's nasty. I had a similar problem trying to get the BB fixed cup out of my 1972 Atala when I converted it to fixed gear. It's Italian thread (of course), so whoever installed it made sure they got it in plenty tight. Plus, instead of sensible flats like Campy used on their fixed cups, this one had notches like the adjustable cup lockring. But not in pairs so a properly designed lockring tool (like the VAR #16: could grab it. No, this one had 3 notches, so only those cheesy single-tooth lockring spanners would engage. Needless to say, I couldn't loosen it with such a tool. Of course, the cup was nicely hardened steel, so sawing or grinding a new notch would be a royal PITA. So I made my own notched tool to pull it out:
Failed. So I took it in to the LBS for them to try. They had it for a week or so, tried everything they could think of -- penetrting oil, heat, cold, BFWs, etc. No joy. I took it homeand it sat for a while, when I finally found this little number made by Hugh Enox:

A couple BFWs and a good bit of grunting and heaving and it finally broke loose!
could grab it. No, this one had 3 notches, so only those cheesy single-tooth lockring spanners would engage. Needless to say, I couldn't loosen it with such a tool. Of course, the cup was nicely hardened steel, so sawing or grinding a new notch would be a royal PITA. So I made my own notched tool to pull it out: Failed. So I took it in to the LBS for them to try. They had it for a week or so, tried everything they could think of -- penetrting oil, heat, cold, BFWs, etc. No joy. I took it homeand it sat for a while, when I finally found this little number made by Hugh Enox:
A couple BFWs and a good bit of grunting and heaving and it finally broke loose!
01-05-09 | 05:59 PM
#25

slowest!
Joined: Oct 2008
Posts: 628
Likes: 0
From: NW WA
Bikes: Felt, Atala, Kona
Ouch, that's nasty. I had a similar problem trying to get the BB fixed cup out of my 1972 Atala when I converted it to fixed gear. It's Italian thread (of course), so whoever installed it made sure they got it in plenty tight. Plus, instead of sensible flats like Campy used on their fixed cups, this one had notches like the adjustable cup lockring. But not in pairs so a properly designed lockring tool (like the VAR #16: could grab it. No, this one had 3 notches, so only those cheesy single-tooth lockring spanners would engage. Needless to say, I couldn't loosen it with such a tool. Of course, the cup was nicely hardened steel, so sawing or grinding a new notch would be a royal PITA. So I made my own notched tool to pull it out:
Failed. So I took it in to the LBS for them to try. They had it for a week or so, tried everything they could think of -- penetrting oil, heat, cold, BFWs, etc. No joy. I took it homeand it sat for a while, when I finally found this little number made by Hugh Enox:
A couple BFWs and a good bit of grunting and heaving and it finally broke loose!
could grab it. No, this one had 3 notches, so only those cheesy single-tooth lockring spanners would engage. Needless to say, I couldn't loosen it with such a tool. Of course, the cup was nicely hardened steel, so sawing or grinding a new notch would be a royal PITA. So I made my own notched tool to pull it out: Failed. So I took it in to the LBS for them to try. They had it for a week or so, tried everything they could think of -- penetrting oil, heat, cold, BFWs, etc. No joy. I took it homeand it sat for a while, when I finally found this little number made by Hugh Enox:
A couple BFWs and a good bit of grunting and heaving and it finally broke loose!
