


Rear Derailleur Question
 08-29-09 | 02:57 PM
#1
Thread Starter
Senior Member
Joined: May 2008
Posts: 151
Likes: 0
Rear Derailleur Question
Hi guys,
I've got a question about my RD. I've got double chain rings in the front and 7 speeds in the back. When the chain is on the larger chain ring, I can shift back and forth between the largest and smallest cogs with no problem, and the chain doesn't fall off into the wheels or into the frame.
When I'm on the smaller chain ring, however, the chain rubs against the bottom of the guide pulley cage when I'm on the high gears (smallest cogs).
What's my problem here?
Any help is much appreciated! Thanks in advance!

 08-29-09 | 03:13 PM
#3
Thread Starter
Senior Member
Joined: May 2008
Posts: 151
Likes: 0
From the looks of it, it seems as though the limits are set fine since it doesn't move beyond the smallest or largest cogs. The cable tension seems to be okay as well since it shifts smoothly without the chain skipping. My rear derailleur cage looks straight from the back as well.
08-29-09 | 05:15 PM
#4

Great State of Varmint
Joined: Sep 2008
Posts: 7,476
Likes: 18
From: Dante's Third Ring
It looks to me that you're chain is too long. We could confirm this if you'd take a photo of the drivetrain - as you have here (and I flipped right-side up) - with the derailleur shifted to the largest chainring up front, and the largest cog on your cassette.
You shouldn't ride with this combination as it's cross-chaining. But for diagnostic purposes, it's fine.
You shouldn't ride with this combination as it's cross-chaining. But for diagnostic purposes, it's fine.
 08-29-09 | 06:03 PM
#6
Great State of Varmint
Joined: Sep 2008
Posts: 7,476
Likes: 18
From: Dante's Third Ring
Very good! I'll be keeping these as teaching-aids, if you don't mind. You're chain can definitely stand to lose a link. Find the master-link (or whatever the brand-name) and take the chain apart. Remove a link with a chain-tool. No got or understand? Ask your bike-shop to remove one link. Ask to watch. And buy a chain-tool so you can put it back together at home. Or wheel the whole beast to the shop and ask them to do this.
You might even need to take off 2 links, but I doubt it. But taking apart (breaking) chains is a simple skill that all bike owners should know - and have the right tool to accomplish.
Let us know, please, how it goes.
You might even need to take off 2 links, but I doubt it. But taking apart (breaking) chains is a simple skill that all bike owners should know - and have the right tool to accomplish.
Let us know, please, how it goes.
Last edited by Panthers007; 08-29-09 at 06:08 PM. Reason: sp.
08-29-09 | 06:15 PM
#8
Thread Starter
Senior Member
Joined: May 2008
Posts: 151
Likes: 0
I don't mind if you keep the pictures as teaching aids. I have a chain tool to remove links. I'm just a little hesitant to do so because I don't have any extra links at the moment, and if I remove a link, I can't put it back on. I haven't had any problems with it in the past, even when I had it tuned up for the first time about a year ago. I measured the links, and there are exactly 12 links per 1 foot from pin center to pin center, so it doesn't seem like my chain is wearing.
I just had a thought -- would my rear dropout adjusting screws be the culprit here? I was looking at it, and they are screwed in completely, thereby pushing my wheel forward. If I use a Philips head and push my wheels back, would that pull my chain taut so that it doesn't rub?
I just had a thought -- would my rear dropout adjusting screws be the culprit here? I was looking at it, and they are screwed in completely, thereby pushing my wheel forward. If I use a Philips head and push my wheels back, would that pull my chain taut so that it doesn't rub?
08-29-09 | 06:27 PM
#9
Great State of Varmint
Joined: Sep 2008
Posts: 7,476
Likes: 18
From: Dante's Third Ring
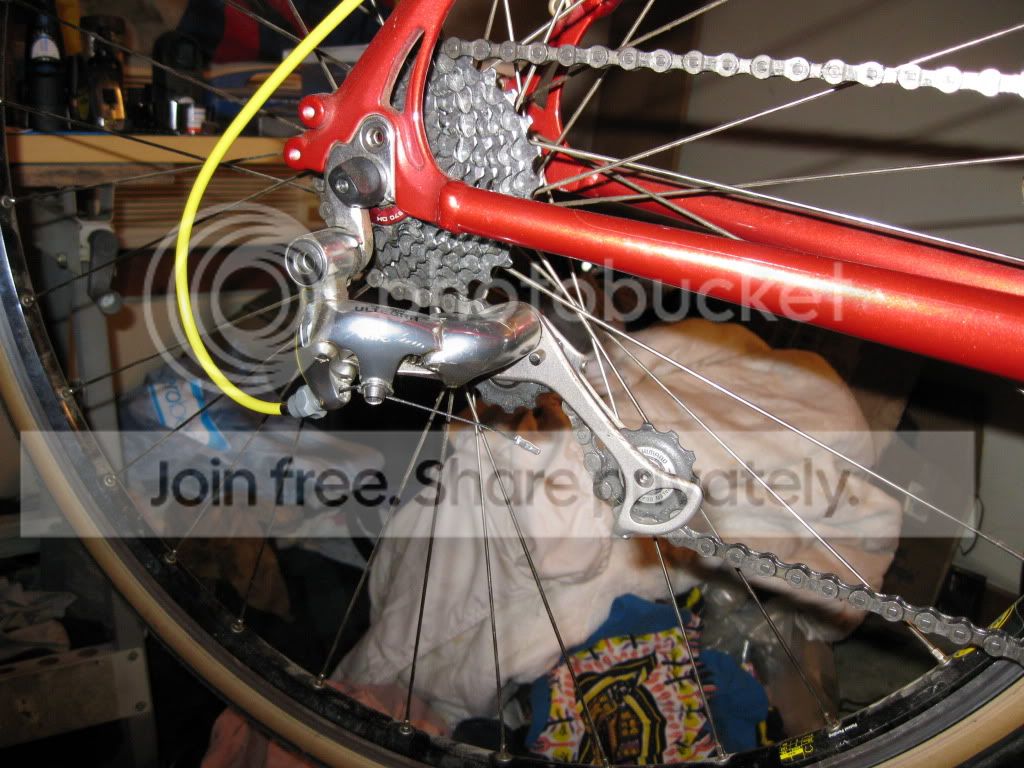
Okay - here's the deal: The chain looked like it was too long as soon as I flipped your first picture right-side up so I didn't get dizzy.  Then your next photo shows the chain - large to large - and the RD. The RD is standing nearly at 6:00 - 12:00. And this confirms that it's in need of losing a link. It should be more like - large to large 3:30-4:00 - 10:00.
If you can pull the wheel far enough back to find these dimensions - wow! And you must have very looooong dropouts! But go ahead and try. Then post another picture if you would.
I'll be adding a photo with one of my bikes in the large-to-large configuration, so check back in a few...
Oh - and this has nothing to do with chain-wear.
<EDIT> Here we go.....
Then your next photo shows the chain - large to large - and the RD. The RD is standing nearly at 6:00 - 12:00. And this confirms that it's in need of losing a link. It should be more like - large to large 3:30-4:00 - 10:00. If you can pull the wheel far enough back to find these dimensions - wow! And you must have very looooong dropouts! But go ahead and try. Then post another picture if you would.
I'll be adding a photo with one of my bikes in the large-to-large configuration, so check back in a few...
Oh - and this has nothing to do with chain-wear.
<EDIT> Here we go.....
Last edited by Panthers007; 08-29-09 at 06:38 PM.
08-29-09 | 08:06 PM
#11
Great State of Varmint
Joined: Sep 2008
Posts: 7,476
Likes: 18
From: Dante's Third Ring
Most chains have 114 links. Either count the links on your old chain - that was properly fit to your bike - and remove the extra links from the new chain. Or just lay it alongside the old one and take it from there.
08-29-09 | 08:21 PM
#12
Thread Starter
Senior Member
Joined: May 2008
Posts: 151
Likes: 0
Wow that's really extended...
I pulled back my adjuster screws a little and here's the result:

Not quite the extension that you have...
I went on the park tools website and found their chain length calculator. According to that, my chain should be (2 * 16.5) + ((52 / 4) + (26 / 4) + 1) = 53.5 inches long, and I counted 55 inches on mine. Sorry for the questions -- I was just confused as to why a bike with stock parts and assembly would not have the correct chain length.
I was reading Sheldon Brown's guide on chain length found here: https://sheldonbrown.com/derailer-adjustment.html#chain . I was a little hesitant to shorten my chain after reading this:
I was also on Bicycle Tutor's website and came across their guide: https://bicycletutor.com/calculate-chain-length/ . This is what mine looks like:


If I were to shorten my chain, where should I break the link? Also, does it matter that my chain rings are of an oval shape (not perfectly circular)? Note that I have a master link in there as indicated below:

If I break the link at the position indicated above and then connect my master link, I should have 1 extra inch of space, as suggested by Bicycle Tutor -- correct?
Should I just shorten it by 1 link and see if it works?
Interestingly, with Park's website, I can either do 53 inches or 54 inches, from rounding to the "closest" whole inch.
Thanks for all of the help...
I pulled back my adjuster screws a little and here's the result:
Not quite the extension that you have...
I went on the park tools website and found their chain length calculator. According to that, my chain should be (2 * 16.5) + ((52 / 4) + (26 / 4) + 1) = 53.5 inches long, and I counted 55 inches on mine. Sorry for the questions -- I was just confused as to why a bike with stock parts and assembly would not have the correct chain length.
I was reading Sheldon Brown's guide on chain length found here: https://sheldonbrown.com/derailer-adjustment.html#chain . I was a little hesitant to shorten my chain after reading this:
If the chain is too short, it will be at risk for jamming and possibly ruining the rear derailer if you accidentally shift into the large-large combination. Never run with a chain that is too short, except in an emergency.
If the chain is too long, it will hang slack in the small-small combinations. You should never use those combinations anyway, so this is not a serious problem. If you exceed the recommended gear range for a particular rear derailer, you may have to accept droop in these gears.
If the chain is too long, it will hang slack in the small-small combinations. You should never use those combinations anyway, so this is not a serious problem. If you exceed the recommended gear range for a particular rear derailer, you may have to accept droop in these gears.
If I were to shorten my chain, where should I break the link? Also, does it matter that my chain rings are of an oval shape (not perfectly circular)? Note that I have a master link in there as indicated below:
If I break the link at the position indicated above and then connect my master link, I should have 1 extra inch of space, as suggested by Bicycle Tutor -- correct?
Should I just shorten it by 1 link and see if it works?
Interestingly, with Park's website, I can either do 53 inches or 54 inches, from rounding to the "closest" whole inch.
Thanks for all of the help...
08-29-09 | 08:50 PM
#14
Great State of Varmint
Joined: Sep 2008
Posts: 7,476
Likes: 18
From: Dante's Third Ring
Just one link - next to your master-link so you can quickly put it together. See where your master link came off of? Does the Master-Link have 2 outer-plates with 2 posts attached? I'm not familiar with the type of link you have. Is it like the first one in this:
https://bicycletutor.com/quick-release-chain-link/
Let me know - I'll walk you through it once we have established how your Master-Link works. Relax - we're almost there.
https://bicycletutor.com/quick-release-chain-link/
Let me know - I'll walk you through it once we have established how your Master-Link works. Relax - we're almost there.
08-29-09 | 08:58 PM
#16
Thread Starter
Senior Member
Joined: May 2008
Posts: 151
Likes: 0
Just one link - next to your master-link so you can quickly put it together. See where your master link came off of? Does the Master-Link have 2 outer-plates with 2 posts attached? I'm not familiar with the type of link you have. Is it like the first one in this:
https://bicycletutor.com/quick-release-chain-link/
Let me know - I'll walk you through it once we have established how your Master-Link works. Relax - we're almost there.
https://bicycletutor.com/quick-release-chain-link/
Let me know - I'll walk you through it once we have established how your Master-Link works. Relax - we're almost there.

Last edited by tennisplyr3; 08-29-09 at 09:06 PM.
08-29-09 | 09:08 PM
#17
Great State of Varmint
Joined: Sep 2008
Posts: 7,476
Likes: 18
From: Dante's Third Ring
Phew! Thank goodness....you don't want to know the disaster I was thinking! 
Forgive my lousy freehand writing here, it's supposed to say 'here' - but pushing the chain-pin through the spot I marked will then allow you to quickly put your Master-Link back on and - with your chain one link shorter - go on your merry way:
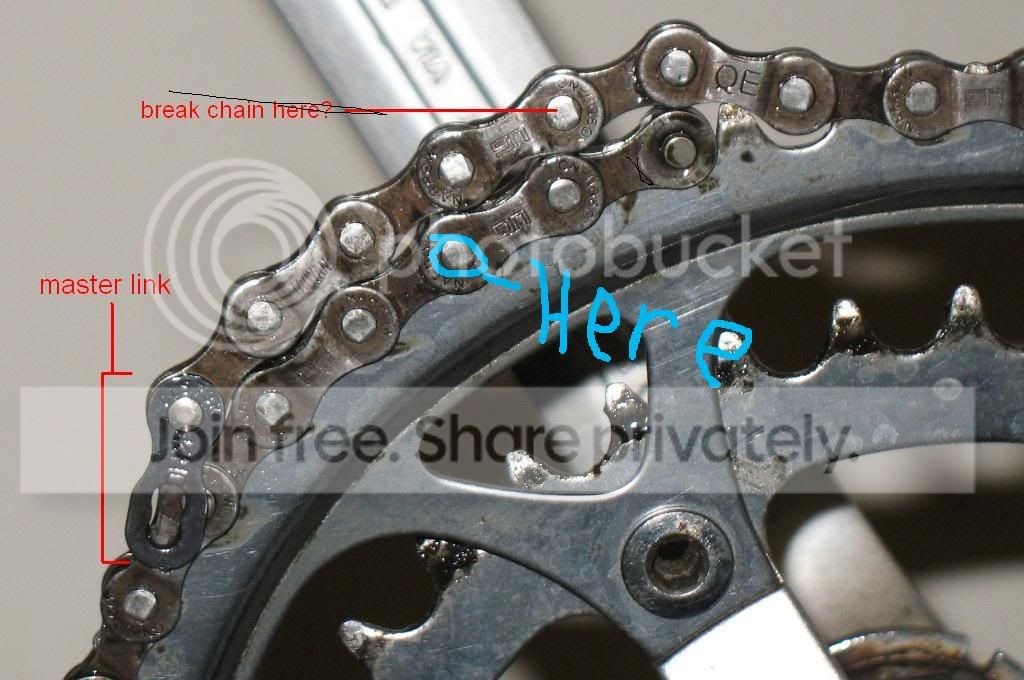
Forgive my lousy freehand writing here, it's supposed to say 'here' - but pushing the chain-pin through the spot I marked will then allow you to quickly put your Master-Link back on and - with your chain one link shorter - go on your merry way:
08-29-09 | 09:23 PM
#19
Great State of Varmint
Joined: Sep 2008
Posts: 7,476
Likes: 18
From: Dante's Third Ring


 08-29-09 | 09:27 PM
#20
Thread Starter
Senior Member
Joined: May 2008
Posts: 151
Likes: 0
Haha yeah...
I removed one link, and there's plenty of clearance now for smaller chainring - smallest cog. Thanks for the help! I'm really surprised that some factory assembled bikes don't have the correct chain lengths!
I removed one link, and there's plenty of clearance now for smaller chainring - smallest cog. Thanks for the help! I'm really surprised that some factory assembled bikes don't have the correct chain lengths!
 08-29-09 | 09:33 PM
#23

GO BIG RED
Joined: Nov 2008
Posts: 678
Likes: 2
From: Hastings,NE
Bikes: 1996 Bianchi Veloce 1993 Bridgestone MB-3 1992 Trek 700 1992 Trek 820
First of all, congrats on a very well written and illustrated thread.
Sure you can. With a decent chain tool you should able to add links back as easy as take them off.
I don't mind if you keep the pictures as teaching aids. I have a chain tool to remove links. I'm just a little hesitant to do so because I don't have any extra links at the moment, and if I remove a link, I can't put it back on. I haven't had any problems with it in the past, even when I had it tuned up for the first time about a year ago. I measured the links, and there are exactly 12 links per 1 foot from pin center to pin center, so it doesn't seem like my chain is wearing.
I just had a thought -- would my rear dropout adjusting screws be the culprit here? I was looking at it, and they are screwed in completely, thereby pushing my wheel forward. If I use a Philips head and push my wheels back, would that pull my chain taut so that it doesn't rub?
I just had a thought -- would my rear dropout adjusting screws be the culprit here? I was looking at it, and they are screwed in completely, thereby pushing my wheel forward. If I use a Philips head and push my wheels back, would that pull my chain taut so that it doesn't rub?
 08-29-09 | 09:39 PM
#25
Great State of Varmint
Joined: Sep 2008
Posts: 7,476
Likes: 18
From: Dante's Third Ring
Looks absolutely perfect! Now you have a chain to compare to any future chains for proper length.
I knew one link would do the trick. And I found I need to shorten a chain as well - not the one in my pictures. I have several machines. This will make a great teaching thread for future people seeking advice. And my teaching-aid collection has expanded very nicely!
Tally Ho!
I knew one link would do the trick. And I found I need to shorten a chain as well - not the one in my pictures. I have several machines. This will make a great teaching thread for future people seeking advice. And my teaching-aid collection has expanded very nicely!
Tally Ho!