


Custom Tandem Build 2.0. Di2/hydro double
 02-29-16, 10:36 AM
#26
Senior Member
Thread Starter
Join Date: Jan 2013
Location: Kingston, Ontario
Posts: 197
Bikes: Norco Bigfoot, Miyata 110, Giant TCR Advanced 0
Mentioned: 0 Post(s)
Tagged: 0 Thread(s)
Quoted: 13 Post(s)
Likes: 0
Liked 0 Times
in
0 Posts
Ive been checking geometry and chatting with a few members on here and compiled thoughts of front end geometry to make this new iteration of our tandem successful. There are many helpful members on here. thanks.
Here is a comparison of trail vs the rake of the fork that @twocicle mentioned having used on his Calfee tandem. Of which he mentioned that the 43mm rake was the best for straight line stability vs the 49mm rake being the fastest/lightest feeling steering.
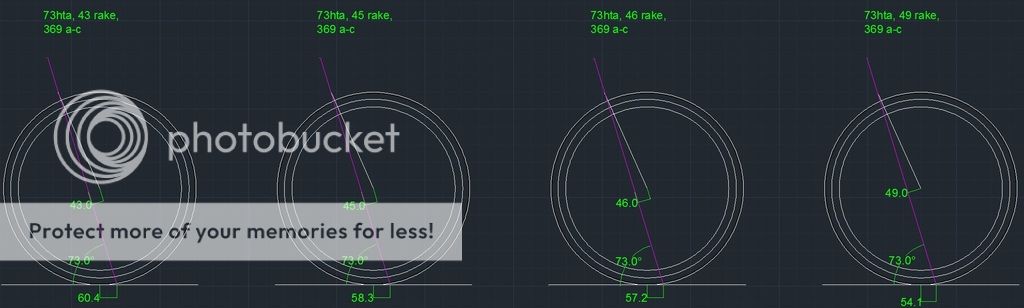
For our uses, we will be looking for straight line stability while still being well footed should we want to take a corner without any ill effects. This was in part the reason I was hoping to pick up the 49mm rake fork that I have. To get a desireable feel, I had thought I will slacken the head tube angle a bit and run the higher offset fork. More stability with the slacker head tube angle to meet the trail I desire will cost us a bit in the corner/turn in but will pay dividends with the straight line stability where we ride the most. We don't do mountains or high speed descending with many corners so this is design tailored to our needs.
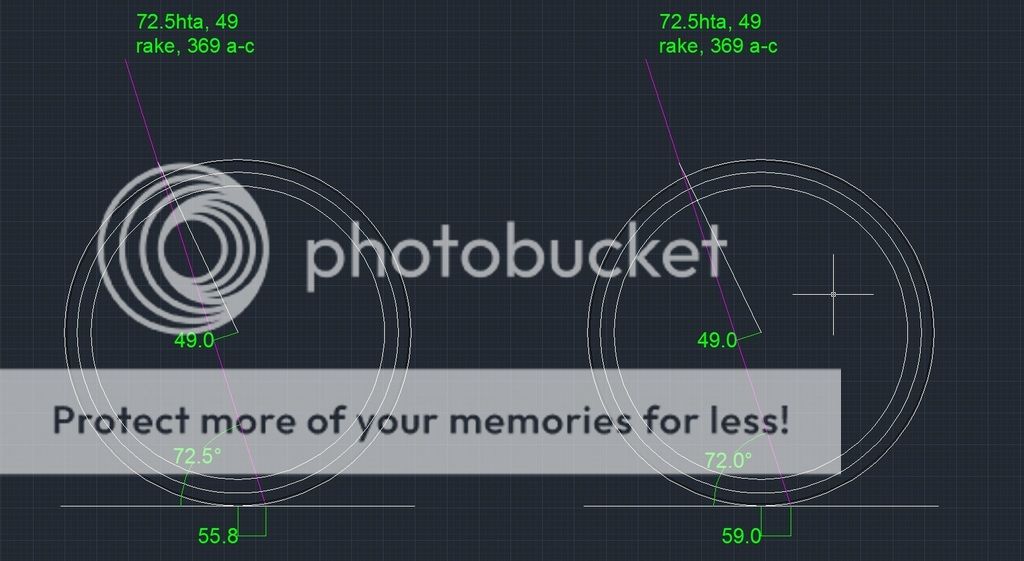
Im up in the air between 72 and 72.5 head tube angle, but I think I will likely settle somewhere between the two when it comes to actual fabrication.
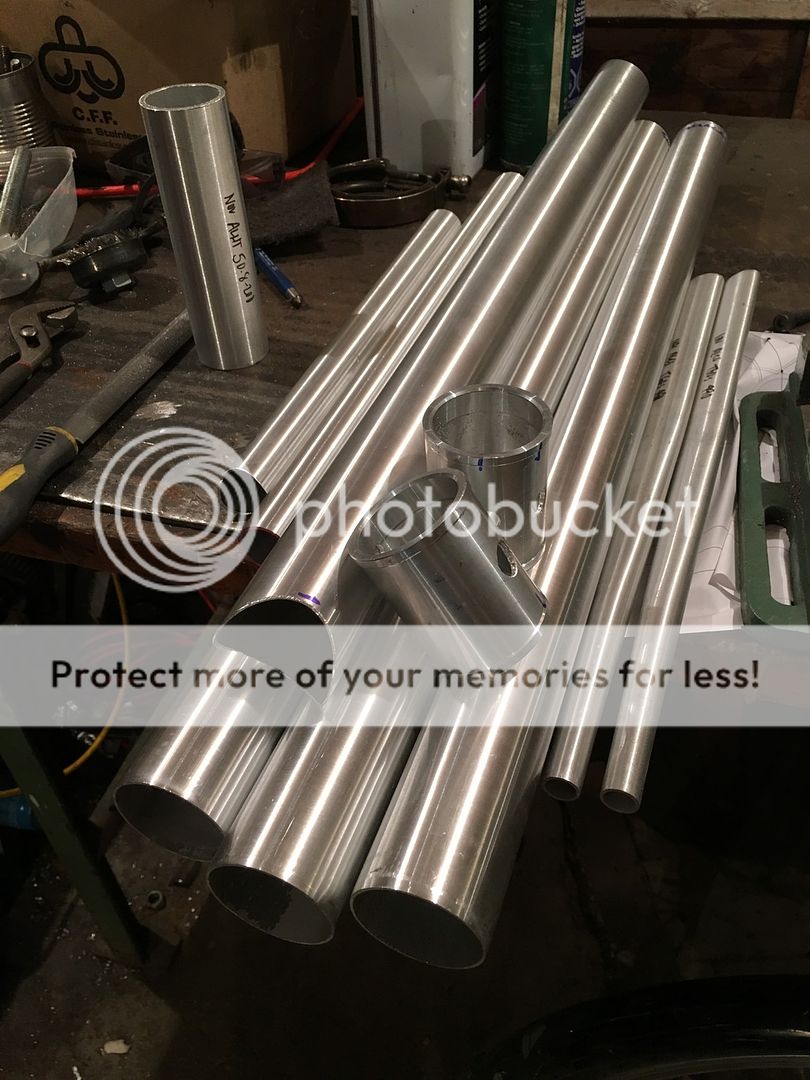
With the front end dialed, boom tube set to carbondrive specs and tubes picked out, its a pretty simple fill in the blanks in terms of fitting the top tube profile for standover and to ensure that the butted tube profiles all have the thick butted bits long enough to weld and fabricate with. Final design expected this week.
Here is a comparison of trail vs the rake of the fork that @twocicle mentioned having used on his Calfee tandem. Of which he mentioned that the 43mm rake was the best for straight line stability vs the 49mm rake being the fastest/lightest feeling steering.

For our uses, we will be looking for straight line stability while still being well footed should we want to take a corner without any ill effects. This was in part the reason I was hoping to pick up the 49mm rake fork that I have. To get a desireable feel, I had thought I will slacken the head tube angle a bit and run the higher offset fork. More stability with the slacker head tube angle to meet the trail I desire will cost us a bit in the corner/turn in but will pay dividends with the straight line stability where we ride the most. We don't do mountains or high speed descending with many corners so this is design tailored to our needs.

Im up in the air between 72 and 72.5 head tube angle, but I think I will likely settle somewhere between the two when it comes to actual fabrication.
With the front end dialed, boom tube set to carbondrive specs and tubes picked out, its a pretty simple fill in the blanks in terms of fitting the top tube profile for standover and to ensure that the butted tube profiles all have the thick butted bits long enough to weld and fabricate with. Final design expected this week.
 02-29-16, 01:03 PM
#27
Clipless in Coeur d'Alene

One thing to consider for the front end is disc fork availability, and max tire size desired. Not many 367mm a-c disc forks on the market, whereas 397mm cx forks seem to be more around.
The current 367mm forks are mostly limited to 28mm tires, not so much do to the width but the tread height hitting the underside of the fork crown. Actual tire clearance will depend on the tire make/model, plus rim setup (wider rims will pull down the tire height somewhat).
The different a-c measurements and tire sizes (bigger = a little more trail) will effect your trail, so take note of that.
FWIW, being a simpleton I like this trail calculator, plus the help definitions... https://yojimg.net/bike/web_tools/trailcalc.php
Last edited by twocicle; 02-29-16 at 01:19 PM.
02-29-16, 02:50 PM
#28
Senior Member
Thread Starter
Join Date: Jan 2013
Location: Kingston, Ontario
Posts: 197
Bikes: Norco Bigfoot, Miyata 110, Giant TCR Advanced 0
Mentioned: 0 Post(s)
Tagged: 0 Thread(s)
Quoted: 13 Post(s)
Likes: 0
Liked 0 Times
in
0 Posts
I already have a whisky #9 road fork (see first post)
correct in 367. I had 369 in the design for some reason. it wont change things much though being 2 mm off in that dimension.
correct in 367. I had 369 in the design for some reason. it wont change things much though being 2 mm off in that dimension.
04-08-16, 09:50 AM
#29
Senior Member
Thread Starter
Join Date: Jan 2013
Location: Kingston, Ontario
Posts: 197
Bikes: Norco Bigfoot, Miyata 110, Giant TCR Advanced 0
Mentioned: 0 Post(s)
Tagged: 0 Thread(s)
Quoted: 13 Post(s)
Likes: 0
Liked 0 Times
in
0 Posts
few little updates.
1.the design is totally done.
-I am going to run closer to 73 degrees HTA after all is said and done. The lightness of steering will be fine as long as it doesn't have flop steer.
-shortening the bike up a lot over last years bike. same length chainstay since I pretty much maxed that out for shortness last year but im taking a solid 4cm off the boom tube. from 775 to 736mm. This was a comment from all of the stokers last year that I pulled around with me.
2. The Parlee PF30 BB is far too tight to use with Megaexo cranks. Its a shame, because its a really nice part. It does fit on a shimano crankset with ease though so I will be able to use it for something else down the road. Shame. So, with that out of the way, I need to order a threaded bottom bracket shell to be able to weld into the frame to use a MegaExo BB. its a bit of a shame to have to do, since a threaded BB shell is 41mm diameter and the boom tube is 50.8mm, so I will need to do a little bit of tube forming to make it fit well (similar to my last year frame) where the PF30 BB shell I could just miter the boom tube being that a PF30 shell is 52mm diameter. Add to that, I have the PF30 reamer to finish the frame, but I do not have a BB thread chasing/facing tool, so I have to rely on my LBS for that.... just adds time.
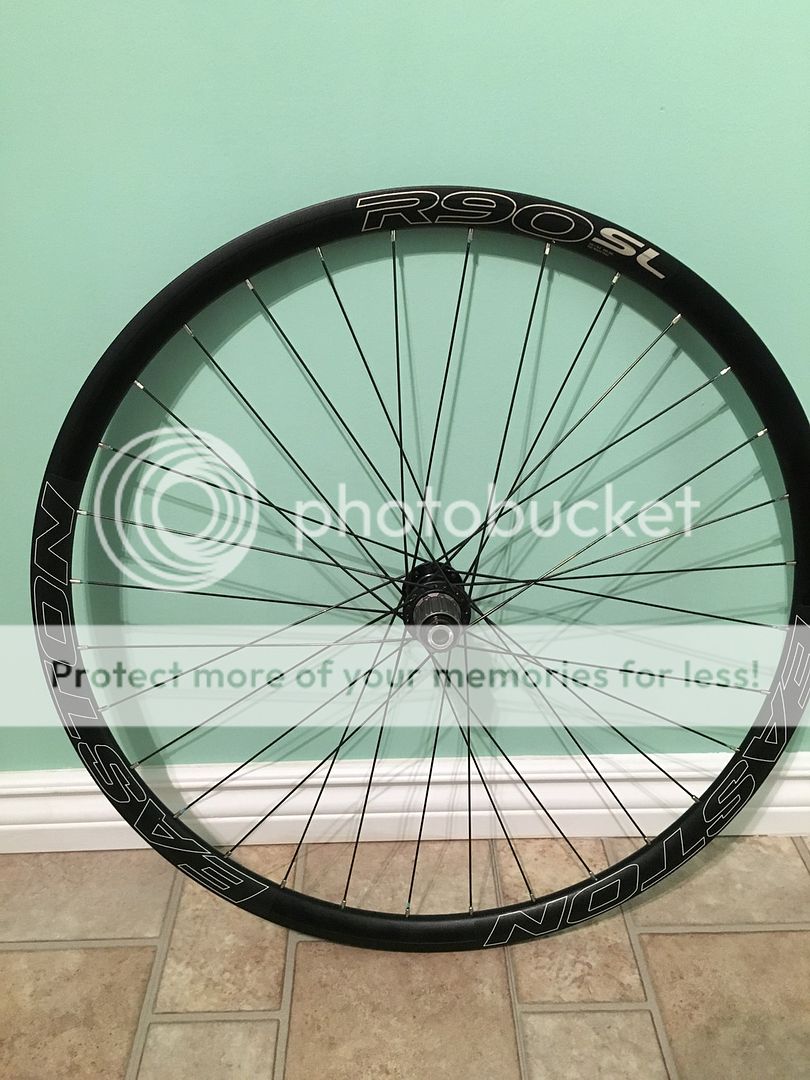
3. My Easton rims are still not here yet. I want to get these built up very soon. To recap, Im using Shimano XTR hubs, Easton r90SL disc 32h rims with DT Swiss Alpine III triple butted spokes.
4. I have almost everything else I need to fabricate the frame and build the bike once its powder coated. RT99 rotor for the front, Saint bh90 hoses, di2 charger all came in. I am heading to my LBS to order a Robert Axle Project 142x12 axle to be able to pull our Thule, and to order the di2 wires/shimano bleed kit.
5. I have di2 frame grommet for 6mm holes where the wires enter the frame, but I am trying to find a solution where the wires cross the tube joints so that I don't have an issue long term with wires chafing on the holes I mill into the frame prior to welding. I could use large grommets used in the auto industry, but im looking for a more elegant solution. This is just to make sure the edges aren't sharp, not particularly to hold the wires internally.
1.the design is totally done.
-I am going to run closer to 73 degrees HTA after all is said and done. The lightness of steering will be fine as long as it doesn't have flop steer.
-shortening the bike up a lot over last years bike. same length chainstay since I pretty much maxed that out for shortness last year but im taking a solid 4cm off the boom tube. from 775 to 736mm. This was a comment from all of the stokers last year that I pulled around with me.
2. The Parlee PF30 BB is far too tight to use with Megaexo cranks. Its a shame, because its a really nice part. It does fit on a shimano crankset with ease though so I will be able to use it for something else down the road. Shame. So, with that out of the way, I need to order a threaded bottom bracket shell to be able to weld into the frame to use a MegaExo BB. its a bit of a shame to have to do, since a threaded BB shell is 41mm diameter and the boom tube is 50.8mm, so I will need to do a little bit of tube forming to make it fit well (similar to my last year frame) where the PF30 BB shell I could just miter the boom tube being that a PF30 shell is 52mm diameter. Add to that, I have the PF30 reamer to finish the frame, but I do not have a BB thread chasing/facing tool, so I have to rely on my LBS for that.... just adds time.
3. My Easton rims are still not here yet.
I want to get these built up very soon. To recap, Im using Shimano XTR hubs, Easton r90SL disc 32h rims with DT Swiss Alpine III triple butted spokes.4. I have almost everything else I need to fabricate the frame and build the bike once its powder coated. RT99 rotor for the front, Saint bh90 hoses, di2 charger all came in. I am heading to my LBS to order a Robert Axle Project 142x12 axle to be able to pull our Thule, and to order the di2 wires/shimano bleed kit.
5. I have di2 frame grommet for 6mm holes where the wires enter the frame, but I am trying to find a solution where the wires cross the tube joints so that I don't have an issue long term with wires chafing on the holes I mill into the frame prior to welding. I could use large grommets used in the auto industry, but im looking for a more elegant solution. This is just to make sure the edges aren't sharp, not particularly to hold the wires internally.
 04-21-16, 01:40 AM
#31
Junior Member
Join Date: Apr 2016
Posts: 8
Mentioned: 0 Post(s)
Tagged: 0 Thread(s)
Quoted: 0 Post(s)
Likes: 0
Liked 0 Times
in
0 Posts
Hello shlammed ..
I'm Ashutosh and I'm from India. I'm planning to build a tandem myself so that I can enjoy riding it with my 8 year old son. While searching this forum, I came across your post and must say that is a very impressive tandem you've built. Kudos to you !
Being in India, we do not have many tandems, lest the kits to build them. Can you please help me with some data regarding your frame geometry ? To begin with, the diameters and thickness of various tubes that you've used ? ( captain and stroker top tube, down tube, seat tube, chainstays, seat stays, head tube etc)
I'm not sure what kind of fork sets i'll get here, but will share that info with you asap. I'd also like to know what kind of fixture you used to align all those tubes in order to make a frame that was weld-able in a fixture?
Thanking you in advance.
Regards
Ashutosh
04-23-16, 01:56 PM
#32
Senior Member
Thread Starter
Join Date: Jan 2013
Location: Kingston, Ontario
Posts: 197
Bikes: Norco Bigfoot, Miyata 110, Giant TCR Advanced 0
Mentioned: 0 Post(s)
Tagged: 0 Thread(s)
Quoted: 13 Post(s)
Likes: 0
Liked 0 Times
in
0 Posts
Thanks for the compliment ashutosh.
I'm away on vacation right now but if you send me a private message I can link you to the tubes I used for both builds and my opinion on the tubes I used in the last build. It will likely be a month or so before I can get this new frame done and ready to assemble if I'm optimistic. Life at home with a baby doesn't give me the time I used to have to play with this kind of stuff.
��
04-27-16, 09:35 AM
#33
Senior Member
Thread Starter
Join Date: Jan 2013
Location: Kingston, Ontario
Posts: 197
Bikes: Norco Bigfoot, Miyata 110, Giant TCR Advanced 0
Mentioned: 0 Post(s)
Tagged: 0 Thread(s)
Quoted: 13 Post(s)
Likes: 0
Liked 0 Times
in
0 Posts
not totally finished, but the rear wheel is laced!
 04-29-16, 08:31 AM
#34
Senior Member
Thread Starter
Join Date: Jan 2013
Location: Kingston, Ontario
Posts: 197
Bikes: Norco Bigfoot, Miyata 110, Giant TCR Advanced 0
Mentioned: 0 Post(s)
Tagged: 0 Thread(s)
Quoted: 13 Post(s)
Likes: 0
Liked 0 Times
in
0 Posts
getting closer!
tandem wheels laced and front brought up to 80% goal tension. Those Apline3 triple butted spokes are THICK. tight fit getting them into place, but I think they will do a good job!
They laced up real easy once the spokes were in place and they are pretty true without any real effort in trying to make them round.
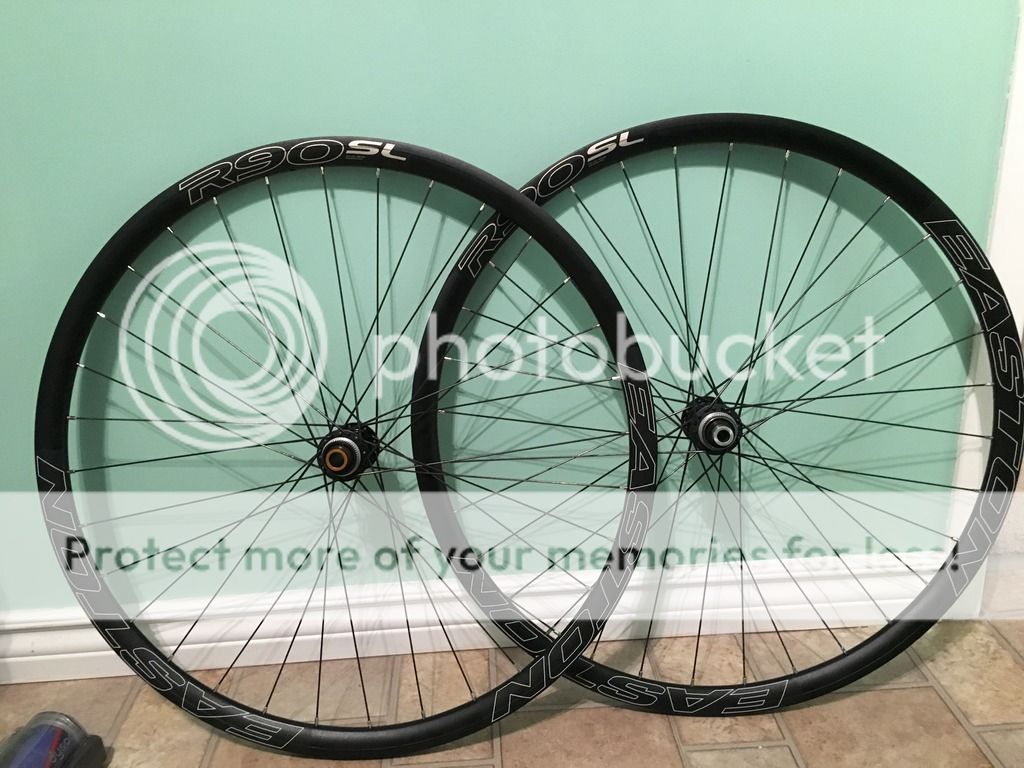
LBS mentioned I can use his truing stand if I coordinate a time with him, so im holding off now to finish the build there.
05-05-16, 08:30 AM
#35
Senior Member
Thread Starter
Join Date: Jan 2013
Location: Kingston, Ontario
Posts: 197
Bikes: Norco Bigfoot, Miyata 110, Giant TCR Advanced 0
Mentioned: 0 Post(s)
Tagged: 0 Thread(s)
Quoted: 13 Post(s)
Likes: 0
Liked 0 Times
in
0 Posts
Mitred the boom tube. Quite a bit of effort into this as it's essentially the backbone of the bike. Keeping these cuts perfectly in phase is essential. I had to leave the tube in the vise on the mill, move the vise from one end of the table to the other and crank the table across to get the tube to be perfect. The other option was to make/buy tube blocks and phase them together but this ended up being much easier.
Vented the bottom bracket shells which also is how the di2 wires will be routed front to back.
These new tubes seem pretty nice. Much cleaner than what was used on last year's frame, reducing prep time and I assume it will weld easier. The tubing also seems really stiff but extremely light weight.
Vented the bottom bracket shells which also is how the di2 wires will be routed front to back.
These new tubes seem pretty nice. Much cleaner than what was used on last year's frame, reducing prep time and I assume it will weld easier. The tubing also seems really stiff but extremely light weight.
 07-04-16, 01:32 PM
#36
Senior Member
Thread Starter
Join Date: Jan 2013
Location: Kingston, Ontario
Posts: 197
Bikes: Norco Bigfoot, Miyata 110, Giant TCR Advanced 0
Mentioned: 0 Post(s)
Tagged: 0 Thread(s)
Quoted: 13 Post(s)
Likes: 0
Liked 0 Times
in
0 Posts
slow build. I bought an old car and its been absorbing my time that I spend away from the family.
Here is where I am at as of now...
 Tandem 2.0 by HellaFab Fabrication, on Flickr
 Tandem 2.0 by HellaFab Fabrication, on Flickr
Here is where I am at as of now...
Tandem 2.0 by HellaFab Fabrication, on FlickrTandem 2.0 by HellaFab Fabrication, on Flickr
07-20-16, 07:36 AM
#37
Senior Member
Thread Starter
Join Date: Jan 2013
Location: Kingston, Ontario
Posts: 197
Bikes: Norco Bigfoot, Miyata 110, Giant TCR Advanced 0
Mentioned: 0 Post(s)
Tagged: 0 Thread(s)
Quoted: 13 Post(s)
Likes: 0
Liked 0 Times
in
0 Posts
Printed off some notch templates for the top tube since it is continuous through both seat tubes. while I was at it, I made templates for the downtube to make sure I keep it all in phase.
 Tube mitre templates by HellaFab Fabrication, on Flickr
I made an on-the fly aestheirc upgrade after I saw a nice way to cap a large top tube around smaller seat tubes. The Tomii cycles instagram had this photo on it that inspired me to implement something similar in my aluminum welded frame. terminating the 50.8mm (2") top tube around the 31.8mm (1.25") seat tube was keeping me up at night and its the most elegant solution, but it is quite a bit of extra effort to do it properly and cleanly.
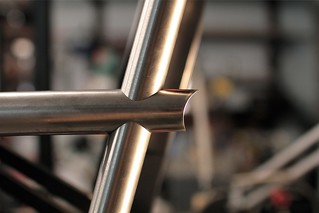 GT inspired TT / ST junction by Nao Tomii, on Flickr
Thanks for the Inspiration @tomiicycles.
Tube mitre templates by HellaFab Fabrication, on FlickrI made an on-the fly aestheirc upgrade after I saw a nice way to cap a large top tube around smaller seat tubes. The Tomii cycles instagram had this photo on it that inspired me to implement something similar in my aluminum welded frame. terminating the 50.8mm (2") top tube around the 31.8mm (1.25") seat tube was keeping me up at night and its the most elegant solution, but it is quite a bit of extra effort to do it properly and cleanly.
GT inspired TT / ST junction by Nao Tomii, on FlickrThanks for the Inspiration @tomiicycles.
09-23-16, 06:34 AM
#38
Senior Member
Thread Starter
Join Date: Jan 2013
Location: Kingston, Ontario
Posts: 197
Bikes: Norco Bigfoot, Miyata 110, Giant TCR Advanced 0
Mentioned: 0 Post(s)
Tagged: 0 Thread(s)
Quoted: 13 Post(s)
Likes: 0
Liked 0 Times
in
0 Posts
Getting closer to being finished.
Been taking my time...and we already have our tandem to ride while I build the improved one.
 Tandem 2.0 by HellaFab Fabrication, on Flickr
 Tandem 2.0 by HellaFab Fabrication, on Flickr
The front parallelogram is welded. Time to work on the rear end, then weld on the small bits.
The seat stays I am going to be doing where it sits wide on the seat tube, below the top tube joint, and intersects the top tube itself. Its going to be quite a bit of work to get it fit properly with two mitres, but ive got nothing but time.
 seatstay detail by HellaFab Fabrication, on Flickr
Been taking my time...and we already have our tandem to ride while I build the improved one.
Tandem 2.0 by HellaFab Fabrication, on FlickrTandem 2.0 by HellaFab Fabrication, on FlickrThe front parallelogram is welded. Time to work on the rear end, then weld on the small bits.
The seat stays I am going to be doing where it sits wide on the seat tube, below the top tube joint, and intersects the top tube itself. Its going to be quite a bit of work to get it fit properly with two mitres, but ive got nothing but time.
seatstay detail by HellaFab Fabrication, on Flickr
09-24-16, 09:04 AM
#39
Full Member
Join Date: Nov 2010
Location: Vancouver, BC
Posts: 420
Bikes: 2022 Calfee Tetra, 2023 Giant TCR
Mentioned: 3 Post(s)
Tagged: 0 Thread(s)
Quoted: 120 Post(s)
Likes: 0
Liked 2 Times
in
2 Posts
Frame looks really nice. Will your frame use internal Di2 wiring? If so, did you cut a small slot at the top of the front BB shell? This will allow the Di2 wire to go down the down tube, bypass the front BB, go through the boom tube, and connect with Junction B in the rear BB.
09-25-16, 07:02 PM
#40
Senior Member
Thread Starter
Join Date: Jan 2013
Location: Kingston, Ontario
Posts: 197
Bikes: Norco Bigfoot, Miyata 110, Giant TCR Advanced 0
Mentioned: 0 Post(s)
Tagged: 0 Thread(s)
Quoted: 13 Post(s)
Likes: 0
Liked 0 Times
in
0 Posts
Yes. I drilled the bottom bracket shell to allow internal wiring. I also have drilled the 1/4" hole for the di2 grommet in the downtube so far.
Wire jokes on the stoker seat tube will wait until I finish the frame and mount the derailleur
M
Wire jokes on the stoker seat tube will wait until I finish the frame and mount the derailleur
M
09-26-16, 08:48 AM
#41
Full Member
Join Date: Nov 2010
Location: Vancouver, BC
Posts: 420
Bikes: 2022 Calfee Tetra, 2023 Giant TCR
Mentioned: 3 Post(s)
Tagged: 0 Thread(s)
Quoted: 120 Post(s)
Likes: 0
Liked 2 Times
in
2 Posts
Since aluminum frames don't have extra room around the BB area, check that the holes provide enough room for the routing of the wire and junction B. You don't want any surprises after the frame is finished.
09-26-16, 10:12 AM
#42
Senior Member
Thread Starter
Join Date: Jan 2013
Location: Kingston, Ontario
Posts: 197
Bikes: Norco Bigfoot, Miyata 110, Giant TCR Advanced 0
Mentioned: 0 Post(s)
Tagged: 0 Thread(s)
Quoted: 13 Post(s)
Likes: 0
Liked 0 Times
in
0 Posts
Im using Shimano SD50 6mm grommets. (0.25" hole) works perfectly. the holes in the BB shell are big and will provide lots of room. The BB shells are PF30 sized but the cranks are 24mm spindle. There will be loads of room to route the wires cleanly.
Im using the Tripeak PF30 to BSA adapter at the stoker and the Problem Solvers EBB up front. Im going to use a cut section of water bottle inside the front bottom bracket as recommended by a few online to cover the inside of the BB shell to keep the wires from rubbing the crank because its exposed with the problemsolvers EBB.
The B junction is going to be at the captain seat tube, tucked neatly into the boom tube. The stoker seat tube has a suspension post so there it no way to mount the battery there. I will have long runs to both the front and rear derailleur from there (already have the wires).
Holding the Saint BH90 hose up to my frame and scaled drawing on my "fixture" Im hopeful that the 2000mm BH90 brake tube will work. Its going to be very close. If it doesn't, I will order 2.5M of goodridge hose but I would like to not have to do that.
09-26-16, 12:38 PM
#43
Full Member
Join Date: Nov 2010
Location: Vancouver, BC
Posts: 420
Bikes: 2022 Calfee Tetra, 2023 Giant TCR
Mentioned: 3 Post(s)
Tagged: 0 Thread(s)
Quoted: 120 Post(s)
Likes: 0
Liked 2 Times
in
2 Posts
Just out of curiosity, did you use PF30 rear BB to create room for the cable routing, or because the PF30 shell is easier to fabricate?
It's fine to install the battery in the captain's seat tube. However, I'm surprised that the suspension seatpost can't fit the Di2 battery. Are you using the Tamer?
You should be able to find a sufficiently long cable for the rear hydraulic disc brake. I prefer internal cable routing but this is tough to do on a tandem.
09-26-16, 01:35 PM
#44
Senior Member
Thread Starter
Join Date: Jan 2013
Location: Kingston, Ontario
Posts: 197
Bikes: Norco Bigfoot, Miyata 110, Giant TCR Advanced 0
Mentioned: 0 Post(s)
Tagged: 0 Thread(s)
Quoted: 13 Post(s)
Likes: 0
Liked 0 Times
in
0 Posts
I would have liked to do an internal wire routing for the brake hose, but its honestly not worth it IMO. I also could not find a supplier of the proper aluminum tubing required to get it in place.
I used the PF30 rear mainly because I have the reamer tool to clean it up post welding instead of another trip to the bike shop to have them chase the threads. It also does give a lot more room for the wires as you mention. Lastly, with the 2" (50.8mm) boom tube, it mates much cleaner than a BSA threaded BB shell as those are only roughly 41mm OD. some forming would be required to get the smaller BB shell to fit and keeping that in phase complicates things further- I did this on the last frame and it was fine but this is a much cleaner finished product.
The stoker post is a generic suspension post I believe from my quick google its a "tamer" design. smooths out the ride a little bit but its mostly placebo.
09-29-16, 10:36 AM
#45
Senior Member
Thread Starter
Join Date: Jan 2013
Location: Kingston, Ontario
Posts: 197
Bikes: Norco Bigfoot, Miyata 110, Giant TCR Advanced 0
Mentioned: 0 Post(s)
Tagged: 0 Thread(s)
Quoted: 13 Post(s)
Likes: 0
Liked 0 Times
in
0 Posts
Jig to hold the chainstay together for keeping everything straight when working the metal.
The clamping arms use a slightly over sized index spacing grooves for the tubes and are built to fit in a channel in the aluminum stock to slide for width adjust-ability. I can tailor the tire size this way and get the proper chain-stay length to match the design and make sure it will fit on the bottom bracket and not be too wide. The rear end spacing stays the same though for the axle. helps with tacking before mitering too.
 Chainstay mitre by HellaFab Fabrication, on Flickr
The clamping arms use a slightly over sized index spacing grooves for the tubes and are built to fit in a channel in the aluminum stock to slide for width adjust-ability. I can tailor the tire size this way and get the proper chain-stay length to match the design and make sure it will fit on the bottom bracket and not be too wide. The rear end spacing stays the same though for the axle. helps with tacking before mitering too.
Chainstay mitre by HellaFab Fabrication, on Flickr
10-07-16, 07:08 AM
#46
Senior Member
Thread Starter
Join Date: Jan 2013
Location: Kingston, Ontario
Posts: 197
Bikes: Norco Bigfoot, Miyata 110, Giant TCR Advanced 0
Mentioned: 0 Post(s)
Tagged: 0 Thread(s)
Quoted: 13 Post(s)
Likes: 0
Liked 0 Times
in
0 Posts
More progress on the tandem.
 Tandem 2.0 by HellaFab Fabrication, on Flickr
 Tandem 2.0 by HellaFab Fabrication, on Flickr
 Tandem 2.0 by HellaFab Fabrication, on Flickr
A real framebuilding jig would be so nice. Getting the rear end aligned properly took a few tries. having to break the tacks and file/reposition several times until I was satisfied. Aluminum cant be formed cold like steel can be or it would have been much easier.
Anyone have a compact FSA SLK crankset with 175mm arms (with 24mm spindle)? shoot me a message with a photo if you do, im looking for one - but I need to be picky to make sure it will mate with my tandem timing drive arm. I have a standard 39/53 but with our daughter in the Thule, we don't ride as fast anymore, and I cant seem to find a 32/34t 74bcd chainring to use our existing FSA tandem crank arm for the slow rides.
Tandem 2.0 by HellaFab Fabrication, on FlickrTandem 2.0 by HellaFab Fabrication, on FlickrTandem 2.0 by HellaFab Fabrication, on FlickrA real framebuilding jig would be so nice. Getting the rear end aligned properly took a few tries. having to break the tacks and file/reposition several times until I was satisfied. Aluminum cant be formed cold like steel can be or it would have been much easier.
Anyone have a compact FSA SLK crankset with 175mm arms (with 24mm spindle)? shoot me a message with a photo if you do, im looking for one - but I need to be picky to make sure it will mate with my tandem timing drive arm. I have a standard 39/53 but with our daughter in the Thule, we don't ride as fast anymore, and I cant seem to find a 32/34t 74bcd chainring to use our existing FSA tandem crank arm for the slow rides.
10-07-16, 09:10 AM
#47
Clipless in Coeur d'Alene
Anyone have a compact FSA SLK crankset with 175mm arms (with 24mm spindle)? shoot me a message with a photo if you do, im looking for one - but I need to be picky to make sure it will mate with my tandem timing drive arm. I have a standard 39/53 but with our daughter in the Thule, we don't ride as fast anymore, and I cant seem to find a 32/34t 74bcd chainring to use our existing FSA tandem crank arm for the slow rides.
If you can stick with your existing tandem triple crankset, that will allow you more range than a compact would. Want to go double? If your FD can adjust inward enough, use the inner 2 positions of the triple crankset. 48/30 is a good combo.
We just converted back to a triple setup (w/Di2) and changed out our cranks, so I now have a couple standard/single FSA road cranksets (double and triple) to sell at some point. No compact though.
Last edited by twocicle; 10-07-16 at 09:16 AM.
10-07-16, 01:16 PM
#48
Senior Member
Thread Starter
Join Date: Jan 2013
Location: Kingston, Ontario
Posts: 197
Bikes: Norco Bigfoot, Miyata 110, Giant TCR Advanced 0
Mentioned: 0 Post(s)
Tagged: 0 Thread(s)
Quoted: 13 Post(s)
Likes: 0
Liked 0 Times
in
0 Posts
Thanks.
I have a standard road crankset that im planning to use right now.
Some other options exist for me with the PF30 crankset if im willing to ditch our existing FSA tandem stoker stuff completely and have miss-matched front/rear cranks... which im not sure that I want. I already have a Cannondale Hollowgram crankset in my parts bin that would work pretty well with a proper spider.
Last edited by shlammed; 10-07-16 at 01:26 PM.
02-13-17, 08:24 AM
#49
Senior Member
Thread Starter
Join Date: Jan 2013
Location: Kingston, Ontario
Posts: 197
Bikes: Norco Bigfoot, Miyata 110, Giant TCR Advanced 0
Mentioned: 0 Post(s)
Tagged: 0 Thread(s)
Quoted: 13 Post(s)
Likes: 0
Liked 0 Times
in
0 Posts
Slowest custom build ever (unless you are on a wait list for someone who is busy).
Yesterday I finished the work needed on the rear end and broke out the finishing tools. The openings are finished and ready for bearings, the bearing seats were faced and I tossed the wheels on and put the fork in to get a photo. Im pretty happy with how it has turned out. Do you think I need a brace under the seat stay for the disc brake?
All that is left on the frame is brake hose brackets and water bottle fittings before I send it out for powder coating and heat treatment.


I mounted the rear bottom bracket to check chainring clearance to the chainstay and there is loads, even with the narrow standard crank. The measurements I took paid off. In hindsight I could have made the rear triangle shorter being that the chainring clearance is more than I had planned, but its such a long bike the chainstay length is a non-issue.
Yesterday I finished the work needed on the rear end and broke out the finishing tools. The openings are finished and ready for bearings, the bearing seats were faced and I tossed the wheels on and put the fork in to get a photo. Im pretty happy with how it has turned out. Do you think I need a brace under the seat stay for the disc brake?
All that is left on the frame is brake hose brackets and water bottle fittings before I send it out for powder coating and heat treatment.
I mounted the rear bottom bracket to check chainring clearance to the chainstay and there is loads, even with the narrow standard crank. The measurements I took paid off. In hindsight I could have made the rear triangle shorter being that the chainring clearance is more than I had planned, but its such a long bike the chainstay length is a non-issue.
03-24-17, 07:29 AM
#50
Senior Member
Thread Starter
Join Date: Jan 2013
Location: Kingston, Ontario
Posts: 197
Bikes: Norco Bigfoot, Miyata 110, Giant TCR Advanced 0
Mentioned: 0 Post(s)
Tagged: 0 Thread(s)
Quoted: 13 Post(s)
Likes: 0
Liked 0 Times
in
0 Posts
Finished the "braze-ons" for water bottle and brake routing, tore the frame down and its with the heat treater/powder coater. should be back to me within a week or so for final buildup.


