how to tape bullhorns
 02-12-08, 10:27 PM
#1
moving target
Thread Starter

how to tape bullhorns
Since I ruined the handle bar tape on my fixed gear I decided to take advantage of this opportunity to write up a how to on how to wrap bullhorns.

While your legs provide your main source of power while you are on your bicycle, your hands provide a crucial contact point when sprinting, climbing, and stopping. Granted some people think naked shiny bars look nice, do your hands a favor and tape your bars.
This guide is going to cover taping up bullhorns without brake levers.
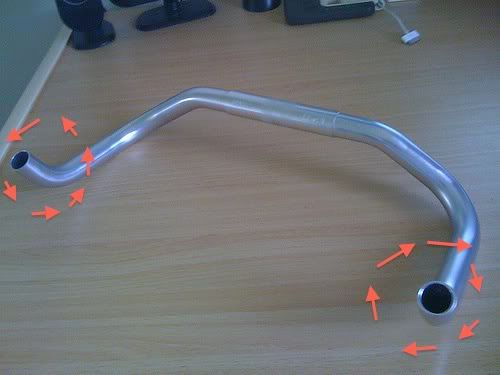
this is what we are starting with
Things you will need before hand
# Handle bars
# Bar tape
# Electrical tape
# Scissors
It is much easier to have everything in reach before you get started, because nothing sucks worse than having a nice neat job ruined because you cant find the tape to finish it.
Lets Get Started
You are going to tape from the inside towards to outside of your bars, this way when you are cranking on the bars to climb you are tightening your bar tape.

one loop
With your handlebars in one hand take the bar tape and make a complete loop around them once with the bar tape. (The reason I do this is because it gives me a nice cushy bulge at the top of the bars)

Continue wrapping down your bars in even passes. Each pass should should should pass over the previous one half way.Each one should cross the previous one half way

Work in slow tight even loops until you get to the middle of your handle bars near the stem. Now for the tricky part that will result in a neat looking job. You need to take your last pass and cut it at an angle even with the layer underneath it.cutting the layer evenly

Make sure to keep all of this nice and tight.
Take your electrical tape and overlap it half way around your handle bar tape. Going in the direction you have been wrapping your handle bar tape.

Remember to follow your bar tape
Loop the electrical tape around your bars once or twice making sure to cover the exposed edges of the handle bar tape neatly. Be sure to insert end plugs into the open ends of your handle bars to keep them from gouging holes out of your arms or legs.
They should look something like this when you are done.

While your legs provide your main source of power while you are on your bicycle, your hands provide a crucial contact point when sprinting, climbing, and stopping. Granted some people think naked shiny bars look nice, do your hands a favor and tape your bars.
This guide is going to cover taping up bullhorns without brake levers.
this is what we are starting with
Things you will need before hand
# Handle bars
# Bar tape
# Electrical tape
# Scissors
It is much easier to have everything in reach before you get started, because nothing sucks worse than having a nice neat job ruined because you cant find the tape to finish it.
Lets Get Started
You are going to tape from the inside towards to outside of your bars, this way when you are cranking on the bars to climb you are tightening your bar tape.
one loop
With your handlebars in one hand take the bar tape and make a complete loop around them once with the bar tape. (The reason I do this is because it gives me a nice cushy bulge at the top of the bars)
Continue wrapping down your bars in even passes. Each pass should should should pass over the previous one half way.Each one should cross the previous one half way
Work in slow tight even loops until you get to the middle of your handle bars near the stem. Now for the tricky part that will result in a neat looking job. You need to take your last pass and cut it at an angle even with the layer underneath it.cutting the layer evenly
Make sure to keep all of this nice and tight.
Take your electrical tape and overlap it half way around your handle bar tape. Going in the direction you have been wrapping your handle bar tape.
Remember to follow your bar tape
Loop the electrical tape around your bars once or twice making sure to cover the exposed edges of the handle bar tape neatly. Be sure to insert end plugs into the open ends of your handle bars to keep them from gouging holes out of your arms or legs.
They should look something like this when you are done.


 02-12-08, 10:51 PM
#6
Still kicking.

Somebody say sticky?
__________________
Appreciate the old bikes more than the new.
Appreciate the old bikes more than the new.
02-13-08, 12:27 AM
#8
Cornucopia of Awesomeness

Join Date: Oct 2004
Location: not where i used to be
Posts: 4,847
Mentioned: 0 Post(s)
Tagged: 0 Thread(s)
Quoted: 1 Post(s)
Likes: 0
Liked 0 Times
in
0 Posts
02-13-08, 12:48 AM
#9
Senior Member

Join Date: Nov 2006
Posts: 624
Mentioned: 0 Post(s)
Tagged: 0 Thread(s)
Quoted: 0 Post(s)
Likes: 0
Liked 0 Times
in
0 Posts
02-13-08, 02:54 AM
#10
Senior Member
Join Date: Sep 2006
Location: Van BC
Posts: 3,744
Mentioned: 0 Post(s)
Tagged: 0 Thread(s)
Quoted: 0 Post(s)
Likes: 0
Liked 1 Time
in
1 Post
Park Tools' website has a great tutorial on how to tape road drops with hoods. It includes a variation that I now use all the time. The problem this variation is supposed to solve is that unlike bullhorns, drops do not point the same direction all the way from the stem to the ends---they do a complete 180. So if you wrap drops all the way from the ends to the stem in the same direction, then either the tops/ shoulders or the drops will have a tendency to come undone as you crank on the bars. So in the method recommended on the site, you reverse the direction of the wrap as you go around the hoods so that it's optimal in both areas. It's really simple once you see how it's done, and it works great.
02-13-08, 07:33 AM
#11

Senior Member

Join Date: Aug 2005
Location: baltimore
Posts: 1,663
Bikes: Pake Track; Bianchi XL EV2 El Reparto Corse, Kona Jake the Snake
Mentioned: 0 Post(s)
Tagged: 0 Thread(s)
Quoted: 0 Post(s)
Likes: 0
Liked 1 Time
in
1 Post
NO! We have a spot for this already.....
https://www.bikeforums.net/singlespeed-fixed-gear/287364-resource-thread-single-speed-fixed-gear-read-first.html
How hard is this to understand that we only need 1 resource thread? Not a resource thread for every write up that someone does.
Having said that, c0urt nicely done.
https://www.bikeforums.net/singlespeed-fixed-gear/287364-resource-thread-single-speed-fixed-gear-read-first.html
How hard is this to understand that we only need 1 resource thread? Not a resource thread for every write up that someone does.
Having said that, c0urt nicely done.
02-13-08, 08:23 AM
#12
moving target
Thread Starter
actually i didnt expect it to get stickied. thanks for that guys. it would probably be best stuck in the resource thread. it is also miss-titled. it I should have titled it how to tape bullhorns.
there is a write up on my website on how to tape drops using with hoods using the figure 8 trick. I can edit it later for this site, my sites the code is really different plus i would have to rehost the pictures.
there is a write up on my website on how to tape drops using with hoods using the figure 8 trick. I can edit it later for this site, my sites the code is really different plus i would have to rehost the pictures.
02-13-08, 11:03 AM
#13

another cat...FAB!

Join Date: Jun 2005
Location: 1st star to the right...
Posts: 1,381
Bikes: Merlin Ti Build, Trek Y-50, Bianchi Titanium Build, Custom Cuevas Road bike
Mentioned: 0 Post(s)
Tagged: 0 Thread(s)
Quoted: 0 Post(s)
Liked 0 Times
in
0 Posts
+1
I like this - very simple - I'm not SS, but I'm going to use this technique for my road bars - many thanks court...
I like this - very simple - I'm not SS, but I'm going to use this technique for my road bars - many thanks court...
__________________

Change the course of the Epidemic | The Merlin | Merlin XLM | Bianchi Ti | CyclePeople
Don't take it off until there's a cure LIVESTRONG | pay it forward | Cats | NEW Gallery
Don't take it off until there's a cure LIVESTRONG | pay it forward | Cats | NEW Gallery
9
02-13-08, 12:16 PM
#14
i'd leave the sweet stuff

Join Date: Nov 2006
Location: x32308x: where all our dreams come true!
Posts: 727
Bikes: BCA ten speed / 2007 bfssfg group buy IRO
Mentioned: 0 Post(s)
Tagged: 0 Thread(s)
Quoted: 0 Post(s)
Likes: 0
Liked 0 Times
in
0 Posts
great post!
why the crap is it stickied!?
i move to unsticky and link in the proper location.
somebody second, and then we'll vote.
why the crap is it stickied!?
i move to unsticky and link in the proper location.
somebody second, and then we'll vote.
 02-13-08, 12:39 PM
#16

Elitist

Join Date: Jul 2005
Location: Atlanta, GA
Posts: 15,965
Mentioned: 88 Post(s)
Tagged: 0 Thread(s)
Quoted: 1386 Post(s)
Liked 92 Times
in
77 Posts
For a much, much cleaner look, wrap in the opposite direction (from center to tip) and you won't have to use any tape. Start at the stem for 100% coverage.
02-13-08, 12:46 PM
#17
Elitist
Join Date: Jul 2005
Location: Atlanta, GA
Posts: 15,965
Mentioned: 88 Post(s)
Tagged: 0 Thread(s)
Quoted: 1386 Post(s)
Liked 92 Times
in
77 Posts
Added to the DIY thread.
https://www.bikeforums.net/singlespeed-fixed-gear/259766-do-yourself-diy.html#post6158956
https://www.bikeforums.net/singlespeed-fixed-gear/259766-do-yourself-diy.html#post6158956
02-13-08, 12:57 PM
#18
moving target
Thread Starter
yeah didnt need to be sticked, works better in the diy section or the resource section but i still feel loved
11-30-12, 08:22 PM
#19
Junior Member
Join Date: Nov 2012
Posts: 6
Mentioned: 0 Post(s)
Tagged: 0 Thread(s)
Quoted: 0 Post(s)
Likes: 0
Liked 0 Times
in
0 Posts
To clarify- when you say "You are going to tape from the inside towards to outside of your bars," I read that as starting in the middle and going out. Then later you say "Work in slow tight even loops until you get to the middle of your handle bars near the stem." I would think that you wouldn't get to the middle if you were working towards the "inside". So, maybe a silly question but now I'm confused. When you say "inside" are you referring to the left side of the bike?? Thanks in advance for your answer!
11-30-12, 08:29 PM
#20
moving target
Thread Starter
For a much, much cleaner look, wrap in the opposite direction (from center to tip) and you won't have to use any tape. Start at the stem for 100% coverage.
looks better
looks better
11-30-12, 08:31 PM
#21
Junior Member
Join Date: Nov 2012
Posts: 6
Mentioned: 0 Post(s)
Tagged: 0 Thread(s)
Quoted: 0 Post(s)
Likes: 0
Liked 0 Times
in
0 Posts
Taping Bullhorns- Need Help!
Hey all-
Okay, I read the taping bullhorns thread and posted there but I'll post again here in hopes someone will see it sooner =) Do you start either on the left or right side and go all the way across, or start in the middle (near the post) and work outwards on each side?
Okay, I read the taping bullhorns thread and posted there but I'll post again here in hopes someone will see it sooner =) Do you start either on the left or right side and go all the way across, or start in the middle (near the post) and work outwards on each side?
11-30-12, 08:38 PM
#23
Junior Member
Join Date: Nov 2012
Posts: 6
Mentioned: 0 Post(s)
Tagged: 0 Thread(s)
Quoted: 0 Post(s)
Likes: 0
Liked 0 Times
in
0 Posts
The question was regarding the original Taping Bullhorns diy thread. The OP specifically mentioned taping from inside to outside and then said that when you get to the post... Didn't make sense to me. Trying to get clarification.