


Patch won't stick
 03-18-23 | 09:29 AM
#1
Thread Starter
Newbie
Joined: Mar 2023
Posts: 2
Likes: 2
Patch won't stick
Hi there,
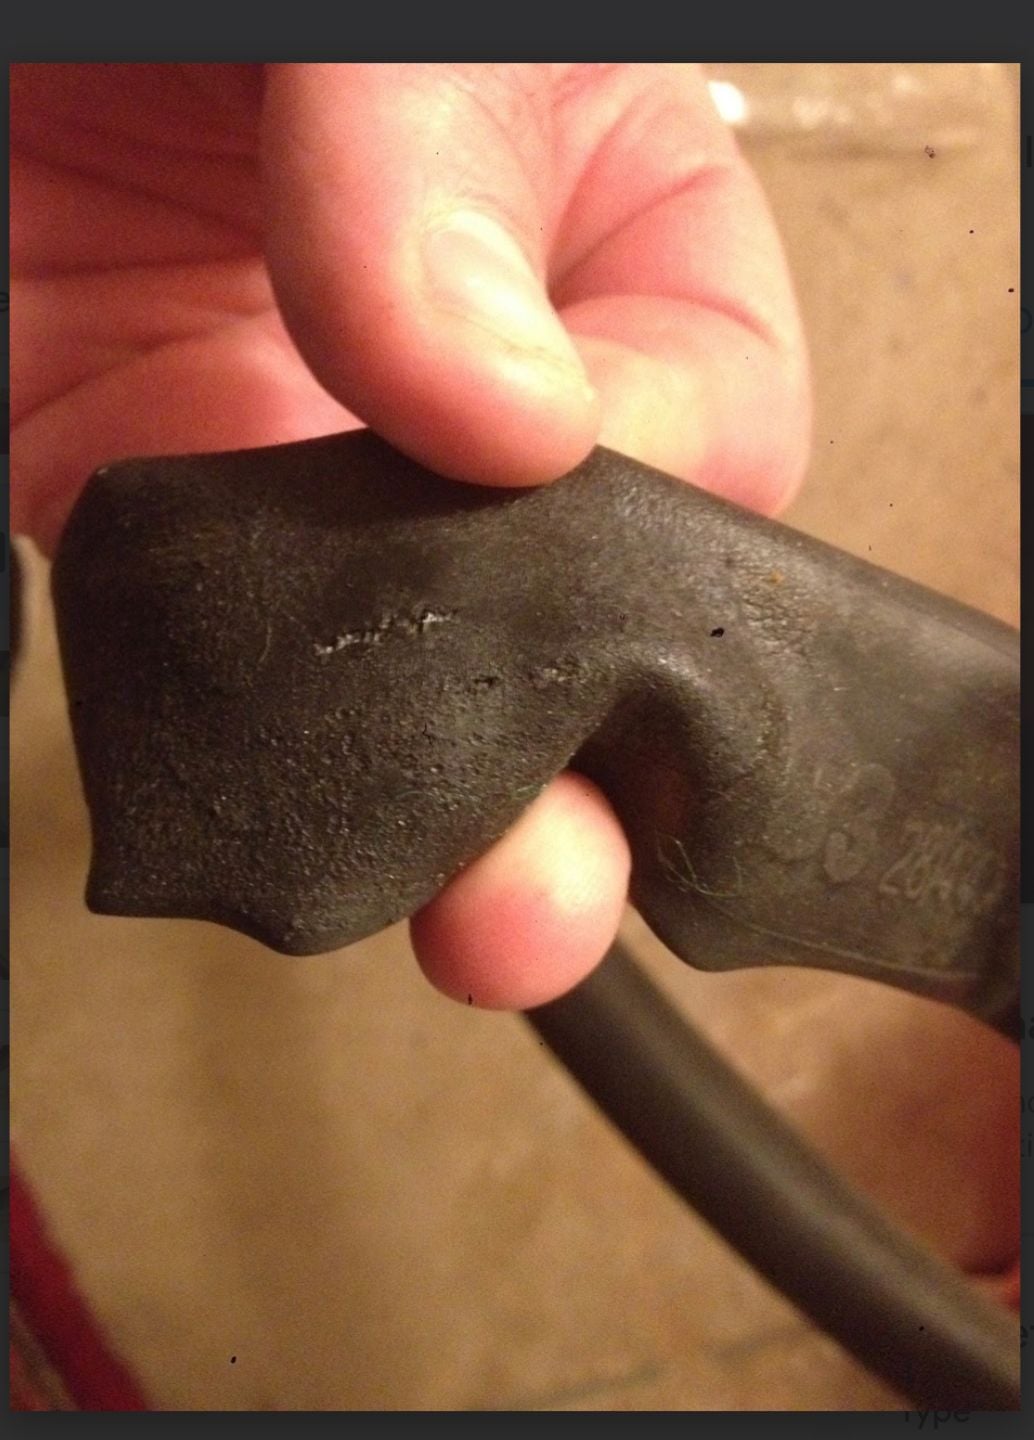
I made a nasty split in my inner tube. I have been trying to patch it, without success.
The way the split was made is the following. I rode on a nail. It pierced the inner tube from the outside, but the problem is that I walked my bike home without removing it, because I thought I had a flat tire for another reason.
The nail thus made a very small hole on the outside of the inner tube, but two large rifts on the inside.
I have tried patching both sides by making patches from an old inner tube.
The small hole on the outside got patched perfectly, but I couldn't get the inside large rifts to heal at all.
Here's what I did:
Alternatively, I also tried pumping directly to 3 bars right after stepping on the applied patch, but it wouldn't hold at all.
Sometimes, after deflating, I would take the inner tube out, submerge it in water, pump it a little, and it wouldn't leak at all. Surprisingly, I would have to reseat it and pump it to 3 bars for it to deflate again.
I tried some variants, for example smoothing the glue layer with my finger before letting it dry, no change. I also tried letting it dry for 15 minutes, no change. I also initially tried to just cut the patch without beveling the edges, no change.
I've been failing for about 10 times in a row now.
Each time it's pretty easy to peel the patch off, most of the time it even remains in one piece.
Could it be because I am making these patches myself? Would the result be any different with a bought patch?
Could it be because there might be remains of glue from my first and subsequent attempts, that prevent the patch from adhering well?
Any idea what I might be doing wrong, or how to fix my inner tube?
I am trying to upload pictures but the forum won't let me, you can check them out at drive <dot> google <dot> com/drive/folders/1ZUAiv8zLEL8nRBpdpWs4Qkd-F_1HX3YD.
Thanks a lot in advance for the help!
I made a nasty split in my inner tube. I have been trying to patch it, without success.
The way the split was made is the following. I rode on a nail. It pierced the inner tube from the outside, but the problem is that I walked my bike home without removing it, because I thought I had a flat tire for another reason.
The nail thus made a very small hole on the outside of the inner tube, but two large rifts on the inside.
I have tried patching both sides by making patches from an old inner tube.
The small hole on the outside got patched perfectly, but I couldn't get the inside large rifts to heal at all.
Here's what I did:
- I rubbed the area around it well with sandpaper
- I cut a patch in the old inner tube, trying to make beveled edges with a box cutter
- I sanded the patch well, and sanded particularly well the edges, to try to make them thinner
- I cleaned both surfaces
- I applied rubber cement from a Zefal kit on both surfaces
- I let it dry for 5 minutes, as indicated on the Zefal kit's manual
- I applied the patch, pushed well on it with the tire removal tool
- I stepped on it for 2 minutes
- I reseated the inner tube, pumped it lightly so that it would press against the tire edges
- I waited till next morning
Alternatively, I also tried pumping directly to 3 bars right after stepping on the applied patch, but it wouldn't hold at all.
Sometimes, after deflating, I would take the inner tube out, submerge it in water, pump it a little, and it wouldn't leak at all. Surprisingly, I would have to reseat it and pump it to 3 bars for it to deflate again.
I tried some variants, for example smoothing the glue layer with my finger before letting it dry, no change. I also tried letting it dry for 15 minutes, no change. I also initially tried to just cut the patch without beveling the edges, no change.
I've been failing for about 10 times in a row now.
Each time it's pretty easy to peel the patch off, most of the time it even remains in one piece.
Could it be because I am making these patches myself? Would the result be any different with a bought patch?
Could it be because there might be remains of glue from my first and subsequent attempts, that prevent the patch from adhering well?
Any idea what I might be doing wrong, or how to fix my inner tube?
I am trying to upload pictures but the forum won't let me, you can check them out at drive <dot> google <dot> com/drive/folders/1ZUAiv8zLEL8nRBpdpWs4Qkd-F_1HX3YD.
Thanks a lot in advance for the help!
Last edited by FrenchCyclist; 03-18-23 at 09:34 AM.
 03-18-23 | 09:46 AM
#2
Senior Member


Joined: Apr 2011
Posts: 12,648
Likes: 4,791
Don't pump it up at all. Let it sit overnight.
The problem here is that you likely have a smallish tube volume, so when you air it up the patched area and surrounding tube stretch at different rates, which act like peeling tape off something at an angle. If the patch is large enough and the bond good enough, you may be able to inflate the tube without the bond failing all the way back to the tear.
Using the thinnest possible innertube as a patch will also help to minimize that difference in stretching.
Obviously, you could also just replace the tube. But it is an interesting problem.
03-18-23 | 09:51 AM
#3
Facts just confuse people


Joined: Jul 2017
Posts: 19,317
Likes: 7,049
From: Mississippi
Bikes: Tarmac Disc Comp Di2 - 2020
I usually wouldn't try to repair a split or tear. Unless we are only talking a couple millimeters.
In fact, since I rarely ever get a flat, I just put in a new tube, even for a puncture.
Welcome to BF!
In fact, since I rarely ever get a flat, I just put in a new tube, even for a puncture.
Welcome to BF!
03-18-23 | 10:59 AM
#5
Senior Member
Joined: Apr 2009
Posts: 39,897
Likes: 3,865
From: New Rochelle, NY
Bikes: too many bikes from 1967 10s (5x2)Frejus to a Sumitomo Ti/Chorus aluminum 10s (10x2), plus one non-susp mtn bike I use as my commuter
Yes, tubes are too cheap to dabble in unreliable complicated repairs. Patching simple punctures makes sense, but you need to be willing to quit.
Also, buy and use a proper patch kit. Patches use a 2 part bonding agent. Half is in the "glue" in the tube, and half on the prepared patch. While homemade patches can seem to work, they won't be as reliable.
Also, buy and use a proper patch kit. Patches use a 2 part bonding agent. Half is in the "glue" in the tube, and half on the prepared patch. While homemade patches can seem to work, they won't be as reliable.
__________________
FB
Chain-L site
An ounce of diagnosis is worth a pound of cure.
Just because I'm tired of arguing, doesn't mean you're right.
�One accurate measurement is worth a thousand expert opinions� - Adm Grace Murray Hopper - USN
WARNING, I'm from New York. Thin skinned people should maintain safe distance.
FB
Chain-L site
An ounce of diagnosis is worth a pound of cure.
Just because I'm tired of arguing, doesn't mean you're right.
�One accurate measurement is worth a thousand expert opinions� - Adm Grace Murray Hopper - USN
WARNING, I'm from New York. Thin skinned people should maintain safe distance.
03-18-23 | 11:02 AM
#6
Senior Member
Joined: Aug 2005
Posts: 33,657
Likes: 1,119
From: Pittsburgh, PA
Bikes: '96 Litespeed Catalyst, '05 Litespeed Firenze, '06 Litespeed Tuscany, '20 Surly Midnight Special, All are 3x10. It is hilly around here!
That was an awful lot of time and effort to save a $3 inner tube. I will patch a small thorn or wire puncture if it isn't on a molded seam or too near the valve base but any wider cut gets the tube pitched.
03-18-23 | 11:15 AM
#7

Senior Member
Joined: May 2010
Posts: 5,603
Likes: 2,468
From: Bastrop Texas
Bikes: Univega, Peu P6, Peu PR-10, Ted Williams, Peu UO-8, Peu UO-18 Mixte, Peu Dolomites
Your method and application appears sound but it did not work. Oh, Well...
Sure sounds like a problem with dissimilar materials in the components. Or a common failing of newer vulcanizing cement that does not contain Toluene. Toluene is a vital component of having a good bond in vulcanization. Of course like many things it has been found to be carcinogenic and therefore is on the Stigma List.
In my flat fix kit I keep a small tube of unopened Vulcanizing Cement and an unopened Tube of Super-Glue just in case the Cement has dried out.
Further note that over the years, although some people have, I have never had a successful seam rip repair on butyl tubes.
__________________
 No matter where you're at... There you are... Δf:=f(1/2)-f(-1/2)
03-18-23 | 12:11 PM
#8
Senior Member

Joined: Jun 2002
Posts: 3,924
Likes: 589
From: San Jose, CA
Bikes: Too many bikes, too little time to ride
Inner tubes haven't been $3 in quite some years now. But I agree it's a lot of effort to save a tube. My rule is 2 attempts before I give up. I'm just as diligent as the OP but sometimes luck is just not on your side.
03-18-23 | 12:23 PM
#9
Senior Member
Joined: Jan 2009
Posts: 4,367
Likes: 1,651
From: San Diego, CA
I have made many attempts over the decades to make patches with old inner tube rubber and the results were iffy at best with too much time spent trying to make them work. Go for some Rema brand patches.
03-18-23 | 04:01 PM
#10

Senior Member

Joined: Jul 2015
Posts: 7,362
Likes: 3,217
From: NW Oregon
Bikes: 1982 Trek 930R Custom, '91 Diamondback Ascent w/ XT, XTR updates, Fuji Team Pro CF road flyer, Specialized Sirrus Gravel Convert, '09 Comencal Meta 5.5 XC, '02 Marin MBX500, '84 Gitane Criterium bike
your pricing may vary by season and if you buy from a bicycle shop....
03-18-23 | 04:40 PM
#11

Cantilever believer
Joined: Nov 2021
Posts: 3,121
Likes: 4,779
From: Phoenix, AZ
I patch several hundred tubes a year for four different nonprofits. Doing it in bulk saves a lot of money for these organizations with now that wholesale tube prices are up above $5 each.
I agree that proper surface prep and the correct tools & parts are very important for success. When working in bulk, I use a battery powered dremel with a sanding drum to get a clean roughened patch area (going 20-40% larger to be safe) in seconds, with all bumps, seams, and ridges obliterated. Now this isn't typically an option on tour (the tool doesn't weigh much at all, but it's bulky), but for shop or home patching it's a huge timesaver & greatly improves the likelihood for success.
I also only use genuine Rema cement and typically use only Rema patches. I've tried off-brand cement & patches with much lower success rates, as the cheap cements just don't create as good a bond and can stay "not set" for a while, allowing peel-off. I have successfully used non-Rema patches with Rema cement when a Rema patch won't cover the hole properly, but I prefer the Tip Top whenever practical. I've encountered tubes patched with old butyl tube casing instead of a patch, and all too often it's an easy task to peel that patch away with bare fingers, let alone what air pressure can do with much greater force.
All this being said, patching a slit or tear is tough even when the prep, patch, and cement are exactly right - the tube still really wants to continue separating along that plane of weakness. Sometimes it holds together great with a good Rema oval patch... and sometimes it doesn't. The only patch locations with lower success rates are ones where the hole is less than 1/2 patch diameter away from the valve.
__________________
Richard C. Moeur, PE - Phoenix AZ, USA
https://www.richardcmoeur.com/bikestuf.html
Richard C. Moeur, PE - Phoenix AZ, USA
https://www.richardcmoeur.com/bikestuf.html
03-18-23 | 05:40 PM
#12

Mad bike riding scientist
Joined: Nov 2004
Posts: 29,144
Likes: 6,202
From: Denver, CO
Bikes: Some silver ones, a red one, a black and orange one, and a few titanium ones
I also only use genuine Rema cement and typically use only Rema patches. I've tried off-brand cement & patches with much lower success rates, as the cheap cements just don't create as good a bond and can stay "not set" for a while, allowing peel-off. I have successfully used non-Rema patches with Rema cement when a Rema patch won't cover the hole properly, but I prefer the Tip Top whenever practical. I've encountered tubes patched with old butyl tube casing instead of a patch, and all too often it's an easy task to peel that patch away with bare fingers, let alone what air pressure can do with much greater force.
__________________
Stuart Black
Dreamin' of Bemidji Down the Mississippi (in part)
Plan Epsilon Around Lake Michigan in the era of Covid
Gold Fever Three days of dirt in Colorado
Pokin' around the Poconos A cold ride around Lake Erie
Dinosaurs in Colorado A mountain bike guide to the Purgatory Canyon dinosaur trackway
Solo Without Pie. The search for pie in the Midwest.
Picking the Scablands. Washington and Oregon, 2005. Pie and spiders on the Columbia River!
 03-18-23 | 05:52 PM
#13
Mad bike riding scientist
Joined: Nov 2004
Posts: 29,144
Likes: 6,202
From: Denver, CO
Bikes: Some silver ones, a red one, a black and orange one, and a few titanium ones
Hi there,
I made a nasty split in my inner tube. I have been trying to patch it, without success.
The way the split was made is the following. I rode on a nail. It pierced the inner tube from the outside, but the problem is that I walked my bike home without removing it, because I thought I had a flat tire for another reason.
The nail thus made a very small hole on the outside of the inner tube, but two large rifts on the inside.
I have tried patching both sides by making patches from an old inner tube.
The small hole on the outside got patched perfectly, but I couldn't get the inside large rifts to heal at all.
Here's what I did:
Alternatively, I also tried pumping directly to 3 bars right after stepping on the applied patch, but it wouldn't hold at all.
Sometimes, after deflating, I would take the inner tube out, submerge it in water, pump it a little, and it wouldn't leak at all. Surprisingly, I would have to reseat it and pump it to 3 bars for it to deflate again.
I tried some variants, for example smoothing the glue layer with my finger before letting it dry, no change. I also tried letting it dry for 15 minutes, no change. I also initially tried to just cut the patch without beveling the edges, no change.
I've been failing for about 10 times in a row now.
Each time it's pretty easy to peel the patch off, most of the time it even remains in one piece.
Could it be because I am making these patches myself? Would the result be any different with a bought patch?
Could it be because there might be remains of glue from my first and subsequent attempts, that prevent the patch from adhering well?
Any idea what I might be doing wrong, or how to fix my inner tube?
I am trying to upload pictures but the forum won't let me, you can check them out at drive <dot> google <dot> com/drive/folders/1ZUAiv8zLEL8nRBpdpWs4Qkd-F_1HX3YD.
Thanks a lot in advance for the help!
I made a nasty split in my inner tube. I have been trying to patch it, without success.
The way the split was made is the following. I rode on a nail. It pierced the inner tube from the outside, but the problem is that I walked my bike home without removing it, because I thought I had a flat tire for another reason.
The nail thus made a very small hole on the outside of the inner tube, but two large rifts on the inside.
I have tried patching both sides by making patches from an old inner tube.
The small hole on the outside got patched perfectly, but I couldn't get the inside large rifts to heal at all.
Here's what I did:
- I rubbed the area around it well with sandpaper
- I cut a patch in the old inner tube, trying to make beveled edges with a box cutter
- I sanded the patch well, and sanded particularly well the edges, to try to make them thinner
- I cleaned both surfaces
- I applied rubber cement from a Zefal kit on both surfaces
- I let it dry for 5 minutes, as indicated on the Zefal kit's manual
- I applied the patch, pushed well on it with the tire removal tool
- I stepped on it for 2 minutes
- I reseated the inner tube, pumped it lightly so that it would press against the tire edges
- I waited till next morning
Alternatively, I also tried pumping directly to 3 bars right after stepping on the applied patch, but it wouldn't hold at all.
Sometimes, after deflating, I would take the inner tube out, submerge it in water, pump it a little, and it wouldn't leak at all. Surprisingly, I would have to reseat it and pump it to 3 bars for it to deflate again.
I tried some variants, for example smoothing the glue layer with my finger before letting it dry, no change. I also tried letting it dry for 15 minutes, no change. I also initially tried to just cut the patch without beveling the edges, no change.
I've been failing for about 10 times in a row now.
Each time it's pretty easy to peel the patch off, most of the time it even remains in one piece.
Could it be because I am making these patches myself? Would the result be any different with a bought patch?
Could it be because there might be remains of glue from my first and subsequent attempts, that prevent the patch from adhering well?
Any idea what I might be doing wrong, or how to fix my inner tube?
I am trying to upload pictures but the forum won't let me, you can check them out at drive <dot> google <dot> com/drive/folders/1ZUAiv8zLEL8nRBpdpWs4Qkd-F_1HX3YD.
Thanks a lot in advance for the help!


It looks a bit like the tube is past its prime. Patching it with anything is going to be dicey.
That said, go buy some Rema TipTop patches. They are cheap. Amazon has a kit for less than $3 each. Buy a couple or more. Your time is worth something and life is too short to try and reinvent something that already exists. Chemists use something called the Donem Principle which states �if someone has already done �em, don�t do it again�.
__________________
Stuart Black
Dreamin' of Bemidji Down the Mississippi (in part)
Plan Epsilon Around Lake Michigan in the era of Covid
Gold Fever Three days of dirt in Colorado
Pokin' around the Poconos A cold ride around Lake Erie
Dinosaurs in Colorado A mountain bike guide to the Purgatory Canyon dinosaur trackway
Solo Without Pie. The search for pie in the Midwest.
Picking the Scablands. Washington and Oregon, 2005. Pie and spiders on the Columbia River!
Stuart Black
Dreamin' of Bemidji Down the Mississippi (in part)
Plan Epsilon Around Lake Michigan in the era of Covid
Gold Fever Three days of dirt in Colorado
Pokin' around the Poconos A cold ride around Lake Erie
Dinosaurs in Colorado A mountain bike guide to the Purgatory Canyon dinosaur trackway
Solo Without Pie. The search for pie in the Midwest.
Picking the Scablands. Washington and Oregon, 2005. Pie and spiders on the Columbia River!
03-18-23 | 07:10 PM
#14

Really Old Senior Member
Joined: Feb 2007
Posts: 14,630
Likes: 1,882
From: Mid Willamette Valley, Orygun
Bikes: 87 RockHopper,2008 Specialized Globe. Both upgraded to 9 speeds. 2019 Giant Explore E+3
My REMA patches just peeled off instead of fusing. Ditto for a vinyl patch. (air mattress) IIRC, they took about the same effort to peel.
03-18-23 | 07:16 PM
#15
Cantilever believer
Joined: Nov 2021
Posts: 3,121
Likes: 4,779
From: Phoenix, AZ
The only critique I have is with using non-Rema patches with Rema vulcanizing fluid. There is no reason to do that. Rema patches need Rema vulcanizing fluid to make the patch. It�s a two component system that works when both components are there. When one component is missing�like using non-Rema patches�you might as well be using rubber cement which is cheaper. Not as good, but cheaper.
__________________
Richard C. Moeur, PE - Phoenix AZ, USA
https://www.richardcmoeur.com/bikestuf.html
Richard C. Moeur, PE - Phoenix AZ, USA
https://www.richardcmoeur.com/bikestuf.html
03-18-23 | 07:18 PM
#16
Cantilever believer
Joined: Nov 2021
Posts: 3,121
Likes: 4,779
From: Phoenix, AZ
I've ran into a couple bicycle tubes that seemed like that. Kind of like it was part vinyl ???? (also a friend's wheelbarrow tube from a China-mart)
My REMA patches just peeled off instead of fusing. Ditto for a vinyl patch. (air mattress) IIRC, they took about the same effort to peel.
My REMA patches just peeled off instead of fusing. Ditto for a vinyl patch. (air mattress) IIRC, they took about the same effort to peel.
03-18-23 | 10:53 PM
#17
Senior Member
Joined: Jul 2015
Posts: 7,362
Likes: 3,217
From: NW Oregon
Bikes: 1982 Trek 930R Custom, '91 Diamondback Ascent w/ XT, XTR updates, Fuji Team Pro CF road flyer, Specialized Sirrus Gravel Convert, '09 Comencal Meta 5.5 XC, '02 Marin MBX500, '84 Gitane Criterium bike
dude.. buy a new tube and admit that you ruined a tube. That thing is thrashed. a large area has been softened by the repeated chemical attacks on the material. wow.
and order a decent patch kit too. Remo and Park work fine. Quit spending HOURS to only find that you've ruined what you tried to salvage.
and a "patch" that big will make flat spot on the tire due to that double-thick area NOT STRETCHING when you inflate the tire/tube.... if it had held..
seriously.
the "holes" on the opposite side look like Tire Iron Marks, for the record... AKA: "Pinch Flat"
Last edited by maddog34; 03-18-23 at 11:01 PM.
03-19-23 | 02:52 AM
#18
Senior Member
Joined: Jun 2002
Posts: 3,924
Likes: 589
From: San Jose, CA
Bikes: Too many bikes, too little time to ride

Lately I've been doing this instead of traditional patches. Seems to hold up pretty well.
Working great so far on TPU tubes; time will tell how well they hold up on butyl tubes.
03-19-23 | 06:26 AM
#19

Senior Member
Joined: Aug 2015
Posts: 2,332
Likes: 373
Im sure you were already told, But
-cutting patches from old innertubes just doesn't work.-
Get at patch kit and follow the instructions. Especially the part about letting the solvent in the glue evaporate for 5 minutes before applying the patch, and you be fine.
-cutting patches from old innertubes just doesn't work.-
Get at patch kit and follow the instructions. Especially the part about letting the solvent in the glue evaporate for 5 minutes before applying the patch, and you be fine.
03-19-23 | 07:34 AM
#20

Old fart
Joined: Nov 2004
Posts: 26,347
Likes: 5,251
From: Appleton WI
Bikes: Several, mostly not name brands.
And use the Rema cold-vulcanizing fluid, not rubber cement. As [MENTION=158672]FBinNY[/MENTION] noted above, an effective patch is a two-part process involving a chemical reaction between the tube, the patch, and the vulcanizing fluid.
03-19-23 | 08:50 AM
#21
Mad bike riding scientist
Joined: Nov 2004
Posts: 29,144
Likes: 6,202
From: Denver, CO
Bikes: Some silver ones, a red one, a black and orange one, and a few titanium ones
I've ran into a couple bicycle tubes that seemed like that. Kind of like it was part vinyl ???? (also a friend's wheelbarrow tube from a China-mart)
My REMA patches just peeled off instead of fusing. Ditto for a vinyl patch. (air mattress) IIRC, they took about the same effort to peel.
My REMA patches just peeled off instead of fusing. Ditto for a vinyl patch. (air mattress) IIRC, they took about the same effort to peel.
__________________
Stuart Black
Dreamin' of Bemidji Down the Mississippi (in part)
Plan Epsilon Around Lake Michigan in the era of Covid
Gold Fever Three days of dirt in Colorado
Pokin' around the Poconos A cold ride around Lake Erie
Dinosaurs in Colorado A mountain bike guide to the Purgatory Canyon dinosaur trackway
Solo Without Pie. The search for pie in the Midwest.
Picking the Scablands. Washington and Oregon, 2005. Pie and spiders on the Columbia River!
03-19-23 | 03:23 PM
#22
Senior Member
Joined: Jul 2015
Posts: 7,362
Likes: 3,217
From: NW Oregon
Bikes: 1982 Trek 930R Custom, '91 Diamondback Ascent w/ XT, XTR updates, Fuji Team Pro CF road flyer, Specialized Sirrus Gravel Convert, '09 Comencal Meta 5.5 XC, '02 Marin MBX500, '84 Gitane Criterium bike
they feel rather greasy and slippery to the touch.... at first i thought the feel was due to a new release agent during Mfg. but then i tried patching one... that was a waste of two good patches!
10-14-23 | 09:29 AM
#23
Thread Starter
Newbie
Joined: Mar 2023
Posts: 2
Likes: 2
Hi there everyone!
I am writing back to thank all of you for your help and contributions, and to give you some news.
I didn't expect to spark such a rich conversation!
In the end I tried one or two more times, with the advice of some of the answers here. It still didn't work.
I then bought a large patch, also didn't work.
I ended up buying a new inner tube.
Some caveats though:
First, my conclusion in the end was that probably, the reason why my homemade patches were not sticking was that the surface of the inner tube had been scorched too much, or had remains from earlier tries or something, since even the bought patch didn't hold at all, and since conversely, my homemade patch on the other side of the tube, where the nail had pierced through, held fine at all times.
Second, I would still moderate a conclusion that buying a new inner tube is much simpler. In reality, I bought a new inner tube, started riding, and it literally blew up after 10 seconds. Probably because my tire is a very old one, and the shop I went to only had inner tubes that were for bigger tires. Still ok, but the seller told me to be very careful when installing it. So I had to buy a second inner tube in the end, and had to thus change it twice. So going for an inner tube in my case didn't end up being that simpler. Especially if one takes into account that to go the homemade patch route, I didn't have to leave my home, whereas to buy the two inner tubes, I had to ride twice to the shop, which took me half an hour each time.
So I still conclude that trying a homemade patch is worth it. In my case it didn't work, but it probably could have worked if I had tried correctly from the start, and I am pretty sure it would have worked if it was a normal hole, and not a tear.
Thanks a lot very much for all your advice, reactions and help!
