


Attaching head badge?
 07-27-16 | 08:53 AM
#1
Thread Starter
Senior Member


Joined: Nov 2014
Posts: 1,231
Likes: 1,181
From: Saratoga calif.
Bikes: 2 ezip electric bikes, trek 800 antelope, nishiki international, 1948 schwin new world, phillippe french boutique bike
Attaching head badge?
When I repainted my Centurion Mixte frame I removed the head badge.
Now that I'm getting ready to reassemble everything. I need to replace it.
What did you all use for new rivets for attaching it to the steer tube?
I would rather not use pop rivets.
Some kind of aluminum or maybe copper? Plastic?
I don't want to install the fork till I get this done.
If I can't find a good solution I might just not put it back on and maybe get some kind of decal to put in it's place.
The bike, by this point is all custom any way. And I have renamed it Duchess .
 07-27-16 | 09:03 AM
#2

over the hill
Joined: Apr 2009
Posts: 1,405
Likes: 6
From: florida
Bikes: 72 maino-76 austro daimler inter 10-? giant kronos
Depends on the badge. Is it the circular silver colored 'C'? On a brass colored one like raleigh/brass screws. What ever matches. Of course you could glue it. Installing the fork would be fine/meaning not a prerequisit.
07-27-16 | 09:14 AM
#3


multimodal commuter
Joined: Nov 2006
Posts: 19,810
Likes: 597
From: NJ, NYC, LI
Bikes: 1940s Fothergill, 1959 Allegro Special, 1963? Claud Butler Olympic Sprint, Lambert 'Clubman', 1974 Fuji "the Ace", 1976 Holdsworth 650b conversion rando bike, 1983 Trek 720 tourer, 1984 Counterpoint Opus II, 1993 Basso Gap, 2010 Downtube 8h, and...
It's not easy to find rivets small enough.
Ideally what you want is a 'split' or 'bifurcated' rivet. Brass, copper, stainless steel, aluminum, any of these would do. Zinc plated steel is second choice; but the difficulty will be finding rivets small enough.
A few years ago I got a hundred tiny little rivets from rivetsinstock.com, which was far more than I needed, so I sold off the rest of them here; but my stash is long gone and they don't seem to have such small ones in stock any more.
If you can't find suitable rivets, glue the badge on and glue little nail heads into the rivet holes.
__________________
www.rhmsaddles.com.
www.rhmsaddles.com.
07-27-16 | 09:17 AM
#4

Bike Butcher of Portland
Joined: Jul 2014
Posts: 12,493
Likes: 8,060
From: Portland, OR
Bikes: It's complicated.
It's either tiny pop rivets, tiny screws that you screw in, or tiny little screws that you pound in. The first two you can imagine, here's the ones you pound in:
You usually have to snap off the inside of the screws or else the steerer rubs, in my experience. An old screwdriver and a hammer works for me.
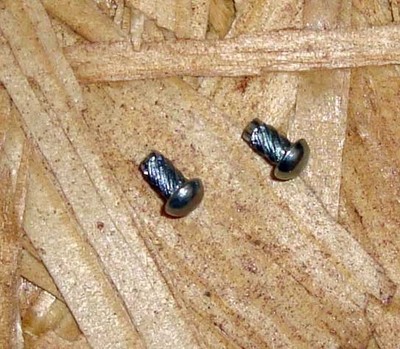
Only place I've found them is eBay
You usually have to snap off the inside of the screws or else the steerer rubs, in my experience. An old screwdriver and a hammer works for me.
Only place I've found them is eBay
__________________
If someone tells you that you have enough bicycles and you don't need any more, stop talking to them. You don't need that kind of negativity in your life.
If someone tells you that you have enough bicycles and you don't need any more, stop talking to them. You don't need that kind of negativity in your life.
07-27-16 | 09:35 AM
#6

Senior Member

Joined: Apr 2007
Posts: 12,569
Likes: 2,740
From: Thunder Bay, Ontario, Canada - burrrrr!
Bikes: 1958 Rabeneick 120D, 1968 Legnano Gran Premio, 196? Torpado Professional, 2000 Marinoni Piuma
I still have a dozen, or so, of these screw rivets and a proper sized drill bit to facilitate attachment, just in case the original holes have been enlarged...
__________________
"98% of the bikes I buy are projects".
"98% of the bikes I buy are projects".
07-27-16 | 10:27 AM
#7
Senior Member
Joined: Oct 2015
Posts: 235
Likes: 0
From: Silicon Valley
Bikes: 1978 Motobecane Grand Jubile | 1983 Univega Gran Turismo | 1973 Raleigh Competition
I just used some adhesive for automotive trim on my raleigh. Then fashioned a few small brass finish nails into faux rivets and glued them into place.
07-27-16 | 10:29 AM
#8
self propelled lifer
Joined: Aug 2007
Posts: 557
Likes: 12
From: Manitoba
Bikes: 1962 Dawes Galaxy; 72 Gitane Interclub;73 Peugeot PR10;78 Torpado Luxe;73 Grandis; 81 Raleigh/Carlton Comp; 85 Bianchi Stelvio; 87 Bianchi Brava; 73 Bottechia Special; 1969 or70 Bob Jackson
I haven't been able to find rivets small enough either, they do seem to be available but none of the hardware stores carry them. My solution in the past has been a little ball of epoxy putty for each attachment point on the head badge, just put the putty over the holes in the head tube, line up the head badge and press, a little of the putty will come through the hole in the headbadge and headtube, just press it down a little and it'll look like a grey rivet head. If you ever need to remove the headbadge just knock off the end of the putty plug inside the head tube and it'll pop right off

 07-27-16 | 10:47 AM
#10

Half way there
Joined: Sep 2015
Posts: 2,967
Likes: 895
From: North Carolina
Bikes: Many, and the list changes frequently
It's either tiny pop rivets, tiny screws that you screw in, or tiny little screws that you pound in. The first two you can imagine, here's the ones you pound in:
You usually have to snap off the inside of the screws or else the steerer rubs, in my experience. An old screwdriver and a hammer works for me.
Only place I've found them is eBay
You usually have to snap off the inside of the screws or else the steerer rubs, in my experience. An old screwdriver and a hammer works for me.
Only place I've found them is eBay
I have also epoxied head badges on. Works fine too.
07-27-16 | 10:52 AM
#11
Senior Member
Joined: May 2009
Posts: 1,915
Likes: 1,476
From: A different place and time.
My poor, long gone Pinarello came from the factory with two sided tape holding the head badge on. It was like the 3M stuff, maybe a 32nd of an inch thick piece of foam that was sticky on both sides. After the frame was destroyed in a crash, I took the badge off with dental floss.

 07-27-16 | 12:22 PM
#13
Senior Member
Joined: May 2011
Posts: 3,780
Likes: 17
From: Upstate NY
Bikes: Bianchi San Mateo and a few others
After powder coating my daughter's '81 Fuji, I used the heads of some extra stainless steel spokes as faux rivets, held in place by epoxy.
I cut off the spoke head with a Dremel, leaving maybe 3/16" of the spoke shaft. I put some epoxy in the head tube's holes, inserted my faux rivets, and mashed the epoxy into place firmly with my fingers from inside the head tube.
There's also a touch of contact cement between the badge and the head tube to stick the badge in place and prevent the potential for rattles.
 07-27-16 | 02:01 PM
#15
Senior Member
Joined: Mar 2013
Posts: 3,837
Likes: 376
From: Maryland
Bikes: Lots of English 3-speeds, a couple of old road bikes, 3 mountain bikes, 1 hybrid, and a couple of mash-ups
I use #2 x 1/8" pan head screws. I don't remember where I bought them though (probably McMaster/Carr).
07-27-16 | 02:53 PM
#16

Decrepit Member
Joined: Aug 2005
Posts: 10,488
Likes: 94
From: Santa Rosa, California
Bikes: Waterford 953 RS-22, several Paramounts
For many decades, Schwinn used No. 2 x 3/16" Round Head Type B sheet metal screws to attach head badges. One potential problem with securing them like that today is that particularly desirable head badges like the enameled brass Paramount badges are easier to steal. I've resorted to filling the slot with JB Weld.

 07-27-16 | 02:57 PM
#17

feros ferio

Joined: Jul 2000
Posts: 22,417
Likes: 1,882
From: www.ci.encinitas.ca.us
Bikes: 1959 Capo Modell Campagnolo; 1960 Capo Sieger (2); 1962 Carlton Franco Suisse; 1970 Peugeot UO-8; 1982 Bianchi Campione d'Italia; 1988 Schwinn Project KOM-10;
I used small machine screws on both Capos. Rivets would look nicer, but the screw heads are tolerable.
__________________
"Far and away the best prize that life offers is the chance to work hard at work worth doing." --Theodore Roosevelt
Capo: 1959 Modell Campagnolo, S/N 40324; 1960 Sieger (2), S/N 42624, 42597
Carlton: 1962 Franco Suisse, S/N K7911
Peugeot: 1970 UO-8, S/N 0010468
Bianchi: 1982 Campione d'Italia, S/N 1.M9914
Schwinn: 1988 Project KOM-10, S/N F804069
07-27-16 | 03:24 PM
#18

Senior Member
Joined: Apr 2005
Posts: 16,748
Likes: 138
From: Wherever
Let's not confuse everybody. They're called drive screws.
And/or U-Drive screws.
U-Drive Screws (Hammer Drive Screws) | The Fastener Resource Center
And/or U-Drive screws.
U-Drive Screws (Hammer Drive Screws) | The Fastener Resource Center
07-27-16 | 03:28 PM
#19
Senior Member
Joined: Apr 2005
Posts: 16,748
Likes: 138
From: Wherever
07-27-16 | 03:47 PM
#20
Half way there
Joined: Sep 2015
Posts: 2,967
Likes: 895
From: North Carolina
Bikes: Many, and the list changes frequently
 07-27-16 | 06:11 PM
#22
Senior Member

Joined: Apr 2006
Posts: 4,060
Likes: 943
From: Washington County, Vermont, USA
Bikes: 1973-4 Gitane Tour de France, early 1970's Lejeune, 1970 Italvega Super Speciale, 2010 Surly Long Haul Trucker 26
Let's not confuse everybody. They're called drive screws.
And/or U-Drive screws.
U-Drive Screws (Hammer Drive Screws) | The Fastener Resource Center
And/or U-Drive screws.
U-Drive Screws (Hammer Drive Screws) | The Fastener Resource Center
Yes, "drive screws" is correct. I used them to attach the "flaming torch" head badge on my Dawes, and they look great.
I still haven't figured out how to remove them, though. My assumption is that I won't live long enough for that to become an issue.
But how do you remove them? Does anyone know?
__________________
www.redclovercomponents.com
"Progress might have been all right once, but it has gone on too long."
--Ogden Nash
www.redclovercomponents.com
"Progress might have been all right once, but it has gone on too long."
--Ogden Nash
 07-27-16 | 08:30 PM
#25

McMaster-Carr also has aluminum rivets with 1/16" shank and 0.13" diameter head. For a few of them, you could chuck one in a drill, and turn down the heads with emery boards, followed by wet-or-dry and Simichrome. Could even turn down the shank a bit, if you're clever.
McMaster-Carr
McMaster-Carr