


Blocking and butchering a Brooks
 08-25-17 | 06:11 PM
#1

Thread Starter
Senior Member
Joined: Apr 2013
Posts: 1,662
Likes: 46
From: Amsterdam
Bikes: 1980 Koga-Miyata Gentsluxe-S, 1998 Eddy Merckx Corsa 01, 1983 Tommasini Racing, 2012 Gulf Western CAAD10, 1980 Univega Gran Premio
Blocking and butchering a Brooks
Recently I gave my experience with a used B17 saddle (comfortable but has squashed with prior use and now bulges into my thigh). While I ponder trying a Professional or B17 Narrow or a Rivet Independent, I’ve decided to butcher and block this one. I've read threads here and elsewhere on how to do this, and there seems to be a fair bit of variation. My plan is to:
1) Cut away leather on the sides, as marked with painter’s tape. I’ll leave flaps that can be joined underneath for support.
2) Loosen the adjusting bolt a bit.
3) Get it wet with warm water. Per a post by [MENTION=73614]rhm[/MENTION], I won’t dunk it, as I often see recommended, but probably spritz it with a spray bottle to saturate it, to keep from leeching out any solubles with the water. I'll do this till it's saturated and soft.
4) When it’s good and wet, I'll pull the flaps under, clamp them together, and then I’m thinking of using some string, or something that won’t mark the leather, to tie the sides to shape the saddle to be as narrow as possible.
5) At this point I'm thinking to press a hard tube or dowel on top, down the center-line, lengthwise. I’m thinking from the rear center-line hole to about an inch past the front hole. The goal here is to get a modest relief channel for the perineum. I might use a CO2 cartridge for this as the tool, since that seems to have about the right diameter.
6) I’ll then let it air dry (no heat), sand/buff the edges, trim the material on the support band underneath, and lash those flaps together either with leather string or zip ties. Then tighten the bolt a bit, apply some Proofide, and enjoy my Swallow-like saddle.
Anyone see any major issues with this plan? Will I need to rig something to keep the dowel or CO2 cartridge pressed down while it dries?
1) Cut away leather on the sides, as marked with painter’s tape. I’ll leave flaps that can be joined underneath for support.
2) Loosen the adjusting bolt a bit.
3) Get it wet with warm water. Per a post by [MENTION=73614]rhm[/MENTION], I won’t dunk it, as I often see recommended, but probably spritz it with a spray bottle to saturate it, to keep from leeching out any solubles with the water. I'll do this till it's saturated and soft.
4) When it’s good and wet, I'll pull the flaps under, clamp them together, and then I’m thinking of using some string, or something that won’t mark the leather, to tie the sides to shape the saddle to be as narrow as possible.
5) At this point I'm thinking to press a hard tube or dowel on top, down the center-line, lengthwise. I’m thinking from the rear center-line hole to about an inch past the front hole. The goal here is to get a modest relief channel for the perineum. I might use a CO2 cartridge for this as the tool, since that seems to have about the right diameter.
6) I’ll then let it air dry (no heat), sand/buff the edges, trim the material on the support band underneath, and lash those flaps together either with leather string or zip ties. Then tighten the bolt a bit, apply some Proofide, and enjoy my Swallow-like saddle.
Anyone see any major issues with this plan? Will I need to rig something to keep the dowel or CO2 cartridge pressed down while it dries?

 08-25-17 | 06:51 PM
#3

Senior Member
Joined: Oct 2010
Posts: 9,479
Likes: 1,303
From: Jacksonville, NC
Bikes: A few
Look forward to the execution and later, the ride report!
I saw where someone had something he claimed was a Swift on Wilmington CL. Saw the pics and had to tell him it was a B17 standard that someone cut the whole sides off. I could only imagine how far he would have gotten before it ripped in half.
I saw where someone had something he claimed was a Swift on Wilmington CL. Saw the pics and had to tell him it was a B17 standard that someone cut the whole sides off. I could only imagine how far he would have gotten before it ripped in half.
08-25-17 | 07:44 PM
#4
Thread Starter
Senior Member
Joined: Apr 2013
Posts: 1,662
Likes: 46
From: Amsterdam
Bikes: 1980 Koga-Miyata Gentsluxe-S, 1998 Eddy Merckx Corsa 01, 1983 Tommasini Racing, 2012 Gulf Western CAAD10, 1980 Univega Gran Premio
Thanks, but it's far from my own idea. If you google "butchered brooks saddle" you'll see a variety of similar approaches. My main variation, which I don't know if it's really feasible, is to try to create a bit of a midline depression in the middle of the saddle while it's wet.
08-25-17 | 10:16 PM
#5

Full Member
Joined: Jun 2015
Posts: 432
Likes: 7
From: Houston, TX
Bikes: Trek 510, Dahon Classic III, Specialized Tricross, Raleigh Technium 460
Your plan to join the flaps on the underside will work, although you may want to consider the curvature lines to be more gradual. This is what mine ended up looking like after I replaced my Brooks leather. I did this a couple of years ago and it was quite tedious, but one hell of an awesome learning experience.
https://www.bikeforums.net/classic-vi...fessional.html

https://www.bikeforums.net/classic-vi...fessional.html
08-25-17 | 11:40 PM
#6

Senior Member


Joined: Nov 2011
Posts: 7,955
Likes: 702
From: Port Angeles, WA
Bikes: A green one, "Ragleigh," or something.
Subscribed
__________________
● 1971 Grandis SL ● 1972 Lambert Grand Prix frankenbike ● 1972 Raleigh Super Course fixie ● 1973 Nishiki Semi-Pro ● 1979 Motobecane Grand Jubile ●1980 Apollo "Legnano" ● 1984 Peugeot Vagabond ● 1985 Shogun Prairie Breaker ● 1986 Merckx Super Corsa ● 1987 Schwinn Tempo ● 1988 Schwinn Voyageur ● 1989 Bottechia Team ADR replica ● 1990 Cannondale ST600 ● 1993 Technium RT600 ● 1996 Kona Lava Dome ●
● 1971 Grandis SL ● 1972 Lambert Grand Prix frankenbike ● 1972 Raleigh Super Course fixie ● 1973 Nishiki Semi-Pro ● 1979 Motobecane Grand Jubile ●1980 Apollo "Legnano" ● 1984 Peugeot Vagabond ● 1985 Shogun Prairie Breaker ● 1986 Merckx Super Corsa ● 1987 Schwinn Tempo ● 1988 Schwinn Voyageur ● 1989 Bottechia Team ADR replica ● 1990 Cannondale ST600 ● 1993 Technium RT600 ● 1996 Kona Lava Dome ●
08-26-17 | 04:51 AM
#7
Senior Member
Joined: Jan 2010
Posts: 813
Likes: 170
From: Adelaide, Australia
If I was doing it I would immerse the whole saddle in the water for about an hour. Reason: if you only wet a portion of the leather you may finish with the leather being a different colour when it dries or the solubles in the leather forming a tide mark at the transition point.
Room temperature water is fine. Reason: I know of no advantage of warm water. Real disadvantage if the temp is over 70C as it changes the cell structures.
On LFGSS Skully used to do some work, and he used a bike chain link to hold the skirts together.
Sadly, over time the photo links are being lost. He also had some on a blog
It will be interesting to see if the impression created by the CO2 cartridge lasts with use.
Please take photos and keep the thread updated.
And use a very sharp blade to cut the leather.
You might get some gum tragacanth to burnish the cut edges.
Room temperature water is fine. Reason: I know of no advantage of warm water. Real disadvantage if the temp is over 70C as it changes the cell structures.
On LFGSS Skully used to do some work, and he used a bike chain link to hold the skirts together.
Sadly, over time the photo links are being lost. He also had some on a blog
It will be interesting to see if the impression created by the CO2 cartridge lasts with use.
Please take photos and keep the thread updated.
And use a very sharp blade to cut the leather.
You might get some gum tragacanth to burnish the cut edges.
Last edited by Big Block; 08-26-17 at 04:55 AM.
08-26-17 | 02:05 PM
#8
Thread Starter
Senior Member
Joined: Apr 2013
Posts: 1,662
Likes: 46
From: Amsterdam
Bikes: 1980 Koga-Miyata Gentsluxe-S, 1998 Eddy Merckx Corsa 01, 1983 Tommasini Racing, 2012 Gulf Western CAAD10, 1980 Univega Gran Premio
Your plan to join the flaps on the underside will work, although you may want to consider the curvature lines to be more gradual. This is what mine ended up looking like after I replaced my Brooks leather. I did this a couple of years ago and it was quite tedious, but one hell of an awesome learning experience.
If I was doing it I would immerse the whole saddle in the water for about an hour. Reason: if you only wet a portion of the leather you may finish with the leather being a different colour when it dries or the solubles in the leather forming a tide mark at the transition point.
Room temperature water is fine. Reason: I know of no advantage of warm water. Real disadvantage if the temp is over 70C as it changes the cell structures.
On LFGSS Skully used to do some work, and he used a bike chain link to hold the skirts together.
Sadly, over time the photo links are being lost. He also had some on a blog
It will be interesting to see if the impression created by the CO2 cartridge lasts with use.
Please take photos and keep the thread updated.
And use a very sharp blade to cut the leather.
You might get some gum tragacanth to burnish the cut edges.
Room temperature water is fine. Reason: I know of no advantage of warm water. Real disadvantage if the temp is over 70C as it changes the cell structures.
On LFGSS Skully used to do some work, and he used a bike chain link to hold the skirts together.
Sadly, over time the photo links are being lost. He also had some on a blog
It will be interesting to see if the impression created by the CO2 cartridge lasts with use.
Please take photos and keep the thread updated.
And use a very sharp blade to cut the leather.
You might get some gum tragacanth to burnish the cut edges.
08-26-17 | 02:37 PM
#9
Full Member
Joined: Jun 2015
Posts: 432
Likes: 7
From: Houston, TX
Bikes: Trek 510, Dahon Classic III, Specialized Tricross, Raleigh Technium 460
I'm also interested to see how the relief impression holds up with use. I suspect the saddle will want to straighten itself out from stretching. Would be a good experiment as an alternative to cutting a relief channel.
08-26-17 | 02:51 PM
#10

Bianchi Goddess


Joined: Apr 2009
Posts: 28,962
Likes: 4,229
From: Shady Pines Retirement Fort Wayne, In
Bikes: Too many to list here check my signature.
Your plan to join the flaps on the underside will work, although you may want to consider the curvature lines to be more gradual. This is what mine ended up looking like after I replaced my Brooks leather. I did this a couple of years ago and it was quite tedious, but one hell of an awesome learning experience.
https://www.bikeforums.net/classic-vi...fessional.html
https://www.bikeforums.net/classic-vi...fessional.html
__________________
“One morning you wake up, the girl is gone, the bikes are gone, all that's left behind is a pair of old tires and a tube of tubular glue, all squeezed out"
Sugar "Kane" Kowalczyk
“One morning you wake up, the girl is gone, the bikes are gone, all that's left behind is a pair of old tires and a tube of tubular glue, all squeezed out"
Sugar "Kane" Kowalczyk
08-26-17 | 08:31 PM
#11


multimodal commuter
Joined: Nov 2006
Posts: 19,810
Likes: 597
From: NJ, NYC, LI
Bikes: 1940s Fothergill, 1959 Allegro Special, 1963? Claud Butler Olympic Sprint, Lambert 'Clubman', 1974 Fuji "the Ace", 1976 Holdsworth 650b conversion rando bike, 1983 Trek 720 tourer, 1984 Counterpoint Opus II, 1993 Basso Gap, 2010 Downtube 8h, and...
I agree with [MENTION=185335]Big Block[/MENTION] about water temperature.
And I'd probably soak the leather, or at least immerse it repeatedly; you will need a lot of water to soften it enough. If you want I can send you a pattern of what to cut.
That said, I don't think it's a good idea. You're basically trying to do two things; (1) forming a recess in the top is a variation on the"imperial" theme, and (2)cutting the sides and connecting remaining bit is the classic "swallow" treatment. I don't think you can imperialize it after you swallowize it, so if you want to do both, do the recess first.
To make the imperialesque recess, you will need pressure from both sides; the dowel you mention to press down, okay, but also a symmetrically placed pair underneath to support the edges. This is not going to be easy. The leather will have to become really really soft, and even so it will require a great deal of pressure. If the leather is at all compromised by age etc, it's going to tear.
If you can successfully imperialize your saddle, i suggest you let it dry and try riding it before attempting the next step. At least, that is how I would do it if i would do it; but honestly I wouldn't do it.
And I'd probably soak the leather, or at least immerse it repeatedly; you will need a lot of water to soften it enough. If you want I can send you a pattern of what to cut.
That said, I don't think it's a good idea. You're basically trying to do two things; (1) forming a recess in the top is a variation on the"imperial" theme, and (2)cutting the sides and connecting remaining bit is the classic "swallow" treatment. I don't think you can imperialize it after you swallowize it, so if you want to do both, do the recess first.
To make the imperialesque recess, you will need pressure from both sides; the dowel you mention to press down, okay, but also a symmetrically placed pair underneath to support the edges. This is not going to be easy. The leather will have to become really really soft, and even so it will require a great deal of pressure. If the leather is at all compromised by age etc, it's going to tear.
If you can successfully imperialize your saddle, i suggest you let it dry and try riding it before attempting the next step. At least, that is how I would do it if i would do it; but honestly I wouldn't do it.
08-26-17 | 08:45 PM
#12

Señor Member


Joined: Oct 2004
Posts: 18,481
Likes: 1,565
From: Hardy, VA
Bikes: Mostly English - predominantly Raleighs
I agree with @Big Block about water temperature.
And I'd probably soak the leather, or at least immerse it repeatedly; you will need a lot of water to soften it enough. If you want I can send you a pattern of what to cut.
That said, I don't think it's a good idea. You're basically trying to do two things; (1) forming a recess in the top is a variation on the"imperial" theme, and (2)cutting the sides and connecting remaining bit is the classic "swallow" treatment. I don't think you can imperialize it after you swallowize it, so if you want to do both, do the recess first.
To make the imperialesque recess, you will need pressure from both sides; the dowel you mention to press down, okay, but also a symmetrically placed pair underneath to support the edges. This is not going to be easy. The leather will have to become really really soft, and even so it will require a great deal of pressure. If the leather is at all compromised by age etc, it's going to tear.
If you can successfully imperialize your saddle, i suggest you let it dry and try riding it before attempting the next step. At least, that is how I would do it if i would do it; but honestly I wouldn't do it.
And I'd probably soak the leather, or at least immerse it repeatedly; you will need a lot of water to soften it enough. If you want I can send you a pattern of what to cut.
That said, I don't think it's a good idea. You're basically trying to do two things; (1) forming a recess in the top is a variation on the"imperial" theme, and (2)cutting the sides and connecting remaining bit is the classic "swallow" treatment. I don't think you can imperialize it after you swallowize it, so if you want to do both, do the recess first.
To make the imperialesque recess, you will need pressure from both sides; the dowel you mention to press down, okay, but also a symmetrically placed pair underneath to support the edges. This is not going to be easy. The leather will have to become really really soft, and even so it will require a great deal of pressure. If the leather is at all compromised by age etc, it's going to tear.
If you can successfully imperialize your saddle, i suggest you let it dry and try riding it before attempting the next step. At least, that is how I would do it if i would do it; but honestly I wouldn't do it.
I saw the thread title and the initial post and was going to say "soak it".
I have an Imperial, and have found that (at least in my opinion), it is improved by adding elastic lacing. No need whatsoever to stitch the saddle together at the bottom. Instead, small perforations along the bottom of the side flaps and then lace with elastic cord and one of the little plastic push/slide devices like those that come on the waist or hood of garments designed to withstand weather.
__________________
In search of what to search for.
In search of what to search for.
08-27-17 | 06:01 PM
#13
Thread Starter
Senior Member
Joined: Apr 2013
Posts: 1,662
Likes: 46
From: Amsterdam
Bikes: 1980 Koga-Miyata Gentsluxe-S, 1998 Eddy Merckx Corsa 01, 1983 Tommasini Racing, 2012 Gulf Western CAAD10, 1980 Univega Gran Premio
I agree with @Big Block about water temperature.
And I'd probably soak the leather, or at least immerse it repeatedly; you will need a lot of water to soften it enough. If you want I can send you a pattern of what to cut.
That said, I don't think it's a good idea. You're basically trying to do two things; (1) forming a recess in the top is a variation on the"imperial" theme, and (2)cutting the sides and connecting remaining bit is the classic "swallow" treatment. I don't think you can imperialize it after you swallowize it, so if you want to do both, do the recess first.
To make the imperialesque recess, you will need pressure from both sides; the dowel you mention to press down, okay, but also a symmetrically placed pair underneath to support the edges. This is not going to be easy. The leather will have to become really really soft, and even so it will require a great deal of pressure. If the leather is at all compromised by age etc, it's going to tear.
If you can successfully imperialize your saddle, i suggest you let it dry and try riding it before attempting the next step. At least, that is how I would do it if i would do it; but honestly I wouldn't do it.
And I'd probably soak the leather, or at least immerse it repeatedly; you will need a lot of water to soften it enough. If you want I can send you a pattern of what to cut.
That said, I don't think it's a good idea. You're basically trying to do two things; (1) forming a recess in the top is a variation on the"imperial" theme, and (2)cutting the sides and connecting remaining bit is the classic "swallow" treatment. I don't think you can imperialize it after you swallowize it, so if you want to do both, do the recess first.
To make the imperialesque recess, you will need pressure from both sides; the dowel you mention to press down, okay, but also a symmetrically placed pair underneath to support the edges. This is not going to be easy. The leather will have to become really really soft, and even so it will require a great deal of pressure. If the leather is at all compromised by age etc, it's going to tear.
If you can successfully imperialize your saddle, i suggest you let it dry and try riding it before attempting the next step. At least, that is how I would do it if i would do it; but honestly I wouldn't do it.
I saw the thread title and the initial post and was going to say "soak it".
I have an Imperial, and have found that (at least in my opinion), it is improved by adding elastic lacing. No need whatsoever to stitch the saddle together at the bottom. Instead, small perforations along the bottom of the side flaps and then lace with elastic cord and one of the little plastic push/slide devices like those that come on the waist or hood of garments designed to withstand weather.
I have an Imperial, and have found that (at least in my opinion), it is improved by adding elastic lacing. No need whatsoever to stitch the saddle together at the bottom. Instead, small perforations along the bottom of the side flaps and then lace with elastic cord and one of the little plastic push/slide devices like those that come on the waist or hood of garments designed to withstand weather.
09-10-17 | 07:59 AM
#14
Thread Starter
Senior Member
Joined: Apr 2013
Posts: 1,662
Likes: 46
From: Amsterdam
Bikes: 1980 Koga-Miyata Gentsluxe-S, 1998 Eddy Merckx Corsa 01, 1983 Tommasini Racing, 2012 Gulf Western CAAD10, 1980 Univega Gran Premio
I've now cut the saddle sides, using a "delux" snap-off utility knife. I'm glad I paid the $2 extra for the more comfortable handle. It took a lot of eyeballing and remeasuring to try to get the template I made with painter's tape symmetrical, and it helped to have a photo of a template of the pattern for a new, flat piece of leather from Rudi.


After I cut the sides, I used the Dremel to cut off the bag loops and trim the leather in the rear to be flush with the bottom of the Brooks plate. I know I'll never use that kind of saddle bag, and I like the idea of the saddle looking as svelte as possible. I also used the Dremel to clean up the cut edges a bit, but there's more of that to do later, especially around the flap that will be pulled under. I'll trim the ends of the flaps so they butt against each other after it's been soaked and shaped.


Rudi suggested I cut a groove on the inside of the leather, where the flaps will fold, and was kind enough to send me the tool to do it. Thank you [MENTION=73614]rhm[/MENTION]! I'll be sending it back shortly. It was a little tricky, but I put down more painter's tape to create a guide, and made the groove along the edge of the tape. This is a step that I don't think I've seen done in other Brooks B17-to-Swallow butchering guides, but it makes sense that it will help get a nice clean fold. I didn't want to groove too deeply - I aimed for about 1/3 of the way through, but it's probably ended up more like a 1/4 deep groove.

Next is the soaking and shaping and clamping the flaps underneath while they dry. I'm thinking before that I'll prime and paint the cut steel where I cut the bag tabs.
After I cut the sides, I used the Dremel to cut off the bag loops and trim the leather in the rear to be flush with the bottom of the Brooks plate. I know I'll never use that kind of saddle bag, and I like the idea of the saddle looking as svelte as possible. I also used the Dremel to clean up the cut edges a bit, but there's more of that to do later, especially around the flap that will be pulled under. I'll trim the ends of the flaps so they butt against each other after it's been soaked and shaped.
Rudi suggested I cut a groove on the inside of the leather, where the flaps will fold, and was kind enough to send me the tool to do it. Thank you [MENTION=73614]rhm[/MENTION]! I'll be sending it back shortly. It was a little tricky, but I put down more painter's tape to create a guide, and made the groove along the edge of the tape. This is a step that I don't think I've seen done in other Brooks B17-to-Swallow butchering guides, but it makes sense that it will help get a nice clean fold. I didn't want to groove too deeply - I aimed for about 1/3 of the way through, but it's probably ended up more like a 1/4 deep groove.
Next is the soaking and shaping and clamping the flaps underneath while they dry. I'm thinking before that I'll prime and paint the cut steel where I cut the bag tabs.
Save
09-10-17 | 08:25 AM
#16

Bike Butcher of Portland
Joined: Jul 2014
Posts: 12,486
Likes: 8,054
From: Portland, OR
Bikes: It's complicated.
I agree with [MENTION=185335]Big Block[/MENTION] about water temperature.
And I'd probably soak the leather, or at least immerse it repeatedly; you will need a lot of water to soften it enough. If you want I can send you a pattern of what to cut.
That said, I don't think it's a good idea. You're basically trying to do two things; (1) forming a recess in the top is a variation on the"imperial" theme, and (2)cutting the sides and connecting remaining bit is the classic "swallow" treatment. I don't think you can imperialize it after you swallowize it, so if you want to do both, do the recess first.
To make the imperialesque recess, you will need pressure from both sides; the dowel you mention to press down, okay, but also a symmetrically placed pair underneath to support the edges. This is not going to be easy. The leather will have to become really really soft, and even so it will require a great deal of pressure. If the leather is at all compromised by age etc, it's going to tear.
If you can successfully imperialize your saddle, i suggest you let it dry and try riding it before attempting the next step. At least, that is how I would do it if i would do it; but honestly I wouldn't do it.
And I'd probably soak the leather, or at least immerse it repeatedly; you will need a lot of water to soften it enough. If you want I can send you a pattern of what to cut.
That said, I don't think it's a good idea. You're basically trying to do two things; (1) forming a recess in the top is a variation on the"imperial" theme, and (2)cutting the sides and connecting remaining bit is the classic "swallow" treatment. I don't think you can imperialize it after you swallowize it, so if you want to do both, do the recess first.
To make the imperialesque recess, you will need pressure from both sides; the dowel you mention to press down, okay, but also a symmetrically placed pair underneath to support the edges. This is not going to be easy. The leather will have to become really really soft, and even so it will require a great deal of pressure. If the leather is at all compromised by age etc, it's going to tear.
If you can successfully imperialize your saddle, i suggest you let it dry and try riding it before attempting the next step. At least, that is how I would do it if i would do it; but honestly I wouldn't do it.
__________________
If someone tells you that you have enough bicycles and you don't need any more, stop talking to them. You don't need that kind of negativity in your life.
If someone tells you that you have enough bicycles and you don't need any more, stop talking to them. You don't need that kind of negativity in your life.
09-10-17 | 09:39 AM
#17

Senior Member
Joined: Nov 2003
Posts: 5,366
Likes: 629
From: Soviet of Oregon or Pensacola FL
Bikes: Still have a few left!
Appreciated this thread and thought I'd contribute my experience. Inspired by a vintage bike display at my LBS in Olympia, WA, I took X-acto knife in hand, to carve up a nicely broken-in B17 into a copy of the "Swallowesque" saddle seen on a French bike.
The saddle I copied was made without any stitched together leather flaps in the center tho, and I only became aware of them a few years later when I saw a real Swallow.
I expected mine to sag, since it was one of the basic Brooks, made of thinner leather that had broke in quickly. But after some 15 years, it hasn't. Maybe because I'm small and even in "fat old man" trim, only weight 150 pounds. Here are 2 pics taken in July this year. Don
The saddle I copied was made without any stitched together leather flaps in the center tho, and I only became aware of them a few years later when I saw a real Swallow.
I expected mine to sag, since it was one of the basic Brooks, made of thinner leather that had broke in quickly. But after some 15 years, it hasn't. Maybe because I'm small and even in "fat old man" trim, only weight 150 pounds. Here are 2 pics taken in July this year. Don
09-10-17 | 12:49 PM
#18
Thread Starter
Senior Member
Joined: Apr 2013
Posts: 1,662
Likes: 46
From: Amsterdam
Bikes: 1980 Koga-Miyata Gentsluxe-S, 1998 Eddy Merckx Corsa 01, 1983 Tommasini Racing, 2012 Gulf Western CAAD10, 1980 Univega Gran Premio
Appreciated this thread and thought I'd contribute my experience. Inspired by a vintage bike display at my LBS in Olympia, WA, I took X-acto knife in hand, to carve up a nicely broken-in B17 into a copy of the "Swallowesque" saddle seen on a French bike.
The saddle I copied was made without any stitched together leather flaps in the center tho, and I only became aware of them a few years later when I saw a real Swallow.
I expected mine to sag, since it was one of the basic Brooks, made of thinner leather that had broke in quickly. But after some 15 years, it hasn't. Maybe because I'm small and even in "fat old man" trim, only weight 150 pounds. Here are 2 pics taken in July this year. Don
The saddle I copied was made without any stitched together leather flaps in the center tho, and I only became aware of them a few years later when I saw a real Swallow.
I expected mine to sag, since it was one of the basic Brooks, made of thinner leather that had broke in quickly. But after some 15 years, it hasn't. Maybe because I'm small and even in "fat old man" trim, only weight 150 pounds. Here are 2 pics taken in July this year. Don
I'm struck also by how much you trimmed from the middle side section - there's barely any vertical side left in the middle. It looks great that way. Doing the flaps definitely adds a significant amount of time to this process. If this works well for me, and I want a butchered Brooks for a second bike, I may do the next one with a Brooks Pro the way you did - just chop the excess off.
09-10-17 | 01:46 PM
#19
Senior Member
Joined: Nov 2003
Posts: 5,366
Likes: 629
From: Soviet of Oregon or Pensacola FL
Bikes: Still have a few left!
Thanks. I do think rider weight plays a role, and middle support is probably best way to go. I sent a post into Brooks' web site years ago. It was up for a while, don't know if still there. Don
09-10-17 | 02:27 PM
#20
Senior Member
Joined: Nov 2003
Posts: 5,366
Likes: 629
From: Soviet of Oregon or Pensacola FL
Bikes: Still have a few left!
I checked out the Brooks website and did a search on "butchered Brooks" but got nada. Looks like our DIY approach to a Swallow will remain in the hands of those who can, and do! Don
09-18-17 | 12:41 PM
#21
Thread Starter
Senior Member
Joined: Apr 2013
Posts: 1,662
Likes: 46
From: Amsterdam
Bikes: 1980 Koga-Miyata Gentsluxe-S, 1998 Eddy Merckx Corsa 01, 1983 Tommasini Racing, 2012 Gulf Western CAAD10, 1980 Univega Gran Premio
I'm finally ready for a test ride! After detensioning the bolt, I soaked the saddle in room temp. water for about 20 hours. I wasn't sure how soft and floppy the leather should be, but figured that should be enough. The flaps were pretty flexible, but hardly floppy. I probably could have left it in the bucket for another night, but I wanted to get on with this. I'm glad I got the craving tool from Rudi and cut a groove where the flaps should fold - I think that definitely helped getting a fairly tight fold. Oh, and the water in the bucket came out the color of cola. A lot of dye came out, that's for sure
I folded the flaps under and clamped them loosely, then used rope to snug the sides together, and reclamped it tight. After about an hour I took the rope off, as the clamp was holding the shape well. I left it like that for a couple of days. I was in no hurry, since I had waited to order Proofide and wanted to apply that to the underside before I laced the flaps together.

After that arrived, I removed the clamps, trimmed the flaps, hit them with a dremel to smooth the edges a bit, and drilled 4 holes (without any attempt at making them perfectly symmetrical). Proofide was applied to both the underside, the top, and the edges. Then I put the zip ties in, feeding the long ends out the vent holes on top, which happily lined up rather well, and allowed me to easily pull the zip ties tight.
 [/url]
I took the "after" photos without buffing the saddle. After buffing, it's still a little duller than it was, but also looks less worn (less contrast between shiny parts and weathered parts). The wetting/drying process clearly shrank the leather - there's a lot less sag lenght wise, and the right/left asymmetry is less pronounced.
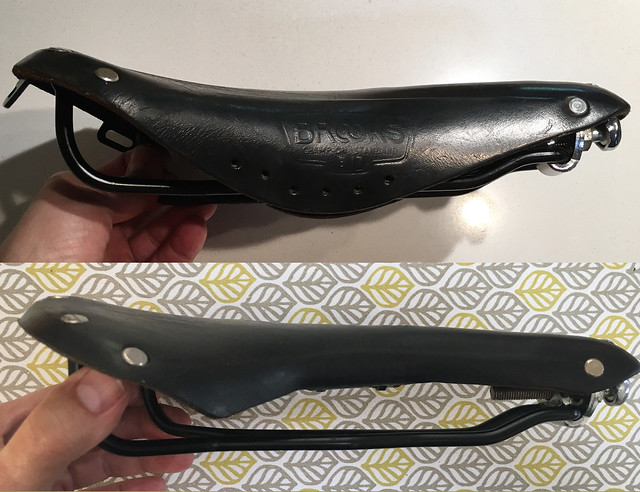
It feels quite taut even without touching the adjustment bolt.

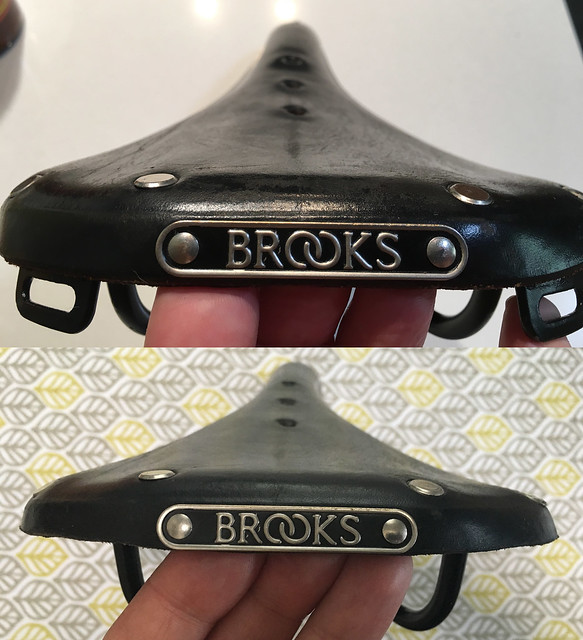
My goal, aside from making the saddle cooler looking, was to reduce the middle width section where it was jamming into my thighs. I used calipers to measure the width at each of the 3 vent holes, perpendicular to the long axis. Here are the widths before/after cutting and soaking/after tying the flaps (and final difference) in mm:
Front hole: 61.4/49.6/44.5 (-16.9mm)
Middle hole: 89.3/82.0/67.3 (-22.0mm)
Rear hole: 135.4/134.7/126.9 (-5.5mm)
I measured before lacing the flaps because I was curious how much effect that had on the final width, knowing that some people who do this don't bother with the flaps. It made the most difference in the middle section, as one would expect. And, for the weight weenies, it went from about 520 gm to 486 gm.
I folded the flaps under and clamped them loosely, then used rope to snug the sides together, and reclamped it tight. After about an hour I took the rope off, as the clamp was holding the shape well. I left it like that for a couple of days. I was in no hurry, since I had waited to order Proofide and wanted to apply that to the underside before I laced the flaps together.
After that arrived, I removed the clamps, trimmed the flaps, hit them with a dremel to smooth the edges a bit, and drilled 4 holes (without any attempt at making them perfectly symmetrical). Proofide was applied to both the underside, the top, and the edges. Then I put the zip ties in, feeding the long ends out the vent holes on top, which happily lined up rather well, and allowed me to easily pull the zip ties tight.
[/url]I took the "after" photos without buffing the saddle. After buffing, it's still a little duller than it was, but also looks less worn (less contrast between shiny parts and weathered parts). The wetting/drying process clearly shrank the leather - there's a lot less sag lenght wise, and the right/left asymmetry is less pronounced.
It feels quite taut even without touching the adjustment bolt.
My goal, aside from making the saddle cooler looking, was to reduce the middle width section where it was jamming into my thighs. I used calipers to measure the width at each of the 3 vent holes, perpendicular to the long axis. Here are the widths before/after cutting and soaking/after tying the flaps (and final difference) in mm:
Front hole: 61.4/49.6/44.5 (-16.9mm)
Middle hole: 89.3/82.0/67.3 (-22.0mm)
Rear hole: 135.4/134.7/126.9 (-5.5mm)
I measured before lacing the flaps because I was curious how much effect that had on the final width, knowing that some people who do this don't bother with the flaps. It made the most difference in the middle section, as one would expect. And, for the weight weenies, it went from about 520 gm to 486 gm.
Save
Save
Save
09-18-17 | 11:48 PM
#22
Senior Member
Joined: Jan 2010
Posts: 813
Likes: 170
From: Adelaide, Australia
You wrote that the colour of the water was like cola. More like a cup of tea. You soaked tannins out of the leather.
In vegetable tanned leather, the hide is treated with vegetable tannins to stabilise the final product. The use of tannins and the similarity to the word tanning is no coincidence.
This process takes a considerable period of time to achieve.
https://en.m.wikipedia.org/wiki/Tann...etable_tanning
I wrote earlier than one hour in the water was sufficient. One hour (or until the are no more bubbles rising) gets the leather pliable without excessive removal of the tannins.
Rudi may post a link to the articles I have sent him on this topic.
With the loss of the tannins, I am unsure how the leather will now react.
I have some more saddles to recover soon for my own use. One hour will be the immersion time for the leather.
In vegetable tanned leather, the hide is treated with vegetable tannins to stabilise the final product. The use of tannins and the similarity to the word tanning is no coincidence.
This process takes a considerable period of time to achieve.
https://en.m.wikipedia.org/wiki/Tann...etable_tanning
I wrote earlier than one hour in the water was sufficient. One hour (or until the are no more bubbles rising) gets the leather pliable without excessive removal of the tannins.
Rudi may post a link to the articles I have sent him on this topic.
With the loss of the tannins, I am unsure how the leather will now react.
I have some more saddles to recover soon for my own use. One hour will be the immersion time for the leather.
09-19-17 | 01:05 PM
#24
Thread Starter
Senior Member
Joined: Apr 2013
Posts: 1,662
Likes: 46
From: Amsterdam
Bikes: 1980 Koga-Miyata Gentsluxe-S, 1998 Eddy Merckx Corsa 01, 1983 Tommasini Racing, 2012 Gulf Western CAAD10, 1980 Univega Gran Premio
You wrote that the colour of the water was like cola. More like a cup of tea. You soaked tannins out of the leather.
I wrote earlier than one hour in the water was sufficient. One hour (or until the are no more bubbles rising) gets the leather pliable without excessive removal of the tannins.
Rudi may post a link to the articles I have sent him on this topic.
With the loss of the tannins, I am unsure how the leather will now react.
I have some more saddles to recover soon for my own use. One hour will be the immersion time for the leather.
I wrote earlier than one hour in the water was sufficient. One hour (or until the are no more bubbles rising) gets the leather pliable without excessive removal of the tannins.
Rudi may post a link to the articles I have sent him on this topic.
With the loss of the tannins, I am unsure how the leather will now react.
I have some more saddles to recover soon for my own use. One hour will be the immersion time for the leather.
I initially soaked only the flaps, up to the groove that marked where the folding would happen, for about 2 hours. Then I tested, and I was surprised how stiff the flaps remained. I had read that the leather should be pliable, or bending would break the fibers, and these did not feel at all pliable to me. Perhaps my expectations were off, but the leather really didn't seem amenable to changing it's shape. That's when I put it in a small bucket, and left it for another 18 hours, while checking about every 4-8 hours. I did not see any little bubbles coming from the leather at any point in the process. By the way, if I repeat this process on a new saddle, that doesn't need to be entirely reblocked, I would only soak the flaps up the the fold point, and avoid this issue.
I read in an article on how Brooks makes their saddles that they have experts with 15-20 years of experience "reading" wet leather who decide how long an individual piece of leather is soaked in water before it can be shaped. Apparently there is considerable variation here, but the article didn't mention how great that variation may be.
This was an old, misshaped saddle. It is on one of the 3 bikes I regularly ride, and will see perhaps 500 miles/yr of use. I weight 150-155#, and ride on smooth pavement. There's the possibility that I've excessively weakened this saddle, and that it will soon fail, but this would surprise me. I've read of others who have soaked old Brooks saddles literally for days, and reblocked them, and used them for years, sometimes on mountain bikes, without apparent problems. I expect this saddle to be fine for years to come.
If I want to kill some time, I might take the pieces of leather I cut off before soaking and soak them for variable times, then fold them 90 degrees and let them dry, and see if I can tell any difference in stiffness, etc. I'll be interested in how your experiments go, though it sounds like you're doing something completely different (i.e., recovering saddle frames with new leather, vs. reblocking and trimming original leather while it remains mounted on the frame.)
09-19-17 | 01:57 PM
#25
Senior Member
Joined: Jan 2010
Posts: 813
Likes: 170
From: Adelaide, Australia
The new leather I use is 7mm thick. The 'Professional' model leather is only 5mm.
Yet an hour is sufficient for my vacuum forming.
I doubt that Brooks would use a water soluble dye for a saddle. But I don't know.
If you look at the videos of the making of the saddles, there is no evidence of each cut being inspected midway through the immersion.
And with the massive presses they use, there is no need. More marketing spin.
Partial immersion will lead to a shore line, as I have written before. This is not normally sought after.
I have the advantage of working with new leather where the leather hasn't been filled with unknown treatments.
Yet an hour is sufficient for my vacuum forming.
I doubt that Brooks would use a water soluble dye for a saddle. But I don't know.
If you look at the videos of the making of the saddles, there is no evidence of each cut being inspected midway through the immersion.
And with the massive presses they use, there is no need. More marketing spin.
Partial immersion will lead to a shore line, as I have written before. This is not normally sought after.
I have the advantage of working with new leather where the leather hasn't been filled with unknown treatments.