


What to do with this Monark?
 12-01-17 | 09:05 PM
#26

Senior Member

Joined: Feb 2013
Posts: 15,369
Likes: 4,391
From: Alta California
-----
As regards colour -
Note how as the eye vectors northward from the crown race seat toward the threads the hue transits from deep green to pastel blue.
Other loci to examine -
interior of head tube
interior of shell
interior of seat binder ears
interior of seat tube at seat lug
---
Who knows, you may have the first green 319/320 frameset on record!
-----
 12-02-17 | 10:27 AM
#27
Thread Starter
Senior Member
Joined: Jun 2013
Posts: 1,345
Likes: 200
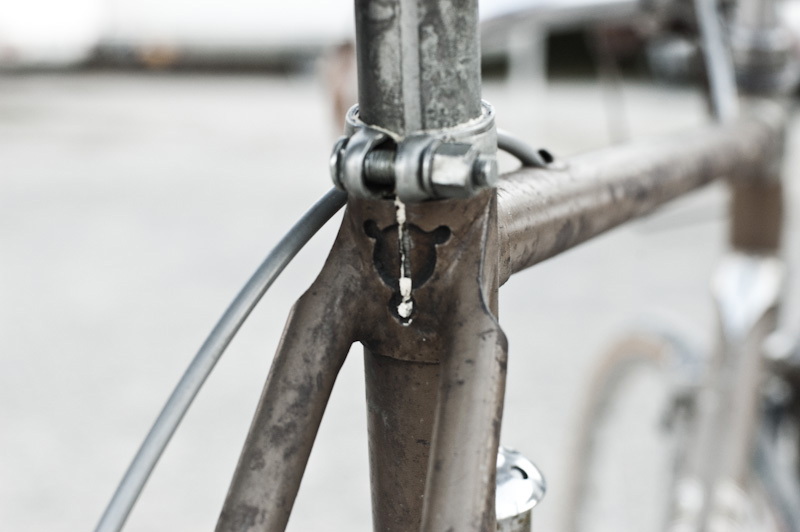
Thank you. So here are some photos of those other areas you suggested to check. All have that same matallic green on them. I don't see any trace of blue anywhere. What do you think? Is that primer/undercoating or the real color?
?
?
12-02-17 | 11:19 AM
#28
Senior Member
Joined: Feb 2013
Posts: 15,369
Likes: 4,391
From: Alta California
-----
Thank you for your examination and for these good detail images.
The green is definitely colour rather than undercoat or primer.
One additional place for confirmation you can check is beneath the head enblem. It appears this was not removed when red finish was applied so we would expect to see the original finish there.
Returning to steerer for a moment -
the whitish colour just below the threads is curious. it is not the colour of a primer but could be a base coat for a flambouyant finish. do the places where the green shows up the best show it to be a flambouyant?

in this chainstay image the contrasting colour shows on my monitor as a blue close to the Monark blue. is this how it appears in person?

in this image it appears there may be a crack in the backside of the seat tube just below the seat lug. is that how it appears in person or is it perhaps just a scratch in the finish?

you have mentioned you would like to do a refinish and apply the correct transfer set. if you were to go forward with this i would suggest removal of all the braze-ons first. just me humble opinion.
-----
Thank you for your examination and for these good detail images.
The green is definitely colour rather than undercoat or primer.
One additional place for confirmation you can check is beneath the head enblem. It appears this was not removed when red finish was applied so we would expect to see the original finish there.
Returning to steerer for a moment -
the whitish colour just below the threads is curious. it is not the colour of a primer but could be a base coat for a flambouyant finish. do the places where the green shows up the best show it to be a flambouyant?
in this chainstay image the contrasting colour shows on my monitor as a blue close to the Monark blue. is this how it appears in person?
in this image it appears there may be a crack in the backside of the seat tube just below the seat lug. is that how it appears in person or is it perhaps just a scratch in the finish?
you have mentioned you would like to do a refinish and apply the correct transfer set. if you were to go forward with this i would suggest removal of all the braze-ons first. just me humble opinion.
-----
12-02-17 | 04:23 PM
#29
Thread Starter
Senior Member
Joined: Jun 2013
Posts: 1,345
Likes: 200
The chainstay is the same green color showing through as the rest of the frame. It's not blue. Thats one reason I had stated it was a poor quality respray. That and all the think paint obscuring the lug detail. I understand about removing all the braze-ons to make it period correct, and I have brazed a whole frame frame from scratch before, but that would also involve filling where the bottle mounts are. I'm not sure I want to do all that. However, I sure wish to take a dremil or file and clean up the brazing as is. Then strip it down to bare metal, paint it the same green, and maybe outline the lugs in gold with a very fine brush. Then repaint the headbadge white and metal color. I don't however wish to destroy history. So, I'm kinda on the fence about everything. I wish I knew if the serial number meant anything. Thank you for your information.
12-02-17 | 05:20 PM
#30
Senior Member

Joined: Nov 2013
Posts: 2,399
Likes: 1,572
From: Near Pottstown, PA: 30 miles NW of Philadelphia
Bikes: 2 Trek Mtn, Cannondale R600 road, 6 vintage road bikes
Please post a photo of the back of the seat lug, showing the slot for tightening the lug around the post. In a recent Crescent thread there was discussion about the location of the stress relief hole at the bottom of that slot. Off center due to sloppy workmanship or intentionally off center, lined up with one edge of the slot. thanks.
12-02-17 | 05:21 PM
#31
Senior Member
Joined: Feb 2013
Posts: 15,369
Likes: 4,391
From: Alta California
-----
Monark marque history page here:
https://www.cykelaffaren.se/page/monark
Swedish bicycle history site:
https://register.cykelhistoriska.se/
In case you have not as yet run across it this page gives model numbers and specifications in crosstable format for Crescent badged machines 1959-1980:
https://cykelhistoriska.se/old/pepitalista.html
Have thus far been unable to find information of Monark of Sweden serial numbers.
Awaiting arrival of member [MENTION=436667]styggno1[/MENTION] who is sure to be able to enlighten... (pm sent a few days back)
-----
Last edited by juvela; 12-02-17 at 05:58 PM. Reason: spellin'
12-02-17 | 08:53 PM
#32
Senior Member
Joined: Feb 2013
Posts: 15,369
Likes: 4,391
From: Alta California
-----
shell -
some time during the 1960's a change of shell was made by Varberg for the model 319/320 from NERVEX Professional to Agrati. do not know a specific year for this. find it interesting to note that while your example is early enough to exhibit the track style crown it is late enough to have the Agrati shell.
this bicycle cited previously is sufficiently early to wear the NERVEX shell -


---
headplate finish -
when one gets back into the 1950's many Monark badged cycles came through with bare aluminum emblems - no contrasting white paint. this machine is dated 1953:

-----
shell -
some time during the 1960's a change of shell was made by Varberg for the model 319/320 from NERVEX Professional to Agrati. do not know a specific year for this. find it interesting to note that while your example is early enough to exhibit the track style crown it is late enough to have the Agrati shell.
this bicycle cited previously is sufficiently early to wear the NERVEX shell -
---
headplate finish -
when one gets back into the 1950's many Monark badged cycles came through with bare aluminum emblems - no contrasting white paint. this machine is dated 1953:
-----
12-03-17 | 08:26 AM
#33
Thread Starter
Senior Member
Joined: Jun 2013
Posts: 1,345
Likes: 200
Please post a photo of the back of the seat lug, showing the slot for tightening the lug around the post. In a recent Crescent thread there was discussion about the location of the stress relief hole at the bottom of that slot. Off center due to sloppy workmanship or intentionally off center, lined up with one edge of the slot. thanks.


 12-04-17 | 03:25 PM
#36
Senior Member
Joined: Nov 2013
Posts: 2,399
Likes: 1,572
From: Near Pottstown, PA: 30 miles NW of Philadelphia
Bikes: 2 Trek Mtn, Cannondale R600 road, 6 vintage road bikes
Monarchs and Crescents were made in the same shop. I still wonder if the variations were planned or were workmanship issues. More data!
12-04-17 | 03:40 PM
#37
Senior Member
Joined: Feb 2013
Posts: 15,369
Likes: 4,391
From: Alta California
Keep in mind that frame under discussion is some years earlier than yours.
Some of the variations through time in model 319/320 frames are discussed on this enthusiast's page:
https://www.cykelhobby.com/92320ident.htm
Readers with an interest in Swedish cycles may wish to begin an exploration at the home page:
https://www.cykelhobby.com/
Cinelli seemed to have a strong belief in drilling holes in this spot to get rid of stress risers. Here is an early 1950's example with three holes:
-----
Last edited by juvela; 12-05-17 at 09:31 AM. Reason: add image
12-05-17 | 05:51 AM
#38
Senior Member
Joined: Nov 2013
Posts: 2,399
Likes: 1,572
From: Near Pottstown, PA: 30 miles NW of Philadelphia
Bikes: 2 Trek Mtn, Cannondale R600 road, 6 vintage road bikes
-----
Keep in mind that frame under discussion is some years earlier than yours.
Some of the variations through time in model 319/320 frames are discussed on this enthusiast's page:
Crescent racer modell 92320--
Keep in mind that frame under discussion is some years earlier than yours.
Some of the variations through time in model 319/320 frames are discussed on this enthusiast's page:
Crescent racer modell 92320--
12-05-17 | 06:35 AM
#39
ambulatory senior

Joined: Dec 2016
Posts: 6,451
Likes: 4,515
From: Peoria Il
Bikes: Austro Daimler modified by Gugie! Raleigh Professional and lots of other bikes.
12-05-17 | 04:34 PM
#40
Thread Starter
Senior Member
Joined: Jun 2013
Posts: 1,345
Likes: 200
I stripped the frame. That's a tedious and thankless job if you have never done it. Especially when you drip some of that stripper on the dorsal aspect of your bare foot. Yikes! Anyhow, the detail is nice and yes that sure does look like aftermarket work for those braze-ons.


