


Fuji cranks and chainrings
 12-13-20 | 11:26 AM
#1
Thread Starter
Junior Member

Joined: Sep 2020
Posts: 87
Likes: 19
Fuji cranks and chainrings
My Fuji Gran Tourer has a section of the big chainring where some of the gear teeth are a bit janky. It looks like the outer chainring was knocked or dragged against something at some point. This is the only part the looks like this. The rest of the big chainring and the small chainring have the same even-looking level of wear.
At what point is a chain ring due for replacing? Does the wear here look like it’s causing performance issues?
Also, will the driveside crank disconnect from the chainring? I love the pantographed Fuji cranks and would love to reuse them if and when I get new chainrings.
The bottom bracket probably needs replacing or repacking. (Easier just to replace, no?) Now that I have the drive train disassembled to refurbish the derailleurs I can tell that the BB bearings are pretty noisy (clicking sounds) and there’s a weird resistance accompanied by a sort of sliding sound that comes and goes at irregular intervals when spinning the cranks.

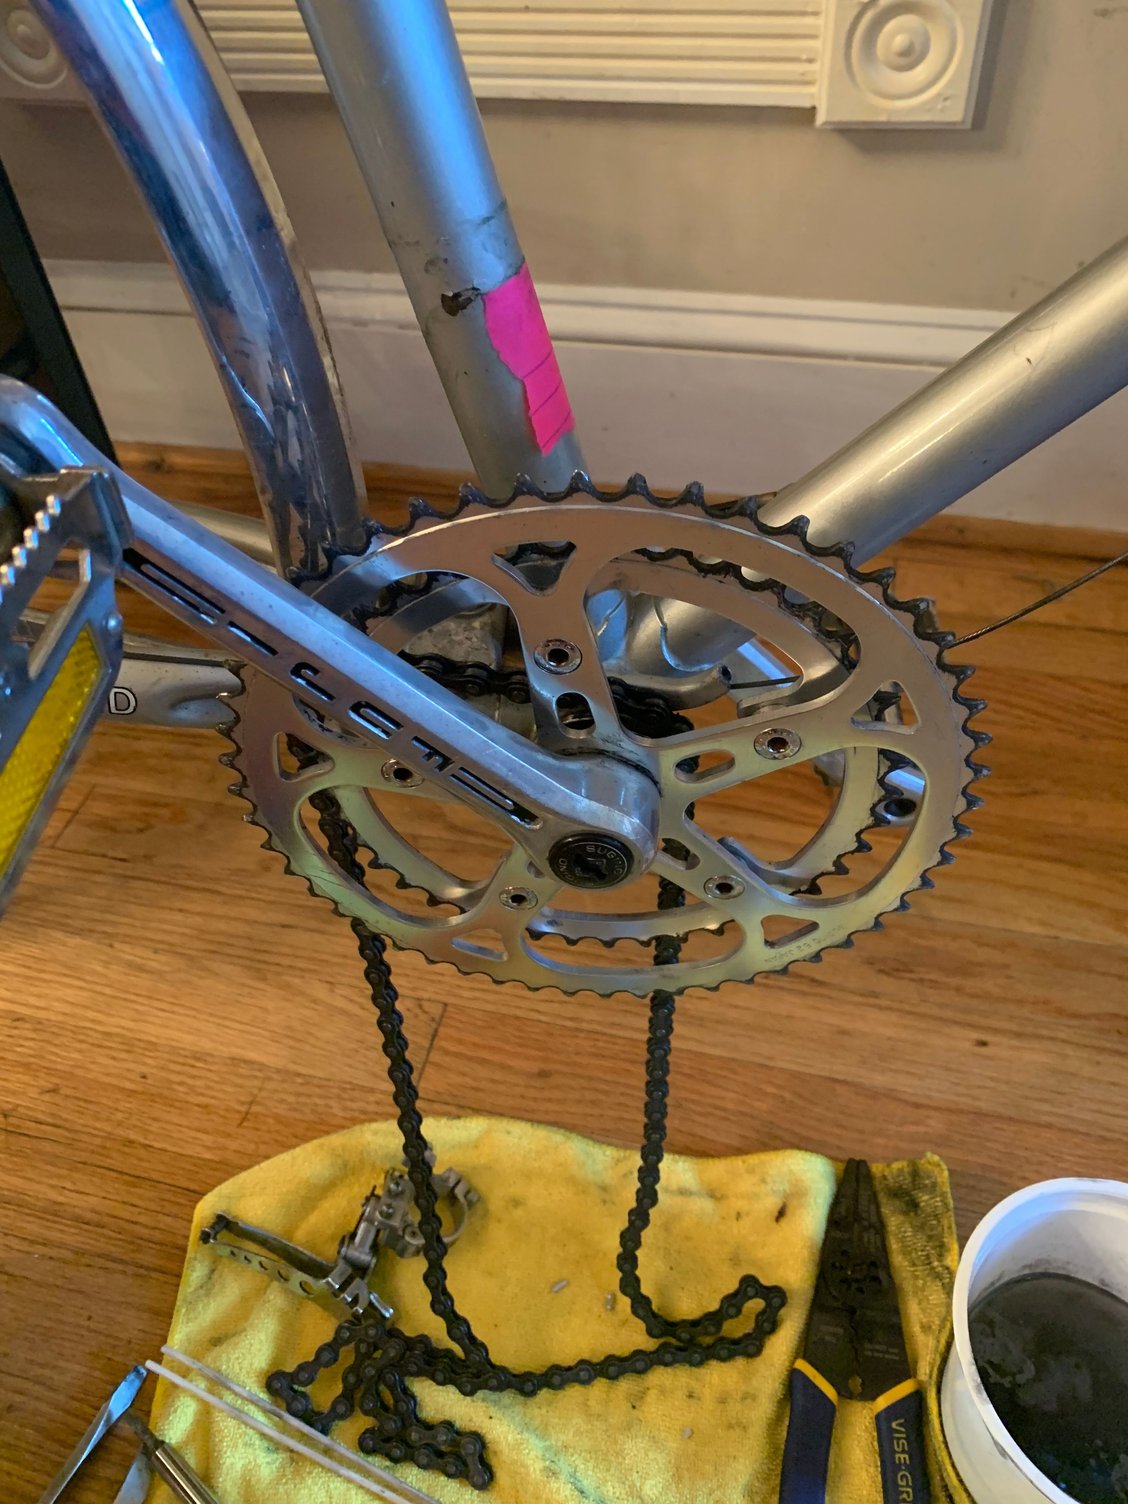
At what point is a chain ring due for replacing? Does the wear here look like it’s causing performance issues?
Also, will the driveside crank disconnect from the chainring? I love the pantographed Fuji cranks and would love to reuse them if and when I get new chainrings.
The bottom bracket probably needs replacing or repacking. (Easier just to replace, no?) Now that I have the drive train disassembled to refurbish the derailleurs I can tell that the BB bearings are pretty noisy (clicking sounds) and there’s a weird resistance accompanied by a sort of sliding sound that comes and goes at irregular intervals when spinning the cranks.
 12-13-20 | 12:20 PM
#2

Senior Member
Joined: Jan 2012
Posts: 1,475
Likes: 655
From: Joisey
First off, the outer chainring isn't replaceable, it is swaged/pressed onto the crankarm. Only the inner ring is removable, so if you want to replace the outer chainring, you can't reuse the driveside arm.
And the crank has a Sugino Maxy taper, which IIRC only fits less-expensive (back in the day) Maxy-type cranks, so if you want to upgrade to a better crankset, one with both chainring removeable, you may need a new bb spindle as well, or maybe an entire new bottom bracket. Since your bb is noisy and grindy, it may need replacing anyway---at a minimum it needs an inspection/overhaul.
Not saying you should upgrade, and if you want to keep it stock you wouldn't, but just so you know it could also involve replacing the bb. FWIW, aside from not having to replace the entire crankarm the next time the teeth get worn, it's also nice to have both rings replaceable to give you gearing options to choose a different outer ring, bigger if you're a shtarker or smaller if you hardly ever use your current high gears.
The IIRC part of replacing/upgrading matters, because the area of my brain that remembered all that different spindle taper stuff, and Maxy-type chainring configurations, has been written over by my need to not forget the Gilligan's Island theme song ("...the Skipper, too. The millionaire, and his wife. The movie star!..."), so maybe there are replaceable-outer crankarms that will fit a Maxy taper?
As for whether to replace the outer ring, there is a theory that as long as you don't mind having to replace the entire toothed parts of your drivetrain all at once, you never have to replace any chains, cogs or rings until the chain starts skipping somewhere. The chain and teeth wear in together, and we usually only find out our teeth are worn when we put on a new chain and it skips. Often on the smaller cogs, which wear faster. So for some the answer is to never replace the chain. Till it all goes to heck at once.
In that scenario, a few chipped/bent/manked chainring teeth don't matter at all, as long as the chain doesn't skip and the front still shifts OK. If you look at modern chainrings, you'll find lots of weirdly shaped teeth, some shorter, some sharper, etc. Sure, that's done for a reason, and precisely designed by advance computertronics, and yours are random, but if it doesn't cause any problems, then it's not necessarily a problem. Those jagged ones are more likely to draw blood if you slip tightening something nearby and metal meets flesh, so there's that. You could take a file to the sharper ones and square/smooth off the the scary edges.
If you want to be a by-the-book mechanic, you replace the outer ring, in your case the driveside crankarm, and the chain, because after all this time it's suspect. Inspect/overhaul/replace the bb as needed. If your replacement driveside arm/crank has its own inner ring, use whichever one looks better. Then see if you have any skipping cogs in the rear. If you do, new freewheel. Technically, you may just need to replace a smaller cog or two, but finding replacement cogs these days is difficult.
And never forget, Gilligan's fans, it was supposed to just be A THREE HOUR TOUR! What the heck! Nobody expects to get shipwrecked on a 3hr tour! And, sure, maybe the Captain should have checked the marine weather forecast a little better before setting out, but, ya know, things happen.
And the crank has a Sugino Maxy taper, which IIRC only fits less-expensive (back in the day) Maxy-type cranks, so if you want to upgrade to a better crankset, one with both chainring removeable, you may need a new bb spindle as well, or maybe an entire new bottom bracket. Since your bb is noisy and grindy, it may need replacing anyway---at a minimum it needs an inspection/overhaul.
Not saying you should upgrade, and if you want to keep it stock you wouldn't, but just so you know it could also involve replacing the bb. FWIW, aside from not having to replace the entire crankarm the next time the teeth get worn, it's also nice to have both rings replaceable to give you gearing options to choose a different outer ring, bigger if you're a shtarker or smaller if you hardly ever use your current high gears.
The IIRC part of replacing/upgrading matters, because the area of my brain that remembered all that different spindle taper stuff, and Maxy-type chainring configurations, has been written over by my need to not forget the Gilligan's Island theme song ("...the Skipper, too. The millionaire, and his wife. The movie star!..."), so maybe there are replaceable-outer crankarms that will fit a Maxy taper?
As for whether to replace the outer ring, there is a theory that as long as you don't mind having to replace the entire toothed parts of your drivetrain all at once, you never have to replace any chains, cogs or rings until the chain starts skipping somewhere. The chain and teeth wear in together, and we usually only find out our teeth are worn when we put on a new chain and it skips. Often on the smaller cogs, which wear faster. So for some the answer is to never replace the chain. Till it all goes to heck at once.
In that scenario, a few chipped/bent/manked chainring teeth don't matter at all, as long as the chain doesn't skip and the front still shifts OK. If you look at modern chainrings, you'll find lots of weirdly shaped teeth, some shorter, some sharper, etc. Sure, that's done for a reason, and precisely designed by advance computertronics, and yours are random, but if it doesn't cause any problems, then it's not necessarily a problem. Those jagged ones are more likely to draw blood if you slip tightening something nearby and metal meets flesh, so there's that. You could take a file to the sharper ones and square/smooth off the the scary edges.
If you want to be a by-the-book mechanic, you replace the outer ring, in your case the driveside crankarm, and the chain, because after all this time it's suspect. Inspect/overhaul/replace the bb as needed. If your replacement driveside arm/crank has its own inner ring, use whichever one looks better. Then see if you have any skipping cogs in the rear. If you do, new freewheel. Technically, you may just need to replace a smaller cog or two, but finding replacement cogs these days is difficult.
And never forget, Gilligan's fans, it was supposed to just be A THREE HOUR TOUR! What the heck! Nobody expects to get shipwrecked on a 3hr tour! And, sure, maybe the Captain should have checked the marine weather forecast a little better before setting out, but, ya know, things happen.
__________________
Fuggedaboutit!
Fuggedaboutit!
 12-13-20 | 12:35 PM
#3
Thread Starter
Junior Member
Joined: Sep 2020
Posts: 87
Likes: 19
First off, the outer chainring isn't replaceable, it is swaged/pressed onto the crankarm. Only the inner ring is removable, so if you want to replace the outer chainring, you can't reuse the driveside arm.
And the crank has a Sugino Maxy taper, which IIRC only fits less-expensive (back in the day) Maxy-type cranks, so if you want to upgrade to a better crankset, one with both chainring removeable, you may need a new bb spindle as well, or maybe an entire new bottom bracket. Since your bb is noisy and grindy, it may need replacing anyway---at a minimum it needs an inspection/overhaul.
Not saying you should upgrade, and if you want to keep it stock you wouldn't, but just so you know it could also involve replacing the bb. FWIW, aside from not having to replace the entire crankarm the next time the teeth get worn, it's also nice to have both rings replaceable to give you gearing options to choose a different outer ring, bigger if you're a shtarker or smaller if you hardly ever use your current high gears.
The IIRC part of replacing/upgrading matters, because the area of my brain that remembered all that different spindle taper stuff, and Maxy-type chainring configurations, has been written over by my need to not forget the Gilligan's Island theme song ("...the Skipper, too. The millionaire, and his wife. The movie star!..."), so maybe there are replaceable-outer crankarms that will fit a Maxy taper?
As for whether to replace the outer ring, there is a theory that as long as you don't mind having to replace the entire toothed parts of your drivetrain all at once, you never have to replace any chains, cogs or rings until the chain starts skipping somewhere. The chain and teeth wear in together, and we usually only find out our teeth are worn when we put on a new chain and it skips. Often on the smaller cogs, which wear faster. So for some the answer is to never replace the chain. Till it all goes to heck at once.
In that scenario, a few chipped/bent/manked chainring teeth don't matter at all, as long as the chain doesn't skip and the front still shifts OK. If you look at modern chainrings, you'll find lots of weirdly shaped teeth, some shorter, some sharper, etc. Sure, that's done for a reason, and precisely designed by advance computertronics, and yours are random, but if it doesn't cause any problems, then it's not necessarily a problem. Those jagged ones are more likely to draw blood if you slip tightening something nearby and metal meets flesh, so there's that. You could take a file to the sharper ones and square/smooth off the the scary edges.
If you want to be a by-the-book mechanic, you replace the outer ring, in your case the driveside crankarm, and the chain, because after all this time it's suspect. Inspect/overhaul/replace the bb as needed. If your replacement driveside arm/crank has its own inner ring, use whichever one looks better. Then see if you have any skipping cogs in the rear. If you do, new freewheel. Technically, you may just need to replace a smaller cog or two, but finding replacement cogs these days is difficult.
And never forget, Gilligan's fans, it was supposed to just be A THREE HOUR TOUR! What the heck! Nobody expects to get shipwrecked on a 3hr tour! And, sure, maybe the Captain should have checked the marine weather forecast a little better before setting out, but, ya know, things happen.
And the crank has a Sugino Maxy taper, which IIRC only fits less-expensive (back in the day) Maxy-type cranks, so if you want to upgrade to a better crankset, one with both chainring removeable, you may need a new bb spindle as well, or maybe an entire new bottom bracket. Since your bb is noisy and grindy, it may need replacing anyway---at a minimum it needs an inspection/overhaul.
Not saying you should upgrade, and if you want to keep it stock you wouldn't, but just so you know it could also involve replacing the bb. FWIW, aside from not having to replace the entire crankarm the next time the teeth get worn, it's also nice to have both rings replaceable to give you gearing options to choose a different outer ring, bigger if you're a shtarker or smaller if you hardly ever use your current high gears.
The IIRC part of replacing/upgrading matters, because the area of my brain that remembered all that different spindle taper stuff, and Maxy-type chainring configurations, has been written over by my need to not forget the Gilligan's Island theme song ("...the Skipper, too. The millionaire, and his wife. The movie star!..."), so maybe there are replaceable-outer crankarms that will fit a Maxy taper?
As for whether to replace the outer ring, there is a theory that as long as you don't mind having to replace the entire toothed parts of your drivetrain all at once, you never have to replace any chains, cogs or rings until the chain starts skipping somewhere. The chain and teeth wear in together, and we usually only find out our teeth are worn when we put on a new chain and it skips. Often on the smaller cogs, which wear faster. So for some the answer is to never replace the chain. Till it all goes to heck at once.
In that scenario, a few chipped/bent/manked chainring teeth don't matter at all, as long as the chain doesn't skip and the front still shifts OK. If you look at modern chainrings, you'll find lots of weirdly shaped teeth, some shorter, some sharper, etc. Sure, that's done for a reason, and precisely designed by advance computertronics, and yours are random, but if it doesn't cause any problems, then it's not necessarily a problem. Those jagged ones are more likely to draw blood if you slip tightening something nearby and metal meets flesh, so there's that. You could take a file to the sharper ones and square/smooth off the the scary edges.
If you want to be a by-the-book mechanic, you replace the outer ring, in your case the driveside crankarm, and the chain, because after all this time it's suspect. Inspect/overhaul/replace the bb as needed. If your replacement driveside arm/crank has its own inner ring, use whichever one looks better. Then see if you have any skipping cogs in the rear. If you do, new freewheel. Technically, you may just need to replace a smaller cog or two, but finding replacement cogs these days is difficult.
And never forget, Gilligan's fans, it was supposed to just be A THREE HOUR TOUR! What the heck! Nobody expects to get shipwrecked on a 3hr tour! And, sure, maybe the Captain should have checked the marine weather forecast a little better before setting out, but, ya know, things happen.
I actually have had some trouble where sometimes when I shift to the big chainring the chain doesn’t catch and it just spins in the lower gear for a bit. I’m hoping that my refurbishment and adjustment of the front derailleur fixes that and it’s not the chainring. Yikes.
I see your point about replacing it all at once because of the gears and chain wearing together. Besides the difficulty shifting up into high gear in front I’ve never had any issue with skipping or any of that. Again, hopefully the derailleur maintenance and adjustment fixes that.
12-13-20 | 01:22 PM
#4
Senior Member
Joined: Jan 2012
Posts: 1,475
Likes: 655
From: Joisey
Fer sure the way to put off worrying about finding a skipping rear cog is to never replace the chain. The problem with never replacing the chain is it accelerates wear on everything else, so you're more likely going to have replace more stuff when the chain finally craps out.
That's all really interesting. Thanks.
I actually have had some trouble where sometimes when I shift to the big chainring the chain doesn’t catch and it just spins in the lower gear for a bit. I’m hoping that my refurbishment and adjustment of the front derailleur fixes that and it’s not the chainring. Yikes.
I see your point about replacing it all at once because of the gears and chain wearing together. Besides the difficulty shifting up into high gear in front I’ve never had any issue with skipping or any of that. Again, hopefully the derailleur maintenance and adjustment fixes that.
I actually have had some trouble where sometimes when I shift to the big chainring the chain doesn’t catch and it just spins in the lower gear for a bit. I’m hoping that my refurbishment and adjustment of the front derailleur fixes that and it’s not the chainring. Yikes.
I see your point about replacing it all at once because of the gears and chain wearing together. Besides the difficulty shifting up into high gear in front I’ve never had any issue with skipping or any of that. Again, hopefully the derailleur maintenance and adjustment fixes that.
__________________
Fuggedaboutit!
Fuggedaboutit!
12-13-20 | 03:23 PM
#5

Ride, Wrench, Swap, Race

Joined: Jan 2010
Posts: 9,831
Likes: 1,809
From: Northern California
Bikes: Cheltenham-Pedersen racer, Boulder F/S Paris-Roubaix, Varsity racer, '52 Christophe, '62 Continental, '92 Merckx, '75 Limongi, '76 Presto, '72 Gitane SC, '71 Schwinn SS, etc.
That trauma to the teeth isn't what is preventing quick shifting up to the big ring, but I would check and correct the tip of any tooth that is asymmetric left-to-right.
The teeth don't look heavily worn to my eye.
It won't hurt to test-install a newer chain, to see how it works. A KMC X-series chain is great quality for low price.
I've always equated the Maxy taper to the Suntour VX taper (also made by Sugino), and to the common JIS taper.
I often choose to use a bb with a bit less driveside offset on bikes of this type, this allows fuller range of the freewheel's gears while in the big ring so less downshifting in front for me, especially if the freewheel has a good 30t or so big cog.
The teeth don't look heavily worn to my eye.
It won't hurt to test-install a newer chain, to see how it works. A KMC X-series chain is great quality for low price.
I've always equated the Maxy taper to the Suntour VX taper (also made by Sugino), and to the common JIS taper.
I often choose to use a bb with a bit less driveside offset on bikes of this type, this allows fuller range of the freewheel's gears while in the big ring so less downshifting in front for me, especially if the freewheel has a good 30t or so big cog.
12-13-20 | 07:10 PM
#6

Senior Member


Joined: Jun 2013
Posts: 3,434
Likes: 1,603
From: 700 Ft. above sea level.
Bikes: Not as many as there were awhile ago.
Decent used FUJI pantograph cranksets are not uncommon and relativelyly inexpensive. It shouldn't be hard to find a good replacement.
__________________
".....distasteful and easily triggered."
".....distasteful and easily triggered."
12-13-20 | 09:14 PM
#7

Senior Member
Joined: Dec 2014
Posts: 3,598
Likes: 330
From: Fernandina Beach FL
Bikes: Vintage Japanese Bicycles, Tange, Ishiwata, Kuwahara
You're going to need some kind of high power - high RPM circular grinder tool to shear off the big chainring. And, leave a nice 130mm BCD spider for new chainrings. Or else, just junk the whole thing and buy a new square taper chain ring set off eBay for about $50. Be good. Have fun.
12-13-20 | 10:49 PM
#8
Senior Member
Joined: Jun 2009
Posts: 601
Likes: 303
From: Brooklyn, NY
Bikes: 1970s Coppi/Fiorelli beater, 1973 Raleigh Competition, 1972 Bob Jackson, 1970 Cilo Sprint-X, 1985 Fuji Touring Series IV, 1969 Legnano Roma
If you really like that Fuji branding/panto work on the crank, the exact same look was found on cranks from slightly higher in Fuji's food chain, ones that *do* have a standard spider and replaceable rings - I believe you want to look for cranks from something like a Royale/S-10 from similar years.
12-14-20 | 07:08 AM
#9
Senior Member
Joined: Oct 2017
Posts: 791
Likes: 300
From: NJ
Bikes: 68 SS, 72 Fuji Finest, 72 PX-10, 77 Pana Pro 7000, 84 Pinnarello Treviso NR, 84 Trek 520, 88 Project KOM, 90 Trek 750, 91 Trek 930
If you really like that Fuji branding/panto work on the crank, the exact same look was found on cranks from slightly higher in Fuji's food chain, ones that *do* have a standard spider and replaceable rings - I believe you want to look for cranks from something like a Royale/S-10 from similar years.
__________________
Last new bike 1991
Last new bike 1991
12-18-20 | 07:42 PM
#10
Thread Starter
Junior Member
Joined: Sep 2020
Posts: 87
Likes: 19
Posted another thread about a derailleur issue I'm having (Front derailleur scratch prevention. - Bike Forums), but realized I shoulda just combined my whole drive train misadventure into one thread. The folks on the other thread said my chainrings were too worn out and needed replacing. Hhhhm...I'd really rather not if I don't have too. My LBS six months ago said everything looked fine, so I'm hoping that I just wasn't doing a good job of setting my derailleur back onto the bike.
Basically here's where things are at.
1. Can't get derailleur back on in a position that works. Either rubs on cage in biggest or third smallest rear cog when on the big chainring (before I took it off third smallest to largest was its range for running freely on the big chainring without trimming), or else it jams up when shifting from small to large. Either of those problems has continually plagued me throughout the million tiny little adjustments I've made.
2. Amidst all of that, all my little adjustments with the FD really chipped up the paint. I'm guessing the best thing to do now is get some automotive touch-up paint that's a good match, take care of the touch-up, and then wrap the tube in helicopter tape or electrical tape or something before putting the FD clamp back on.
3. If I do need to replace something in the drivetrain, I need to replace a bunch of it at once? I started looking up currently available new cranksets whose aesthetics would look good with my bike (Velo-Orange, etc.). 52/42 chainrings seem way less common nowadays. Where do I even begin in figuring out which ratio to go with? The Velo-Orange drillium crankset seems to my eye one of the best-looking ones on the market now, but would 48/34 make for a really difference cycling experience?
On a related note, I see a lot of folks on here with 10 or 12-speed bikes mentioning using things like 8-speed chains, etc. I'm a bit confused by that. Thanks, all, for your help.
Basically here's where things are at.
1. Can't get derailleur back on in a position that works. Either rubs on cage in biggest or third smallest rear cog when on the big chainring (before I took it off third smallest to largest was its range for running freely on the big chainring without trimming), or else it jams up when shifting from small to large. Either of those problems has continually plagued me throughout the million tiny little adjustments I've made.
2. Amidst all of that, all my little adjustments with the FD really chipped up the paint. I'm guessing the best thing to do now is get some automotive touch-up paint that's a good match, take care of the touch-up, and then wrap the tube in helicopter tape or electrical tape or something before putting the FD clamp back on.
3. If I do need to replace something in the drivetrain, I need to replace a bunch of it at once? I started looking up currently available new cranksets whose aesthetics would look good with my bike (Velo-Orange, etc.). 52/42 chainrings seem way less common nowadays. Where do I even begin in figuring out which ratio to go with? The Velo-Orange drillium crankset seems to my eye one of the best-looking ones on the market now, but would 48/34 make for a really difference cycling experience?
On a related note, I see a lot of folks on here with 10 or 12-speed bikes mentioning using things like 8-speed chains, etc. I'm a bit confused by that. Thanks, all, for your help.
12-19-20 | 11:21 AM
#11
Ride, Wrench, Swap, Race
Joined: Jan 2010
Posts: 9,831
Likes: 1,809
From: Northern California
Bikes: Cheltenham-Pedersen racer, Boulder F/S Paris-Roubaix, Varsity racer, '52 Christophe, '62 Continental, '92 Merckx, '75 Limongi, '76 Presto, '72 Gitane SC, '71 Schwinn SS, etc.
The modern chain is going to greatly increase running clearance inside of the front derailer cage.
I often add a bit more clearance yet by spreading the front portion of the cage. By carefully positioning the jaws of my old-fashioned duckbill plier up high, I can pull the handles apart with force and spread the cage without flaring it near the middle or at the lower edge (which would reduce downshifting authority and chain control).
I position the handles between spaces in the rear wheel spokes before pulling them apart. Done this a hundred times even on higher-end bikes from every era, and it always gives me more adjustment lattitude. It's a secret adjustment just like the beveling of sprocket teeth (which biases the position of the tips of the teeth). Adjustment like this along with narrower chain can make flawed combinations of parts work perfectly!
I generally position the front derailer outer cage plate with the tail very slightly out versus being perfectly parallel with the outer chainring. Careful sighting-down of these parts can be critically important, just as when verifying chainline.
Also super-important that the chainrings run true, that the arms are tight and that the bb has no play in it.

I often add a bit more clearance yet by spreading the front portion of the cage. By carefully positioning the jaws of my old-fashioned duckbill plier up high, I can pull the handles apart with force and spread the cage without flaring it near the middle or at the lower edge (which would reduce downshifting authority and chain control).
I position the handles between spaces in the rear wheel spokes before pulling them apart. Done this a hundred times even on higher-end bikes from every era, and it always gives me more adjustment lattitude. It's a secret adjustment just like the beveling of sprocket teeth (which biases the position of the tips of the teeth). Adjustment like this along with narrower chain can make flawed combinations of parts work perfectly!
I generally position the front derailer outer cage plate with the tail very slightly out versus being perfectly parallel with the outer chainring. Careful sighting-down of these parts can be critically important, just as when verifying chainline.
Also super-important that the chainrings run true, that the arms are tight and that the bb has no play in it.
12-19-20 | 02:17 PM
#12
Thread Starter
Junior Member
Joined: Sep 2020
Posts: 87
Likes: 19
The modern chain is going to greatly increase running clearance inside of the front derailer cage.
I often add a bit more clearance yet by spreading the front portion of the cage. By carefully positioning the jaws of my old-fashioned duckbill plier up high, I can pull the handles apart with force and spread the cage without flaring it near the middle or at the lower edge (which would reduce downshifting authority and chain control).
I position the handles between spaces in the rear wheel spokes before pulling them apart. Done this a hundred times even on higher-end bikes from every era, and it always gives me more adjustment lattitude. It's a secret adjustment just like the beveling of sprocket teeth (which biases the position of the tips of the teeth). Adjustment like this along with narrower chain can make flawed combinations of parts work perfectly!
I generally position the front derailer outer cage plate with the tail very slightly out versus being perfectly parallel with the outer chainring. Careful sighting-down of these parts can be critically important, just as when verifying chainline.
Also super-important that the chainrings run true, that the arms are tight and that the bb has no play in it.
I often add a bit more clearance yet by spreading the front portion of the cage. By carefully positioning the jaws of my old-fashioned duckbill plier up high, I can pull the handles apart with force and spread the cage without flaring it near the middle or at the lower edge (which would reduce downshifting authority and chain control).
I position the handles between spaces in the rear wheel spokes before pulling them apart. Done this a hundred times even on higher-end bikes from every era, and it always gives me more adjustment lattitude. It's a secret adjustment just like the beveling of sprocket teeth (which biases the position of the tips of the teeth). Adjustment like this along with narrower chain can make flawed combinations of parts work perfectly!
I generally position the front derailer outer cage plate with the tail very slightly out versus being perfectly parallel with the outer chainring. Careful sighting-down of these parts can be critically important, just as when verifying chainline.
Also super-important that the chainrings run true, that the arms are tight and that the bb has no play in it.
So my chainrings should still be good?
12-19-20 | 03:31 PM
#13
Ride, Wrench, Swap, Race
Joined: Jan 2010
Posts: 9,831
Likes: 1,809
From: Northern California
Bikes: Cheltenham-Pedersen racer, Boulder F/S Paris-Roubaix, Varsity racer, '52 Christophe, '62 Continental, '92 Merckx, '75 Limongi, '76 Presto, '72 Gitane SC, '71 Schwinn SS, etc.
