


DIY - Vector graphics for decal/graphics recreation
 11-12-11 | 07:23 PM
#1
Thread Starter
Junior Member
Joined: Jul 2011
Posts: 164
Likes: 2
From: Southern Colorado
DIY - Vector graphics for decal/graphics recreation
I am in the middle of refinishing a Canopus bike I picked up recently (https://www.bikeforums.net/showthread...on-Restoration) and I was having to figure out what to do with the artwork. I went to a few places that could make the decals, but in each case I would end up having to pay them to take pictures of the decals and make a digital file. Estimates ranged from 1-2 hours at about $65 an hour. Ouch! While I love the frame, I am reluctant to pay $800 to do a full refinish and graphics. So, I sat down today and figured out how to convert my graphics to digital files and I thought I would share what I learned.
The required components to do this are realtively simple and mostly free. You will need:
A digital camera
Inkscape (free on the web)
MS Paint
You may use other programs, but this is what I used. For the record, this is not a gnats butt detail tutorial, I assume that you already know how to use Windows based programs and can use MS Paint to edit pictures.
You first need to take a picture of your decals. This can be done on the bike, but you have to know that the curve of the tubes will cause it to look different in a flat picture. This can be overcome in two ways, take many pictures from different angles and merge the photos with something like Photoshop, or remove the decals and photograph them on a piece of paper. I opted for option 2. I know that not everyone will have that option, but this way is pretty simple if you can remove the decals. In my case, using the hairdryer method to heat them and remove them worked out well.
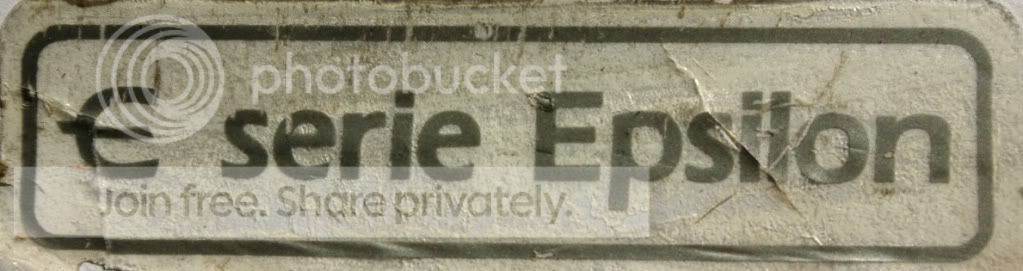
Here is my picture of the removed decal. As you can see, it was in rough shape and did not come off pretty. Of the three I did, this was the worst by far. So, I figured it would be the best for a tutorial.
With your image, open it in Inkscape. Inkscape can open most any image, so it is pretty nice. Once opened, you want to trace the image. What you hope for is a nice, clean image with a bunch of contrast. If your image does not have enough contrast, you can adjust in any photo editing software. Play with the brightness and contrast until you have what you need. You may have to play with the photo and test in Inkscape a few times, I had to do this with my down tube decal.
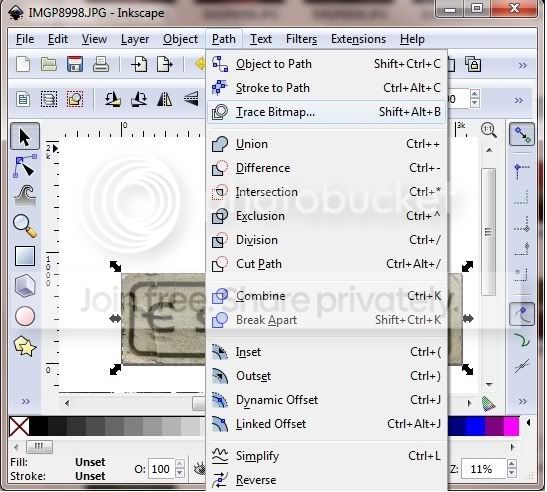
Once opened, you simply need to select the image (important, or nothing will happen), then click on Path/Trace Bitmap.
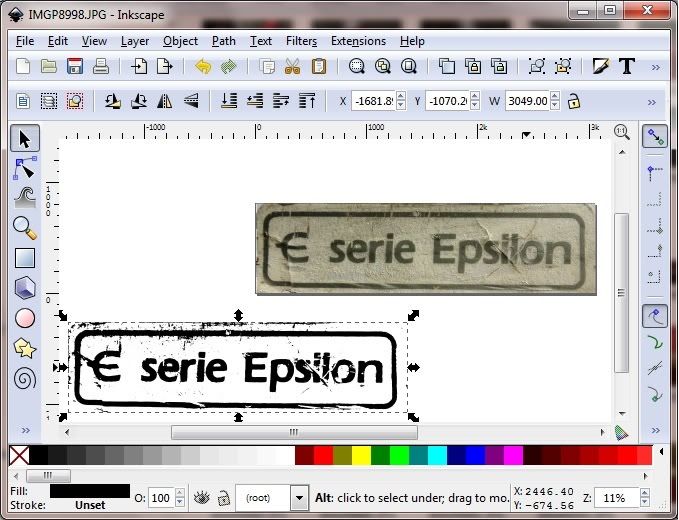
Simply accept the defaults, and then click on "Ok". After a few moments, you will have a new image overlayed on your picture.
Click on the image and drag it off to the side.
Delete the original picture and you are left with the new vector image.
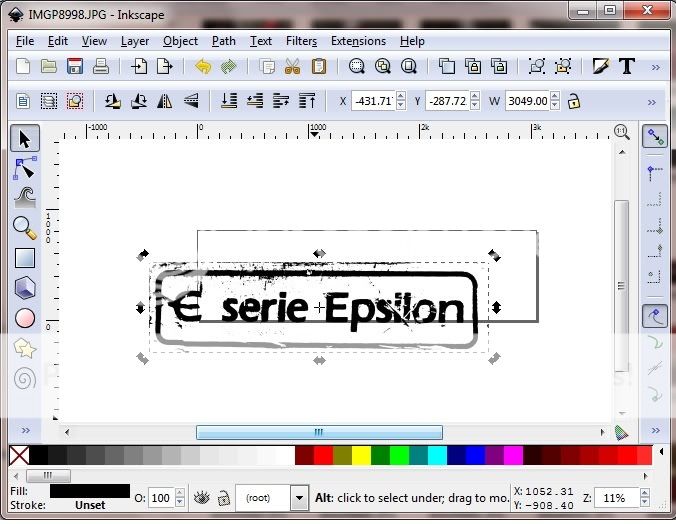
You will want to drag the vector image back to the wireframe outline in the middle before saving, because it seems to only save what is in the frame. Once aligned, save the new vector image as a .png file. This is a format that both MS Paint and Inkscape open easily. You could try other types, but this has the advantage of working.
Open the .png file in MS Paint and you now can edit your vector file. In my case, with the bunged decal, I had a ton of crap to clean up, but it is better than losing the decal or paying $65/hr to save it, at least IMO.
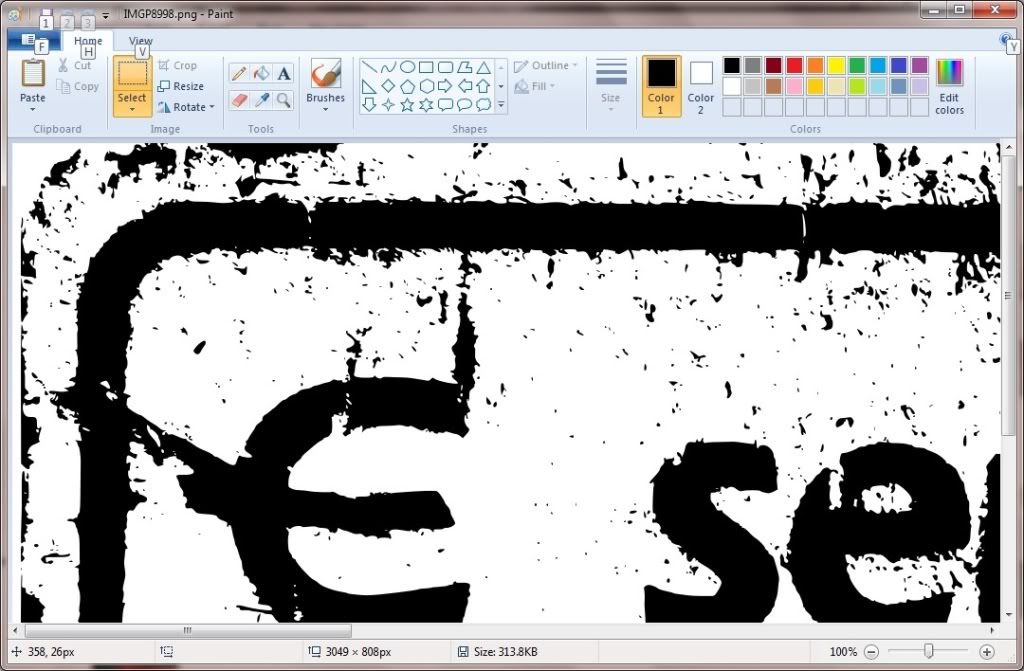
For me, it is easier to zoom in on the picture to clean up.
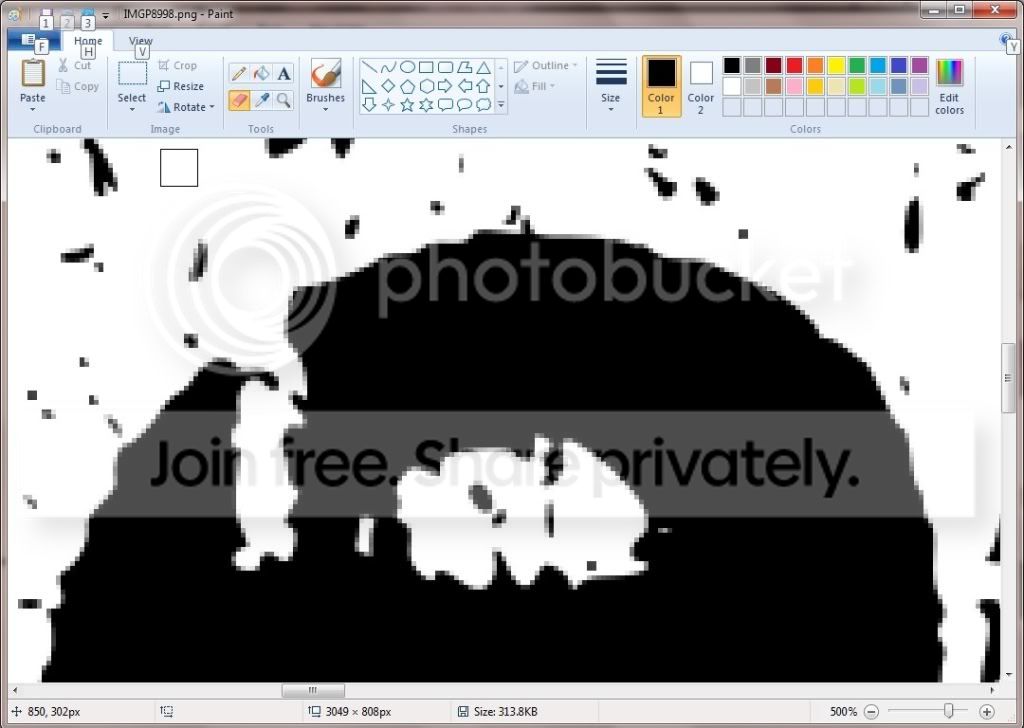
Don't forget to save often, nothing worse than losing hours of work. Once you are done, if you need to save the file in a different format, you can reopen the file in Inkscape and save it in any format supported by Inlscape (there are a bunch). The people I intend on using to refinish my frame are requesting .eps format.
So, here are the before and after photos.
Decal
Initial vector file

Finished vector file

You can now take it to wherever you want to have it reproduced, or try and print them yourself.
Good luck.
The required components to do this are realtively simple and mostly free. You will need:
A digital camera
Inkscape (free on the web)
MS Paint
You may use other programs, but this is what I used. For the record, this is not a gnats butt detail tutorial, I assume that you already know how to use Windows based programs and can use MS Paint to edit pictures.
You first need to take a picture of your decals. This can be done on the bike, but you have to know that the curve of the tubes will cause it to look different in a flat picture. This can be overcome in two ways, take many pictures from different angles and merge the photos with something like Photoshop, or remove the decals and photograph them on a piece of paper. I opted for option 2. I know that not everyone will have that option, but this way is pretty simple if you can remove the decals. In my case, using the hairdryer method to heat them and remove them worked out well.
Here is my picture of the removed decal. As you can see, it was in rough shape and did not come off pretty. Of the three I did, this was the worst by far. So, I figured it would be the best for a tutorial.
With your image, open it in Inkscape. Inkscape can open most any image, so it is pretty nice. Once opened, you want to trace the image. What you hope for is a nice, clean image with a bunch of contrast. If your image does not have enough contrast, you can adjust in any photo editing software. Play with the brightness and contrast until you have what you need. You may have to play with the photo and test in Inkscape a few times, I had to do this with my down tube decal.
Once opened, you simply need to select the image (important, or nothing will happen), then click on Path/Trace Bitmap.
Simply accept the defaults, and then click on "Ok". After a few moments, you will have a new image overlayed on your picture.
Click on the image and drag it off to the side.
Delete the original picture and you are left with the new vector image.
You will want to drag the vector image back to the wireframe outline in the middle before saving, because it seems to only save what is in the frame. Once aligned, save the new vector image as a .png file. This is a format that both MS Paint and Inkscape open easily. You could try other types, but this has the advantage of working.
Open the .png file in MS Paint and you now can edit your vector file. In my case, with the bunged decal, I had a ton of crap to clean up, but it is better than losing the decal or paying $65/hr to save it, at least IMO.
For me, it is easier to zoom in on the picture to clean up.
Don't forget to save often, nothing worse than losing hours of work. Once you are done, if you need to save the file in a different format, you can reopen the file in Inkscape and save it in any format supported by Inlscape (there are a bunch). The people I intend on using to refinish my frame are requesting .eps format.
So, here are the before and after photos.
Decal
Initial vector file
Finished vector file
You can now take it to wherever you want to have it reproduced, or try and print them yourself.
Good luck.
Last edited by Preynmantis; 11-12-11 at 07:37 PM.
 11-12-11 | 08:52 PM
#2

Senior Member

Joined: Aug 2010
Posts: 3,123
Likes: 98
From: Liberty, Missouri
Bikes: 1966 Paramount | 1971 Raleigh International | ca. 1970 Bernard Carre | 1989 Waterford Paramount | 2012 Boulder Brevet | 2019 Specialized Diverge
Your particular example would be pretty easy to re-create without scanning. The font is Eras Demi and not a hand-generated typefact, so it would be a snap to typeset, match the spacing, and add a radius border. Not so easy with most repros.
11-12-11 | 09:07 PM
#3

www.theheadbadge.com


Joined: Sep 2005
Posts: 29,025
Likes: 5,537
From: Southern Florida
Bikes: https://www.theheadbadge.com
You might find it easier (on B&W logos such as this one) to adjust the contrast of the main image beforehand to further define the light/dark areas. It'll make it that much easier when converting to vector.
Adjusting those default vector settings may assist too.
-Kurt
Adjusting those default vector settings may assist too.
-Kurt
__________________


11-12-11 | 10:10 PM
#5

The space coyote lied.

Joined: Sep 2008
Posts: 48,841
Likes: 11,033
From: dusk 'til dawn.
Bikes: everywhere
A little work with bezier tools could make that E symbol look a lot better also. I work a lot cheaper than those guys. $30 an hour.
That particular example would be a half hour job.
That particular example would be a half hour job.
 11-12-11 | 10:15 PM
#6

Phyllo-buster
Joined: Jan 2010
Posts: 9,276
Likes: 2,698
From: Nova Scotia
Bikes: roadsters, club bikes, fixed and classic
It's good work but I'm not sure that's really a true vector file and may not give you the resolution you need. You can save a bitmap file as an eps but will it behave as one? You need make make vectors with bezier points, paths, handles etc. Or maybe is this a development in graphics that makes my Adobe products obsolete?
edit LOP got there first
edit LOP got there first
11-12-11 | 10:28 PM
#7
The space coyote lied.
Joined: Sep 2008
Posts: 48,841
Likes: 11,033
From: dusk 'til dawn.
Bikes: everywhere
Well, I didn't even mention the part about what kind of data was in his file, clubman, but I agree with you. I thought he had autotraced to get that output but I just reread the process and I think the file produced by the method above will have bitmap data. Looks like the crossbar in the symbol is probably vector, however. It must've been a little ugly.
Inkscape does have a "Trace Bitmap" tool that will produce vector output. Those tools rarely work well for this kind of thing but sometimes you get lucky.
Inkscape does have a "Trace Bitmap" tool that will produce vector output. Those tools rarely work well for this kind of thing but sometimes you get lucky.
11-13-11 | 01:52 AM
#8
Senior Member
Joined: Nov 2004
Posts: 929
Likes: 11
Bikes: A few
Preynmantis, I think it is great that you shared this information. We are not all graphics artists with detailed technical knowledge and it is nice that someone (you) has chosen to share what they know or have learned about making replacement decals. Thanks!
11-13-11 | 05:47 AM
#9
Banned.
Joined: Dec 2007
Posts: 27,199
Likes: 1,463
It's good work but I'm not sure that's really a true vector file and may not give you the resolution you need. You can save a bitmap file as an eps but will it behave as one? You need make make vectors with bezier points, paths, handles etc. Or maybe is this a development in graphics that makes my Adobe products obsolete?
edit LOP got there first
edit LOP got there first
It looks like it comes down to 2 options:
A- Scan or photo the image and clean it up.
B- Try to recreate it using publishing or graphics software.
Last edited by RobbieTunes; 11-13-11 at 05:58 AM.
11-13-11 | 06:43 AM
#10
Senior Member
Joined: Aug 2010
Posts: 3,123
Likes: 98
From: Liberty, Missouri
Bikes: 1966 Paramount | 1971 Raleigh International | ca. 1970 Bernard Carre | 1989 Waterford Paramount | 2012 Boulder Brevet | 2019 Specialized Diverge
I've never understood the thinking that the "only" way to recreate decals is to use a raster option. Fact of the matter is that if one can get a decal off and scan it, one can get a pretty darned good start on a repro decal using raster methods. If the scan is high enough resolution (i.e., doesn't show bitmapping in the curves) and the whites and flat areas are clean, a good reproduction can be made using widely available free software. One can certainly use Adobe Illustrator to recreate the curves and flat colors that are characteristic of the vast majority of decals, stickers, labels, and water slides. Vector-based programs (of which Illustrator is the clear "king," btw) are one of the tools we use to create such items for reproduction on a printing press. But we also use raster (bitmap) graphics all the time and get terrific results - every color magazine you pick up is printed in four-color process, which is a raster process. Don't get me wrong: vector is the "correct" way to go about this, but for the serious enthusiast who is trying to recreate the graphics it is not the only method, and very acceptable results can be attained using either approach. Heck, you can still create actual camera ready art (which is how most of the art for the bikes I collect was created to begin with) from layered ink drawings and amberlith/rubylith. I like that we really do have so many good options to choose between... "back in the day" we simply wound up sticking the label into a stat camera, made a black and white, cut it apart and added new text from the typesetter, and hoped for the best!
11-13-11 | 07:18 AM
#12


AZORCH, I think you meant "vector" rather than raster in your first sentence.
In my experience, the hardest part is matching fonts, especially with old stuff like the Reynolds tubing decals (no, it's not Helvetica!) that used fonts from before the days of digital typography; there were zillions of variations, seemingly. If you can find a digital font that's close, then you can convert it to outline in a graphics program, and play with the bezier info to make it better.
Doing graphical stuff is not that hard. I used to have Illustrator, but it only worked on my old PPC Mac (sadly, now defunct) and I can't afford to buy it again for a few bike decals. I've been making do with Intaglio; tried Inkscape, but it's an X-windows app on the Mac, and I found it just too much trouble.
In my experience, the hardest part is matching fonts, especially with old stuff like the Reynolds tubing decals (no, it's not Helvetica!) that used fonts from before the days of digital typography; there were zillions of variations, seemingly. If you can find a digital font that's close, then you can convert it to outline in a graphics program, and play with the bezier info to make it better.
Doing graphical stuff is not that hard. I used to have Illustrator, but it only worked on my old PPC Mac (sadly, now defunct) and I can't afford to buy it again for a few bike decals. I've been making do with Intaglio; tried Inkscape, but it's an X-windows app on the Mac, and I found it just too much trouble.
11-13-11 | 07:22 AM
#13
Banned.
Joined: Dec 2007
Posts: 27,199
Likes: 1,463
I've never understood the thinking that the "only" way to recreate decals is to use a raster option. Fact of the matter is that if one can get a decal off and scan it, one can get a pretty darned good start on a repro decal using raster methods. If the scan is high enough resolution (i.e., doesn't show bitmapping in the curves) and the whites and flat areas are clean, a good reproduction can be made using widely available free software. One can certainly use Adobe Illustrator to recreate the curves and flat colors that are characteristic of the vast majority of decals, stickers, labels, and water slides. Vector-based programs (of which Illustrator is the clear "king," btw) are one of the tools we use to create such items for reproduction on a printing press. But we also use raster (bitmap) graphics all the time and get terrific results - every color magazine you pick up is printed in four-color process, which is a raster process. Don't get me wrong: vector is the "correct" way to go about this, but for the serious enthusiast who is trying to recreate the graphics it is not the only method, and very acceptable results can be attained using either approach. Heck, you can still create actual camera ready art (which is how most of the art for the bikes I collect was created to begin with) from layered ink drawings and amberlith/rubylith. I like that we really do have so many good options to choose between... "back in the day" we simply wound up sticking the label into a stat camera, made a black and white, cut it apart and added new text from the typesetter, and hoped for the best!
What is vector art vs. raster in layman's terms?
I'm sure I was called a raster several times as a kid...
11-13-11 | 07:28 AM
#14
Banned.
Joined: Dec 2007
Posts: 27,199
Likes: 1,463
Preymantis, this is a good thread topic, with the trend towards more refinishing of frames.
There are many sites that tell how to create and print decals.
This thread is about "saving" graphics, in a way.
Would anyone have an objection to a continuing thread for this?
Maybe with 4 main areas?
1-Creating repro's using an image of the existing graphic.
2-Re-creating repro's from scratch using software.
3-The physical part: printing them, as far as media, inks, printer types, etc.
4-Exporting them to decal makers, sign companies, etc.
At one time, a C&V member showed several bikes he redid, using decals he made on his inkjet printer.
Others here, from time to time, have discussed it briefly, using dye-sub printers, laser, etc.
All this stuff is so far beyond me, it would be nice to learn about it. In layman's terms.
There are many sites that tell how to create and print decals.
This thread is about "saving" graphics, in a way.
Would anyone have an objection to a continuing thread for this?
Maybe with 4 main areas?
1-Creating repro's using an image of the existing graphic.
2-Re-creating repro's from scratch using software.
3-The physical part: printing them, as far as media, inks, printer types, etc.
4-Exporting them to decal makers, sign companies, etc.
At one time, a C&V member showed several bikes he redid, using decals he made on his inkjet printer.
Others here, from time to time, have discussed it briefly, using dye-sub printers, laser, etc.
All this stuff is so far beyond me, it would be nice to learn about it. In layman's terms.
11-13-11 | 07:35 AM
#15
Senior Member
Joined: Aug 2010
Posts: 3,123
Likes: 98
From: Liberty, Missouri
Bikes: 1966 Paramount | 1971 Raleigh International | ca. 1970 Bernard Carre | 1989 Waterford Paramount | 2012 Boulder Brevet | 2019 Specialized Diverge
AZORCH, I think you meant "vector" rather than raster in your first sentence.
In my experience, the hardest part is matching fonts, especially with old stuff like the Reynolds tubing decals (no, it's not Helvetica!) that used fonts from before the days of digital typography; there were zillions of variations, seemingly. If you can find a digital font that's close, then you can convert it to outline in a graphics program, and play with the bezier info to make it better.
Doing graphical stuff is not that hard. I used to have Illustrator, but it only worked on my old PPC Mac (sadly, now defunct) and I can't afford to buy it again for a few bike decals. I've been making do with Intaglio; tried Inkscape, but it's an X-windows app on the Mac, and I found it just too much trouble.
In my experience, the hardest part is matching fonts, especially with old stuff like the Reynolds tubing decals (no, it's not Helvetica!) that used fonts from before the days of digital typography; there were zillions of variations, seemingly. If you can find a digital font that's close, then you can convert it to outline in a graphics program, and play with the bezier info to make it better.
Doing graphical stuff is not that hard. I used to have Illustrator, but it only worked on my old PPC Mac (sadly, now defunct) and I can't afford to buy it again for a few bike decals. I've been making do with Intaglio; tried Inkscape, but it's an X-windows app on the Mac, and I found it just too much trouble.
RobbieTunes, the difference between the two is that raster files are created based upon a matrix of pixels. Imagine that you can zoom in closely enough to see the pixels formation of an image. It might look something like a checkerboard (vast oversimplification, btw!) In a black and white image, each "square" would be either black or white. As you zoom back out again, your brain would begin to merge the pixels together to create an illusion of curves and straight edges, some filled and others outlined. One quality factor for raster files is the resolution, or number of pixels per linear inch: the more pixels, the greater the apparent image "quality" and the less chance of it appearing jaggy or pixelated on the printed page. Raster graphics are size dependent - you can't enlarge such file types without also enlarging the pixels. With low pixel count (lower resolution), there is a greater chance that thin lines and curved edges will look ragged. The argument for vector files is that the curves are based upon a mathematical formulation (bezier curves are not generated initially as pixels, for instance) and the files are "resolution-independent," meaning that they can be resized without fear of image degradation. Not terribly much more simplified, but perhaps you get the point! Anyway, with sufficient forethought, one can use either method successfully.
11-13-11 | 08:13 AM
#16
Thread Starter
Junior Member
Joined: Jul 2011
Posts: 164
Likes: 2
From: Southern Colorado
Thank you all for the input. This was not intended to be a replacement for true professional work, only a quick tutorial for people like me who have never did this kind of work and their budget precludes the use of a professional. I honestly cannot say that this is great, or even good output. However, this specific decal measures 3.4 x .75 inches on the bike, so I am confident that it will be sufficient for my use. My refinisher specifically asked for a vector file in .eps format. Whether this will fit that bill remains to be seen when I take it to them.
I know that a real graphic artist could do better in much less time, but this forum seems to be all about people learning new things and maybe this could help someone else one day.
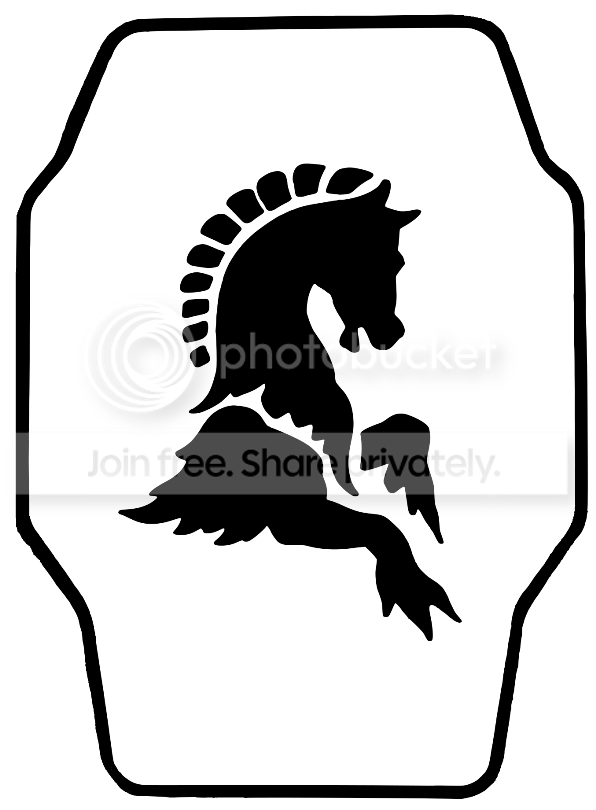
Here are the other two decals I made, the first being the downtube decal and the next being the head badge.

I know that a real graphic artist could do better in much less time, but this forum seems to be all about people learning new things and maybe this could help someone else one day.
Here are the other two decals I made, the first being the downtube decal and the next being the head badge.
Last edited by Preynmantis; 11-13-11 at 08:21 AM.
11-13-11 | 09:15 AM
#17
Thread Starter
Junior Member
Joined: Jul 2011
Posts: 164
Likes: 2
From: Southern Colorado
Preymantis, this is a good thread topic, with the trend towards more refinishing of frames.
There are many sites that tell how to create and print decals.
This thread is about "saving" graphics, in a way.
Would anyone have an objection to a continuing thread for this?
Maybe with 4 main areas?
1-Creating repro's using an image of the existing graphic.
2-Re-creating repro's from scratch using software.
3-The physical part: printing them, as far as media, inks, printer types, etc.
4-Exporting them to decal makers, sign companies, etc.
At one time, a C&V member showed several bikes he redid, using decals he made on his inkjet printer.
Others here, from time to time, have discussed it briefly, using dye-sub printers, laser, etc.
All this stuff is so far beyond me, it would be nice to learn about it. In layman's terms.
There are many sites that tell how to create and print decals.
This thread is about "saving" graphics, in a way.
Would anyone have an objection to a continuing thread for this?
Maybe with 4 main areas?
1-Creating repro's using an image of the existing graphic.
2-Re-creating repro's from scratch using software.
3-The physical part: printing them, as far as media, inks, printer types, etc.
4-Exporting them to decal makers, sign companies, etc.
At one time, a C&V member showed several bikes he redid, using decals he made on his inkjet printer.
Others here, from time to time, have discussed it briefly, using dye-sub printers, laser, etc.
All this stuff is so far beyond me, it would be nice to learn about it. In layman's terms.
For my part and for these graphics, this should be (knock on wood) easy. I will have them done in black on the frame and I believe all they will be doing is making templates and painting the arwork directly in the frame.
Regardless, I will report what happens.
11-13-11 | 09:43 AM
#19
Phyllo-buster
Joined: Jan 2010
Posts: 9,276
Likes: 2,698
From: Nova Scotia
Bikes: roadsters, club bikes, fixed and classic
I wasn't disparging the work of the OP or suggesting that scanning and cleaning files is inadequate for many situations where all you need is a repro decal for a bike. I do it all the time and it works great. But the thread title is misleading saying these are vector graphics.
Here's my basic spin on the 2 main types of files.
Vector based files (.eps, .ai) are resolution independent. That means you can open the file at a size suitable for a tube decal at 6 cm wide or a T shirt at 6 inches wide or a theatrical poster at 6 feet wide and the image is equally as sharp and clear at every size.
Bitmap files (.jpeg. tiff, tga etc) are only as good as the size you make them. If you scan 6 inch a logo and clean it up using brush, pencil and eraser tools it will useful at the original size scan or smaller. You can't resize it (much) larger without degrading the picture quality.
Cleaning up rasterized images (bitmaps) with a decent graphics program is quite useful and a lot of fun when you get the hang of it and highly recommended. Vector based work require some training and isn't really practical or necessary for many situations
I'd be happy to help anyone wanting to using Adobe Photoshop or ImageReady to clean up pictures. There's a lot of shortcuts using different selection tools to make the process go quicker.
Here's my basic spin on the 2 main types of files.
Vector based files (.eps, .ai) are resolution independent. That means you can open the file at a size suitable for a tube decal at 6 cm wide or a T shirt at 6 inches wide or a theatrical poster at 6 feet wide and the image is equally as sharp and clear at every size.
Bitmap files (.jpeg. tiff, tga etc) are only as good as the size you make them. If you scan 6 inch a logo and clean it up using brush, pencil and eraser tools it will useful at the original size scan or smaller. You can't resize it (much) larger without degrading the picture quality.
Cleaning up rasterized images (bitmaps) with a decent graphics program is quite useful and a lot of fun when you get the hang of it and highly recommended. Vector based work require some training and isn't really practical or necessary for many situations
I'd be happy to help anyone wanting to using Adobe Photoshop or ImageReady to clean up pictures. There's a lot of shortcuts using different selection tools to make the process go quicker.
Last edited by clubman; 11-13-11 at 10:03 AM.
11-13-11 | 10:09 AM
#20

Senior Member
Joined: Sep 2008
Posts: 1,350
Likes: 4
From: Collegeville, PA
Bikes: Ruckelshaus Randonneur, Specialized Allez (early 90's, steel), Ruckelshaus Path Bomber currently being built
11-13-11 | 10:09 AM
#21
Thread Starter
Junior Member
Joined: Jul 2011
Posts: 164
Likes: 2
From: Southern Colorado
Clubman,
I did not take it as a slight, though I do have some questions. I know that the files I posted are raster graphics, because they are the .png files I used to clean them up in MS Paint. Using Inkscape, I saved the file as a .eps file. In saving it as an .eps file, is the output now a vector image? I saw your comment above about being able to save it as an .eps file, but it may not behave as one. While I understand the statement, I am not sure I understand how to recognize the difference.
Given that these graphics will be at much smaller sizes than displayed here, do you think they will work well for creating painting templates? To my uneducated eye, I was thinking that they should be ok. Were I looking to print these and use decals, I would be looking for help in sharpening them.
I would love any help on making this stuff better. I don't know if I will ever do this again, but it is nice to know how. That and if my output isn't good enough for my refinisher, I may be back at this.
I did not take it as a slight, though I do have some questions. I know that the files I posted are raster graphics, because they are the .png files I used to clean them up in MS Paint. Using Inkscape, I saved the file as a .eps file. In saving it as an .eps file, is the output now a vector image? I saw your comment above about being able to save it as an .eps file, but it may not behave as one. While I understand the statement, I am not sure I understand how to recognize the difference.
Given that these graphics will be at much smaller sizes than displayed here, do you think they will work well for creating painting templates? To my uneducated eye, I was thinking that they should be ok. Were I looking to print these and use decals, I would be looking for help in sharpening them.
I would love any help on making this stuff better. I don't know if I will ever do this again, but it is nice to know how. That and if my output isn't good enough for my refinisher, I may be back at this.
11-13-11 | 10:31 AM
#22
The space coyote lied.
Joined: Sep 2008
Posts: 48,841
Likes: 11,033
From: dusk 'til dawn.
Bikes: everywhere
eps files (along with pdf, psd, ai, cdr, etc) can contain vector and raster information. You can tell what a specific element is by zooming way in on it. Once you get zoomed in this is what you may see:

A vector element will remain a series of lines and curves at ANY zoom level. A raster/bitmap element may look like curves and lines while zoomed out but when zoomed in you'll see it's a bunch of dots of various colors.
I do some printing of art that should ideally be vector with bitmap source material. A good guideline for inkjet output is to make it at least 300dpi at full size, 200dpi is often "good enough".
Hmmm, sounds like your refinisher is likely using a cutter/plotter to cut masking stencils. There's a good chance that the cutter/plotter can do absolutely nothing with a bitmap file. (EDIT: Doh! Surely he's cutting vinyl decals to be applied. I've been watching too many of those hot rod shows)
To prepare a file for the cutter, you can trace the bitmap in Inkscape. You use the pen tool. I usually start by putting a node (by clicking with the pen tool) at the apex of each curve, at each corner and at the end of each straight line. Then I select all nodes, convert to curves. Then set about adjusting all the handles so that the curves look right. For your example decal, as mentioned above you can match the font. Many fonts will have to be hand traced, however.
Your first one will probably take a LONG time, but it gets faster as you get better.
A vector element will remain a series of lines and curves at ANY zoom level. A raster/bitmap element may look like curves and lines while zoomed out but when zoomed in you'll see it's a bunch of dots of various colors.
I do some printing of art that should ideally be vector with bitmap source material. A good guideline for inkjet output is to make it at least 300dpi at full size, 200dpi is often "good enough".
Hmmm, sounds like your refinisher is likely using a cutter/plotter to cut masking stencils. There's a good chance that the cutter/plotter can do absolutely nothing with a bitmap file. (EDIT: Doh! Surely he's cutting vinyl decals to be applied. I've been watching too many of those hot rod shows)
To prepare a file for the cutter, you can trace the bitmap in Inkscape. You use the pen tool. I usually start by putting a node (by clicking with the pen tool) at the apex of each curve, at each corner and at the end of each straight line. Then I select all nodes, convert to curves. Then set about adjusting all the handles so that the curves look right. For your example decal, as mentioned above you can match the font. Many fonts will have to be hand traced, however.
Your first one will probably take a LONG time, but it gets faster as you get better.
Last edited by LesterOfPuppets; 11-13-11 at 10:47 AM.
11-13-11 | 10:41 AM
#23

@$#!?&!!$
Joined: Jun 2008
Posts: 686
Likes: 0
From: Green Country, OK
Good explanation of vector LesterOfPuppets.
if you up the contrast on the original photo(like cudak888 suggested) you could do an auto trace in illustrator and it would convert it to vector. You would need to clean it up, but it should take quite a bit less time than starting from scratch. There is also an older program called streamline that converts images to vector files. It could probably be had for much cheaper than the newer versions of Illustrator that have auto trace included.
I hand draw most artwork in pen and ink, get a good photo or scan and convert it to vector. I like working that way personally.
Jake
if you up the contrast on the original photo(like cudak888 suggested) you could do an auto trace in illustrator and it would convert it to vector. You would need to clean it up, but it should take quite a bit less time than starting from scratch. There is also an older program called streamline that converts images to vector files. It could probably be had for much cheaper than the newer versions of Illustrator that have auto trace included.
I hand draw most artwork in pen and ink, get a good photo or scan and convert it to vector. I like working that way personally.
Jake
11-13-11 | 10:53 AM
#24
The space coyote lied.
Joined: Sep 2008
Posts: 48,841
Likes: 11,033
From: dusk 'til dawn.
Bikes: everywhere
Another way to think about vector and raster files is the information they contain. Say you have a 1" by 1" piece of art.
A vector file contains the information as a series of lines and curves. The coordinates of the start and end points of these lines/curves are what's recorded in the file.
A raster file at 200dpi would contain information that describes the color of each of the 40,000 dots that it takes to display that 1"x1" image. Many raster files can contain more info than that, but for simplicity's sake that's the deal.
If you're a fan of 1980s video games there are some good vector examples:
Asteroids, BattleZone, Lunar Lander, Red Baron : Vector
Missile Command, Pac Man, Asteroids Deluxe : Raster
I guess I should note that none of those vector games contained Bezier curve information. That's why they looked so blocky.
A vector file contains the information as a series of lines and curves. The coordinates of the start and end points of these lines/curves are what's recorded in the file.
A raster file at 200dpi would contain information that describes the color of each of the 40,000 dots that it takes to display that 1"x1" image. Many raster files can contain more info than that, but for simplicity's sake that's the deal.
If you're a fan of 1980s video games there are some good vector examples:
Asteroids, BattleZone, Lunar Lander, Red Baron : Vector
Missile Command, Pac Man, Asteroids Deluxe : Raster
I guess I should note that none of those vector games contained Bezier curve information. That's why they looked so blocky.
Last edited by LesterOfPuppets; 11-13-11 at 11:05 AM.
11-13-11 | 12:05 PM
#25
Thread Starter
Junior Member
Joined: Jul 2011
Posts: 164
Likes: 2
From: Southern Colorado
Hmmm, sounds like your refinisher is likely using a cutter/plotter to cut masking stencils. There's a good chance that the cutter/plotter can do absolutely nothing with a bitmap file. (EDIT: Doh! Surely he's cutting vinyl decals to be applied. I've been watching too many of those hot rod shows)