


What is the correct way to modify lugs for small sizes
 12-20-25 | 01:37 PM
#1
Thread Starter
Senior Member


Joined: Apr 2011
Posts: 12,627
Likes: 4,781
What is the correct way to modify lugs for small sizes
Small bikes have steeper down tubes. Given an off-the-shelf lost wax cast, tight fitting BB shell and lower HT lug, how are you supposed to modify them?
Cut them away on the inside of where you are bending them to, and bend to close the gap, then silver solder?
Cut them away on the outside of the bending direction and fill with brass, then file inside and out?
Cut away at the side, split the side and bend both halves, then solder?
Cut them away entirely and replace with a piece of mitered tubing and brass?
Refuse to build frames for anyone under 5'8"?
 12-20-25 | 02:34 PM
#2
Senior Member


Joined: Feb 2012
Posts: 19,344
Likes: 5,461
From: Rochester, NY
Bikes: Stewart S&S coupled sport tourer, Stewart Sunday light, Stewart Commuting, Stewart Touring, Co Motion Tandem, Stewart 3-Spd, Stewart Track, Fuji Finest, Mongoose Tomac ATB, GT Bravado ATB, JCP Folder, Stewart 650B ATB
Small bikes have steeper down tubes. Given an off-the-shelf lost wax cast, tight fitting BB shell and lower HT lug, how are you supposed to modify them?
Cut them away on the inside of where you are bending them to, and bend to close the gap, then silver solder? Yes
Cut them away on the outside of the bending direction and fill with brass, then file inside and out? Yes
Cut away at the side, split the side and bend both halves, then solder? Yes
Cut them away entirely and replace with a piece of mitered tubing and brass? Yes
Refuse to build frames for anyone under 5'8"?

Really all but the last is done and which method depends on a few factors. The biggie is how much angle change is needed.
Generally I was able to get about 1* of change from the lug's intended angle with very little tweaking of the lug's curves and sockets using pliers or a small adjustable wrench as initial forming tools and not loose what I would call "good enough gaps" for silver to fill. When the angle changes grew I next would do some internal to the lug sockets grinding. This usually means the internal gaps between the tube and lug will grow a bunch. Here's when changing to a bronze filler might be seen as the smart move by some. I've managed as much as 4+* of angle change this way and used bronze filler. One can hack saw a "dart" (to borrow a tailoring term), close up the cut, braze/weld it shut and continue with internal to the socket clean up although I never tried this I have used a similar method of forming a domed stay end with good results. The last method is to just make the lugs yourself. A tube with a .058" wall will slide over another tube that has a diameter 1/8" less than tube #1. So an upper head lug for classic road tubes might be a 1.375"x.058" tube as the source for the head tube portion and a 1.125"x.058" tube at the top tube portion of this yet to be made lug. These lugs can be made for pretty much any angle or tube diameters. I make my own head tube end reinforcement rings this way when I otherwise am filleting the frame. Andy (who's only 5'6")
I should add that the trouble of reangling lugs and wanting to play with tube diameters are two big reasons why so many of my frames, regardless of their size or wheels, have been filleted. I made a few Terry type bikes (terryaki...) with lugs and the lower head angle around 65-66 degrees and at some point the HJ lugs availability of 64* lower lugs had dried up. These days I would probably just make some lugs if I had to do another lugged Terry type. Andy.
__________________
AndrewRStewart
AndrewRStewart
Last edited by Andrew R Stewart; 12-20-25 at 02:42 PM. Reason: extra opinion
12-20-25 | 02:45 PM
#3
Thread Starter
Senior Member
Joined: Apr 2011
Posts: 12,627
Likes: 4,781
As long as we can refuse any rider over 5'10" too
Really all but the last is done and which method depends on a few factors. The biggie is how much angle change is needed.
Generally I was able to get about 1* of change from the lug's intended angle with very little tweaking of the lug's curves and sockets using pliers or a small adjustable wrench as initial forming tools and not loose what I would call "good enough gaps" for silver to fill. When the angle changes grew I next would do some internal to the lug sockets grinding. This usually means the internal gaps between the tube and lug will grow a bunch. Here's when changing to a bronze filler might be seen as the smart move by some. I've managed as much as 4+* of angle change this way and used bronze filler. One can hack saw a "dart" (to borrow a tailoring term), close up the cut, braze/weld it shut and continue with internal to the socket clean up although I never tried this I have used a similar method of forming a domed stay end with good results. The last method is to just make the lugs yourself. A tube with a .058" wall will slide over another tube that has a diameter 1/8" less than tube #1. So an upper head lug for classic road tubes might be a 1.375"x.058" tube as the source for the head tube portion and a 1.125"x.058" tube at the top tube portion of this yet to be made lug. These lugs can be made for pretty much any angle or tube diameters. I make my own head tube end reinforcement rings this way when I otherwise am filleting the frame. Andy (who's only 5'6")
I should add that the trouble of reangling lugs and wanting to play with tube diameters are two big reasons why so many of my frames, regardless of their size or wheels, have been filleted. I made a few Terry type bikes (terryaki...) with lugs and the lower head angle around 65-66 degrees and at some point the HJ lugs availability of 64* lower lugs had dried up. These days I would probably just make some lugs if I had to do another lugged Terry type. Andy.
But I was looking at building a first frame, and this would have been a major hill to climb.
12-20-25 | 02:52 PM
#4
Senior Member
Joined: Feb 2012
Posts: 19,344
Likes: 5,461
From: Rochester, NY
Bikes: Stewart S&S coupled sport tourer, Stewart Sunday light, Stewart Commuting, Stewart Touring, Co Motion Tandem, Stewart 3-Spd, Stewart Track, Fuji Finest, Mongoose Tomac ATB, GT Bravado ATB, JCP Folder, Stewart 650B ATB
Another way to look at making your own lugs is that they are cheap (material wise, I assume your time is worth as little as my time is), can be at any angle that the fit/design is best at and those usual first bike's mistakes are happening on the cheap to make lugs, which can be redone far easier than once you are about to attach the stays. Andy
__________________
AndrewRStewart
AndrewRStewart
12-20-25 | 02:57 PM
#5
Thread Starter
Senior Member
Joined: Apr 2011
Posts: 12,627
Likes: 4,781
Think of making a set of lugs for a frame as being about half the work to make a frame lugless... So this first frame with hand made lugs might really be considered your first and a half frame
Another way to look at making your own lugs is that they are cheap (material wise, I assume your time is worth as little as my time is), can be at any angle that the fit/design is best at and those usual first bike's mistakes are happening on the cheap to make lugs, which can be redone far easier than once you are about to attach the stays. Andy
Another way to look at making your own lugs is that they are cheap (material wise, I assume your time is worth as little as my time is), can be at any angle that the fit/design is best at and those usual first bike's mistakes are happening on the cheap to make lugs, which can be redone far easier than once you are about to attach the stays. Andy
12-20-25 | 07:02 PM
#6
semi-retired framebuilder
Joined: Dec 2007
Posts: 145
Likes: 580
From: Halifax, Nova Scotia, Canada
Bikes: twenty-three at last count
These days it’s not just smaller frames that have steeper down tubes ie needing lower head lugs of a shallower angle. Almost all lugs are designed for road bikes with the clearances for 25mm tires - but most of what I’m building these days are “all-road” or modern road bikes, using clearances for 700x38 with fenders, or 700x42. So the lower head lugs need to be more like a 57-degree or 58- degree, and likewise the bottom bracket shell needs a shallower subtended angle, again more like 57 or 58 degrees vs the usual 60 or 61 degree angle between down tube and seat tube.
Fortunately, there are a few (but only a few) lugs and bottom brackets now becoming available with these numbers. Hopefully more as time goes on. As Andy says, I can sneak a degree on cast lugs without any blacksmithing.
Fortunately, there are a few (but only a few) lugs and bottom brackets now becoming available with these numbers. Hopefully more as time goes on. As Andy says, I can sneak a degree on cast lugs without any blacksmithing.
12-20-25 | 09:16 PM
#7
framebuilder
Joined: Dec 2009
Posts: 1,786
Likes: 2,701
From: Niles, Michigan
Design your frame and then select your lugs and other materials. The less experienced you are the better it is to have lugs that match the frame angles. Hank mo longer has his Henry James lugs made. He had 4 down tube angles, 57,59,60 and 62. These were fantastic for beginners. Some can still be found. He had a couple of degree options on his top and seat lugs too.
Stamped and welded or Nikko bulge formed lugs can have they angles modified more easily. I have some sets of Nikko lugs. You can get a better fit with seat and top tube lugs by sloping the top tube a degree or 2.
A punch set is necessary if you want to get clean shorelines when you braze. That way you can place your blows more precisely.
Last edited by Doug Fattic; 12-20-25 at 09:52 PM.
 12-20-25 | 11:59 PM
#8
Thread Starter
Senior Member
Joined: Apr 2011
Posts: 12,627
Likes: 4,781
Design your frame and then select your lugs and other materials. The less experienced you are the better it is to have lugs that match the frame angles. Hank mo longer has his Henry James lugs made. He had 4 down tube angles, 57,59,60 and 62. These were fantastic for beginners. Some can still be found. He had a couple of degree options on his top and seat lugs too.
Stamped and welded or Nikko bulge formed lugs can have they angles modified more easily. I have some sets of Nikko lugs. You can get a better fit with seat and top tube lugs by sloping the top tube a degree or 2.
A punch set is necessary if you want to get clean shorelines when you braze. That way you can place your blows more precisely.
Stamped and welded or Nikko bulge formed lugs can have they angles modified more easily. I have some sets of Nikko lugs. You can get a better fit with seat and top tube lugs by sloping the top tube a degree or 2.
A punch set is necessary if you want to get clean shorelines when you braze. That way you can place your blows more precisely.
I still have everything in storage. Maybe I'll get brave and cut those two lugs up. Cheaper than replacing them at this point.

 12-21-25 | 04:56 PM
#10

all of my lugs are cast and i can easily get 2-3 degrees on either side of their as-delivered state. simply expand the interior and make the parts an extreme slide fit. meaning, get them to fit loose on whatever tube they’re accepting. the casting doesn’t determine the design. the fixture does. when i assemble a complete main triangle for the heating cycle, though its in the fixture where i only add two small tacks total prior to removal, the interference fit is no longer an issue. i also think folks are too over-analytical when it comes to clearances. better to work on improving torch waving and pace than to beat a lug into submission.
everything above applies to pre-investment cast parts too.
everything above applies to pre-investment cast parts too.
__________________
Atmo bis
Atmo bis
Last edited by e-RICHIE; 12-21-25 at 07:07 PM. Reason: above not about
12-22-25 | 08:30 AM
#11
Thread Starter
Senior Member
Joined: Apr 2011
Posts: 12,627
Likes: 4,781
all of my lugs are cast and i can easily get 2-3 degrees on either side of their as-delivered state. simply expand the interior and make the parts an extreme slide fit. meaning, get them to fit loose on whatever tube they�re accepting. the casting doesn�t determine the design. the fixture does. when i assemble a complete main triangle for the heating cycle, though its in the fixture where i only add two small tacks total prior to removal, the interference fit is no longer an issue. i also think folks are too over-analytical when it comes to clearances. better to work on improving torch waving and pace than to beat a lug into submission.
everything above applies to pre-investment cast parts too.
everything above applies to pre-investment cast parts too.
12-22-25 | 09:20 AM
#13
Thread Starter
Senior Member
Joined: Apr 2011
Posts: 12,627
Likes: 4,781
Sorry, it was my understanding that silver won't bridge certain distances between lug and tube that brass would, which is why builders need to use brass for certain joints or lugs - like dropouts into stays and some bulge formed lugs. So one would think that a tube that is angled to the extreme might have a large spot down inside where the tube is angled away from the lug wall that the silver would not flow into and bridge between them. Have I misunderstood the problem, or just the degree?
12-22-25 | 10:55 AM
#14
Senior Member
Joined: Feb 2012
Posts: 19,344
Likes: 5,461
From: Rochester, NY
Bikes: Stewart S&S coupled sport tourer, Stewart Sunday light, Stewart Commuting, Stewart Touring, Co Motion Tandem, Stewart 3-Spd, Stewart Track, Fuji Finest, Mongoose Tomac ATB, GT Bravado ATB, JCP Folder, Stewart 650B ATB
Re: Gap
My understanding is that most lug sockets are a huge overkill WRT the amount of tube socket overlap to attain adequate strength. So gaps that exceed the .005", often, quoted amount for56% silver gap the strength should lessen at these points. But there's so much surface area and the fit is not consistent across the interface that these concerns about gaps is, as Richard says, overstated.
I chose to use bronze filler with lugs for a few other reasons too. Not just the gappy fit up of a hugely changed lug angle but cost and the challenge to get comfy with flowing bronze too. Another is borrowing from the jewelry industry. There are joints that have more than one brazing cycle and having the first filler melt at a higher temp than the second braze's filler helps prevent melt out of that first filler. Seat stay caps and their attachment to the seat tube as example. Andy.
__________________
AndrewRStewart
AndrewRStewart
12-22-25 | 10:57 AM
#15
Sorry, it was my understanding that silver won't bridge certain distances between lug and tube that brass would, which is why builders need to use brass for certain joints or lugs - like dropouts into stays and some bulge formed lugs. So one would think that a tube that is angled to the extreme might have a large spot down inside where the tube is angled away from the lug wall that the silver would not flow into and bridge between them. Have I misunderstood the problem, or just the degree?
__________________
Atmo bis
Atmo bis
12-22-25 | 08:13 PM
#16
framebuilder
Joined: Dec 2009
Posts: 1,786
Likes: 2,701
From: Niles, Michigan
Kontact, beginners can become easily frustrated and discouraged by building complications. One of my biggest jobs as a framebuilding class teacher is helping them manage their negative emotions as things go less than they desired. And sometimes me doing the hardest parts so they don't get stuck. The closer the lug angles are to your design, the easier it will be for you.
Almost all rookies make the same mistake so knowing what they are really shortens the learning curve.
Almost all rookies make the same mistake so knowing what they are really shortens the learning curve.
12-22-25 | 08:21 PM
#17
Thread Starter
Senior Member
Joined: Apr 2011
Posts: 12,627
Likes: 4,781
Kontact, beginners can become easily frustrated and discouraged by building complications. One of my biggest jobs as a framebuilding class teacher is helping them manage their negative emotions as things go less than they desired. And sometimes me doing the hardest parts so they don't get stuck. The closer the lug angles are to your design, the easier it will be for you.
Almost all rookies make the same mistake so knowing what they are really shortens the learning curve.
Almost all rookies make the same mistake so knowing what they are really shortens the learning curve.
When it comes to making stuff, I'm very patient. But about the time this problem popped up I moved and lost my work space. So it got shelved by default. Maybe it is time to take it out of the box.
12-24-25 | 09:35 AM
#18
framebuilder
Joined: Dec 2009
Posts: 1,786
Likes: 2,701
From: Niles, Michigan
My recommendation is to use your lugs you have now for practice before doing a main triangle for real. With instruction, students can really make brazing improvements with some practice. I've taught hundreds how to braze and almost none of them could have brazed a lug decently without practicing first. You have to avoid rookie mistakes like not bending the silver straight enough (or it takes more concentration and coordination to keep it where it belongs as it melts), at the right angle (same reason as #1) and don't relax your hand holding the brazing rod to your side because it takes too much time and thought placing it in position when the joint is up to temperature. Most beginners can either keep track of their filler rod hand movement or their torch hand pattern but they can't do both at the same time until practice allows for some muscle memory to take over.
The primary issue learning to braze is operating both hands independently of each other. I constantly remind a student to keep the same flame to joint distance and/or keep point the flame towards the center. A normal person's mind can only keep track and respond to half of what they should. Practice becomes your way to get past rookie common mistakes.
So of course I'm going to suggest starting with simpler practice brazes to get used to moving both hands like you should. Once you are past the awkward stage, you can start with lug brazing, I'd recommend using the lugs you have on a complete front triangle so your practice and real frame can be held the same way as you are brazing. You will learn a lot. I'd also recommend adjusting the design of your practice front triangle to better fit the angles of the lugs you are using. Don't think of it as a frame to ride. Use .035" wall straight gauge tubing from aircraft suppliers.
12-24-25 | 09:45 AM
#19
Senior Member
Joined: Feb 2012
Posts: 19,344
Likes: 5,461
From: Rochester, NY
Bikes: Stewart S&S coupled sport tourer, Stewart Sunday light, Stewart Commuting, Stewart Touring, Co Motion Tandem, Stewart 3-Spd, Stewart Track, Fuji Finest, Mongoose Tomac ATB, GT Bravado ATB, JCP Folder, Stewart 650B ATB
Kontact- If you are close to Rochester, NY I would be happy to spend part of a day with you and a torch. I also have a bunch of cut offs I save just for practice. Andy.
__________________
AndrewRStewart
AndrewRStewart
12-24-25 | 04:39 PM
#20

Senior Member
Joined: Apr 2009
Posts: 3,701
Likes: 5,481
From: Seattle
Now with Youtube videos, a garage builder with no mentor can at least see it being done from a camera's perspective, but that's not nearly as good as being there. At least it's better than the bad old days pre-internet.
But even "being there", seeing it in person, is nowhere near as good as having a mentor talk you through it while you do it, and honestly critique your results. Me, I had an experienced pro literally holding my hand to show me how to wave the torch, how long to spend on each area. And I still roasted the first practice joint, so maybe I was not a natural.
 And that was after I'd done a fair bit of brazing. They had me putting plugs on the tops of seatstays, dozens of them, then I got to braze dropouts to a couple dozen stays, and I was in that apprentice situation for months (maybe a year?) before I even attempted a lug. Let alone a fork crown, which is even more dangerous (to the rider).
 But my second practice joint looked OK and cutting it up showed good penetration, so the 3rd lug I brazed was on a frame for my roommate, because I couldn't afford more practice lugs! Obviously I couldn't afford a 531 tubeset, dropouts etc for myself (and pay my rent and eat) but he could, so he graciously agreed to be my guinea pig. That was in '77 and he still has that bike. It had a kiddy seat on it for a decade, now converted to a gentleman's town bike.
But maybe that's not a story I should tell. I went straight to making a bike for someone else to ride, which should be criminal, it's very unwise. I dodged a bullet there. My roommate wasn't fully aware of what-all could have gone wrong. What if the front end parted from the rear while he was carrying his kid?
Anyway, lugs were more expensive then, now they're giving 'em away because no one wants them, so there's no excuse for not doing a lot more practice joints. I recommend breaking some joints in a vise with cheaterbars, to see how and where they break � great feedback for how/where you have to improve.
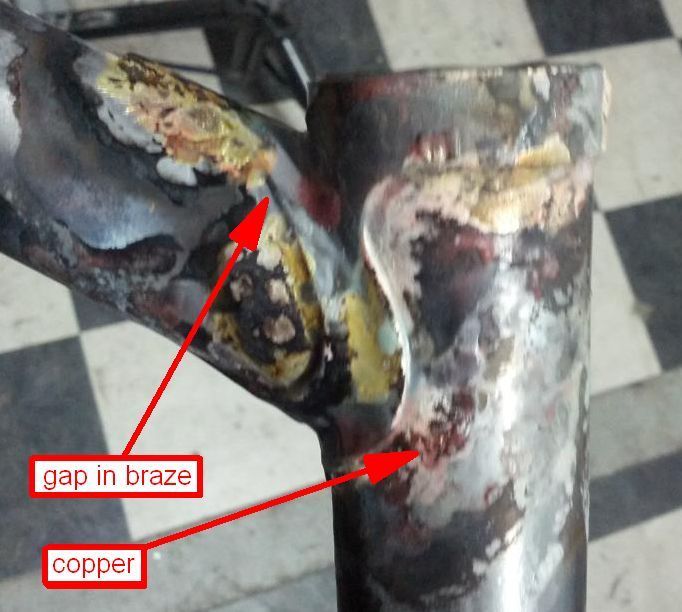
But it's almost impossible for practicing on your own to substitute for what you can learn from a seasoned pro in a half-day, or maybe even an hour. You don't know what you don't know. As an example, here's a pic that a guy who called himself framebuilder posted, not as a "what did I do wrong" but more of a "look at my awesome brazed lug". He had a company name and he was taking orders.
I've seen so many others that, after they broke, you could see that they never got penetration across the gap, they just brazed the lug edges from each side, maybe a mm or two deep in from each edge. One local guy who made over a hundred frames never got good IMHO. One of his frames had cutting oil coming out between the top tube and the lug, from reaming the headtube, and he explained it by saying "silver is porous". I saw one of his forks where a blade fell out of the socket. He had never worked with an actual FB, so he didn't know how much he didn't know.
12-24-25 | 09:35 PM
#21
Thread Starter
Senior Member
Joined: Apr 2011
Posts: 12,627
Likes: 4,781
12-24-25 | 09:44 PM
#22
Thread Starter
Senior Member
Joined: Apr 2011
Posts: 12,627
Likes: 4,781
I think more emphasis should be on the "with instruction" part! OK some people are just "naturals", but the problem is too many people think they are. Un-earned confidence kills!
Now with Youtube videos, a garage builder with no mentor can at least see it being done from a camera's perspective, but that's not nearly as good as being there. At least it's better than the bad old days pre-internet.
But even "being there", seeing it in person, is nowhere near as good as having a mentor talk you through it while you do it, and honestly critique your results. Me, I had an experienced pro literally holding my hand to show me how to wave the torch, how long to spend on each area. And I still roasted the first practice joint, so maybe I was not a natural. And that was after I'd done a fair bit of brazing. They had me putting plugs on the tops of seatstays, dozens of them, then I got to braze dropouts to a couple dozen stays, and I was in that apprentice situation for months (maybe a year?) before I even attempted a lug. Let alone a fork crown, which is even more dangerous (to the rider).
But my second practice joint looked OK and cutting it up showed good penetration, so the 3rd lug I brazed was on a frame for my roommate, because I couldn't afford more practice lugs! Obviously I couldn't afford a 531 tubeset, dropouts etc for myself (and pay my rent and eat) but he could, so he graciously agreed to be my guinea pig. That was in '77 and he still has that bike. It had a kiddy seat on it for a decade, now converted to a gentleman's town bike.
But maybe that's not a story I should tell. I went straight to making a bike for someone else to ride, which should be criminal, it's very unwise. I dodged a bullet there. My roommate wasn't fully aware of what-all could have gone wrong. What if the front end parted from the rear while he was carrying his kid?
Anyway, lugs were more expensive then, now they're giving 'em away because no one wants them, so there's no excuse for not doing a lot more practice joints. I recommend breaking some joints in a vise with cheaterbars, to see how and where they break � great feedback for how/where you have to improve.
But it's almost impossible for practicing on your own to substitute for what you can learn from a seasoned pro in a half-day, or maybe even an hour. You don't know what you don't know. As an example, here's a pic that a guy who called himself framebuilder posted, not as a "what did I do wrong" but more of a "look at my awesome brazed lug". He had a company name and he was taking orders.Obviously the markups were added by me, the dude thought this was great.
I've seen so many others that, after they broke, you could see that they never got penetration across the gap, they just brazed the lug edges from each side, maybe a mm or two deep in from each edge. One local guy who made over a hundred frames never got good IMHO. One of his frames had cutting oil coming out between the top tube and the lug, from reaming the headtube, and he explained it by saying "silver is porous". I saw one of his forks where a blade fell out of the socket. He had never worked with an actual FB, so he didn't know how much he didn't know.
Now with Youtube videos, a garage builder with no mentor can at least see it being done from a camera's perspective, but that's not nearly as good as being there. At least it's better than the bad old days pre-internet.
But even "being there", seeing it in person, is nowhere near as good as having a mentor talk you through it while you do it, and honestly critique your results. Me, I had an experienced pro literally holding my hand to show me how to wave the torch, how long to spend on each area. And I still roasted the first practice joint, so maybe I was not a natural.
And that was after I'd done a fair bit of brazing. They had me putting plugs on the tops of seatstays, dozens of them, then I got to braze dropouts to a couple dozen stays, and I was in that apprentice situation for months (maybe a year?) before I even attempted a lug. Let alone a fork crown, which is even more dangerous (to the rider).But my second practice joint looked OK and cutting it up showed good penetration, so the 3rd lug I brazed was on a frame for my roommate, because I couldn't afford more practice lugs! Obviously I couldn't afford a 531 tubeset, dropouts etc for myself (and pay my rent and eat) but he could, so he graciously agreed to be my guinea pig. That was in '77 and he still has that bike. It had a kiddy seat on it for a decade, now converted to a gentleman's town bike.
But maybe that's not a story I should tell. I went straight to making a bike for someone else to ride, which should be criminal, it's very unwise. I dodged a bullet there. My roommate wasn't fully aware of what-all could have gone wrong. What if the front end parted from the rear while he was carrying his kid?
Anyway, lugs were more expensive then, now they're giving 'em away because no one wants them, so there's no excuse for not doing a lot more practice joints. I recommend breaking some joints in a vise with cheaterbars, to see how and where they break � great feedback for how/where you have to improve.
But it's almost impossible for practicing on your own to substitute for what you can learn from a seasoned pro in a half-day, or maybe even an hour. You don't know what you don't know. As an example, here's a pic that a guy who called himself framebuilder posted, not as a "what did I do wrong" but more of a "look at my awesome brazed lug". He had a company name and he was taking orders.
I've seen so many others that, after they broke, you could see that they never got penetration across the gap, they just brazed the lug edges from each side, maybe a mm or two deep in from each edge. One local guy who made over a hundred frames never got good IMHO. One of his frames had cutting oil coming out between the top tube and the lug, from reaming the headtube, and he explained it by saying "silver is porous". I saw one of his forks where a blade fell out of the socket. He had never worked with an actual FB, so he didn't know how much he didn't know.
12-25-25 | 08:44 AM
#24
Senior Member
Joined: Feb 2012
Posts: 19,344
Likes: 5,461
From: Rochester, NY
Bikes: Stewart S&S coupled sport tourer, Stewart Sunday light, Stewart Commuting, Stewart Touring, Co Motion Tandem, Stewart 3-Spd, Stewart Track, Fuji Finest, Mongoose Tomac ATB, GT Bravado ATB, JCP Folder, Stewart 650B ATB
And my understanding is that the zinc boiling off vapors are nasty stuff, health wise. Andy
__________________
AndrewRStewart
AndrewRStewart
12-25-25 | 02:55 PM
#25
Senior Member
Joined: Apr 2009
Posts: 3,701
Likes: 5,481
From: Seattle
I know of at least one death from zinc fume inhalation, but that was from melting the zinc off a bunch of plumbing parts in a kiln. When he opened the kiln in his small workspace it was filled with a lethal dose.
I have felt a mild form of the short-term effects which are flu-like: nausea, headache, etc. That was from fillet brazing for hours, like making a production run of tandems. Having felt it and not wanting it again, I started wearing a cartridge respirator, with a plastic face shield over that, when doing long stretches. The cartridge to use for metal fumes is HEPA. For most brazing though, it suffices to have good ventilation and keep your head out of the plume. In my non-expert opinion.
Wikipedia article here seems good: https://en.wikipedia.org/wiki/Metal_fume_fever
Note they say that onset of symptoms is delayed, so you can't just braze until you feel symptoms and then take a break. You may not feel it until you get home. That jives with my experience.
There are other metal fumes that are way more dangerous than zinc, like cadmium and hexavalent chromium ("chrome-6"), which definitely kill.