


Rack building link
 03-19-13 | 08:50 PM
#1

Thread Starter
Senior Member

Joined: Mar 2012
Posts: 1,104
Likes: 48
From: santa barbara CA
Rack building link
Its old but informative as are the comments. Any of you build racks, hobby or otherwise?
https://alexwetmore.org/?p=474
https://alexwetmore.org/?p=474
Last edited by calstar; 03-19-13 at 09:01 PM.
 03-19-13 | 09:03 PM
#2
Randomhead
Joined: Aug 2008
Posts: 25,930
Likes: 4,825
From: Happy Valley, Pennsylvania
I still have no idea what that swagelok guy is going on about (in the comments) and I think I've read it 5 times now
I think Alex Wetmore is personally responsible for no good deals on Swagelok benders on ebay, ever
I think Alex Wetmore is personally responsible for no good deals on Swagelok benders on ebay, ever
03-19-13 | 09:37 PM
#3
Senior Member

Joined: Feb 2012
Posts: 19,353
Likes: 5,471
From: Rochester, NY
Bikes: Stewart S&S coupled sport tourer, Stewart Sunday light, Stewart Commuting, Stewart Touring, Co Motion Tandem, Stewart 3-Spd, Stewart Track, Fuji Finest, Mongoose Tomac ATB, GT Bravado ATB, JCP Folder, Stewart 650B ATB
03-20-13 | 07:09 AM
#4
Senior Member

Joined: Dec 2006
Posts: 1,221
Likes: 23
From: Toronto/Montr�al
Bikes: Eight homemade, three very dusty
Making racks is a good way to learn how to make mitres (some of them in crazy compound angles) and brazed joints, AND how to fixture stuff! Making a rack so that it is symmetrical, centred and level is harder than it looks!
I love making racks, it's how I got started. So far more than half my frames (not a lot) have had racks with them.


I love making racks, it's how I got started. So far more than half my frames (not a lot) have had racks with them.
 03-20-13 | 11:51 AM
#6
Randomhead
Joined: Aug 2008
Posts: 25,930
Likes: 4,825
From: Happy Valley, Pennsylvania
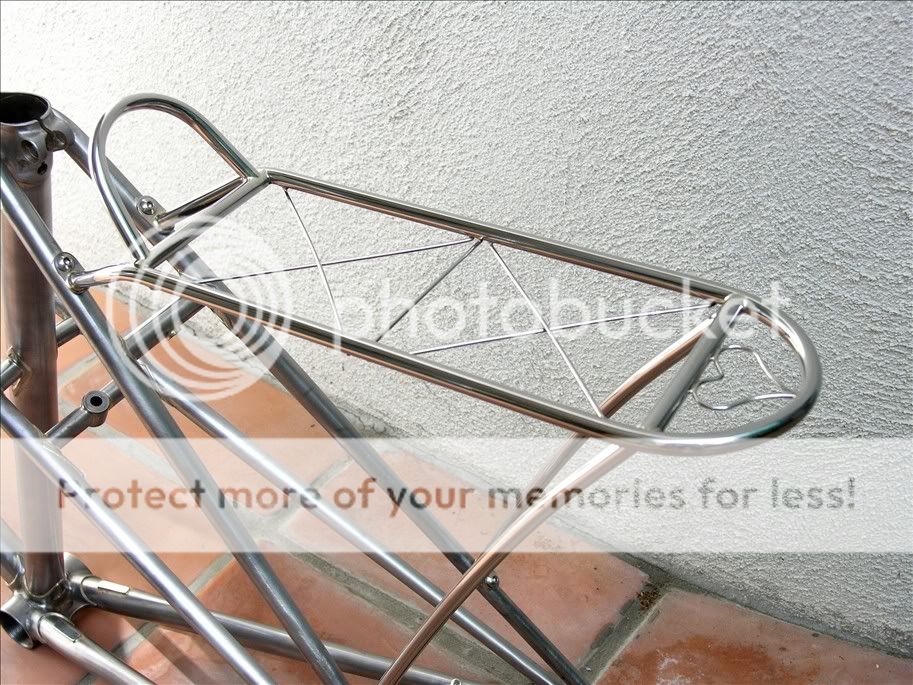
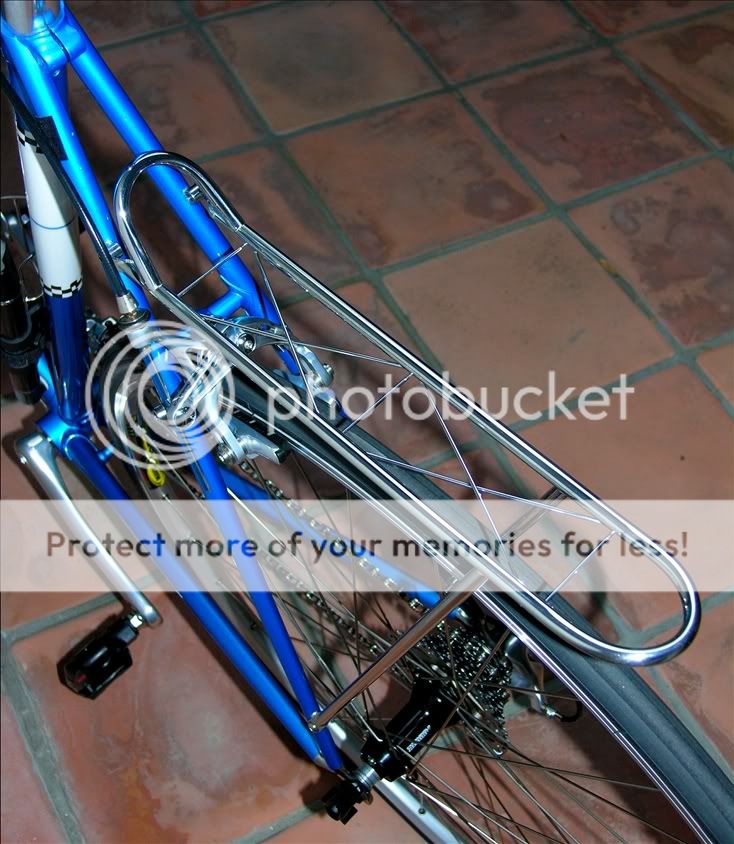
Cassave, is that silver? I built a stainless rack with nickel silver and probably should have joined the main tube to itself with silver. Couldn't get the nickel silver to flow into the joint and overheated the splice tube.
03-20-13 | 12:00 PM
#7

Senior Member


Joined: Jul 2005
Posts: 1,671
Likes: 23
From: Woodland Hills, Calif.
They're both 304 brazed with Bag7 (56%, cad free).
03-20-13 | 12:12 PM
#8

Bicycle Repair Man !!!
Joined: Sep 2007
Posts: 27,266
Likes: 150
From: YEG
Bikes: See my sig...
We joke that every rack we build comes with a bicycle... and building racks is truly much harder than it looks and a good place to hone one's brazing skills (if you braze).
Built a simple rack for my wife's Peugeot designed to handle a Carradice shopper which is a rather large bag, at some point we will be refinishing the frame and will integrate the rack. It replaced the stock Peugeot rack and I wanted to retain the very simple design albeit in a much stronger and stiffer rack that would support a rather heavy single bag as well as dual panniers.

A rack I built for a friend... it had to support a child seat so seat stays were used as lowers and this was integrated into the frame before it got new powder.

We also build separate racks specifically for touring applications... the double rail lets you top load the rack and not have that interfere with the panniers opening and access.

I am starting to take over this end of the business so my partner can focus on hubs and frames and have some designs in the works.
One more... this rack came with a complimentary tandem...


Built a simple rack for my wife's Peugeot designed to handle a Carradice shopper which is a rather large bag, at some point we will be refinishing the frame and will integrate the rack. It replaced the stock Peugeot rack and I wanted to retain the very simple design albeit in a much stronger and stiffer rack that would support a rather heavy single bag as well as dual panniers.
A rack I built for a friend... it had to support a child seat so seat stays were used as lowers and this was integrated into the frame before it got new powder.
We also build separate racks specifically for touring applications... the double rail lets you top load the rack and not have that interfere with the panniers opening and access.
I am starting to take over this end of the business so my partner can focus on hubs and frames and have some designs in the works.
One more... this rack came with a complimentary tandem...
03-20-13 | 12:29 PM
#10
Senior Member
Joined: Dec 2006
Posts: 1,221
Likes: 23
From: Toronto/Montr�al
Bikes: Eight homemade, three very dusty
Cassave, you have the patience of a saint. I find polishing stainless quite tedious!!
Unter, have you tried the Cycle Design flux for Ni-Ag & stainless? It makes a big difference vs. normal brass flux. But it doesn't soak off, hence my polishing comment. I can send a sample if you wish.
Unter, have you tried the Cycle Design flux for Ni-Ag & stainless? It makes a big difference vs. normal brass flux. But it doesn't soak off, hence my polishing comment. I can send a sample if you wish.
03-20-13 | 12:49 PM
#11
Randomhead
Joined: Aug 2008
Posts: 25,930
Likes: 4,825
From: Happy Valley, Pennsylvania
I have been thinking about getting some of the Cycle Design flux for nickel silver. I didn't actually have any problems with the fillet brazing, I just had trouble with getting penetration into the splice. And the big problem was that the only 3/16" tubing I had is really, really thin. Didn't want to use anything that might rust, it sorta defeats the purpose of the stainless.
I polish the stainless tubing on my lathe. Not particularly entertaining, but it wasn't too bad either.
I polish the stainless tubing on my lathe. Not particularly entertaining, but it wasn't too bad either.
 03-20-13 | 02:09 PM
#13
Thread Starter
Senior Member
Joined: Mar 2012
Posts: 1,104
Likes: 48
From: santa barbara CA
Really cool "structures", thanks for the pics. Spruce sells 3/8 x .028(I think Paterek* recommends this wall thickness, anything thicker will tend to kink) for $5.25 a foot, the 3/8 x .035 for $2.94, 1" x .035 for $3.85, 1" x .028 for $7.25. The thinner wall is more expensive because? Where do you get your mtls and what do you use?
thanks, Brian
link to Spruce price list: https://www.aircraftspruce.com/catalo...tubing_un1.php
*edit to add this from Paterek, not that its right or wrong just what he apparantly uses

thanks, Brian
link to Spruce price list: https://www.aircraftspruce.com/catalo...tubing_un1.php
*edit to add this from Paterek, not that its right or wrong just what he apparantly uses
Last edited by calstar; 03-21-13 at 10:03 AM.
03-20-13 | 02:19 PM
#14
Senior Member
Joined: Dec 2006
Posts: 1,221
Likes: 23
From: Toronto/Montr�al
Bikes: Eight homemade, three very dusty
I thought that thinner walls have a greater tendency to kink or ripple. I use 4130 3/8x0.035 for most racks and 1/4x0.035 for small h-bar racks. Plus some 5/16 or 3/16 for inner splices. The 0.028 stuff is more expensive because of demand/supply I think, so I stick to 0.035. I've also used 304 to avoid plating.
I use the Ridgid benders. I found mine used a low prices. The bends are a little flat but they are generally okay.
I use the Ridgid benders. I found mine used a low prices. The bends are a little flat but they are generally okay.
03-20-13 | 02:26 PM
#15
Randomhead
Joined: Aug 2008
Posts: 25,930
Likes: 4,825
From: Happy Valley, Pennsylvania
Ridgids are as good as anything at the radius they use. I've had trouble with my Swagelok because the radius is very small. I guess you could use a mandrel bender.
I have never had any problems with .035" other than it's a lot harder to bend than .028". I suspect if you get thicker it may ripple, dunno.
I have never had any problems with .035" other than it's a lot harder to bend than .028". I suspect if you get thicker it may ripple, dunno.
03-20-13 | 05:04 PM
#16
Thread Starter
Senior Member
Joined: Mar 2012
Posts: 1,104
Likes: 48
From: santa barbara CA
Sixty Fiver did you use stays for part of the platform with smaller tubes telescoped for the bends? It looks like it tapers at both ends in the pic.
I checked the Paterek manual, he does say he uses .028 for his racks, good to know the .035 works fine and its cheaper as well.
Brian
Last edited by calstar; 03-20-13 at 05:07 PM.
03-20-13 | 09:29 PM
#17
Senior Member
Joined: Jul 2011
Posts: 2,441
Likes: 4
I think .028 is light for racks, and I actually thought that was what P. said in his rack tape. In that tape he makes a very light rack, but mentions that is what it is. At least as far as I can remember.
I personally thought that rack making was pretty easy. I came to it with lots of workshop and design experience, but minimal metal working experience. With the bends, I just marked the point where it was clamped in the bender, then I did a bend, measure the bend position, and just copiy that for other similar bends. So if the offset from the mark is 2.125", That just becomes a design module I can insert in any build that uses a similar bend.
I made a bender for motorcycle sized tubing, and adapted dies to a smaller rod bender to get something that would work on smaller tubing. Many of the big box stores have these small benders for decorative iron work. The first dies were just those pot metal pulleys for motors, with epoxy contouring. These lasted a few racks then broke. The dies I currently have are metal bits I found in a store. All they needed was to have grooves cut in them on a lathe. The bits are heavy sprocket hubs from a hydraulics supplier.
I don't have much luck welding the small tubes, but brazing them was pretty much a piece of cake with silver.
Last edited by MassiveD; 03-20-13 at 09:33 PM.
03-20-13 | 09:54 PM
#18
Bicycle Repair Man !!!
Joined: Sep 2007
Posts: 27,266
Likes: 150
From: YEG
Bikes: See my sig...
Sixty Fiver did you use stays for part of the platform with smaller tubes telescoped for the bends? It looks like it tapers at both ends in the pic.
I checked the Paterek manual, he does say he uses .028 for his racks, good to know the .035 works fine and its cheaper as well.
Brian
I took this picture after this rack had been in use for a good long while; this bike parks outside in all kinds of weather on a daily basis and I usually see it parked outside my friend's office every day.
This is his winter "beater"... in the summer he has a custom built Arvon rando bike he has been riding for close to 20 years, which matches his wife's newly refinished Arvon rqando bike (she rides here year round) as well as a racing tandem and a triplet.
Re-building this nice old Nishiki cost less than buying a modern bike with a 3 speed and it is a much nicer frame... was nice to tweak it out with a custom rack and, bottle braze ons, and low rider mounts up front.
We seem to do a lot of this kind of work... taking bicycles that people already love and making them just a little more love-able.

At some point I plan to take my faithful touring bike and replace all the Blackburn racks with custom made integrated ones and then give it a new coat of powder.
03-21-13 | 10:13 AM
#20
Thread Starter
Senior Member
Joined: Mar 2012
Posts: 1,104
Likes: 48
From: santa barbara CA
....With the bends, I just marked the point where it was clamped in the bender, then I did a bend, measure the bend position, and just copiy that for other similar bends. So if the offset from the mark is 2.125", That just becomes a design module I can insert in any build that uses a similar bend.
Brian
03-21-13 | 10:22 AM
#21
Bicycle Repair Man !!!
Joined: Sep 2007
Posts: 27,266
Likes: 150
From: YEG
Bikes: See my sig...
I am lucky to have an old but excellent floor mounted hand bender at my disposal and a lathe to produce dies in any size we might need... for a recent project we turned out a 4 inch die for the 3/8 tubing and it is so much faster and easier than using the hand benders, especially when you want to prep larger quantities of tubing for more standard applications.
It's main job is for bending frame tubes (that need to be filled with sand before bending) and some of that can be pretty extravagant.

https://breakingchainstakinglanes.wor...ign-revisited/
It's main job is for bending frame tubes (that need to be filled with sand before bending) and some of that can be pretty extravagant.
https://breakingchainstakinglanes.wor...ign-revisited/
03-22-13 | 03:05 PM
#22
Senior Member
Joined: Jul 2011
Posts: 2,441
Likes: 4
Yeah, 2 cubed is 8, and 3 cubed is 27, so the stiffness difference assuming the same wall thickness to diameter ratio, is significant. My heavier bender has a compound leverage built into it.
03-22-13 | 09:11 PM
#23
Thread Starter
Senior Member
Joined: Mar 2012
Posts: 1,104
Likes: 48
From: santa barbara CA
I am lucky to have an old but excellent floor mounted hand bender at my disposal and a lathe to produce dies in any size we might need... for a recent project we turned out a 4 inch die for the 3/8 tubing and it is so much faster and easier than using the hand benders, especially when you want to prep larger quantities of tubing for more standard applications.
It's main job is for bending frame tubes (that need to be filled with sand before bending) and some of that can be pretty extravagant.
https://breakingchainstakinglanes.wor...ign-revisited/
It's main job is for bending frame tubes (that need to be filled with sand before bending) and some of that can be pretty extravagant.
https://breakingchainstakinglanes.wor...ign-revisited/
Very cool frame, whimsical and flowing. Did you continuously feed the tubing into the bender until you had the right length? And how did you keep the curve in the same plane?
thanks, Brian
Last edited by calstar; 03-22-13 at 09:18 PM.
03-22-13 | 10:04 PM
#24
Bicycle Repair Man !!!
Joined: Sep 2007
Posts: 27,266
Likes: 150
From: YEG
Bikes: See my sig...
According to my partner, who did all the bending and building... it is easier to build a tandem than a (reproduction) Cygnet frame.
04-08-13 | 02:38 PM
#25
Bicycle Repair Man !!!
Joined: Sep 2007
Posts: 27,266
Likes: 150
From: YEG
Bikes: See my sig...
Posted elsewhere today but... my newly christened "Portage" rack for the Pugsley.
.JPG)
.JPG)
.JPG)
Main tubing is 3/8 chromoly with 3/16 crosses, 3/8 tubing was bent on a 4 inch mandrel we turned out on the lathe for this purpose. The frame fittings are re-purposed zerks that we turned down in the lathe and drilled out for the 5mm bolts. The smaller oil fitting that threads into the zerk was used to make end pins / tie down points for the top and for the extra tie down, bag clips at the bottom.
.JPG)
Because it was designed for the Pugsley's offset frame it is plug and play and is a 3 minute task to install or remove it as there are no adjusters.
.JPG)
Main tubing is 3/8 chromoly with 3/16 crosses, 3/8 tubing was bent on a 4 inch mandrel we turned out on the lathe for this purpose. The frame fittings are re-purposed zerks that we turned down in the lathe and drilled out for the 5mm bolts. The smaller oil fitting that threads into the zerk was used to make end pins / tie down points for the top and for the extra tie down, bag clips at the bottom.
Because it was designed for the Pugsley's offset frame it is plug and play and is a 3 minute task to install or remove it as there are no adjusters.
Last edited by Sixty Fiver; 04-08-13 at 08:20 PM.