Log in
Register
Forums
Community Connections
The Official Bike Forums Cafe Press Store
Introductions
Industry News
Charity Events
Regional Discussions
Regional Rides and Events
Bike Forums
General Cycling Discussion
Adaptive Cycling: Handcycles, Amputee Adaptation, Visual Impairment, and Other Needs
Advocacy & Safety
Alt Bike Culture
Beach Cruisers
Bicycle Mechanics
BMX
Classic & Vintage
Classic and Vintage Bicycles: Whats it Worth? Appraisals.
Clydesdales/Athenas (200+ lb / 91+ kg)
Commuting
Cyclocross and Gravelbiking (Recreational)
Early Brifter Bikes - 7,8, and 9 Speed
Electric Bikes
Electronics, Lighting, & Gadgets
Fatbikes
Fifty Plus (50+)
Fitting Your Bike
Folding Bikes
Framebuilders
Hybrid Bicycles
Indoor & Stationary Cycling Forum
Living Car Free
Long Distance Competition/Ultracycling, Randonneuring and Endurance Cycling
Mountain Biking
Professional Cycling For the Fans
Recreational & Family
Recumbent
Road Cycling
Singlespeed & Fixed Gear
Fixed Gear Freestyle
Tandem Cycling
Touring
Training & Nutrition
Triathlon
Utility Cycling
Winter Cycling
The Racer's Forum
"The 33"-Road Bike Racing
Juniors Racing (All Disciplines)
Masters Racing (All Disciplines)
Cyclocross Racing
Mountain Bike Racing
Track Cycling: Velodrome Racing and Training Area
Products and Services
The Market Place
For Sale
Group Buy
Want To Buy
News & Suggestions
News & Announcements
Forum Suggestions & User Assistance
Forum Leaders
Gallery
Tools
Marketplace
Vendor Directory
New Posts
Premium Membership
iSpy
Log in
Register
Threads
Threads
Posts
Advanced
Log in
Remember Me?
Forgot your Password?
By logging into your account, you agree to our
Terms of Use
and
Privacy Policy
, and to the use of cookies as described therein.
Recent
Popular
Commented
Albums
Trending
My Pictures
My Post Pictures
pastorbobnlnh
December 7, 2019
520
0
Sort:
Default
Default
Most Recent
Most Popular
Trending
Share
Tweet
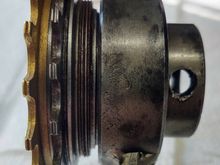
4. However, before threading the body onto the tool, the fifth sprocket (middle on a 5-speed model) should removed. This reveals the second threaded shelf. This is where the VAR tool mentioned earlier threads to.
0
2024/01/18 13:35:35
pastorbobn
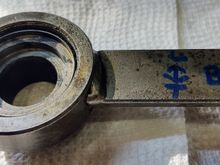
5. The body is threaded to the tool until it stops. Note the threaded Stop is not yet installed.
0
2024/01/18 13:37:54
pastorbobn
6. The body is next backed out slightly. Remember, you don't want the body to be tightened down to this portion of the tool.
0
2024/01/18 13:39:25
pastorbobn
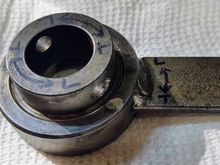
7. Next the Stop is threaded into the main body of the tool. My rod broke and I use a round Phillips screw driver blade to tighten the Stop against the freewheel body.
0
2024/01/18 13:41:04
pastorbobn
8. Clamp the tool in the vise. Using a chainwhip on the largest sprocket, tighten the body against the stop. The sprocket is reverse threaded and should begin to loosen. If it doesn't soak the threads in penetrating oil and wait over night. Repeat and use heat as needed.
0
2024/01/18 13:43:57
pastorbobn
9. Thread off the second largest sprocket. As can be seen, I've marked my tool for threading directions. I find that when applying brut force I forget directions.
0
2024/01/18 13:49:06
pastorbobn
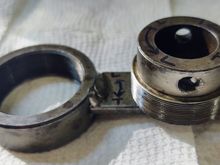
10. Thread off the Stop from the other side of the tool. This can be challenging. It is how I broke my rod. Thread the body from the tool.
0
2024/01/18 13:51:15
pastorbobn
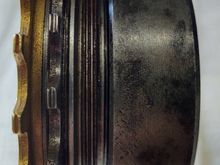
This is how the Stop looks when threaded into the tool without the freewheel body.
0
2024/01/18 14:00:15
pastorbobn
This is the flip side.
0
2024/01/18 14:01:06
pastorbobn
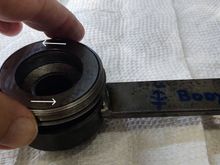
Wit the Stop removed from the tool.
0
2024/01/18 14:01:43
pastorbobn
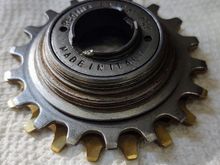
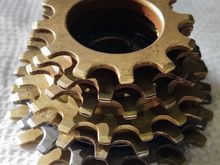
The full 7-speed Regina 12-19 Corncob.
0
2024/01/18 14:02:06
pastorbobn
0
2024/01/24 05:33:00
pastorbobn
0
2024/01/24 05:38:25
pastorbobn
0
2024/01/24 05:55:53
pastorbobn
0
2024/01/24 05:59:48
pastorbobn
0
2024/01/24 15:33:18
pastorbobn
0
2024/01/24 17:24:52
pastorbobn
0
2024/01/25 04:59:56
pastorbobn
0
2024/01/25 05:00:02
pastorbobn
0
2024/01/25 05:00:05
pastorbobn
0
2024/01/25 05:21:42
pastorbobn
0
2024/01/25 05:21:45
pastorbobn
0
2024/01/27 05:24:35
pastorbobn
0
2024/01/27 05:24:52
pastorbobn
0
2024/02/14 06:10:34
pastorbobn
0
2024/03/03 04:46:43
pastorbobn
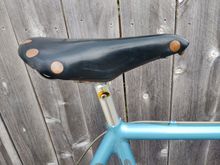
'71 Schwinn Paramount P13 with my DIY leather projects
0
2024/03/06 07:31:40
pastorbobn
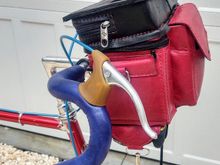
Cockpit side. Double zipper for main compartment. Single zipper for top battery compartment.
0
2024/03/06 07:38:54
pastorbobn
Front pocket for tool-roll.
0
2024/03/06 07:38:57
pastorbobn
Side view with rings (behind brake lever) for shoulder strap.
0
2024/03/06 07:38:59
pastorbobn
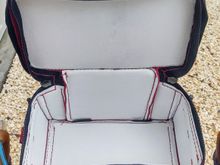
I linned the interior with white leather.
0
2024/03/06 07:48:11
pastorbobn
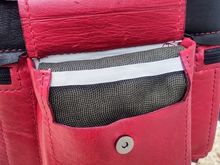
Open tool-pouch.
0
2024/03/06 07:48:14
pastorbobn
Tool-pouch in front pocket.
0
2024/03/06 07:48:19
pastorbobn
Tubular tire holder and sleeve.
0
2024/03/06 07:48:26
pastorbobn
0
2024/03/07 04:58:44
pastorbobn
0
2024/03/10 07:00:15
pastorbobn
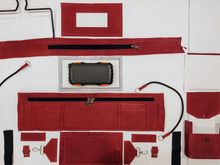
Seperate sections prior to assembly (prior to discovering the mistake of cutting the top too small).
0
2024/03/12 05:58:21
pastorbobn
Sold by BF member @bike-vintage.eu on website www.racevelo.com
0
2024/03/23 13:15:54
pastorbobn
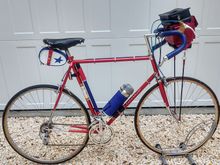
March 1971 P13
0
2024/04/22 06:31:24
pastorbobn
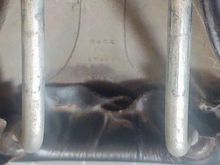
BANG! Schwalbe One Tubular Blow-Out!
0
2024/04/22 06:31:31
pastorbobn
First
Page
9 of 13
Last
Go To
Page
1
...
7
8
9
10
11
12
13
9 of 13
Go To
GO
Go to page
of 13
pages
1
...
7
8
9
10
11
12
13
Copyright © 2026 MH Sub I, LLC dba Internet Brands. All rights reserved. Use of this site indicates your consent to the Terms of Use.