Log in
Register
Forums
Community Connections
The Official Bike Forums Cafe Press Store
Introductions
Industry News
Charity Events
Regional Discussions
Regional Rides and Events
Bike Forums
General Cycling Discussion
Adaptive Cycling: Handcycles, Amputee Adaptation, Visual Impairment, and Other Needs
Advocacy & Safety
Alt Bike Culture
Beach Cruisers
Bicycle Mechanics
BMX
Classic & Vintage
Classic and Vintage Bicycles: Whats it Worth? Appraisals.
Clydesdales/Athenas (200+ lb / 91+ kg)
Commuting
Cyclocross and Gravelbiking (Recreational)
Early Brifter Bikes - 7,8, and 9 Speed
Electric Bikes
Electronics, Lighting, & Gadgets
Fatbikes
Fifty Plus (50+)
Fitting Your Bike
Folding Bikes
Framebuilders
Hybrid Bicycles
Indoor & Stationary Cycling Forum
Living Car Free
Long Distance Competition/Ultracycling, Randonneuring and Endurance Cycling
Mountain Biking
Professional Cycling For the Fans
Recreational & Family
Recumbent
Road Cycling
Singlespeed & Fixed Gear
Fixed Gear Freestyle
Tandem Cycling
Touring
Training & Nutrition
Triathlon
Utility Cycling
Winter Cycling
The Racer's Forum
"The 33"-Road Bike Racing
Juniors Racing (All Disciplines)
Masters Racing (All Disciplines)
Cyclocross Racing
Mountain Bike Racing
Track Cycling: Velodrome Racing and Training Area
Products and Services
The Market Place
For Sale
Group Buy
Want To Buy
News & Suggestions
News & Announcements
Forum Suggestions & User Assistance
Forum Leaders
Gallery
Tools
Marketplace
Vendor Directory
New Posts
Premium Membership
iSpy
Log in
Register
Threads
Threads
Posts
Advanced
Log in
Remember Me?
Forgot your Password?
By logging into your account, you agree to our
Terms of Use
and
Privacy Policy
, and to the use of cookies as described therein.
Recent
Popular
Commented
Albums
Trending
My Pictures
Mad Honk's Photos
View Profile
Sort:
Commented
Most Recent
Most Popular
Most Comments
Trending
Albums
Photos
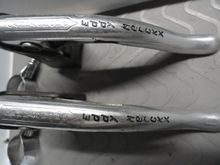
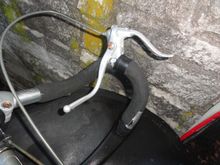
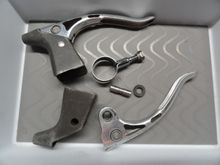
There are a few scuffs in the levers but are not deep and show some wear of road duty as would be suspected in an older set of levers.
0
2023/08/16 16:03:41
Mad Honk
The levers and clamps with the correct hardware. Pivot bushings have been replaced with new ones, and one new grub screw installed in the levers.
0
2023/08/16 16:03:40
Mad Honk
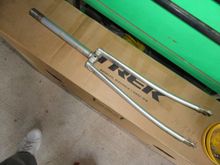
Really tall steerer tube. Likely fits both 27" and 700c wheels.
0
2023/08/10 14:32:05
Mad Honk
Super tall fork of Valite tubing if someone needs one.
0
2023/08/09 18:05:35
Mad Honk
Nitto stem and Suntour shifters that have some value And a bell !
0
2023/08/09 18:05:27
Mad Honk
Also a pair of turkey levers if you want them.
0
2023/08/09 18:05:27
Mad Honk
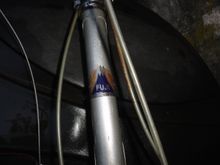
cool Fuji head tube and badge. It is super long one from a tall bike. But it has the complete headset.
0
2023/08/09 18:05:25
Mad Honk
Closest fit I found for a box unless I rob a new saddle of it's packaging. There is room for some small bits, or "borked" parts from the BOC. You know the stuff pantographed Cinelli kickstands, and other useless items.
0
2023/08/09 13:15:33
Mad Honk
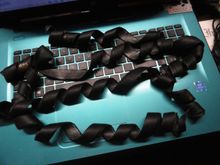
This is the leather wrap from four golf grips. It is more than you will need for your grip project. This leather is infused with paraffin to make it waterproof. You can use a bit of rubber cement to make it stay put when wrapping and it should hold the grip wrap in place.
0
2023/08/08 16:00:09
Mad Honk
Levers were missing some of the nylon washers for pivots, band clamp has the wrong nut assembly and needs one band, and the set screws for the pivots were missing.
0
2023/08/08 12:31:15
Mad Honk
0
2023/08/08 12:31:11
Mad Honk
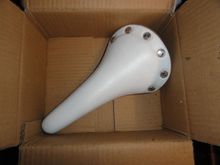
A couple of small nicks in the leather on the underside, but otherwise looks to be OK.
0
2023/08/07 10:16:13
Mad Honk
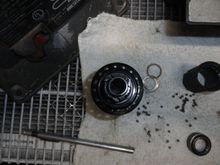
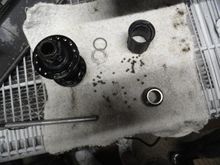
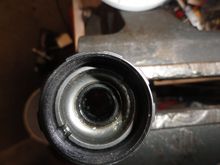
This picture does not do justice to the group of parts that came out of the freehub. Note the very few bearings in the freehub assembly.
0
2023/08/02 16:51:34
Mad Honk
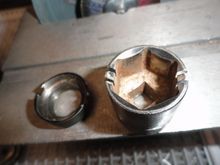
The hub shell and freehub parts after the short disassembly work.
0
2023/08/02 16:51:32
Mad Honk
A single burst of power on the driver and tool combination and the lock ring is loose. About five seconds to open the freehub.
0
2023/08/02 16:47:24
Mad Honk
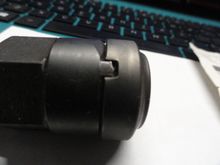
The lock ring as it came to me.
0
2023/08/02 16:46:16
Mad Honk
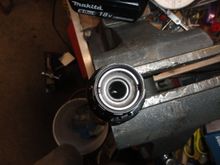
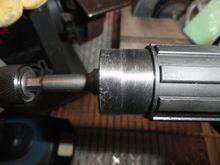
The hub shell with the freehub attached in the shop vise.
0
2023/08/02 16:46:08
Mad Honk
The tool attached to a small battery operated impact driver, that is going to be used to do the work.
0
2023/08/02 16:44:50
Mad Honk
0
2023/08/02 16:44:03
Mad Honk
hub shell with freehub attached locked into a shop vise.
0
2023/08/02 16:44:00
Mad Honk
The tool as it meshes with the lock ring.
0
2023/08/02 13:04:42
Mad Honk
The socket with the bits of metal removed.
0
2023/08/02 13:04:36
Mad Honk
Next step is to remove anything that doesn't look like a lock ring tool. I have marked it black to show what is going to leave.
0
2023/08/02 12:59:27
Mad Honk
A lock ring and the socket wit the two pins cut away on either side of the socket.
0
2023/08/02 12:59:18
Mad Honk
A little grinding and the fit is nice and smooth.
0
2023/08/02 12:54:03
Mad Honk
This was the "fity" cent socket from the pawn shop. You can see the outside diameter of the socket is just a bit large to fit in the body.
0
2023/08/02 12:54:00
Mad Honk
Th engagement of the tool with a lock ring. The ring had left-hand threads so it is important to turn it the right way to dis-engage it from the freehub.
0
2023/08/02 12:40:46
Mad Honk
The original tool from Shimano with pictures of how to use it.
0
2023/08/02 12:40:45
Mad Honk
And what it looks like from the side. Careful inspection will show a dent near the area over the BIM sticker.
0
2023/07/28 10:56:21
Mad Honk
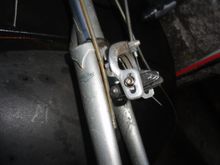
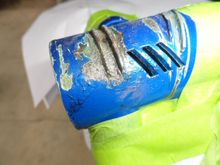
Somebody got under the left side and gave it a bit of customization that looks a lot worse than it really is.
0
2023/07/28 10:56:17
Mad Honk
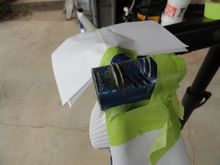
After the primer coat. There will be sanding and feathering of damaged areas elsewhere on the stays, with the ultimate goal of an under-coat of silver and then clear blue to get to a color match to the rest of the frame.
0
2023/07/24 15:20:27
Mad Honk
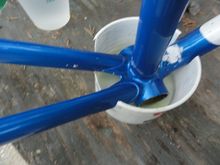
All dressed up for the painting party I did a pretty aggressive wire brushing with the Dremel to get down to bare metal. and ready for the primer
0
2023/07/24 15:20:21
Mad Honk
A bit of wire brush work on the rust and oxidize area has the BB clean enough to give it some primer coat for the time being.
0
2023/07/24 15:20:15
Mad Honk
After a wash with clear water, the rust is pretty much rust free.
0
2023/07/24 15:20:15
Mad Honk
Just the right amount of clearance for the acid bath after a bit of trimming on the container. I am not going to have a large amount of acid to dispose of after the treatment.
0
2023/07/23 14:03:18
Mad Honk
I am being a bit of a cheapskate but the damage didn't need a big pan of Oxalic acid so the hand cleaner container wins the day.
0
2023/07/23 14:03:18
Mad Honk
The down tube rust is gone as well. The OA patch method is a good solution to getting the OA localized to just the damaged area.
0
2023/07/22 07:27:05
Mad Honk
The seat tube de-rusted and ready for some touch up paint.
0
2023/07/22 07:27:01
Mad Honk
The "Patch" applied to the area where the Loto is trying to quit rusting. I can't tell what caused the damage, but I suspect it was likely done with a Brian wind trainer clamp.
0
2023/07/21 18:25:06
Mad Honk
This one is out of my junk box and has all the working parts.
0
2023/07/17 08:54:47
Mad Honk
First
Page
29 of 63
Last
Go To
Page
1
...
27
28
29
30
31
...
63
29 of 63
Go To
GO
Go to page
of 63
pages
1
...
27
28
29
30
31
...
63
Copyright © 2026 MH Sub I, LLC dba Internet Brands. All rights reserved. Use of this site indicates your consent to the Terms of Use.