


Do It Yourself (DIY)
 01-21-07, 01:42 AM
#76
not actually Nickatina

Join Date: Oct 2006
Location: OR
Posts: 4,447
Mentioned: 0 Post(s)
Tagged: 0 Thread(s)
Quoted: 1 Post(s)
Likes: 0
Liked 0 Times
in
0 Posts
Anyone have a link to somewhere explaining how to overhaul hubs w/ pics? Found one website so now I have a bit of an idea what I'm going to need to do but it looks like I can just do it all at home w/ no special bike tools needed... Just grease and solvent.
 01-21-07, 02:05 AM
#77
Senior Citizen

Join Date: Feb 2005
Location: no
Posts: 1,346
Bikes: yes
Mentioned: 0 Post(s)
Tagged: 0 Thread(s)
Quoted: 0 Post(s)
Likes: 0
Liked 0 Times
in
0 Posts
Park Tool's page is nice. The hardest part will be having the proper amount of tension after assembling, it's something you need to do until you get a feel for it, and after that, it's easy as pie.
01-21-07, 04:11 PM
#78
Junior Member
Join Date: Jan 2005
Location: Hellsinki
Posts: 14
Mentioned: 0 Post(s)
Tagged: 0 Thread(s)
Quoted: 0 Post(s)
Likes: 0
Liked 0 Times
in
0 Posts
Originally Posted by cassette
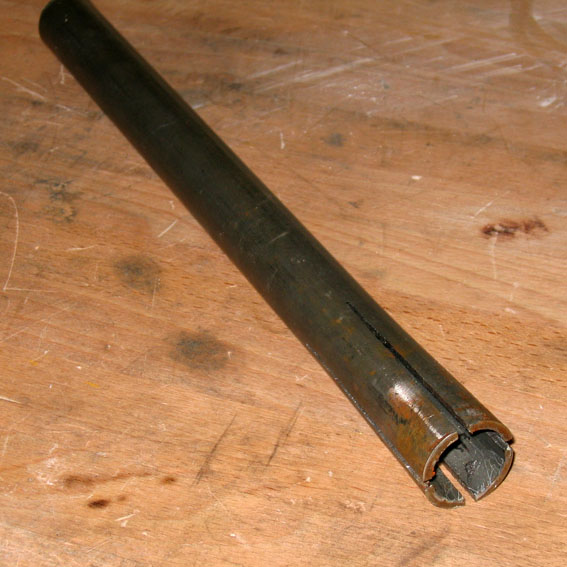
has anyone made the headset cup remover?
Edit: well, comes out with a hacksaw but takes some nerves, I ended up using electrical saw made for sawing holes on wood etc!
01-23-07, 10:18 PM
#79
not actually Nickatina
Join Date: Oct 2006
Location: OR
Posts: 4,447
Mentioned: 0 Post(s)
Tagged: 0 Thread(s)
Quoted: 1 Post(s)
Likes: 0
Liked 0 Times
in
0 Posts
Is there any plans for a wheel truing how-to or a website that explains it with pictures? I read some basics about it, trueing laterally and radially and basically it just involves tightening and loosening spokes... doesn't seem as scary as I thought.
01-29-07, 05:36 PM
#80
Senior Member
Join Date: Sep 2005
Location: New Orleans
Posts: 179
Bikes: Cannondale Road Tandem, Rodbikes Belt Drive Fixed Gear
Mentioned: 0 Post(s)
Tagged: 0 Thread(s)
Quoted: 1 Post(s)
Likes: 0
Liked 0 Times
in
0 Posts
You're right its actually really easy. I found that even if an old wheel is very fubar it still isn't rocket science. Just be sure you know which way is tightening, which is loosening. Also use a good spoke wrench. The first time I did this I used a real cheap wrench that has 12 or so different sizes. The smallest size was not small enough for the nipples. This meant that I rounded many of them. If I remember right, you would turn your spoke wrench counterclockwise. Here's a step by step
1. Check the wheel, make sure it seems to be in good structural shape. Make sure no spokes are broke, might as well check the hub.
2. Especially on an old wheel. put a small drop of thin oil (transmission fluid or some all purpose lubricant) on each spoke. spin the wheel so that the oil goes into the nipple threads. This step is to prevent the spoke from braking or stripping.
3. If you don't have a trueing stand (I don't) put the wheel on the bike and turn the bike over. If you have a brake tighten the brake so that it barely touches the wheel. If there's no brake, you can clamp something to the fork/seat stay that sticks out. You could even do something crude like rubber banding a pen (with cap on) to the bike. Adjust it so that it barely touches the rim. (the easiest way to detect it is to listen for when the wheel is rubbing.)
4. Spin the wheel. In the spot where it hits the pen/brake/whatever, tighten the spoke on the opposite side. Also note that if you have to make significant changes, you will likely need to loosen the other spoke. For example, if the wheel is wobbly to the right, you would tighten the left spoke and loosen the right. Only make small changes, half a turn at a time.
5. After the correction, spin the wheel. If it still rubs, do it again. If it rubs somewhere else on the wheel, do it there.
6. After the wheel doesn't rub, tighten the brake or move the pen closer, Repeat previous steps.
7. Keep doing this until the wheel is true.
8. Adjust the brake back to normal, or remove the pen.
To redish the wheel, maybe to improve chainline or to use a "suicide" hub. loosen all the spokes on one side one turn, tighten all the spokes on the opposite one turn. This will move the whole rim a small amount. Then true the wheel as desribed. If it needs to go over more, do it again.
Hope this helps, it really isn't that hard. Sorry I don't have any pics. If nobody else posts some, I can probably add some tommorrow night. I don't think my wheels need it, but I can demonstrate anyway.
01-29-07, 07:33 PM
#81
Senior Member
Join Date: Sep 2006
Location: Van BC
Posts: 3,744
Mentioned: 0 Post(s)
Tagged: 0 Thread(s)
Quoted: 0 Post(s)
Likes: 0
Liked 1 Time
in
1 Post
^^ a good if obvious tip if you have a spoke wrench with more than one size is to mark it where it's the right size. this will help to prevent your going insane.
02-09-07, 12:24 PM
#82
.
Join Date: Jan 2007
Posts: 132
Mentioned: 0 Post(s)
Tagged: 0 Thread(s)
Quoted: 0 Post(s)
Likes: 0
Liked 0 Times
in
0 Posts
Originally Posted by djembob02
You're right its actually really easy.
(100% serious, didnt want to quote the entire response)
02-13-07, 03:05 AM
#83
fixed
Join Date: Feb 2007
Location: Seattle
Posts: 18
Mentioned: 0 Post(s)
Tagged: 0 Thread(s)
Quoted: 0 Post(s)
Likes: 0
Liked 0 Times
in
0 Posts
Does anyone know How to fix a chipped spinergy (rev X)? I ran into another biker and got it caught up in their back skewer. there are now 4 chips on two of the spokes. I used gorilla glue to strengthen the chips so they don't flake away. Is there anyone who has successfully repaired a spinergy and rode it? If so I would feel more confident riding mine.
thanks
Zach
thanks
Zach
02-13-07, 03:38 AM
#84
crown heights sucka
Join Date: May 2006
Location: brooklyn!
Posts: 352
Bikes: pake
Mentioned: 0 Post(s)
Tagged: 0 Thread(s)
Quoted: 0 Post(s)
Likes: 0
Liked 0 Times
in
0 Posts
I have the feeling you won't get many affirming responses...there are many on this board who feel that factory-fresh spinergys are unacceptably dangerous and failure-prone
I have nothing to add other than this hint of foreboding.
I have nothing to add other than this hint of foreboding.
02-13-07, 01:00 PM
#85
fixed
Join Date: Feb 2007
Location: Seattle
Posts: 18
Mentioned: 0 Post(s)
Tagged: 0 Thread(s)
Quoted: 0 Post(s)
Likes: 0
Liked 0 Times
in
0 Posts
Ok what would be another option for a front wheel then? I would like to stick with CF, but I don't want it to crap out like the spinergy. My buddy just got an aerospoke. It looks pretty solid but heavy.
any suggestions?
any suggestions?
02-13-07, 02:37 PM
#86

i don't stop

Join Date: Mar 2005
Location: basel, switzerland
Posts: 1,058
Bikes: soma rush, giro
Mentioned: 0 Post(s)
Tagged: 0 Thread(s)
Quoted: 0 Post(s)
Likes: 0
Liked 0 Times
in
0 Posts
Originally Posted by cassette
has anyone made the headset cup remover?
__________________
velospace
velospace
02-13-07, 11:20 PM
#87
Bike fiend.

Join Date: Jan 2006
Location: Bomb City, WI
Posts: 93
Bikes: Giant STP SS, Trek 400 (Fixed), 1970's Orion, Huffy Flatbed BMX, Vintage Huffy Kids Cruzer, Vintage Sears Cruiser, Trek Prototype Frame (fixed)
Mentioned: 0 Post(s)
Tagged: 0 Thread(s)
Quoted: 0 Post(s)
Likes: 0
Liked 0 Times
in
0 Posts
Originally Posted by zhoffner
Does anyone know How to fix a chipped spinergy (rev X)? I ran into another biker and got it caught up in their back skewer. there are now 4 chips on two of the spokes. I used gorilla glue to strengthen the chips so they don't flake away. Is there anyone who has successfully repaired a spinergy and rode it? If so I would feel more confident riding mine.
thanks
Zach
thanks
Zach
Still, probably not the safest thing you could think up.
02-14-07, 05:21 PM
#88
fixed
Join Date: Feb 2007
Location: Seattle
Posts: 18
Mentioned: 0 Post(s)
Tagged: 0 Thread(s)
Quoted: 0 Post(s)
Likes: 0
Liked 0 Times
in
0 Posts
Originally Posted by Analog
I've repaired one that had one of the blades completely severed. Just laid it up with a few fresh layers of carbon and epoxy while holding it in place with a jig. I never rode it myself, but I haven't heard any news that it broke yet!
Still, probably not the safest thing you could think up.
Still, probably not the safest thing you could think up.
thanks!
02-14-07, 06:18 PM
#89
Bike fiend.
Join Date: Jan 2006
Location: Bomb City, WI
Posts: 93
Bikes: Giant STP SS, Trek 400 (Fixed), 1970's Orion, Huffy Flatbed BMX, Vintage Huffy Kids Cruzer, Vintage Sears Cruiser, Trek Prototype Frame (fixed)
Mentioned: 0 Post(s)
Tagged: 0 Thread(s)
Quoted: 0 Post(s)
Likes: 0
Liked 0 Times
in
0 Posts
Originally Posted by zhoffner
can you direct me to a website where I could buy the epoxy and carbon? Any other tips would help.
thanks!
thanks!
Instructions
Never used either of these myself, but they're worth looking at.
It would probably be cheaper to just buy a new wheel, though. Unless you want to make a bunch of other carbon-fiber stuff.
02-14-07, 07:46 PM
#90
Senior Member
Join Date: Dec 2006
Location: Queens,NY; Boston,MA
Posts: 720
Mentioned: 0 Post(s)
Tagged: 0 Thread(s)
Quoted: 0 Post(s)
Likes: 0
Liked 0 Times
in
0 Posts
ok, f*ck chainwhips. i hate them and they break and they don't work. i just used the rotafix method and holy sh*t! like magic it was.
02-15-07, 07:58 AM
#91
Banned.
Join Date: Jul 2006
Location: philly
Posts: 994
Mentioned: 0 Post(s)
Tagged: 0 Thread(s)
Quoted: 0 Post(s)
Likes: 0
Liked 0 Times
in
0 Posts
A friend and I performed a unique DIY fix the other day. He has an old Phil Wood hub, which is not threaded for a lockring. He's been using red loctite to hold his cog in place, but it works loose after a short time, especially when he rides brakeless. We were messing around with our bikes in my basement, and decided to try out an idea.
We ground the flange off the cog, taking it almost all the way down to the thickness of the teeth (it's a 3/32" cog). Now, the cog is thin enough that a lockring fits on over it. It's a bb lockring, so it's not reverse threaded, but it works. The lockring holds the cog on securely despite the thread direction, but to make sure it would hold we applied loctite to the whole assembly. Now, it's solid as a rock!
1 Phil Wood hub + 1 Phil Wood cog + 1 old bb lockring + 1 hour on my bench grinder = perfect solution. DIY to the max!
Last edited by skinnyland; 02-15-07 at 10:10 AM.
02-15-07, 11:30 AM
#92
perspective distorts

Join Date: Aug 2005
Location: 25th and Girard
Posts: 1,345
Mentioned: 0 Post(s)
Tagged: 0 Thread(s)
Quoted: 0 Post(s)
Likes: 0
Liked 0 Times
in
0 Posts
what about the chainline? that'd be like a 38mm chainline now. crazy dishing?
02-15-07, 02:19 PM
#93
Banned.
Join Date: Jul 2006
Location: philly
Posts: 994
Mentioned: 0 Post(s)
Tagged: 0 Thread(s)
Quoted: 0 Post(s)
Likes: 0
Liked 0 Times
in
0 Posts
The chainline is actually pretty good. I'll post pics asap, once we take some of the reassembled bike.
02-15-07, 03:48 PM
#94
dutret has a posse

Join Date: Jul 2006
Location: washington dc
Posts: 3,155
Bikes: IRO Angus 53, Marinoni Special 54, LMNO Custom Road Bike, Guerciotti TT, Late 60s Bottechia Road, Univega Via Montega beater/polo/rain bike.
Mentioned: 0 Post(s)
Tagged: 0 Thread(s)
Quoted: 0 Post(s)
Likes: 0
Liked 0 Times
in
0 Posts
a phil wood suicide hub.
and i thought i had heard it all.
you guys could probably sell that and get a decent track/fixed specific hub.
edit: yes i know its not as easy, but i'm just saying. probably because i'm an ass.
and i thought i had heard it all.
you guys could probably sell that and get a decent track/fixed specific hub.
edit: yes i know its not as easy, but i'm just saying. probably because i'm an ass.
02-15-07, 04:01 PM
#95
yo yo yo yo yo
Join Date: Nov 2005
Location: delaware
Posts: 2,518
Mentioned: 0 Post(s)
Tagged: 0 Thread(s)
Quoted: 0 Post(s)
Likes: 0
Liked 0 Times
in
0 Posts
yeah, what a shame
02-15-07, 04:39 PM
#96
Senior Member

Join Date: Apr 2006
Location: new bedford/boston
Posts: 487
Mentioned: 0 Post(s)
Tagged: 0 Thread(s)
Quoted: 0 Post(s)
Likes: 0
Liked 0 Times
in
0 Posts
Originally Posted by Kilgore_Trout
ok, f*ck chainwhips. i hate them and they break and they don't work. i just used the rotafix method and holy sh*t! like magic it was.
02-15-07, 04:43 PM
#97
perspective distorts
Join Date: Aug 2005
Location: 25th and Girard
Posts: 1,345
Mentioned: 0 Post(s)
Tagged: 0 Thread(s)
Quoted: 0 Post(s)
Likes: 0
Liked 0 Times
in
0 Posts
i broke mine the other night. ****er exploded!
02-15-07, 04:44 PM
#98
Senior Member
Join Date: Apr 2006
Location: new bedford/boston
Posts: 487
Mentioned: 0 Post(s)
Tagged: 0 Thread(s)
Quoted: 0 Post(s)
Likes: 0
Liked 0 Times
in
0 Posts
mine is the dura-ace... i would sure hope that **** is explode-proof...
02-15-07, 10:06 PM
#99
Senior Member

Join Date: Sep 2006
Location: Gnv, FL
Posts: 1,890
Mentioned: 0 Post(s)
Tagged: 0 Thread(s)
Quoted: 0 Post(s)
Likes: 0
Liked 0 Times
in
0 Posts
Originally Posted by jol
De-anodising (anodizing - for the stateside) and polishing a Cinelli quill stem
(or any other aluminium (aluminum - as before) part)
(or any other aluminium (aluminum - as before) part)
I guess my question is: How does the oven cleaner not destroy the finish under the anodization? And do you think I should try the oven cleaner method first and then polish them up again?
02-16-07, 12:18 AM
#100
meat popsicle

Join Date: Sep 2004
Location: Brooklyn, NY
Posts: 166
Bikes: Gitane, Frienze, Kilo, Masi, Fuji, Playdate
Mentioned: 0 Post(s)
Tagged: 0 Thread(s)
Quoted: 0 Post(s)
Likes: 0
Liked 0 Times
in
0 Posts
Originally Posted by andre nickatina
Anyone have a link to somewhere explaining how to overhaul hubs w/ pics? Found one website so now I have a bit of an idea what I'm going to need to do but it looks like I can just do it all at home w/ no special bike tools needed... Just grease and solvent.
i don't know if this will help, it's in my bookmarks.