


Build-a-long freewheel!!!! Photo heavy
 01-16-11, 07:11 AM
#1
Senior Member
Thread Starter
Join Date: Jul 2010
Location: Somewhere Between The Beginning And The End
Posts: 1,995
Mentioned: 0 Post(s)
Tagged: 0 Thread(s)
Quoted: 1 Post(s)
Likes: 0
Liked 3 Times
in
3 Posts
Build-a-long freewheel!!!! Photo heavy
Here you go for those interested.....
I start by breaking the lockring/outer race free while still on the wheel because it's a left hand thread, and then remove the freewheel as usual.
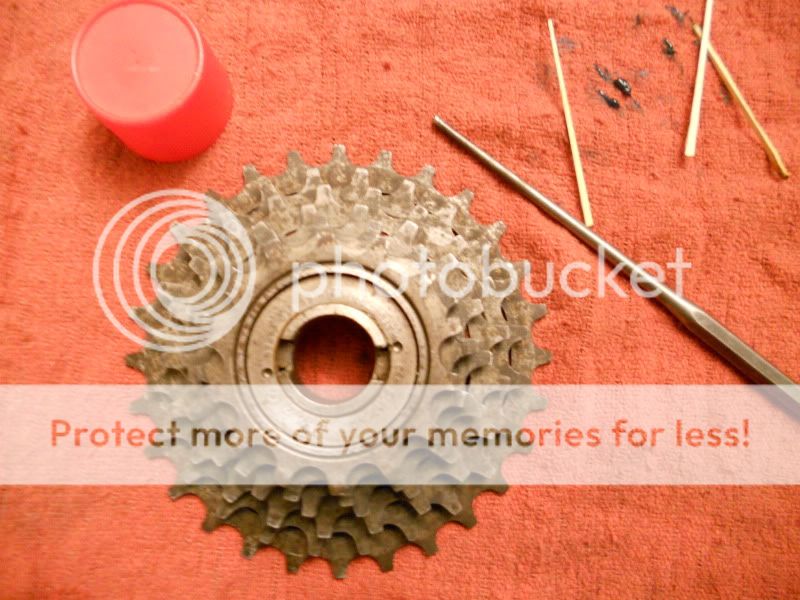
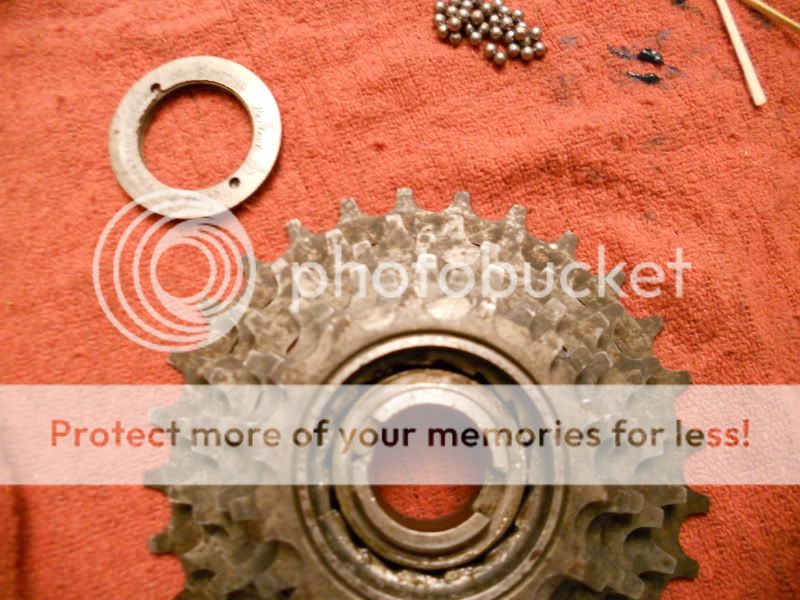
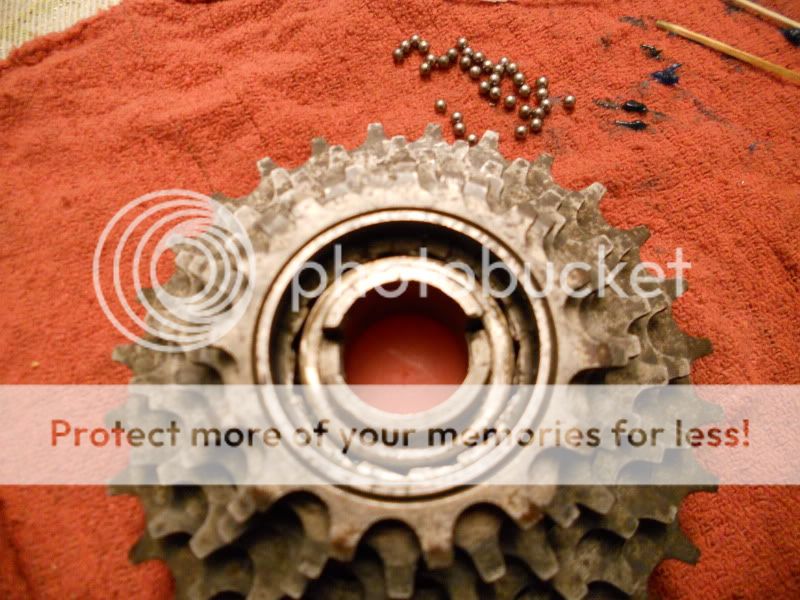
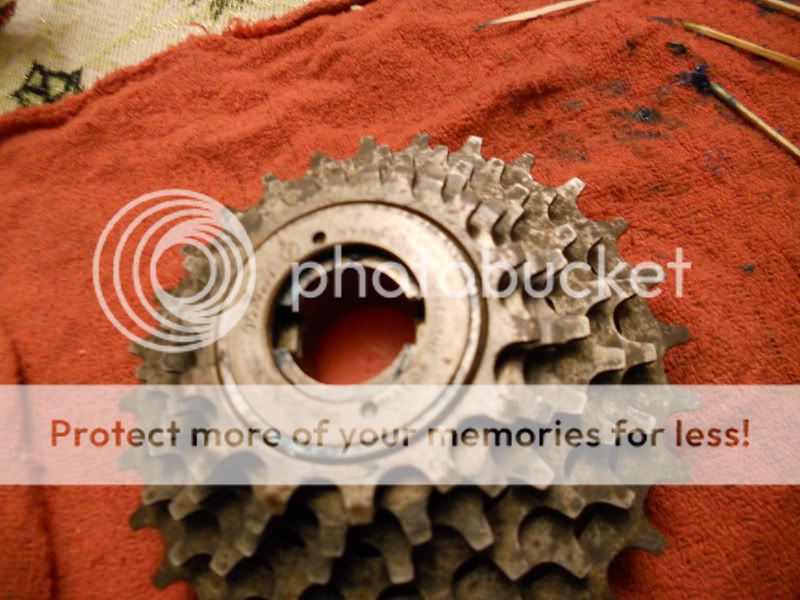
Photo one shows the freewheel ready for surgery.
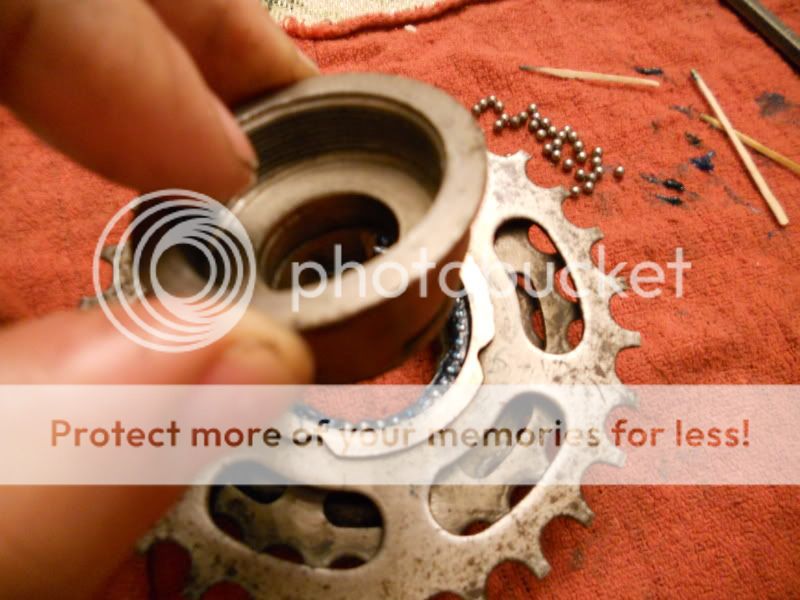
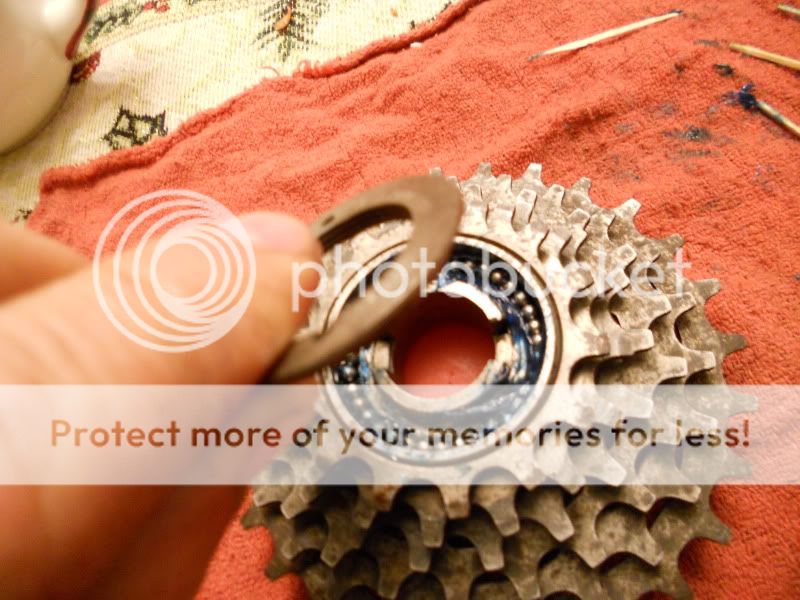
In the second photo I'm pointing to one of the two holes in the lockring/outer race in which you use a spanner wrench or punch to unscrew the lockring/outer race.
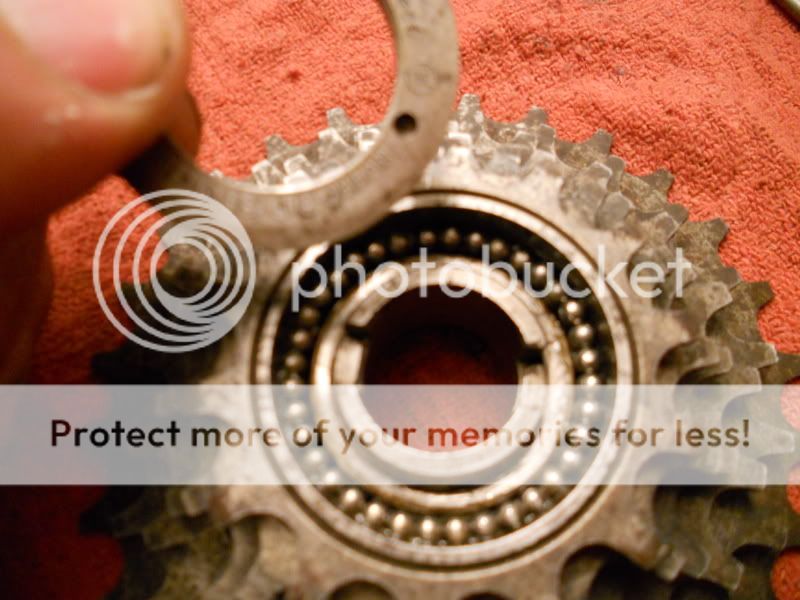
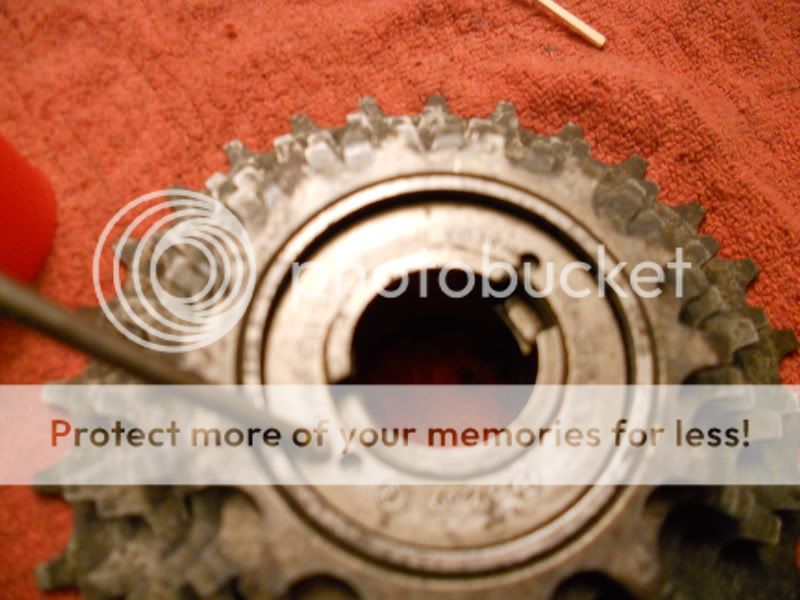
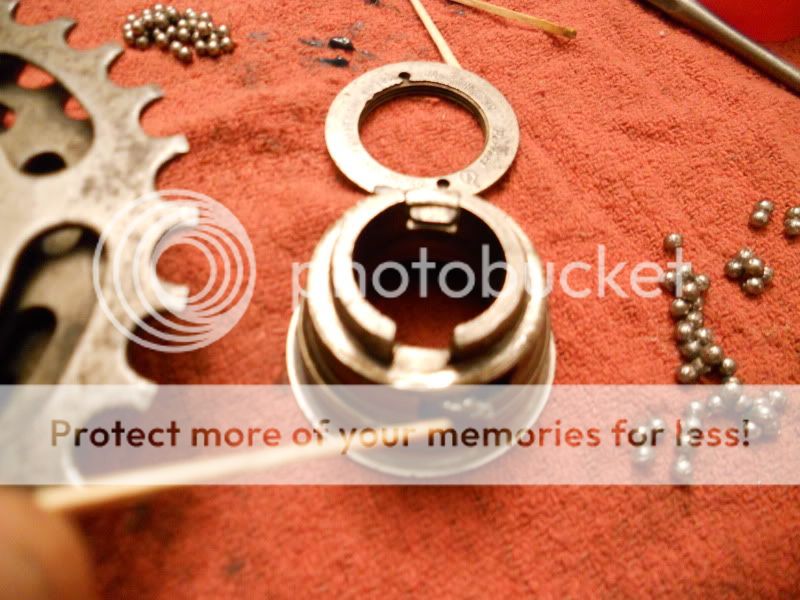
Photo number three... The lockring removed, and Oh no the dreaded bearings!!!!
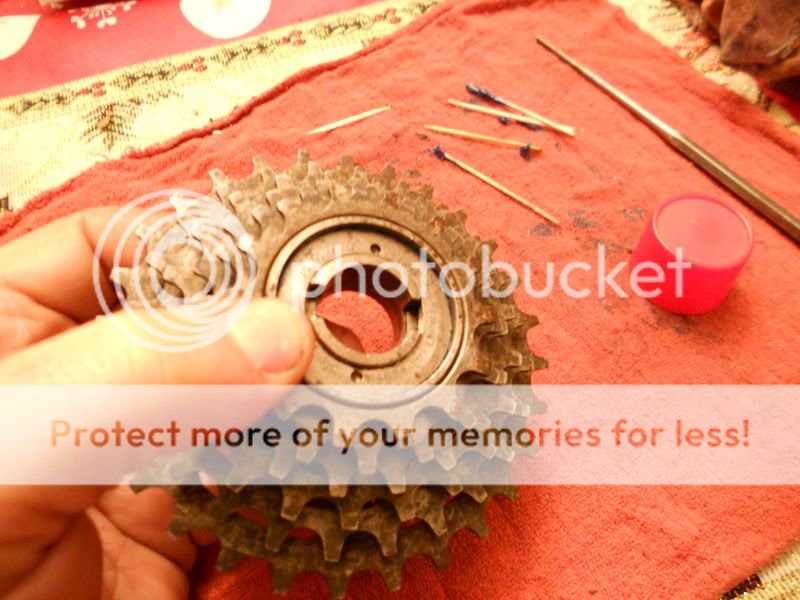
At this point remove all the ball bearings and place them aside as I have counting them as some freewheels have a different number of balls in the inner and outer sides.
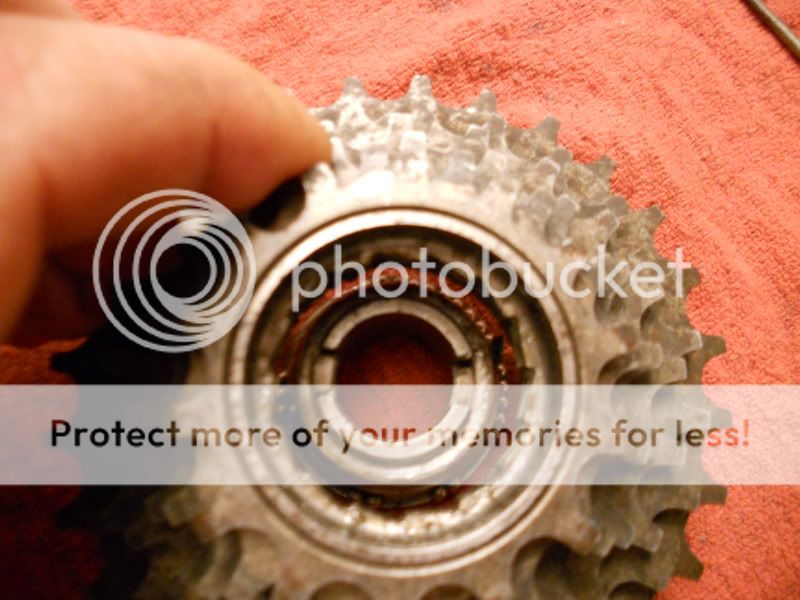
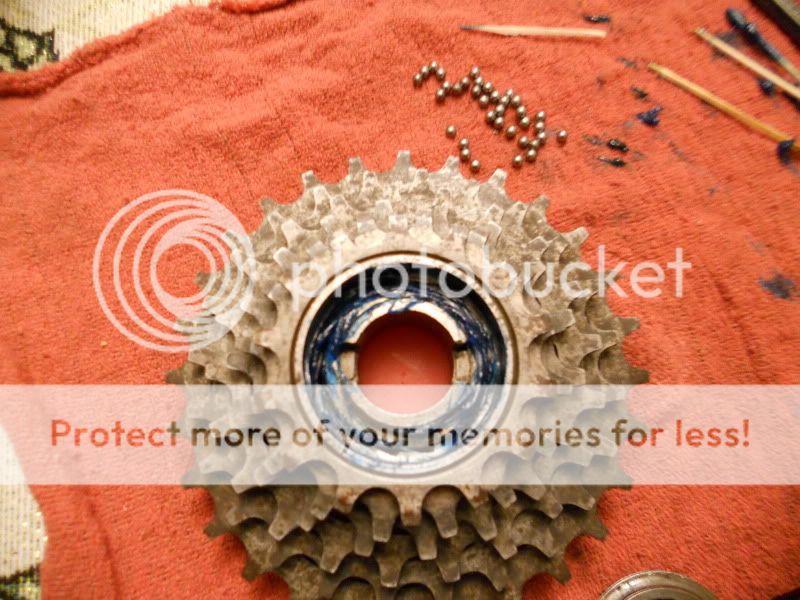
Now slowly lift the freewheel from the freewheel body.... Note how some ball bearings stay on the inner race while others stay in the freewheel race be carefull and do this slowly so you don't lose any.
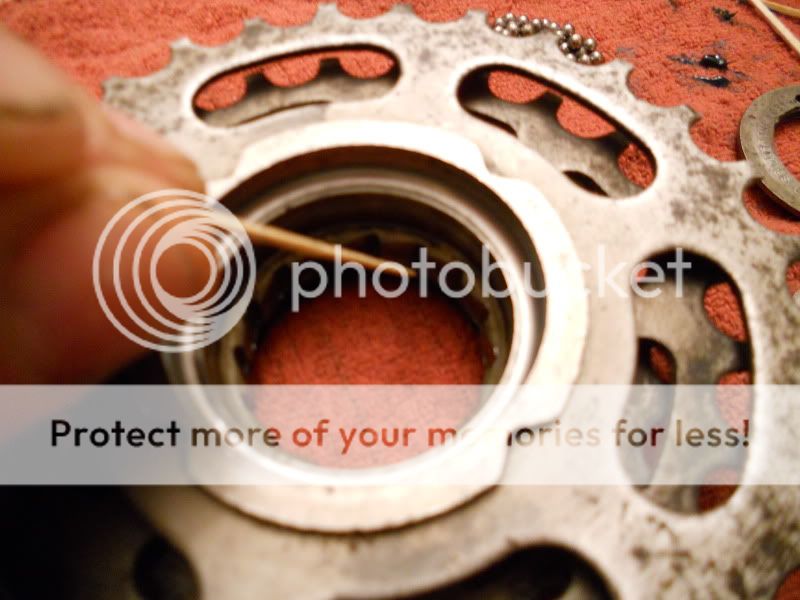
I'm now pointing to the inner race on the freewheel. Clean this well with whatever solvent you like.
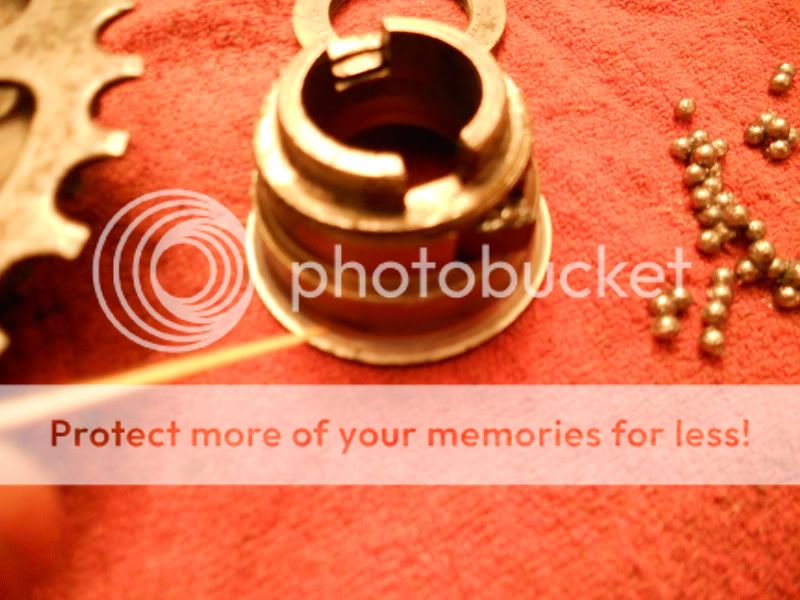
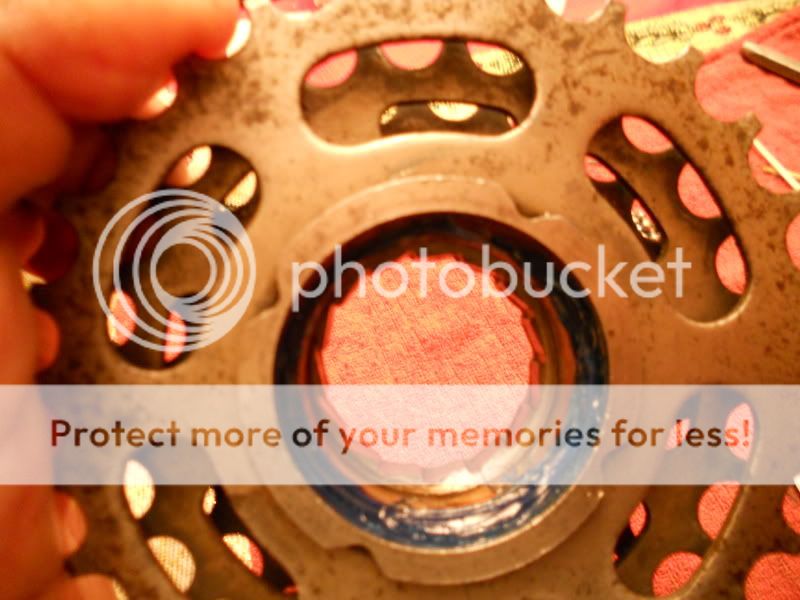
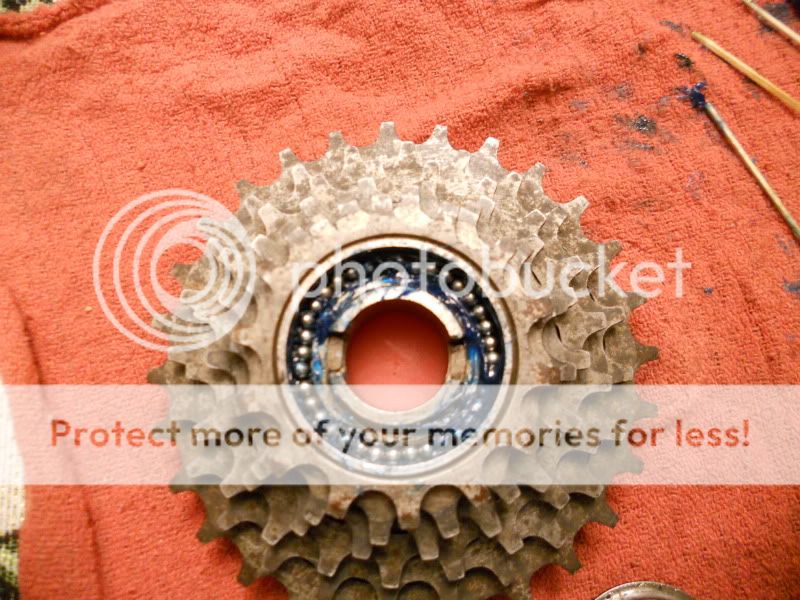
This is the inner race on the freewheel body. Clean this the same as you did in the last step.
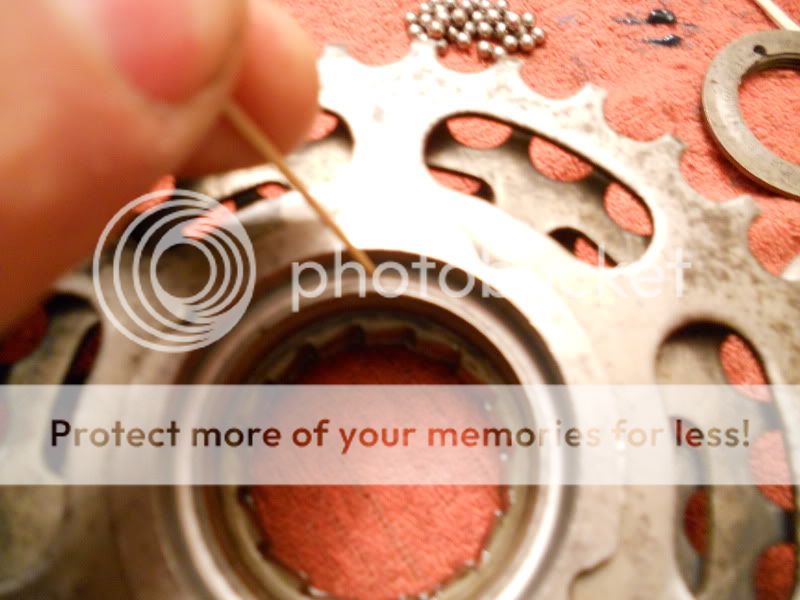
These are the pawls and springs. Clean these as well and put a drop of 75w-90 gear oil on them.
These are the notches that the pawls engage.... Clean them as well and a thin film of gear oil as well.
I start by breaking the lockring/outer race free while still on the wheel because it's a left hand thread, and then remove the freewheel as usual.
Photo one shows the freewheel ready for surgery.
In the second photo I'm pointing to one of the two holes in the lockring/outer race in which you use a spanner wrench or punch to unscrew the lockring/outer race.
Photo number three... The lockring removed, and Oh no the dreaded bearings!!!!
At this point remove all the ball bearings and place them aside as I have counting them as some freewheels have a different number of balls in the inner and outer sides.
Now slowly lift the freewheel from the freewheel body.... Note how some ball bearings stay on the inner race while others stay in the freewheel race be carefull and do this slowly so you don't lose any.
I'm now pointing to the inner race on the freewheel. Clean this well with whatever solvent you like.
This is the inner race on the freewheel body. Clean this the same as you did in the last step.
These are the pawls and springs. Clean these as well and put a drop of 75w-90 gear oil on them.
These are the notches that the pawls engage.... Clean them as well and a thin film of gear oil as well.


 01-16-11, 07:32 AM
#3
Senior Member
Thread Starter
Join Date: Jul 2010
Location: Somewhere Between The Beginning And The End
Posts: 1,995
Mentioned: 0 Post(s)
Tagged: 0 Thread(s)
Quoted: 1 Post(s)
Likes: 0
Liked 3 Times
in
3 Posts

Here is the lockring/outer race... clean this as you did the other parts.
Now lay a nice bead of grease on the inner freewheel race as I have.
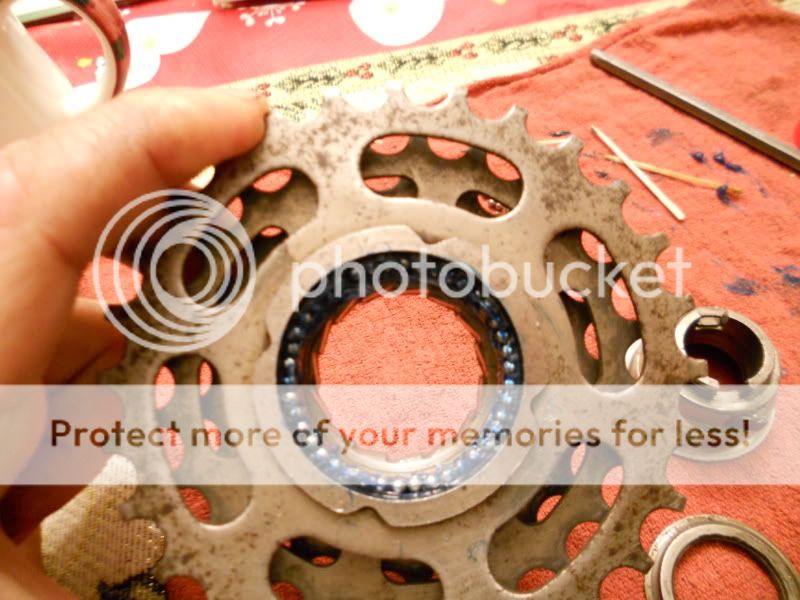
Next place all the balls in the bed of grease as pictured.....
Next place the freewheel body slowly into the freewheel making sure not to disturb any of the balls (do this slowly)...
Freewheel body is now back in place, and it's time to turn the freewheel over to finish things up. Turn it over slowly holding the body and freewheel together so no balls can fall out.
Here the freewheel is now turned over and ready to accept some grease.
Again lay a bead of grease on the outer race of the freewheel.
Now place all the ball bearings in the bed of grease like you did on the other side.
Now place the lockring/outer race on the freewheel body.
Now that the lockring is in place tighten in (counter clockwise) using your spanner or punch.
Your freewheel is now ready to be installed on your wheel and taken for a long ride....
I hope you all enjoy this, and if you have any questions please let me know...... ENJOY!!
Last edited by Capecodder; 01-16-11 at 07:43 AM.
01-16-11, 07:32 AM
#4
Senior Member

Join Date: May 2008
Location: North, Ga.
Posts: 2,401
Bikes: 3Rensho-Aerodynamics, Bernard Hinault Look - 1986 tour winner, Guerciotti, Various Klein's & Panasonic's
Mentioned: 5 Post(s)
Tagged: 0 Thread(s)
Quoted: 159 Post(s)
Liked 375 Times
in
162 Posts
Thanks for posting this! It's something I have never attempted.
01-16-11, 07:53 AM
#5
Senior Member

Join Date: Dec 2009
Location: Melbourne, Oz
Posts: 9,547
Bikes: https://weightweenies.starbike.com/forum/viewtopic.php?f=10&t=152015&p=1404231
Mentioned: 15 Post(s)
Tagged: 0 Thread(s)
Quoted: 1529 Post(s)
Liked 718 Times
in
510 Posts
How is bearing preload set?
Are shims used like on Shimano freehubs, or are they just machined close enough to fit?
Are shims used like on Shimano freehubs, or are they just machined close enough to fit?
01-16-11, 08:01 AM
#6
Fuji Fan
Typically, how hard is it to break the lockring/outer race free? Will a pin spanner generally allow enough torque or will it usually require the force of a punch?
01-16-11, 08:04 AM
#7
Senior Member
Thread Starter
Join Date: Jul 2010
Location: Somewhere Between The Beginning And The End
Posts: 1,995
Mentioned: 0 Post(s)
Tagged: 0 Thread(s)
Quoted: 1 Post(s)
Likes: 0
Liked 3 Times
in
3 Posts
There are shims between the body and the lockring but there is no need to remove them when doing this overhaul. As far as preload goes, you just tighten the lockring back down good an snug and your good to go. If you were starting with all new parts you would then need the correct size spacers or the freewheel would either too tight or too loose. I normaly adjust them as you would a wheel bearing if starting from scratch.
01-16-11, 08:07 AM
#8
Senior Member
Thread Starter
Join Date: Jul 2010
Location: Somewhere Between The Beginning And The End
Posts: 1,995
Mentioned: 0 Post(s)
Tagged: 0 Thread(s)
Quoted: 1 Post(s)
Likes: 0
Liked 3 Times
in
3 Posts
They are all different, but I use a punch as I do not have a spanner of this size. It takes a couple firm blows and It comes free. I have never had an issue breaking one free, but do it while it's still on the wheel or it will just spin cause it's left hand threaded.
Last edited by Capecodder; 01-16-11 at 08:19 AM.
01-16-11, 09:04 AM
#9
Senior Member
Join Date: Oct 2010
Posts: 8,516
Mentioned: 69 Post(s)
Tagged: 0 Thread(s)
Quoted: 3241 Post(s)
Liked 2,512 Times
in
1,510 Posts
Thanks for the tutorial. You make it look and sound like an easy job which should install confidence in first timers like myself!
01-16-11, 09:08 AM
#10

Senior Member

Join Date: Apr 2005
Location: Ann Arbor, MI
Posts: 16,880
Bikes: 1980 Masi, 1984 Mondonico, 1984 Trek 610, 1980 Woodrup Giro, 2005 Mondonico Futura Leggera ELOS, 1967 PX10E, 1971 Peugeot UO-8
Mentioned: 49 Post(s)
Tagged: 0 Thread(s)
Quoted: 1858 Post(s)
Liked 664 Times
in
506 Posts
I notice the pawls are self-contained in the inner hub. I tried decades ago to service Regina corsa or oro freewheel bearings, and the problem was that the pawls were not completely held. The pawls fell out as did the little springs behind them, and I couldn't get them put back together correctly.
Is that troublesome design completely out of the market? Are Sachs/Maillard freewheels designed that way, or like the one in the pictures?
Is that troublesome design completely out of the market? Are Sachs/Maillard freewheels designed that way, or like the one in the pictures?
01-16-11, 09:33 AM
#11
Senior Member
Thread Starter
Join Date: Jul 2010
Location: Somewhere Between The Beginning And The End
Posts: 1,995
Mentioned: 0 Post(s)
Tagged: 0 Thread(s)
Quoted: 1 Post(s)
Likes: 0
Liked 3 Times
in
3 Posts
I have only rebuilt Suntour and Shimano freewheels so I can not comment on the Regina.... The pawls are removable on these, and are held in by a small pin. Sometimes the spring is broken and needs to be replaced, and that's when I take the pawls off. The springs and pawls are no longer available so you need to use parts from another freewheel. I always keep old freewheels for this purpose.
I notice the pawls are self-contained in the inner hub. I tried decades ago to service Regina corsa or oro freewheel bearings, and the problem was that the pawls were not completely held. The pawls fell out as did the little springs behind them, and I couldn't get them put back together correctly.
Is that troublesome design completely out of the market? Are Sachs/Maillard freewheels designed that way, or like the one in the pictures?
Is that troublesome design completely out of the market? Are Sachs/Maillard freewheels designed that way, or like the one in the pictures?
01-16-11, 09:47 AM
#12
Senior Member
Join Date: Jul 2009
Posts: 11,128
Bikes: 1986 Alan Record Carbonio, 1985 Vitus Plus Carbone 7, 1984 Peugeot PSV, 1972 Line Seeker, 1986(est.) Medici Aerodynamic (Project), 1985(est.) Peugeot PY10FC
Mentioned: 22 Post(s)
Tagged: 0 Thread(s)
Quoted: 150 Post(s)
Likes: 0
Liked 34 Times
in
27 Posts
Nice write up and pics! should be helpful to many here who want to dive into their FWs to service them. Gives me memoried of when I used to break open FWs too to service them. I used to use needle nose pliers clamped on to a wood framing clamp to remove the upper race of the Maillard freewheels I had in the 80's. Haven't opened one again in the last 20 years and have since just serviced my freewheels the lazy way by flushing it good with WD40 and then pushing in new grease through the small holes at the back of the FW. Just haven't had any bearing problems to justify doing so.
I recently tried to open up my FWs recently and for some reason I can't seem to break free the upper race ring on my Maillard 700 Compact Super 7 speed FWs using the needle nose plier approach. Looks like I will need to find the tool to do so. Anyone know where I can get it?? Does Park make/sell a tool for these 80's Maillard 700 FWs??
Chombi
01-16-11, 10:11 AM
#13
Senior Member

Nice work Capecodder. Thanks for taking the time to make an excellent visual reference and for posting it here.
__________________
your ticket is at will call
your ticket is at will call
 01-16-11, 10:41 AM
#15
Senior Member

Join Date: Jun 2005
Location: In transit
Posts: 1,897
Bikes: 07 Vanilla, 98 IRD road frame built up with 25th Ann DA, Surly cross check with 105 comp, 78 Raleigh Comp GS, 85 Centurionelli
Mentioned: 8 Post(s)
Tagged: 0 Thread(s)
Quoted: 87 Post(s)
Liked 923 Times
in
191 Posts
Yeah, this was a great thread. I've also never done this the right way, only the WD40 method followed by spray grease. Now that I see what the insides look like I'm not nearly so worried about busting one open. Thanks for the effort to post this.
01-16-11, 11:37 AM
#16
No, your OTHER left!!

Join Date: Dec 2010
Location: Central Virginia, USA
Posts: 539
Bikes: 2 motos and a schwinn (road bikes more or less)
Mentioned: 0 Post(s)
Tagged: 0 Thread(s)
Quoted: 0 Post(s)
Likes: 0
Liked 0 Times
in
0 Posts
awesome write up and pics!! You do a great service for those of us who havent tried this. Looks pretty straightforward. Nice Job
andy
andy
01-16-11, 11:47 AM
#17
Freewheel Medic

Join Date: Oct 2005
Location: An Island on the Coast of GA!
Posts: 12,885
Bikes: Snazzy* Schwinns, Classy Cannondales & a Super Pro Aero Lotus (* Ed.)
Mentioned: 140 Post(s)
Tagged: 0 Thread(s)
Quoted: 1453 Post(s)
Liked 2,196 Times
in
963 Posts
CC,
I'll echo everyone else's sentiments. You took the mystery away and instilled great confidence! Thanks for the great write-up and pictures.
I'll echo everyone else's sentiments. You took the mystery away and instilled great confidence! Thanks for the great write-up and pictures.
__________________
Bob
Enjoying the GA coast all year long!
Thanks for visiting my website: www.freewheelspa.com
Bob
Enjoying the GA coast all year long!
Thanks for visiting my website: www.freewheelspa.com
01-16-11, 12:07 PM
#18
Senior Member

Join Date: Jun 2008
Location: SoCal
Posts: 1,880
Bikes: Lemond, Gios, Fuji, Trek, too many to write
Mentioned: 0 Post(s)
Tagged: 0 Thread(s)
Quoted: 0 Post(s)
Likes: 0
Liked 2 Times
in
1 Post
I did this once too back in the 80's. Good man, I wouldn't do it again. You have lots of patience.
01-16-11, 01:13 PM
#19
Senior Member
I've only heard, as I'm sure others have, that they're such trouble to service. I was imagining all these crazy spring loaded parts in there that I would never get back together. That doesn't look too bad at all. Thanks for taking the time to do this write-up!
01-16-11, 01:24 PM
#20
Senior Member

Join Date: May 2010
Location: Bastrop Texas
Posts: 4,483
Bikes: Univega, Peu P6, Peu PR-10, Ted Williams, Peu UO-8, Peu UO-18 Mixte, Peu Dolomites
Mentioned: 13 Post(s)
Tagged: 0 Thread(s)
Quoted: 967 Post(s)
Liked 1,631 Times
in
1,047 Posts
Wonderful post - Thats what C&V is all about - Knew a guy who would soak an old free wheel in kerosene/Diesel to slowly wash it out then heat it up to dry it out before he stuck it in a can of 5 weight oil - By the way - That guy was NOT me - Being the curious guy that I am I took one of these appart long ago - And I think I still have a few of the bearings still floating around the floor of my garage - I have used what was left of that free wheel as a wind chime these past years...
01-16-11, 01:27 PM
#21
Senior Member
Thread Starter
Join Date: Jul 2010
Location: Somewhere Between The Beginning And The End
Posts: 1,995
Mentioned: 0 Post(s)
Tagged: 0 Thread(s)
Quoted: 1 Post(s)
Likes: 0
Liked 3 Times
in
3 Posts
Crazy spring loaded parts
 That's too funny.
I'll be honest, it is not difficult at all to do, and I really don't know what all the fuss is about. Take a broken or one you don't need apart just to get a feel before tearing the one on your daily rider apart. It does not take very long and you end up with a nice spinning and sounding freewheel. I think I do it just for fun.
01-16-11, 02:20 PM
#22
Senior Member

Join Date: Apr 2007
Location: Thunder Bay, Ontario, Canada - burrrrr!
Posts: 11,674
Bikes: 1958 Rabeneick 120D, 1968 Legnano Gran Premio, 196? Torpado Professional, 2000 Marinoni Piuma
Mentioned: 210 Post(s)
Tagged: 0 Thread(s)
Quoted: 1372 Post(s)
Likes: 0
Liked 1,752 Times
in
939 Posts
This is a guess, but my guess is...
As the older freewheels become more scarce, we will all become more adept at rebuilding them. Nice write up and thanks for introducing many of us to the simplicity of it all. Frankly, I have often thought about rebuilding a freewheel, but I have always fallen prey to the "it ain't worth it" argument. No more.
I like to get my bicycles as close to perfect as I can, with my limited understanding of them. I have always wondered about the freewheel, and, as part the rolling gear, it needs the same attention as do a set of wheel bearings, in my opinion.
Thanks.
01-16-11, 03:52 PM
#23
CL Addict

Join Date: Oct 2007
Location: Evanston, IL
Posts: 1,067
Bikes: '50s Leon Cattrysse - late 50s Raleigh Lenton Sports - 1960/61 Raleigh Lenton Grand Prix - '72 Canadian Tire Company Supercycle - '74 Raleigh International - '83 Nishiki Cresta - '84 Centurion Turbo - '86 v. Herwerden (Chesini) - '87 Specialized Sirr
Mentioned: 3 Post(s)
Tagged: 0 Thread(s)
Quoted: 85 Post(s)
Liked 96 Times
in
59 Posts
Thanks Capecodder! You did not settle for any shortcuts. Looks much easier than I thought. It's funny how things like, repacking headset, hubs & bottom bracket seem daunting jobs until you just get the right tools and go for it. Since you cannot see what is inside the mind imagines a much more complicated process than reality.
Honestly I had no idea a freewheel is packed with this many bearing balls.
Great job!
Honestly I had no idea a freewheel is packed with this many bearing balls.
Great job!
__________________
01-16-11, 03:58 PM
#24
CL Addict
Join Date: Oct 2007
Location: Evanston, IL
Posts: 1,067
Bikes: '50s Leon Cattrysse - late 50s Raleigh Lenton Sports - 1960/61 Raleigh Lenton Grand Prix - '72 Canadian Tire Company Supercycle - '74 Raleigh International - '83 Nishiki Cresta - '84 Centurion Turbo - '86 v. Herwerden (Chesini) - '87 Specialized Sirr
Mentioned: 3 Post(s)
Tagged: 0 Thread(s)
Quoted: 85 Post(s)
Liked 96 Times
in
59 Posts
BTW, I was reading the title as 'build a long freewheel' and had no idea what to expect until I realized it's about re-building a freewheel!
I've always thought it would be great to have one place on this forum where members could place these type of tutorials. I'm sure there is a place somewhere, but as long as it is not separate from all the other postings these kind of tutorial postings will continue to be all over the place.
I've always thought it would be great to have one place on this forum where members could place these type of tutorials. I'm sure there is a place somewhere, but as long as it is not separate from all the other postings these kind of tutorial postings will continue to be all over the place.
__________________
01-16-11, 04:02 PM
#25
Senior Member
Suntour New Winner freewheels use a cone and locknut. Every other freewheel I've overhauled was like the OP's photos, a LH-threaded cone tightened onto a shim/shims for bearing adjustment.